Integrating Salesforce with Twilio Frontline for Insight-driven Donor Engagement
Time to read: 8 minutes
May 13, 2022
Written by
Reviewed by

In today’s digital-first world, it’s no surprise that relationships are built both offline and online. However, when it comes to donor engagement, it’s historically been hard to empower teams to engage donors across channels like messaging and voice while maintaining staff and donor privacy. It's been harder still to achieve this while tracking the progress of these engagements in your system of record, like a CRM.
That’s where Twilio Frontline comes in – a programmable, mobile-first application that is used to securely build personalized donor relationships over preferred channels such as SMS, WhatsApp, and voice. And, with integrations into data systems like Salesforce, teams can easily access all the context they need and track engagements efficiently.
In this blog post, we are going to specifically cover how Twilio Frontline can be most effectively used for donor engagement. We’ll walk through how to set up Twilio Frontline, integrate it with Salesforce, and use it for personalized, insight-driven communications. You’ll see the power of programmability where we can pull in specific information –like the last donation amount –about a donor directly from Salesforce to bring more context to each interaction.
Prerequisites
- Twilio account and phone number. If you haven’t yet, sign up for a free account here.
- SSO provider
- Frontline application downloaded from the app store (iOS, Android)
- Node.js version 12 or later
- NPM version 5.0.0 or later
- Twilio CLI
- Salesforce Developer or Sandbox Org with System Administrator access
- The Salesforce CLI
sfdx - If you want to jump ahead, here is the completed code.
Set up Twilio Frontline using the Node.js Quickstart
To start, you’ll follow the Frontline Node.js Quickstart to get up-and-running quickly. If you don’t have an account, sign up for Twilio and get an SMS-enabled number. It’s important to note – if you are on a Twilio trial account – you will have to verify the message recipient’s number.
Next, you’ll create a new Frontline Instance and configure Conversations. Stop after you add a number to the sender and before you configure the Twilio Frontline Integration Service. We will be building out our own integration service in this example.
Finally, configure SSO for Frontline by following the Single Sign-on Overview. This step is to ensure your Frontline application can login via your organization’s identity provider. The identity provider for the Frontline login can be any SAML 2.0 provider and does not have to be Salesforce, even if Frontline is integrated with Salesforce. For this example, we will be using Salesforce. Make sure you login to the Frontline workspace via SSO.
Set up the Salesforce CRM integration
The Salesforce CRM integration will allow us to pull donor lists and insights directly from Salesforce into Frontline. This makes it easy to maintain contextual and personalized conversations over long periods of time.
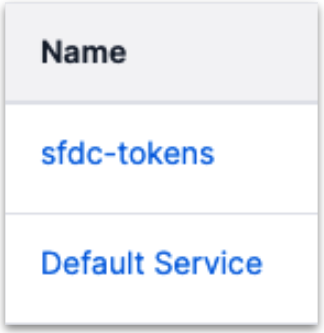
Start by creating a unique Sync service SID within the Twilio Frontline account to cache a Salesforce access token. You will have a Default Service already, but we’ll create a new sync service called sdfc-tokens for storing our Frontline user authentication tokens to use the Salesforce API.
Double check that you have both npm and Node.js installed. First, type npm -vin your terminal. And then type node -v. After you’ve confirmed both are installed, use the Twilio CLI to install the Serverless Plugins by running the following commands:
Set up the Salesforce Connected app
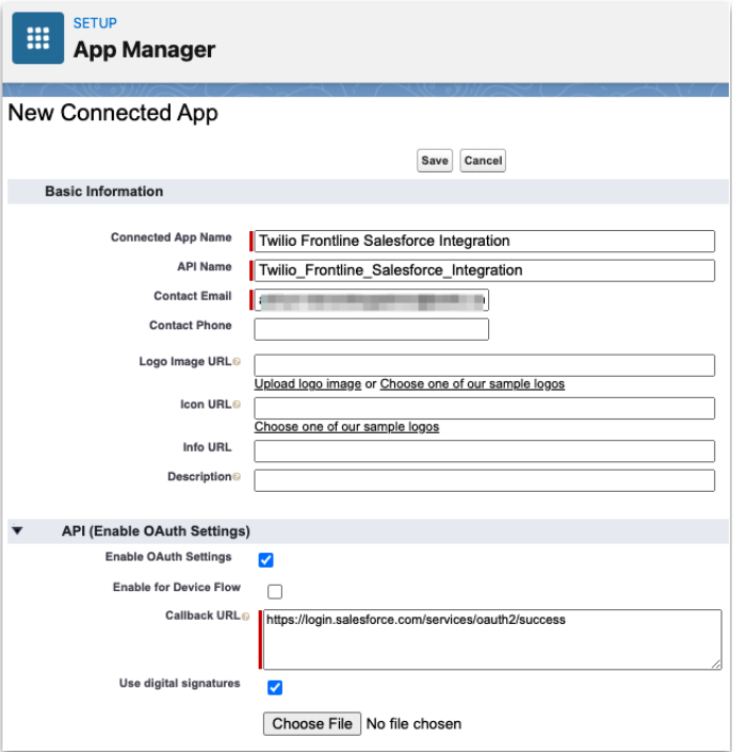
Now that we are set up on the Twilio side, let’s move to Salesforce. You’ll start by creating a Salesforce Connected App. For SSO, we decided to use Salesforce so we are following the Configure Salesforce SSO with Frontline instructions available in Twilio docs.
In Salesforce, you can edit the existing app to enable OAuth instead of creating a new app. You can also create a new app and give it a different name than the Single Sign On App.
Navigate: Salesforce Setup > App Manager > New Connected App
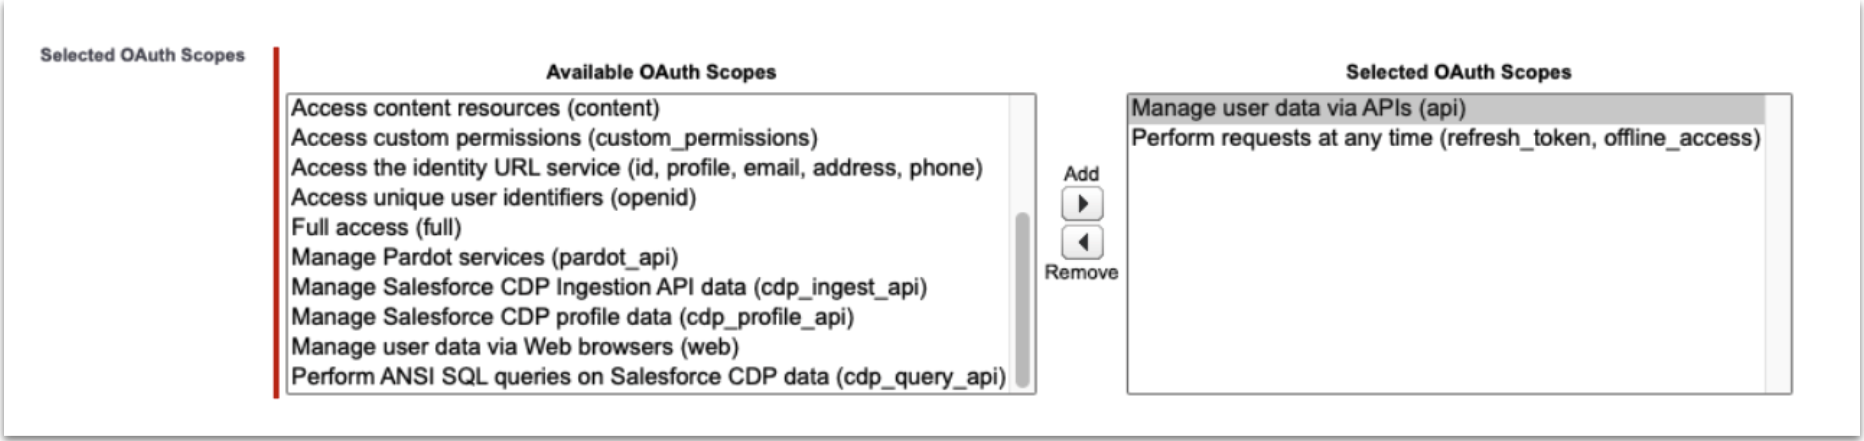
Next, you need to select all the relevant OAuth Scopes:
- Manage user data via APIs (api) → Some versions of Salesforce may call this Access and manage your data (api)
- Perform requests at any time (refresh_token, offline_access)
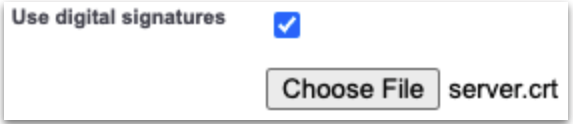
Now you are ready to create a private key and self signed certificate for the Connected App. In this step, be sure to save your private key for use with the integration. You’ll then upload the server certificate to the Connected App.
Once you upload the server certificate, click ‘Save’ and then ‘Continue’ when prompted to do so. You are then going to edit the policy.
- Click ‘Manage,’ or use the Left Navigation for Setup: Platform Tools > Apps > Connected App.
- Then, click ‘Edit’ for your “Twilio Frontline Salesforce Integration” Connected App.
- Click ‘Edit Policies’ and change permitted users from “All Users may self-authorize” to “Admin approved users are pre-authorized.”
- Finally, click ‘Save.’
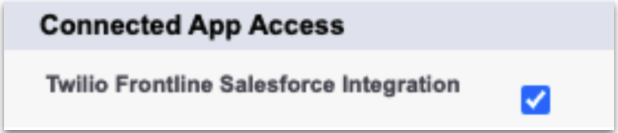
Finally, you need to enable Connect App access.
- Navigate to Setup > Administration > Profiles.
- From there, select the profile from your Frontline users you wish to enable on the Frontline Connected App.
- Edit the profile and enable Connected App Access.
- Finally, click ‘Save.’
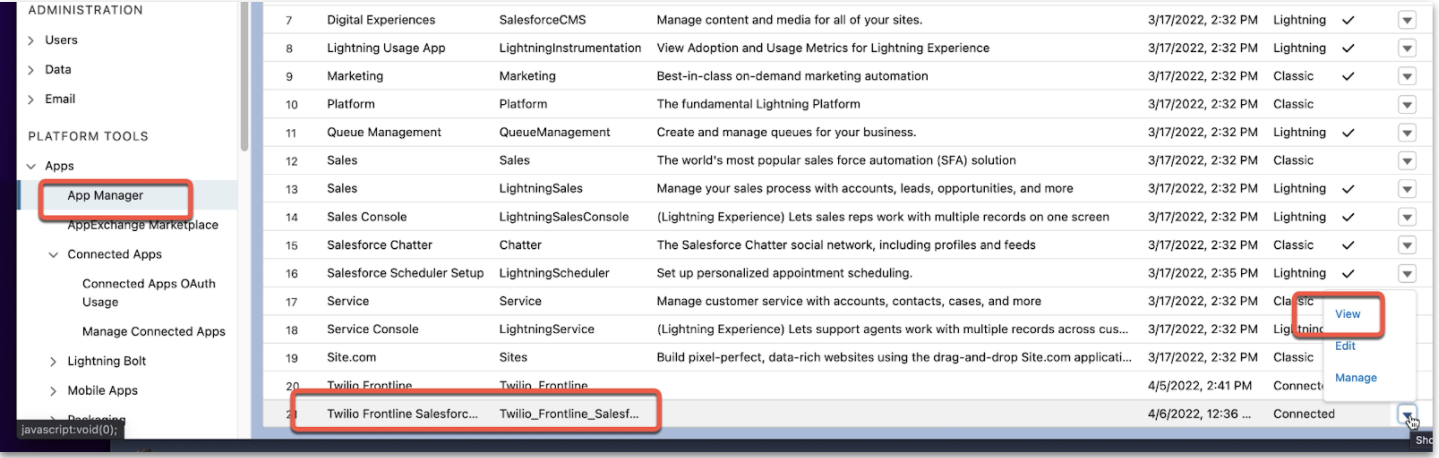
Authorize your Salesforce Org for JWT Bearer Flow
Once you’ve installed the Salesforce CLI, follow JWT Bearer Flow authorization to enable the JWT flow. During this step, you’ll need to reference the Salesforce Connected App for your “Consumer Key/Client ID” and your server private key. To access it, go to Setup > Platform Tools > Apps > App Manager > [Connected App you created] > View
Set up Twilio Functions
First, clone this Github repo if you want to follow along: https://github.com/randyjohnston/function-frontline-salesforce.git. Or, if you'd like the completed code, you find it in this repo: https://github.com/alex-twilio/function-frontline-salesforce. You'll start by changing into the cloned repo directory (cd function-frontline-salesforce) and install the dependencies (npm install). Next, make an assets directory for your server key (mkdir assets) and copy your private key (cp <server.key include the path> assets/server.private.key). Notice the “private” added to the key file name. This will make this key private when deployed to Twilio Functions and only accessible by the other Twilio Functions for this service. Finally, copy the sample provide .env.example file (cp .env.example .env) and edit .env for your environment.
Now it’s time to test! Let’s make sure we have everything working before we start making changes for our Salesforce Contact donation record needs.
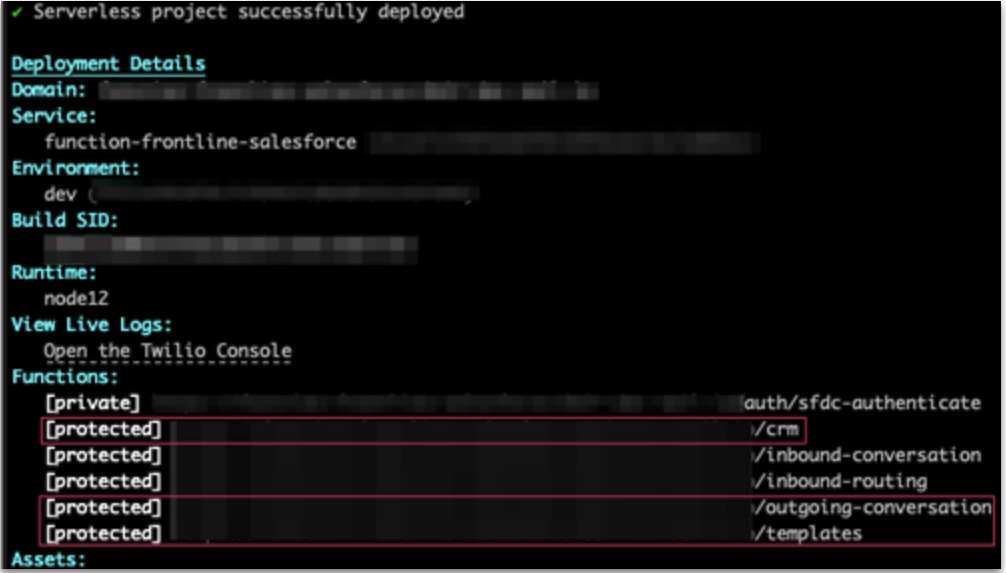
First, deploy to Twilio Functions using the Twilio CLI (twilio serverless:deploy). When doing this, make sure you’re logged into your Twilio account with Twilio CLI. On successful deployment, copy the crm,outgoing-conversation, and templates URLs.
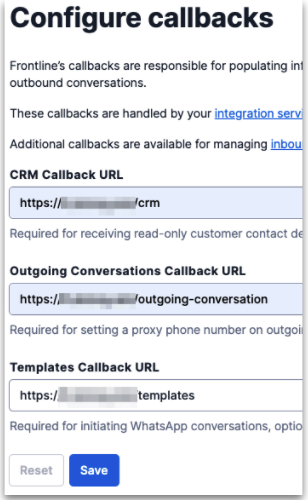
Once you have the Twilio Functions URLs, copy them into Twilio Console Callbacks. You can do so by navigating to Twilio Console > Frontline > Callback. Once you add them, click ‘Save.’
Last, you need to test the Frontline Mobile app on your phone.
Click on the app and log into your workspace (please note: this login uses the SSO provider you configured).
Are you able to click “My Customers” and see a list of Salesforce Contacts and the Frontline Username (which should match the Salesforce user name)? If so, congratulations! We have Frontline working with Salesforce.
Customize the Salesforce Integration for Donor Management
This is where it starts to get fun. While pulling in customer lists allows you to engage a donor in a few simple clicks, adding custom fields provides additional insight that is typically not accessible with mobile-first communications.
For donation offers, there are a few insights that can really help in ongoing conversations such as last donation amount, event attendance, and next suggested donation. Below are all the custom contact record fields we are going to pull in from Salesforce:
| Description | Field Name | Data Type |
|---|---|---|
| SMS Opt In | SMS_Opt_In__c | Checkbox |
| Next Suggested Donation | Next_Suggested_Donation__c | Currency |
| Last Donation Amount | Last_Donation_Amount__c | Currency |
| Event Attendance | Event_Attendance__c | Checkbox |
In Salesforce, navigate to Object Manager > Contact > Fields & Relationships. Click ‘New’ and ‘Select Field’ type. Enter the first description above in ‘Field Label,’ set the default value to unchecked, add the field name provided above. Then provide a description, make sure you’re auto-adding the custom report type, and click ‘Save & New.’
You’ll then repeat these steps for each description.
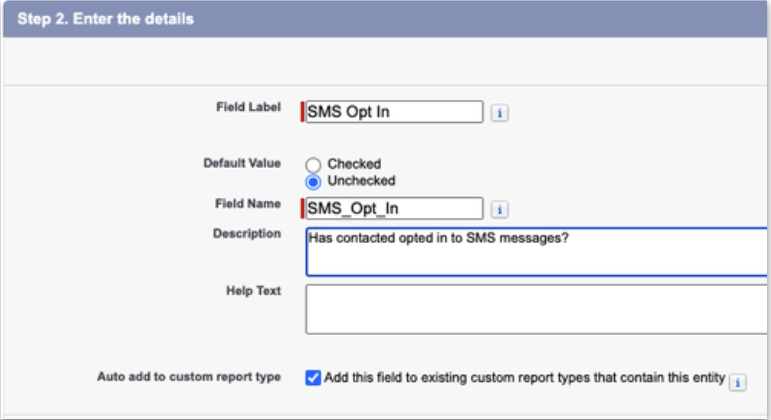
After you’re done adding all your fields, go back to the Fields list and record the “Field Name.” In the example below, you’ll see SMS_Opt_in_c. Custom fields in Salesforce are appended with “_c.”

Pull Donor Data into Frontline
Now we are going to pull in all relevant donor details into Frontline and also link directly to the Salesforce contact record. First we want to update getCustomerDetailsByCustomerIdCallback to include our custom fields. The custom fields will be added after ‘Account.Name’: 1,. We’ll end up with the following:
Next, we’ll add these custom fields to what we return to donor details. We will be using the Information section so we’ll add our fields after the account name:
From:
To:
When it’s all done right, the donor contact within Frontline should be populated with all relevant information. That means employees have up-to-date information about the donors they are engaging with on a regular basis.
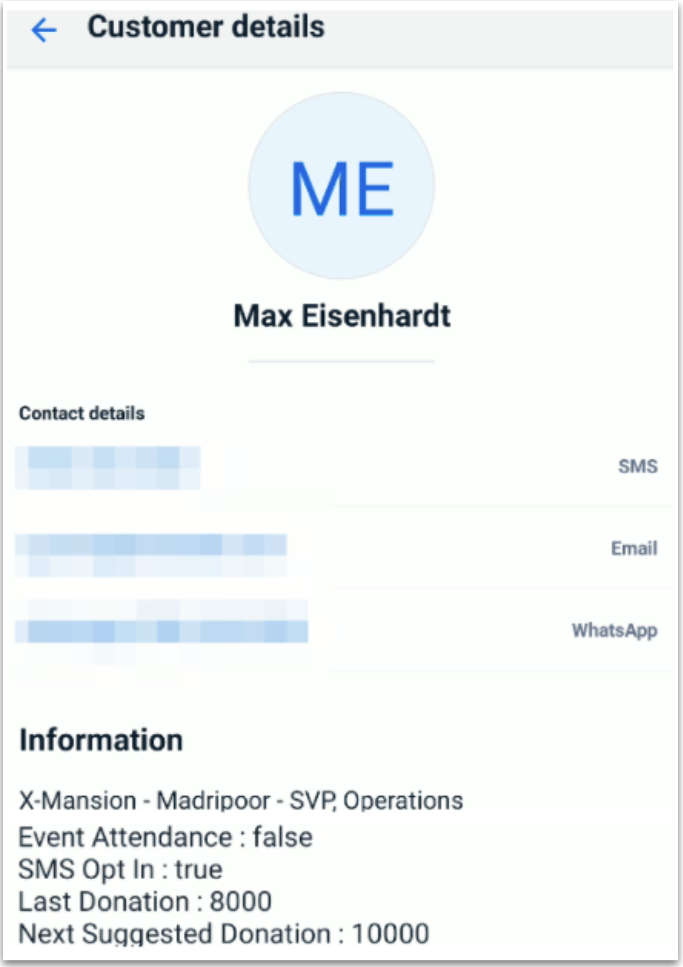
But what if I need a quick pathway into the Salesforce contact record? That’s where we’ll add a contact link.
Frontline’s customer object provides a link section on the detail record, which can be used for any links you’re interested in adding (social media, CRM mobile app, etc.).
For our donor work, we are going to create a deep link into the Salesforce Mobile application to view the contact record. Let’s start by adding our deep link to the links array after our channels array to our crm.protect.js file:
This is the Salesforce deep link that will open up the Salesforce Mobile application on our Contact record: salesforce1://sObject/${sfdcRecord.Id}/view.
In order to test the deep link, it requires the Salesforce Mobile application to be installed. Here’s how it will look in the Frontline app:

Now, when you click on Max Eisenhardt, it will open the Contact record in the Salesforce Mobile app. This provides quick access to Salesforce while ensuring the Frontline app is simple to use and focused on the most critical component – communications.
Last, let’s look at how we can add templates to make it even easier to engage with donors with brand-approved templated messages.
Add Templates to the Frontline App
Templated messages within Frontline are extremely useful for common outreach or responses.
For our use case, we can customize the templates to pull in Salesforce data for added personalization. Here’s what the end result will look like:
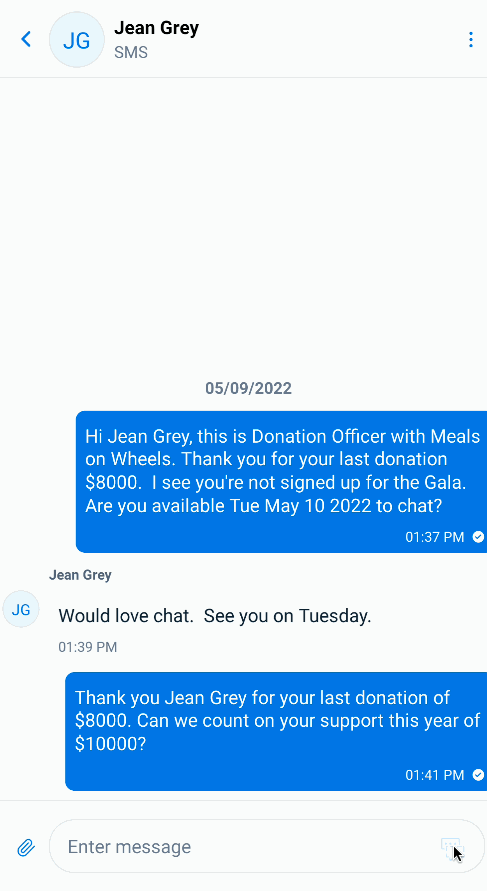
In order to customize our templates using Salesforce data, we will need to update templates.protect.js by modifying getTemplatesByCustomerId. Here is the final templates.protected.js for reference. The template function uses the worker and donor information to lookup the Salesforce contact record:
We’ll pull in the Salesforce contact fields for use in our Frontline templated messages:
For the templated messages in Frontline, they’ll look something like this:
When an individual uses the template, the Salesforce fields will be substituted for the actual values of the specific Donor, making it easy to send highly personalized messages in just a few clicks.
Deploy and Run Final Testing
You’re now ready to deploy your application and test all the changes! Go ahead and type twilio serverless:deploy into the CLI. This will push our local code into Twilio Functions for Frontline to use. Now, whenever a Donation Officer clicks on My Customer and the Customer Details, Frontline will make a call out to our Twilio Functions to perform our Salesforce lookups for our Donor information.
As you can see, the opportunities to customize Frontline are nearly endless. And it doesn’t just stop at donor engagement – we are seeing personalized mobile-first engagement with student advising, case worker communication, and volunteer coordination. With Frontline, you have the flexibility to pull in key insights and templatize the most effective messages while providing a simple interface focused on the most critical piece of building personalized relationships – communication. We can’t wait to see what you build!
Alex Chun is a Principal Solutions Engineer at Twilio.org. Alex Chun partners with social impact organizations to create tech solutions for communication workflows. His areas of interest are hotlines, technologies for helping climate changes, and animal rescues. He is currently working on solutions using Twilio technologies like Flex, Frontline and WhatsApp. You can reach him at achun[at]twilio.com.


Related Resources
Twilio Docs
From APIs to SDKs to sample apps
API reference documentation, SDKs, helper libraries, quickstarts, and tutorials for your language and platform.
Resource Center
The latest ebooks, industry reports, and webinars
Learn from customer engagement experts to improve your own communication.
Ahoy
Twilio's developer community hub
Best practices, code samples, and inspiration to build communications and digital engagement experiences.