Build a Phone Tree with Python, Twilio and a State Machine
Time to read:
June 15, 2021
Written by
Reviewed by

The Twilio Programmable Voice service provides a complete line of features that allow you to implement phone trees or Interactive Voice Response (IVR) systems for your business or organization.
In this tutorial you will learn how to create an extensible phone tree using Python, the Flask web framework, and the power and simplicity of a state machine. The phone tree that you are going to have by the end of this tutorial will match the following diagram:

Tutorial Requirements
- Python 3.6 or newer. If your operating system does not provide a Python interpreter, you can go to python.org to download an installer.
- A Twilio account. If you are new to Twilio click here to create a free account now and receive $10 credit when you upgrade to a paid account. You can review the features and limitations of a free Twilio account.
- A Twilio phone number.
- A personal phone number, to test the project.
Setting up your environment
To get started, open a terminal window and navigate to the place where you would like to set up your project.
Create a new directory called twilio-phone-tree where your project will live, and change into that directory using the following commands:
Creating a virtual environment
Following Python best practices, you are now going to create a virtual environment, where you are going to install the Python dependencies needed for this project.
If you are using a Unix or Mac OS system, open a terminal and enter the following commands to create and activate your virtual environment:
If you are following the tutorial on Windows, enter the following commands in a command prompt window:
Now you are ready to install the Python dependencies used by this project:
The four Python packages needed by this project are:
- The Twilio Python Helper library, to work with SMS messages.
- The Flask framework, to create the web application.
- Pyngrok, to make the Django application temporarily accessible on the Internet for testing via the ngrok utility.
- python-dotenv, to import the application configuration.
Creating a Flask server
In this step you are going to create a brand new Flask web application. Open a file named app.py in your text editor or IDE, and enter the following code in it:
This application creates a webhook on the /webhook URL that will receive events from the Twilio Programmable Voice service.
The idea is that at any time there is an interesting event, such as a customer making a phone call to your Twilio phone number, or pressing one of the number keys while the call is in progress, Twilio will send an HTTP request to this webhook asking for instructions on how to handle the event.
The instructions are given using a domain-specific language called TwiML, based on the XML standard. The Twilio helper library for Python includes several classes that make it possible to create TwiML without actually having to write XML.
A TwiML response is represented by an instance of the VoiceResponse class. This class acts as a container for one or more “verbs”, which are the actual instructions used by the application to indicate how Twilio must handle the event.
In the example above a VoiceResponse instance is created and initialized with a single verb called Say. As you can imagine, this causes Twilio to speak the text that is passed as an argument to the caller, using text-to-speech (you will be able to try this in a few moments).
To complete this first version of the Flask application, add a file named .flaskenv to your project directory and enter the following contents in it:
The .flaskenv file contains configuration information for the Flask application. The FLASK_APP variable tells Flask where the application is stored, and the FLASK_ENV variable puts the application in development (or debug) mode.
The server is now functional and can be started with the following command:
One of the features of Flask’s debug mode is that whenever code is changed, the server automatically restarts to incorporate the changes. Leave the server running in this terminal window as you continue working through the tutorial to take advantage of this functionality.
Starting an ngrok tunnel
The Flask web server is only available locally inside your computer, which means that it cannot be accessed over the Internet. But to implement voice applications, Twilio needs to be able to send HTTP requests to this server.
For an application running on production you will have the Flask server deployed on a cloud server with its own domain name, so this is not a problem. When you are developing the application on your own computer, a trick is necessary to make the local server temporarily available on the Internet.
Open a second terminal window, activate the virtual environment, and then run the following command:
The ngrok screen should look as follows:
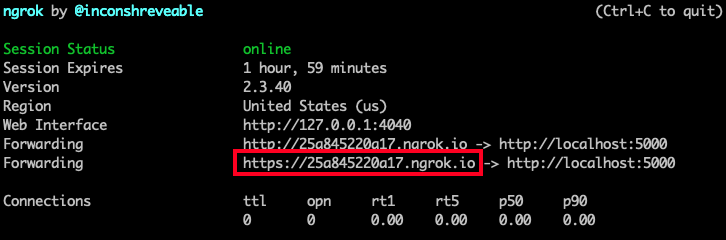
Note the https:// forwarding URL. This URL is temporarily mapped to your Flask web server, and can be accessed from anywhere in the world. Any requests that arrive on it will be transparently forwarded to your server by the ngrok service. The URL is active for as long as you keep ngrok running, or until the ngrok session expires. Each time ngrok is launched, a new randomly generated URL will be mapped to the local server.
Leave the Flask and ngrok terminals running as you continue with this tutorial. If your ngrok session expires, stop ngrok by pressing Ctrl-C, and start it again to begin a new session.
Configuring the webhook for your Twilio phone number
In this section you are going to configure the webhook to the Twilio phone number. In your web browser, visit the Twilio phone numbers section of the Console.
Find the phone number you will be using for this tutorial in the list and click on it to open its configuration page.
Scroll down until you see a section titled “Voice & Fax” and make the following adjustments to the information shown in this section:
- For “Accept Incoming”, select “Voice Calls”.
- For “Configure With”, select “Webhooks, TwiML Bins, Functions, Studio, or Proxy”.
- For “A Call Comes In”, select “Webhook”, then type the ngrok URL followed by /webhook. Make sure the right side dropdown is set to “HTTP POST”.
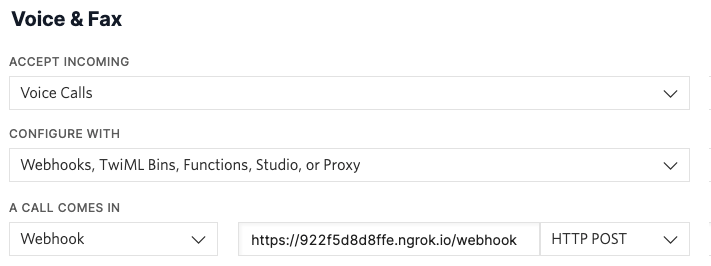
After making these changes, click the “Save” button to record your changes.
To make sure that you’ve configured everything correctly, grab your phone and call your Twilio number. Make sure the Flask application and ngrok are still running when you do this.
The call should be answered right away, and you should hear a “Hello, and welcome to ACME, Inc.” greeting (or the message that you entered as an argument to the Say verb in the Flask application).
The Say verb is just one of the many TwiML verbs that are available. Below is a list of a few more that you will use in this project:
- Gather: wait for the caller to press phone keys or speak. This is going to be how the caller can make selections to navigate the phone tree.
- Dial: call a third party and connect it to the caller.
- Record: allow the caller to leave a recorded message.
- Enqueue: put the caller in a queue with waiting music.
Designing a state machine-driven phone tree
Now you’ve learned how to write a basic Programmable Voice application that answers phone calls with a message. What remains is to replace the simple logic in the ivr_webhook() function with a complete phone tree implementation.
A common approach used when building phone trees is to code the responses to the caller directly in the webhook function; but unfortunately, this leads to an application that is very difficult to maintain and expand.
The technique you are going to learn in this tutorial uses a state machine. The idea is to define all the possible interactions that a caller can have with the phone system as a list of states. The input from the user while in a given state determines a transition to a new state.
You’ve seen this state diagram at the beginning of this article, but here is the phone tree that you will implement one more time:

When the call is answered the caller will be put in the greeting state, and as a result a greeting message will be played.
Immediately after the greeting the caller will be transitioned into the menu state. In this state the caller will hear a menu of options and then the system will pause to let the caller make a selection.
Depending on the choice selected by the caller, the sales, support, hours or reception states will be activated. If the caller makes an invalid selection, the error state will be used to play an error message and then return to the menu. If they press “9”, then they will reenter the menu state to replay the menu options.
What information is needed for each state? If you think about it, for each state there are two actions that need to be taken: one when the state is entered, and another one when the state is exited. The “enter” action for a given state is going to be implemented as TwiML code that Twilio can execute. For most of the states, after the state is entered there is going to be a pause to wait for user input. The “exit” action for the state will then use the user input to determine what is the next state that needs to be entered. Consider the following examples:
|
State |
Enter action |
Exit action |
|
|
Play the greeting message. |
Go to the menu state. |
|
|
Play the menu options and wait for user input. |
Look at user input to decide which state to go to next. If user input is invalid, go to the error state. If the user input is “9”, re-enter the menu state to repeat the options. |
|
|
Play the business hours message, followed by a “press 1 to repeat or any other key to go back to the menu message”. Then wait for user input. |
If the user input is “1”, re-enter the hours state, else go to menu state. |
Hopefully these examples give you the idea of how the system is going to work.
The important design decision is that the ivr_webhook() function is going to be completely generic and will not have any logic specific to this particular phone tree. Here is the code for the updated ivr_webhook() function:
This new version of the webhook finds which state the caller is in from the Flask session variable and then it uses the enter_state() and exit_state() auxiliary functions (not yet implemented) to navigate the state machine. These two functions will find what the enter or exit actions are for the current state and return the appropriate TwiML code for Twilio to carry them out.
Update the ivr_webhook() function with the code above in app.py. You will implement the enter_state() and exit_state() auxiliary functions in the next section.
State machine implementation
As you’ve seen in the previous section there are seven states that need to be implemented, and for each state there are enter and exit actions.
To store the information associated with each state you will use a Python dictionary. Below you can see how the seven states for the phone tree diagram above will be represented. You can add this dictionary definition right above the ivr_webhook() function in app.py.
How does this work? Each state has a key in the IVR dictionary. The value associated with each state is a tuple with two elements: the “enter” and “exit” actions, respectively.
The enter action for a state is given as a reference to a function that returns the TwiML code for that state. The exit action for a state can be given in one of three possible ways:
- If the state is a terminal state that does not transition to any other state, then the exit action is
None. Examples of this are thesales,supportandreceptionstates, which transfer the caller and do not ever return to the phone tree. - If the state needs to automatically transition to another state, without waiting for user input, then the exit action is a string with the name of the next state. The
greetinganderrortasks are in this category, as they automatically need to transition to themenutask after the enter action is executed. - If the state needs to accept user input to determine where to go next, then the exit action is a function that is invoked after input from the user is received.
The greeting state
The greeting state is the easiest to implement. The “enter” action for this state must be implemented in the enter_greeting() function referenced in the IVR dictionary. Add this function above the IVR dictionary definition:
Note that only the TwiML verb is included. The enter_state() function will take care of creating the VoiceResponse instance and adding the verbs to it.
The menu state
The menu state is possibly the most interesting, as it must implement the main navigation logic for the phone tree. Looking at the IVR dictionary, this state is implemented with two functions enter_menu() and exit_menu(), which you can see below. Add these functions to app.py above the IVR dictionary definition:
The enter_menu() function uses the Gather verb to instruct Twilio to wait for the user to make a choice by pressing a number key on the phone.
The action_on_empty_result=True parameter passed to Gather ensures that if the gather object times out before the user presses any key, Twilio will keep the call connected and continue to invoke the application webhook. The default action when a gather timeout occurs is to end the call, which does not work well for this application. The num_digits argument tells Twilio that the user needs to key in a single digit.
The Gather object can include a message that is given with its say() method. The benefit of having the message as part of the Gather verb instead of in a separate Say verb is that the user will then be able to press a key while the message is still playing.
After the enter_menu() function runs and the Gather object is returned to Twilio, the call will wait for the user to select a choice. Once the choice is made, Twilio will invoke the application webhook again, this time passing the user selection in the Digits form variable.
At this point the exit_menu() will be invoked, and the choice made by the user will determine which state is called when the enter_state() function is called to transition to a new state.
The sales, support and reception states
Since this is an example phone tree, there are no sales or support departments, and there is also no receptionist. To give you an idea of how the different TwiML verbs work, you are going to make the sales state go directly to voicemail, the support state to put the caller in a waiting queue with music, and the reception state to connect the caller to a specific phone number.
Since these three states are terminal, there are only “enter” functions for them. Add these three functions in app.py above the definition of the IVR dictionary:
The enter_sales() and enter_support() functions are the first that need to execute more than one TwiML verb. For that reason, these functions return a list. The enter_state() function will be coded to check if the enter function for a state returns a single verb or a list and handle both cases.
The Record verb will sound a beep and then accept a message. Voice recordings can be played from the Recordings page of the Twilio Console. You can also configure a callback endpoint that alerts your application when a new voicemail is recorded. Voicemails can also be transcribed to text, or encrypted.
The Enqueue verb puts the caller in a waiting queue, where music will play until an agent retrieves this call from the queue. Since this application does not have support agents the caller will remain in the queue indefinitely. The Programmable Voice service makes it possible to implement a support hotline with queuing.
The Dial verb will call the number given as an argument and then connect the caller to it. Make sure you replace the placeholder phone number with a number you can receive calls on to test this option.
The hours state
The hours state needs to play a recorded message with the business hours, and then give the caller the option to repeat the message when “1” is pressed, or return to the menu state when any other key is pressed.
Here is the implementation of this state. Similar to the functions before, make sure the following are added above the definition of the IVR dictionary:
The enter_hours() function is similar to enter_menu(), with the difference that the message is shorter and simpler.
The exit_hours() function is also very similar to exit_menu(), in that it looks at the Digits form variable to decide if the next state should be hours again, or menu.
The error state
The last state is error, which just needs to play an error message. Paste this above the IVR dictionary:
This state does not need an exit function because it does not need to wait for input, it just transitions back to the menu without a wait.
The enter_state and exit_state functions
You’ve seen that the ivr_webhook() endpoint and the exit state functions above reference two auxiliary functions, enter_state() and exit_state(). These are the functions that connect the webhook function with the enter and exit state functions. Here are their implementations:
Add these functions to app.py after the IVR dictionary definition.
The enter_state() function is the most complex. This function creates a VoiceResponse object and then calls the “enter” function for the requested state to obtain the TwiML verbs for the state. As mentioned earlier, it checks if the function returns a single verb, or a list of them, and adds them all to the voice response object. Flask’s session variable is updated with the state, so that it can be recalled in the next invocation of the webhook.
If the “exit” action for the state is a string, then it means that there is no need to wait for user input, and the transition to the next state can be immediate. In that case the outer while-loop will repeat everything for the next state, and more TwiML verbs will be added to the same voice response object.
When the state requires user input, the function ends and returns the assembled VoiceResponse instance back to the webhook, which in turn will return it to Twilio for execution.
The exit_state() function is much simpler. It just finds what the exit function for the state is and calls it.
Testing out the phone tree
The project is now complete! If you need to check that you have all the code, use this gist as reference.
Make sure you have the Flask application and ngrok running on their respective terminals, and that the Voice webhook in the Twilio console matches the ngrok URL. Keep in mind that every time ngrok is restarted a new public URL is created, so you will need to update the webhook in your Twilio console.
Now grab your phone and call your Twilio phone number, and the phone tree should start playing!
Next steps
I hope this was a useful tutorial, and that you can adapt the resulting project to your own needs. If you need to delve deeper into TwiML, the Programmable Voice TwiML documentation is a great resource to learn about all the possibilities, many of which haven’t been mentioned in this article.
I’d love to see what you build with Twilio Programmable Voice!
Miguel Grinberg is a Principal Software Engineer for Technical Content at Twilio. Reach out to him at mgrinberg [at] twilio [dot] com if you have a cool project you’d like to share on this blog!


Related Resources
Twilio Docs
From APIs to SDKs to sample apps
API reference documentation, SDKs, helper libraries, quickstarts, and tutorials for your language and platform.
Resource Center
The latest ebooks, industry reports, and webinars
Learn from customer engagement experts to improve your own communication.
Ahoy
Twilio's developer community hub
Best practices, code samples, and inspiration to build communications and digital engagement experiences.