How to Transcribe a Voice Message Using Twilio, Python, and Flask
Time to read:
April 28, 2021
Written by
Reviewed by

In this tutorial you’ll leverage Twilio Programmable Voice to receive phone calls at your Twilio phone number, and transcribe any voice messages left by the caller. This guide can be used as a foundation to build your own voicemail system.
Prerequisites
To get started with this tutorial, you’ll need the following:
- A free Twilio account (sign up with this link and get $10 in free credit when you upgrade to a paid account).
- A Twilio phone number.
Project setup
In this section you are going to set up a brand new Flask project. To keep things nicely organized, open a terminal or command prompt, find a suitable place and create a new directory where the project you are about to create will live:
Create a virtual environment
Following Python best practices, you are now going to create a virtual environment, where you are going to install the Python dependencies needed for this project.
If you are using a Unix or Mac OS system, open a terminal and enter the following commands to create and activate your virtual environment:
If you are following the tutorial on Windows, enter the following commands in a command prompt window:
Now you are ready to install the Python dependencies used by this project:
The four Python packages that are needed by this project are:
- The Flask framework, to create the web application that will receive message notifications from Twilio.
- The Twilio Python Helper library, to work with WhatsApp messages.
- Pyngrok, to make the Flask application temporarily accessible on the Internet for testing via the ngrok utility.
- The python-dotenv package, to read a configuration file.
Set up a development Flask server
Make sure that you are currently in the virtual environment of your project’s directory in the terminal or command prompt. Since we will be utilizing Flask throughout the project, we will need to set up the development server. Add a .flaskenv file (make sure you have the leading dot) to your project with the following lines:
These incredibly helpful lines will save you time when it comes to testing and debugging your project.
FLASK_APPtells the Flask framework where our application is located.FLASK_ENVconfigures Flask to run in debug mode.
Run the command flask run in your terminal to start the Flask framework.
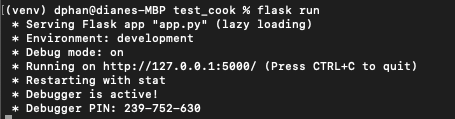
The screenshot above displays what your console will look like after running the command flask run. The service is running privately on your computer’s port 5000 and will wait for incoming connections there. You will also notice that debugging mode is active. When in this mode, the Flask server will automatically restart to incorporate any further changes you make to the source code.
However, since you don't have an app.py file yet, nothing will happen. Though, this is a great indicator that everything is installed properly.
Feel free to have Flask running in the background as you explore the code. We will be testing the entire project at the end.
Authenticate against Twilio Services
We need to safely store some important credentials that will be used to authenticate against the Twilio services.
Create a file named .env in your working directory and paste the following text:
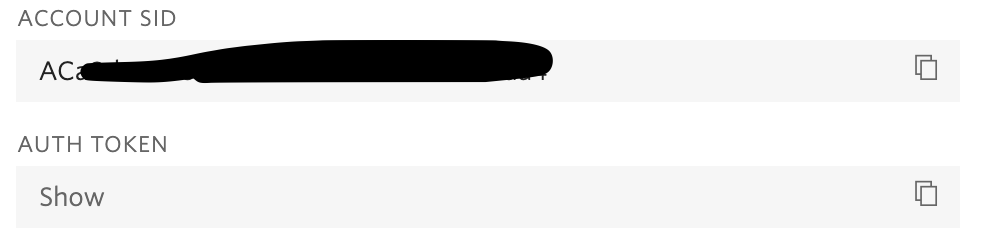
Look for the TWILIO_ACCOUNT_SID and TWILIO_AUTH_TOKEN variables on the Twilio Console and add it to the .env file.
Start an ngrok tunnel
The problem with the Flask web server is that it is local, which means that it cannot be accessed over the Internet. Twilio needs to send web requests to this server, so during development, a trick is necessary to make the local server available on the Internet.
On a second terminal window, activate the virtual environment and then run the following command:
The ngrok screen should look as follows:
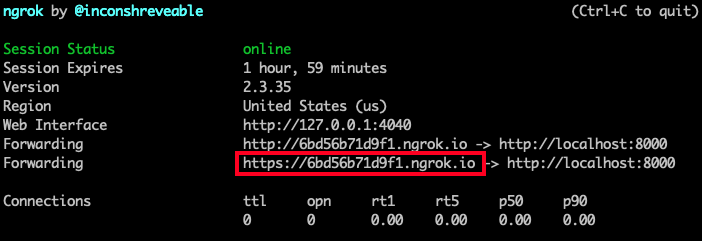
While ngrok is running, you can access the application from anywhere in the world using the temporary forwarding URL shown in the output of the command. All web requests that arrive into the ngrok URL will be forwarded to the Flask application by ngrok.
Record an incoming call
Twilio uses the concept of webhooks to handle any incoming calls to your Twilio phone number.
Create a file named app.py and paste the following code:
The record() function defines a response object using the Twilio library's VoiceResponse() helper class. There are a few TwiML verbs that are referenced in the code such as say, record, and hangup in order to control the call flow.
You'll learn more about the record verb in the next section.
The TwiML <Record> verb
Before I dive into the TwiML <Record> verb it’s important to mention that recording phone calls or voice messages has a variety of legal considerations and you must ensure that you’re adhering to local, state, and federal laws when recording anything.
The code above first creates a new variable called twiml that holds a reference to a new TwiML Voice Response object.
TwiML, which stands for Twilio Markup Language, is XML that has special tags defined by Twilio. You can use TwiML to tell Twilio how to handle an incoming phone call or SMS. Instead of writing XML, you can also write TwiML programmatically, which is what you’re doing in this function.
The <Record> verb will create an audio recording of anything the caller says after the call connects, and it can be modified with a number of different attributes. The attributes most relevant for this tutorial are transcribe and transcribeCallback.
transcribe is an optional attribute that, when included and set to true, will tell Twilio to create a speech-to-text transcription of any message left by the caller, with the caveat that the message has to be between 2 and 120 seconds in length. This means that some very short messages and very long messages will not be transcribed, though the actual audio recordings of the message will not be impacted.
The content of the transcription will be stored by Twilio for you, and can be accessed via the transcription API.
Alternatively, you can provide a transcription callback to the <Record> verb that will execute when the transcription is finished. In this callback, you can access the contents of the transcription and perform an action on it, like save it to a database or print it to a webpage.
If you use the transcribeCallback attribute, you don’t also need to include the transcribe: true attribute.
This brings you to your next step: creating the transcription callback function.
Add the transcription callback function
Create a new file named transcribe.py and paste the following code:
In this file, you create a Twilio client object in order to fetch the transcription of the phone call. The client will look at the list of calls and store the most recent transcription ID from the Twilio REST API into the transcription variable. Then you will parse out the individual sid of the voicemail in order to fetch the transcription of the voicemail.
Configure the webhook for your Twilio phone number
Make sure the Flask server and ngrok are still running. You will need to configure the ngrok URL to the Twilio phone number before testing out the app in the next step.
Go to the Twilio Console and find the phone number you’re using for this tutorial in the list to open the configuration page for that number.
Scroll down until you see a section titled Voice & Fax.
Make the following adjustments to the information shown in this section:
- For Accept Incoming, select Voice Calls
- For Configure With, select Webhooks, TwiML Bins, Functions, Studio, or Proxy
- For A Call Comes In, select Webhook
On the same line as A Call Comes In, paste the temporary ngrok URL with "/record" appended at the end. Remember to leave it as "HTTP POST". You can see an example below:

After making these changes, click the Save button.
Test your app
Call your Twilio phone number from your personal phone. You’ll hear a beep after which you can speak into the phone and say a few words. Make sure you speak for at least a few seconds to ensure that there is enough content for the transcription to be triggered. After leaving your message, hang up the call.
On a third terminal window, activate the virtual environment and then run the following command:
Wait a second to see your transcribed message show up on the terminal.
Congratulations, now that you’ve learned how to record transcriptions, what will you do next?
Diane Phan is a Developer Network editor on the Developer Voices team. She loves to help programmers tackle difficult challenges that might prevent them from bringing their projects to life. She can be reached at dphan [at] twilio.com or LinkedIn.
Related Posts


Related Resources
Twilio Docs
From APIs to SDKs to sample apps
API reference documentation, SDKs, helper libraries, quickstarts, and tutorials for your language and platform.
Resource Center
The latest ebooks, industry reports, and webinars
Learn from customer engagement experts to improve your own communication.
Ahoy
Twilio's developer community hub
Best practices, code samples, and inspiration to build communications and digital engagement experiences.