Build phone verification in React Native with Twilio Verify

December 09, 2021
Written by
Reviewed by

Build phone verification in React Native with Twilio Verify

SMS verification is a great way to onboard your users, especially in a mobile app where they have access to their text messages. Phone verification can also help ensure unique users, decrease spam and fraud, or can be used for ongoing login verification. There are many options for verifying users, but SMS verification remains a popular choice for its ease of use.

This blog post will walk you through how to set up a React Native application from scratch and how to use Twilio's purpose built Verify API for SMS phone verification. If you want to skip ahead, you can find the completed code on my GitHub.

Prerequisites for building phone verification in React Native & Expo

Set up your React Native developer environment

We're using ​​Expo CLI and Expo GO for this tutorial which is quick to set up and get running. You can learn more about the difference between using Expo CLI and the React Native CLI here. You can also find a version that uses the React Native CLI instead of Expo on my GitHub.

Follow the setup instructions in the React Native docs under the Expo CLI quickstart tab:

yarn global add expo-cli

To test the project on a device, install Expo on an iOS or Android phone. You can also set up iOS or Android emulators on your computer. Check out the "React Native CLI" tab for more details on setting up emulators with Android Studio or XCode.

This tutorial assumes some knowledge of JavaScript and React programming. If you're new to either, I found this React Native tutorial helpful to get started.

Set up your Twilio Verify backend

Sign up for or log in to your Twilio account and create a new Verify Service. This is what will allow you to send SMS verification messages.

Then head over to Twilio's Code Exchange and deploy the One Time Passcode (OTP) verification project. By default you'll have a nice web interface for testing verifications, but it also provides serverless functions hosted on Twilio for sending and checking OTPs that we will use from the mobile app. Make note of the base url for your deployed project, it will look something like this https://verify-1234-abcdef.twil.io (you can also grab this later).

Create a new React Native application

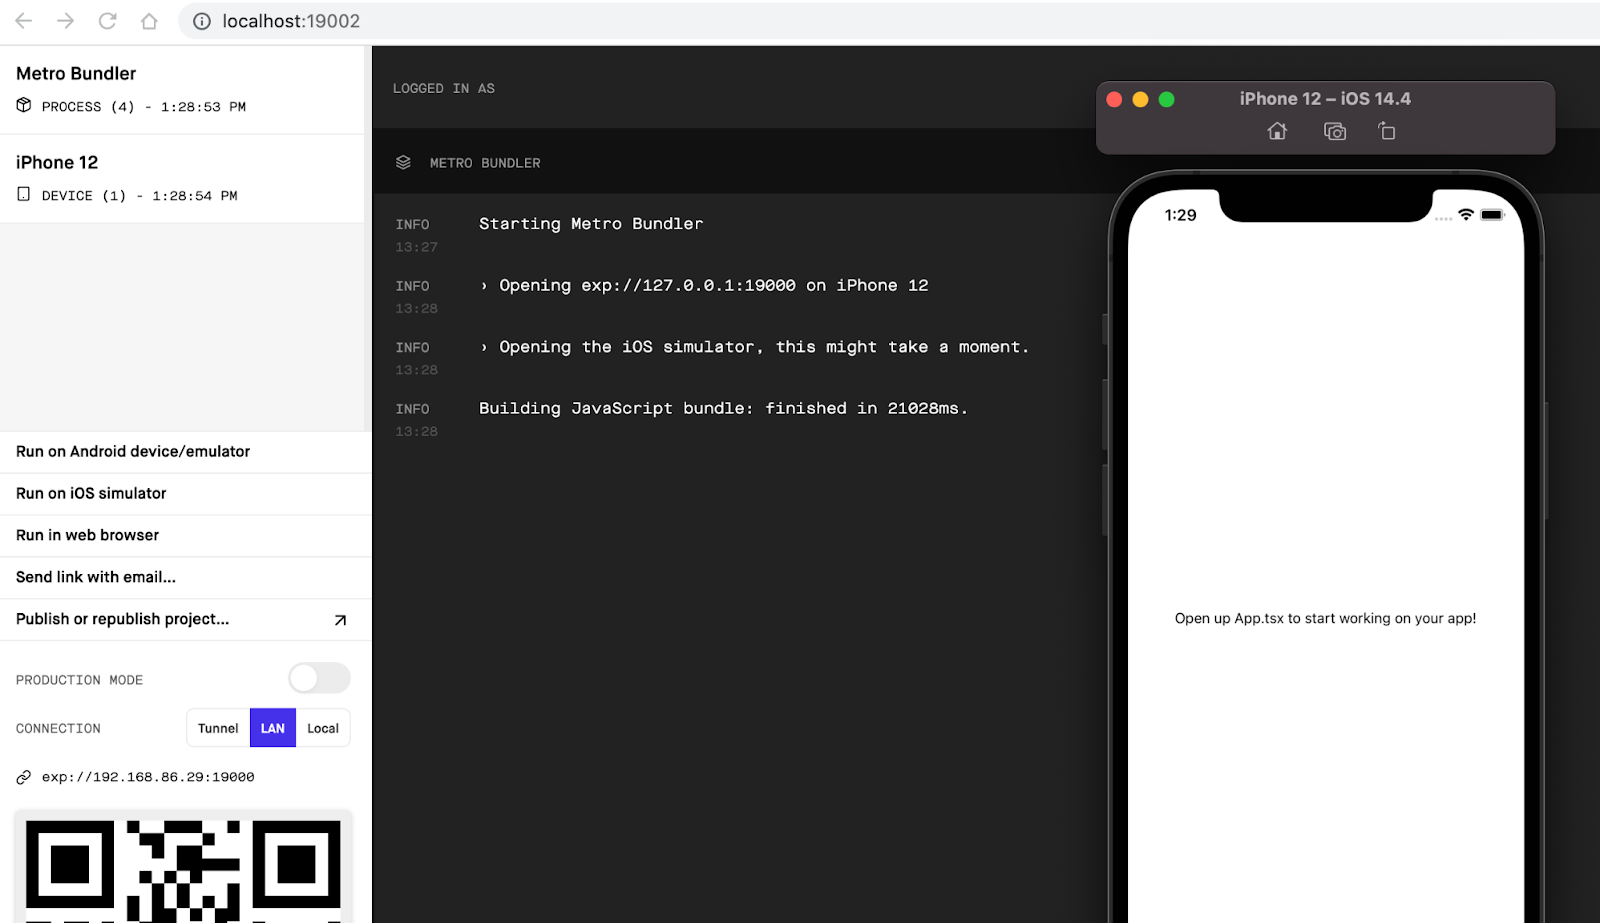
Now that your environment is set up, create a new project called VerifySms and choose the TypeScript template.

expo init VerifySms

cd VerifySms

choose blank (Typescript)

Then run the project with yarn start. It will spin up Metro in your browser. If you installed Expo on your phone, scan the QR code (make sure you're on the same WiFi network) to bring up the app. You can also launch it in the emulator if you have that setup.

expo web interface running metro

Set up page routing

I promise we'll get to the interesting code soon, but the project will be more manageable if we do some code organization up front.

Create a folder called screens and add three files: PhoneNumber.tsx, Otp.tsx, and Gated.tsx.

Install the React navigation library we'll be using with:

yarn add @react-navigation/native
expo install react-native-screens react-native-safe-area-context

Then open up App.tsx and replace the code with the following:

import React from "react";
import { NavigationContainer } from "@react-navigation/native";
import { createNativeStackNavigator } from "@react-navigation/native-stack";

import PhoneNumber from "./screens/PhoneNumber";

const App = () => {
 type StackParamList = {
   PhoneNumber: undefined;
 };

 const Stack = createNativeStackNavigator<StackParamList>();

 return (
   <NavigationContainer>
     <Stack.Navigator
       initialRouteName="PhoneNumber"
       screenOptions={{
         headerShown: false,
       }}
     >
       <Stack.Screen name="PhoneNumber" component={PhoneNumber} />
     </Stack.Navigator>
   </NavigationContainer>
 );
};

export default App;

This code allows us to smoothly navigate between screens. You'll get an error if you try to run the code because we haven't created the PhoneNumber screen yet so we will do that next.

Add a phone number input screen for phone verification

We're going to use a library for the phone number input because it turns out there's a lot of intricacies to collecting phone numbers! Run the following command in your terminal to add the React Native phone number input package.

yarn add react-native-phone-number-input

Replace the code in screens/PhoneNumber.tsx with:

import React, { useState, useRef } from "react";
import {
 SafeAreaView,
 StyleSheet,
 View,
 TouchableOpacity,
 Text,
} from "react-native";
import { Colors } from "react-native/Libraries/NewAppScreen";
import PhoneInput from "react-native-phone-number-input";

const PhoneNumber = ({ navigation }) => {
 const [value, setValue] = useState("");
 const [formattedValue, setFormattedValue] = useState("");
 const phoneInput = useRef<PhoneInput>(null);

 return (
   <>
     <View style={styles.container}>
       <SafeAreaView style={styles.wrapper}>
         <View style={styles.welcome}>
           <Text>Welcome!</Text>
         </View>
         <PhoneInput
           ref={phoneInput}
           defaultValue={value}
           defaultCode="US"
           layout="first"
           onChangeText={(text) => {
             setValue(text);
           }}
           onChangeFormattedText={(text) => {
             setFormattedValue(text);
           }}
           countryPickerProps={{ withAlphaFilter: true }}
           withShadow
           autoFocus
         />
         <TouchableOpacity
           style={styles.button}
           onPress={() => {
             // TODO - send SMS!
           }}
         >
           <Text style={styles.buttonText}>Sign Up</Text>
         </TouchableOpacity>
       </SafeAreaView>
     </View>
   </>
 );
};

const styles = StyleSheet.create({
 container: {
   flex: 1,
   backgroundColor: Colors.lighter,
 },

 wrapper: {
   flex: 1,
   justifyContent: "center",
   alignItems: "center",
 },

 button: {
   marginTop: 20,
   height: 50,
   width: 300,
   justifyContent: "center",
   alignItems: "center",
   backgroundColor: "#7CDB8A",
   shadowColor: "rgba(0,0,0,0.4)",
   shadowOffset: {
     width: 1,
     height: 5,
   },
   shadowOpacity: 0.34,
   shadowRadius: 6.27,
   elevation: 10,
 },

 buttonText: {
   color: "white",
   fontSize: 14,
 },

 welcome: {
   padding: 20,
 },

 status: {
   padding: 20,
   marginBottom: 20,
   justifyContent: "center",
   alignItems: "flex-start",
   color: "gray",
 },
});

export default PhoneNumber;

If you reload the app on your device you should see a phone number input field like this:

phone number input field

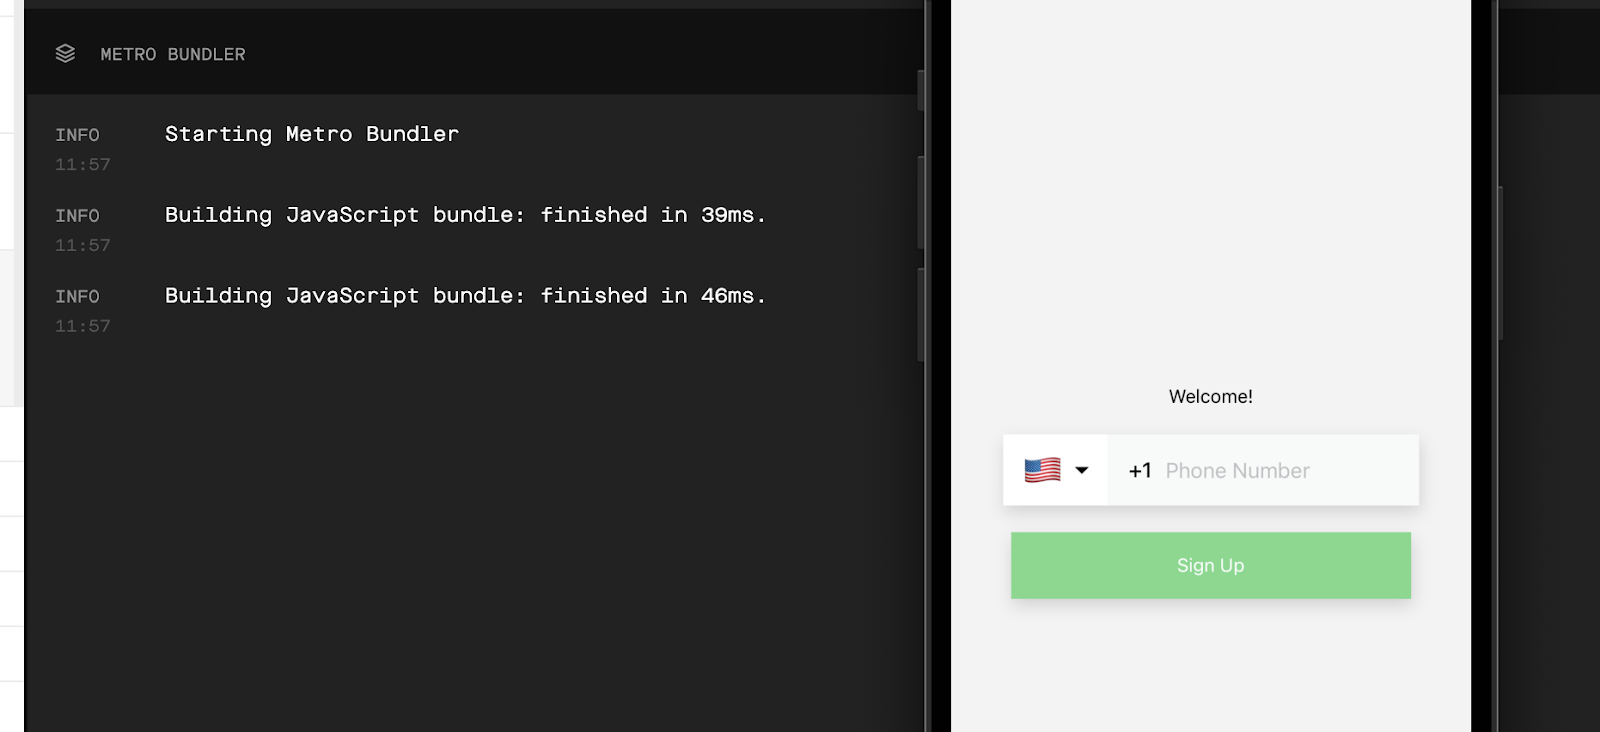
I've set the default country to the US, where I am, but you can customize that and other properties to your liking.

If you enter your phone number and hit "Sign Up" nothing will happen yet so let's build the SMS verification support now.

Grab your base URL from your deployed code exchange project, it will look something likehttps://verify-1234-abcdef.twil.io. If you lost track of your URL you can find it by clicking on the verify service in the Functions section of the Twilio Console.

Create a .env file and add your BASE_URL as a variable:

BASE_URL=https://verify-1234-abcdef.twil.io

Because React Native compiles to multiple platforms we need a way to manage environment variables. Install react-native-dotenv with the following command:

​​yarn add react-native-dotenv

Then open up babel.config.js and update it to:

module.exports = function (api) {
 api.cache(true);
 return {
   presets: ["babel-preset-expo"],
   plugins: [
     [
       "module:react-native-dotenv",
       {
         moduleName: "@env",
         path: ".env",
       },
     ],
   ],
 };
};

Create a new folder called api and add a file called verify.js with the following code. This is what will actually send and check the SMS verifications using the Twilio Verify API.

import { BASE_URL } from "@env";

const sendSmsVerification = async (phoneNumber) => {
 try {
   const data = JSON.stringify({
     to: phoneNumber,
     channel: "sms",
   });

   const response = await fetch(`${BASE_URL}/start-verify`, {
     method: "POST",
     headers: {
       "Content-Type": "application/json",
     },
     body: data,
   });

   const json = await response.json();
   return json.success;
 } catch (error) {
   console.error(error);
   return false;
 }
};

const checkVerification = async (phoneNumber, code) => {
 try {
   const data = JSON.stringify({
     to: phoneNumber,
     code,
   });

   const response = await fetch(`${BASE_URL}/check-verify`, {
     method: "POST",
     headers: {
       "Content-Type": "application/json",
     },
     body: data,
   });

   const json = await response.json();
   return json.success;
 } catch (error) {
   console.error(error);
   return false;
 }
};

module.exports = {
 sendSmsVerification,
 checkVerification,
};

Head back to PhoneNumbers.tsx and import the sendSmsVerification function:

import { sendSmsVerification } from "../api/verify";

Then inside the <TouchableOpacity> button where we have a #TODO to send an SMS we can call our function with the formattedValue of the phone number which is the phone number input in E.164 format:

<TouchableOpacity
 style={styles.button}
 onPress={() => {
   sendSmsVerification(formattedValue).then((sent) => {
     console.log("Sent!");
   });
 }}
>

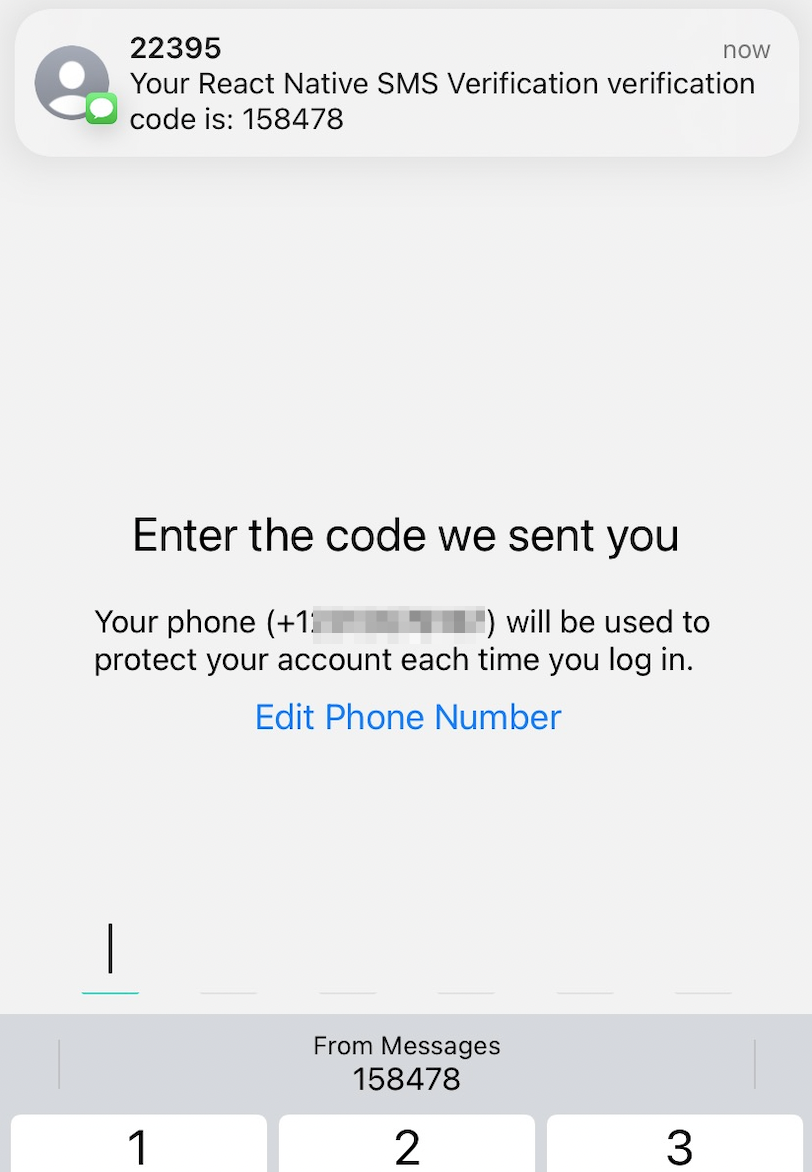
Pull up the application on your device, enter your phone number, and hit Sign Up. You should receive a text message with a OTP!

Add an OTP input screen for checking codes

We're also going to use a library for handling the OTP input. Add the React Native OTP input package with:

yarn add @twotalltotems/react-native-otp-input@1.3.7

If you're using Android you also need to run the following (track the bug here):

yarn add @react-native-community/clipboard

Then open up Otp.tsx and add the following code:

import React, { useState } from "react";
import { SafeAreaView, StyleSheet, Button, Text } from "react-native";

import { checkVerification } from "../api/verify";
import OTPInputView from "@twotalltotems/react-native-otp-input";

const Otp = ({ route, navigation }) => {
 const { phoneNumber } = route.params;
 const [invalidCode, setInvalidCode] = useState(false);
 return (
   <SafeAreaView style={styles.wrapper}>
     <Text style={styles.prompt}>Enter the code we sent you</Text>
     <Text style={styles.message}>
       {`Your phone (${phoneNumber}) will be used to protect your account each time you log in.`}
     </Text>
     <Button
       title="Edit Phone Number"
       onPress={() => navigation.replace("PhoneNumber")}
     />
     <OTPInputView
       style={{ width: "80%", height: 200 }}
       pinCount={6}
       autoFocusOnLoad
       codeInputFieldStyle={styles.underlineStyleBase}
       codeInputHighlightStyle={styles.underlineStyleHighLighted}
       onCodeFilled={(code) => {
         checkVerification(phoneNumber, code).then((success) => {
           if (!success) setInvalidCode(true);
           success && navigation.replace("Gated");
         });
       }}
     />
     {invalidCode && <Text style={styles.error}>Incorrect code.</Text>}
   </SafeAreaView>
 );
};

const styles = StyleSheet.create({
 wrapper: {
   flex: 1,
   justifyContent: "center",
   alignItems: "center",
 },

 borderStyleBase: {
   width: 30,
   height: 45,
 },

 borderStyleHighLighted: {
   borderColor: "#03DAC6",
 },

 underlineStyleBase: {
   width: 30,
   height: 45,
   borderWidth: 0,
   borderBottomWidth: 1,
   color: "black",
   fontSize: 20,
 },

 underlineStyleHighLighted: {
   borderColor: "#03DAC6",
 },

 prompt: {
   fontSize: 24,
   paddingHorizontal: 30,
   paddingBottom: 20,
 },

 message: {
   fontSize: 16,
   paddingHorizontal: 30,
 },

 error: {
   color: "red",
 },
});

export default Otp;

Learn more about how to customize the view in the docs. This code sets the pinCount to 6, which is the Verify API's default length. If you change the OTP length in your Verify Service make sure to update that here too.

Head back over to PhoneNumbers.tsx and update the sendSmsVerification callback to include the following navigation to the Otp screen:

sendSmsVerification(formattedValue).then((sent) => {
  navigation.navigate("Otp", { phoneNumber: formattedValue });
});

In App.tsx import the new Otp screen (and our placeholder for gated content) for navigation:

import Otp from "./screens/Otp";
import Gated from "./screens/Gated";

Add in the parameter types. We pass in a phoneNumber to the OTP screen so we can use it as an identifier for checking the verification.

 type StackParamList = {
   PhoneNumber: undefined;
   Otp: { phoneNumber: string };
   Gated: undefined;
 };

Register the new screens in the Stack Navigator:

<NavigationContainer>
 <Stack.Navigator
   initialRouteName="PhoneNumber"
   screenOptions={{
     headerShown: false,
   }}
 >
   <Stack.Screen name="PhoneNumber" component={PhoneNumber} />
   <Stack.Screen name="Otp" component={Otp} />
   <Stack.Screen name="Gated" component={Gated} />
 </Stack.Navigator>
</NavigationContainer>

Lastly, add the following code to screens/Gated.tsx to give us a success view:

import React from "react";
import { SafeAreaView, StyleSheet, Button, View, Text } from "react-native";

const Gated = ({ navigation }) => {
 return (
   <SafeAreaView style={styles.wrapper}>
     <View>
       <Text>Successfully registered!</Text>
     </View>
     <Button
       title="Start over"
       onPress={() => navigation.replace("PhoneNumber")}
     />
   </SafeAreaView>
 );
};

const styles = StyleSheet.create({
 wrapper: {
   flex: 1,
   justifyContent: "center",
   alignItems: "center",
 },
});

export default Gated;

Test out your application again and you should be able to input and check the OTP code! Learn more about why you should let people edit their phone number in a phone verification flow in our developer best practices.

OTP screen with incoming text message

Next steps for building with Twilio Verify

Now that you have SMS verification set up, maybe you want to add additional channels like email, TOTP or Push authentication. Twilio Verify makes it easy to support multiple channels with a single API.

For more resources, check out the following guides, examples and tutorials:

I can't wait to see what you build!