COVID-19 Diversions: Tracking the ISS with Real-Time Event Notifications Using Node.js, RxJS Observables, and Twilio Programmable SMS
Time to read: 15 minutes
May 22, 2020
Written by
Reviewed by
Are you a developer looking for a new hobby that’s compatible with sheltering in place? Would you like to be able to share it with friends from a virus-safe distance?
You can stargaze from the safety of your own lawn, balcony, or roof, and you don’t need any equipment other than your own eyes, and maybe a pair of binoculars. There are plenty of bright objects in the night sky that are visible with the naked eye. One of them is the International Space Station (ISS), which is the third brightest object in the sky after the sun and moon.
The ISS whips around the earth at 27,576 kilometers per hour (17,000 miles per hour), making a complete orbit every 94 minutes. Opportunities to observe it only last a few minutes, so it’s helpful to know when the ISS will be visible and from which direction it will appear.
You can build an app for that and sharpen your programming skills while pursuing your astronomical adventures. Using JavaScript, Node.js, and RxJS Observables you can write a program that will tell you and your friends when the ISS will be overhead. With Twilio Programmable SMS your application can notify your stargazing team with timely text messages.
Understanding the tutorial project
This tutorial will show you how to create a program that sends SMS messages to people when the ISS is going to be near their geographic location. The application will use information from two sources:
- http://api.open-notify.org/iss-now.json, a REST API that provides the coordinates for the ISS at the moment the API is called
- stargazers.json, a JSON file you’ll create to contain a list of people who will receive notifications, including their phone numbers and geographic coordinates
You’ll use the Twilio Programmable SMS API to send the SMS notifications. Twilio provides a Node.js helper library to make it easier to interact with the Twilio APIs, so you’ll include that in your JavaScript program.
This tutorial will show you a number of aspects of RxJS Observables for JavaScript. You’ll use a RxJS wrapper with the Twilio Node.js helper library. You’ll see how to use the RxJS operators map, distinctUntilChanged, filter, takeUntil, skip and flatMap. You’ll also learn the differences between the Subject and ReplaySubject implementations of the Observable interface.
In this post you’ll also learn how to read files with Node.js and detect when their content changes. You’ll see how to perform repetitive REST API calls and emit responses with an Observable.
Prerequisites
To accomplish the tasks in this tutorial you will need the following:
- Node.js and npm (The Node.js installation will also install npm.)
- Twilio account (Sign up for free using this link and receive an additional $10 account credit.)
- Twilio CLI
- Git
To get the most out of this post you should also have a working knowledge of the core elements of JavaScript, asynchronous JavaScript mechanics, and ReactiveX programming. If you want to refresh your basic knowledge of RxJS, check out these posts:
- Asynchronous JavaScript: Introducing ReactiveX and RxJS Observables
- Asynchronous JavaScript: Using RxJS Observables with REST APIs in Node.js
There is a companion repository containing the complete source code for the project in this post available on GitHub.
Getting your Twilio account credentials
To use the Twilio CLI and interact with the Twilio APIs, you’ll need two essential pieces of information from your Twilio console dashboard: Account SID and Auth Token. You can find them on the top right hand-side of the dashboard.
These are user secrets, so be sure to store them in a safe place.
To use your credentials in development, you’ll want to store them as environment variables or in a .env file. If you choose to store them in a file, be sure the filename is included in your .gitignore file so you don’t inadvertently check your user secrets into a public repository. For the purposes of this tutorial, you’ll store your secrets as environment variables.
If you are using a Unix-based operating system, such as Linux or macOS, you can set environment variables using the following commands:
If you are a Windows user, use the following command-line instructions at a Windows Console or PowerShell prompt:
Getting a Twilio phone number
Twilio Programmable SMS messages are sent using Twilio phone numbers, which provide instant access to local, national, mobile, and toll-free phone numbers in more than 100 countries with a developer-friendly API. You can get a Twilio phone number for free as part of your trial account.
Once you’ve created a Twilio account, you can get a Twilio phone number using the Twilio CLI.
If your installed version of the Twilio CLI is 1.13.0 or earlier, run the following npm command to upgrade to version 2:
Check out the Twilio CLI Quickstart page for more installation options.
If you’ve stored your Twilio credentials as environment variables the Twilio CLI will use them automatically. If you’ve stored them in some other way, you’ll have to login first using the following command:
To list the phone numbers available for registration, use the following command, substituting the appropriate ISO 3166 alpha-2 country code for “US”, if necessary:
You should see a list similar to the following output:
You can use the --help flag to get a list of all the options you can use to find an available phone number in a specific area code or geography. Use the following CLI instruction:
Copy one of the numbers from the list and register it to your Twilio account using the following command:
If your registration attempt is successful, you should see:
Once registered, the phone number is available for you to use until you release it using the CLI or Twilio console. Note that the SID associated with the phone number is a user secret and should be handled securely. Store your newly acquired phone number under the TWILIO_PHONE_NUMBER environment variable in E.164 format.
If you’re using or macOS or another Unix-based operating system:
If you’re a Windows user:
To verify that the number has been successfully added to your account, send a test SMS message to an SMS-enabled phone number:
Note: With a trial account you can only send messages to phone numbers you’ve previously registered to your account. The SMS-enabled phone number you used to sign up for your Twilio account is the first number you’ve registered.
The API will return a response similar to the below output to indicate that SMS message has been successfully received and is queued to be sent:
Within a short time you should receive an SMS message on your phone:
You can check the status of the message creation request using the following CLI command:
As a result, you will see:
Initializing the Node.js project
Once you’ve registered and tested the phone number you can initialize the project and its Git repository with a series of command-line instructions.
Open a console window and execute the following instructions in the directory where you want to create the project directory:
You can learn more about initializing Node.js projects in this post by Twilio's Phil Nash.
Install the dependencies you are going to use:
Building the application
The application will consist of five parts which will:
- observe an input data file and load a list of message recipients, who are referred to as “stargazers”, into the program whenever the contents of the file change
- perform a repetitive REST API call to retrieve the current ISS position and emit it with an Observable
- check the ISS position against each stargazer’s position and send a message to the console when the ISS is approaching a stargazer
- send an SMS messages to the stargazer who the ISS is approaching
- check the status status of the SMS message
Tracking file changes with RxJS Observables
The first step is to load information about the stargazers from an input file and track it for subsequent changes.
Create a stargazers.json file in the project root directory and load it with the following data:
Because this is test data you’ll be using with your Twilio trial account, you should change the placeholder values for the phoneNumber element to the phone number you registered when you created your Twilio account. This way you’ll be able to verify messages are sent successfully by the application. Use E.164 format. (You can send messages to any phone number by upgrading your Twilio account.)
Create a file named tracker.js in the project root directory and copy the following code into it:
The program starts with the initialization of two constants:
inputFilePath represents a path to the stargazers.json data source
stargazers$ is an Observable which emits the content of the stargazers.json
Implement a readFile function which:
- loads the file contents using
fs.readFileSync - parses the content to an array of JSON objects
- emits this array through the
stargazers$Observable
Copy the following code to the bottom of the tracker.js file:
This code uses a try-catch construction, so if there are problems with loading the file or parsing it the program won’t break. If there aren’t any problems, the stargazers$ Observable will emit the latest correct data set.
The readFile function is passed as a callback to the fs.watchFile method, so it is invoked whenever the content of the stargazers.json file changes. In the next line it is also called explicitly to load the initial content of the file.
For debugging purposes, a subscription to the stargazers$ Observable with the log method of the console object sends the data from stargazers.json to the command line. Because stargazers$ is an Observable, each time the file changes the current data will be sent to the console.
Notice that the stargazers$ Observable is initialized with the ReplaySubject implementation. This Subject extension emits, “replays”, old values to new subscribers. The number of emitted old values can be specified by a parameter in the constructor. In the above code, you've passed the parameter 1 to the constructor, which means that every new subscriber will receive, right after subscribing, the current contents of the stargazers.json file, including the most recent changes.
The operation of the stargazers$ ReplaySubject is depicted in the diagram below. Colored circles stand for the data emitted each time the stargazers.json file changes. In the code, these versions are the subsequent emissions of the data from the stargazers.json file:

The reason for using ReplaySubject is that the content of the stargazers.json file won’t change frequently. If you use Subject, which doesn’t emit historical data, you would have to load the stargazers.json file after the last subscription to stargazers$ is created.
Run the program using the following command-line instruction:
In the output you should see the contents of the stargazers.json file:
As you make changes, new output will appear in the console window in which you launched the program. Depending on your development environment and settings, you should see one or more instances of the stargazers.json file. The final iteration will reflect the current state of the file.
If you haven’t been following along with the coding and want to catch up to this step using the code from the GitHub repository, execute the following commands in the directory where you’d like to create the project directory:
Performing a repetitive REST API call and emitting output with an Observable
Now that you have a working import process you can implement a mechanism that polls a REST API for information about the current ISS position. Adjust the import statements in the tracker.js file by adding the Subject export to the import statement from the rxjs library and importing fetch from the node-fetch library:
Replace the stargazers$.subscribe(console.log); line in the tracker.js file with the following JavaScript code:
The above code introduces a new Observable called issPosition$ using the Subject implementation. There is no need to emit historical data to the new subscribers, as this Observable will emit frequently. The setInterval function executes the following every second:
- performs a GET request to the http://api.open-notify.org/iss-now.json endpoint
- parses the response into JSON format
- emits a JSON object containing information about ISS position with the
issPosition$Observable - catches possible errors and sends error information to the console
The last line creates a subscription to the issPosition$ Observable and sends the values it emits to the console.
Run the program:
In the console, you should see the current ISS position updated every second:
Stop the program to discontinue ISS position reporting.
The code up to this point is branch step2 in the companion repository.
Checking the ISS position against the stargazers’ positions
Once you have the stargazers$ and issPosition$ Observables in place, you can use them to check if the ISS is passing over each stargazer’s position. Import the map, flatMap, distinctUntilChanged, filter, skip and takeUntil operators from the rxjs/operators by adding the following line at the top of the tracker.js file:
Replace the issPosition$.subscribe(console.log) line at the bottom of the tracker.js file with the following code:
The isNearby function determines if two sets of geographic coordinates (latitude and longitude) provided as parameters are near each other.
The code flow above is depicted in the following diagram:
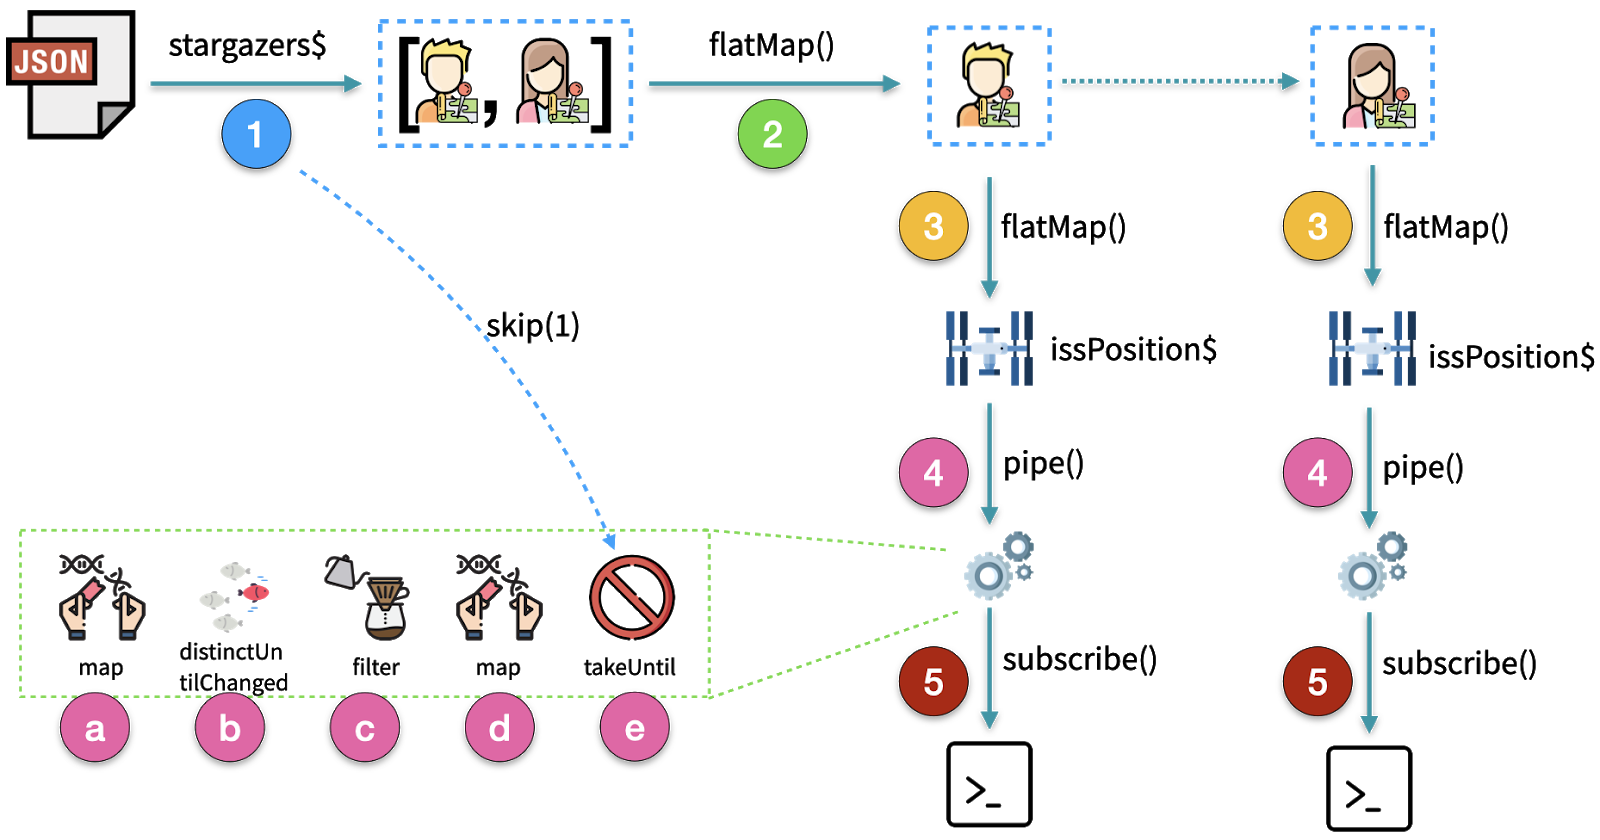
1) The stargazers$ Observable is transformed by a set of operators used within the pipe method. Before transformation, the raw stargazers$ Observable provides a current list of stargazers, emitting new data as the stargazers.json file changes. Here’s a breakdown of the action in each step, with sample output:
Ellipsis (“...”) in the code block indicates a section redacted for brevity.
3) The flatMap(stargazer => issPosition$) transforms stargazer array elements emitted by the Observable into Observables of the current ISS position:
4a) Whenever new data is emitted by the issPosition$ Observable, the Observable created by the flatMap method emits data n=number_of_stargazers times, emitting a boolean value to indicate if the ISS and the stargazer are near each other. That’s done by applying the map(issPosition => isNearby(issPosition.iss_position, stargazer.position)) operator to the issPosition$` Observable so the output looks like:
4b) Duplicate values are dropped by the next operator, distinctUntilChanged(). It transforms the Observable so it emits the data without duplicate results:
4c) Because you only want to notify stargazers when the ISS enters their area, you’ve applied the filter(isNearby => isNearby). Now the Observable emits:
4d) The next transformation, map( _ => 'ISS is approaching ' + stargazer.name), transforms the Observable so it is emitting the name of the stargazer that the ISS is approaching. Now the Observable emits:
4e) The last thing to do is to stop emission of the Observable created in step 4 when a new collection of stargazers is loaded into the program. That is done with the takeUntil(stargazers$.pipe(skip(1))) statement.
5) The console.log function passed as an argument the subscription to the Observable, sends the emitted values to the console.
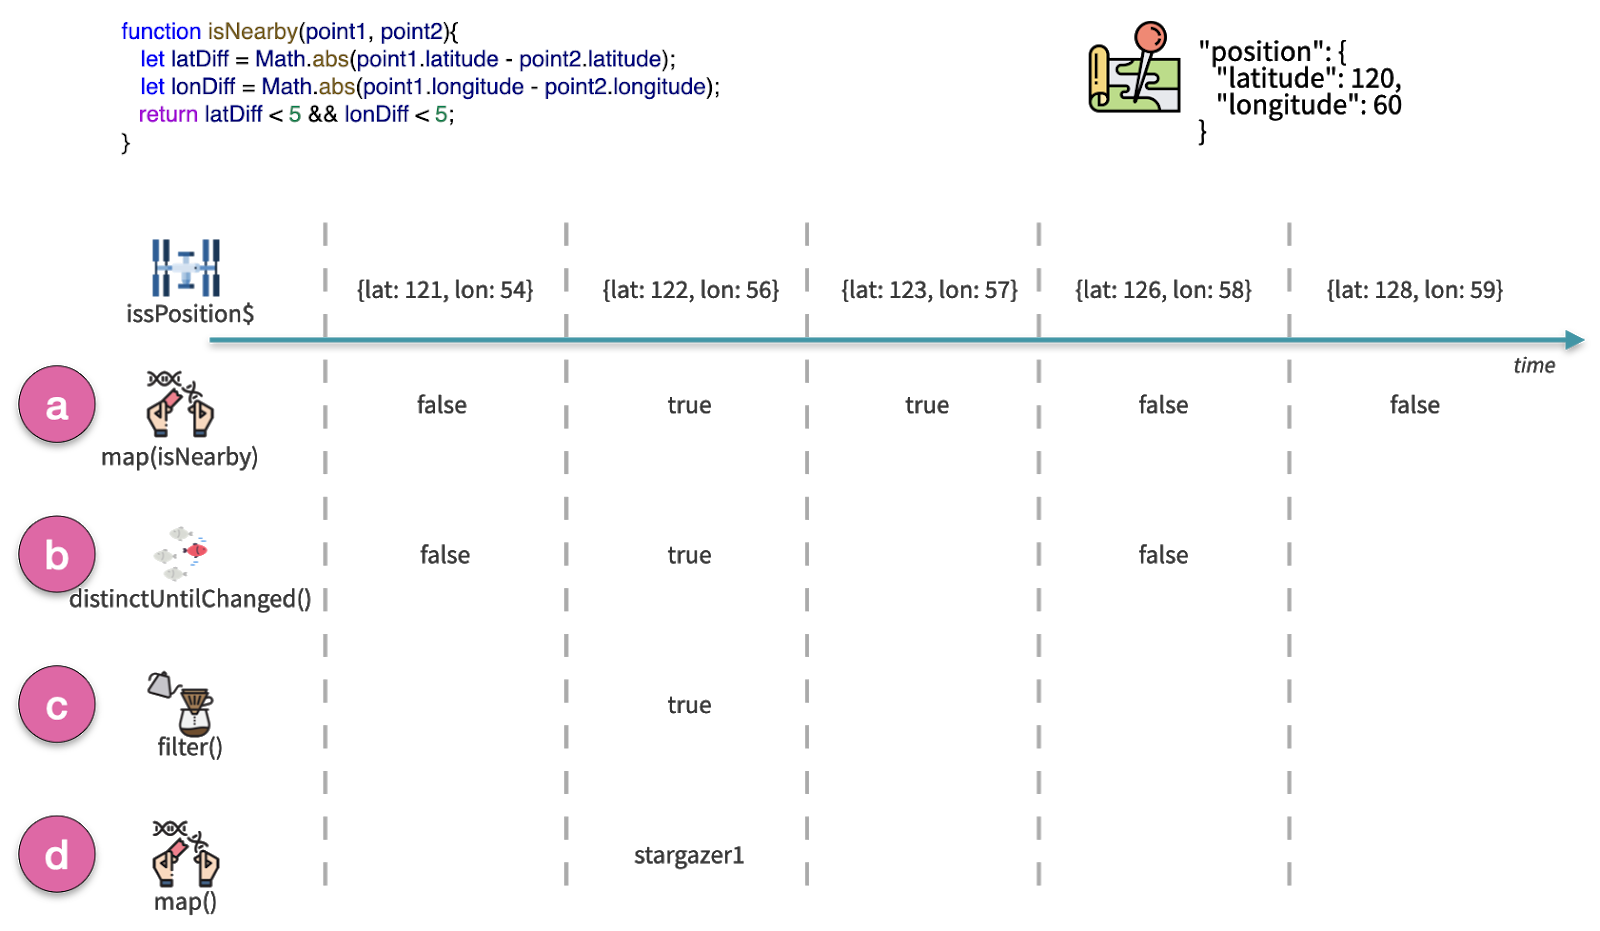
The table below demonstrates the behavior of the sequence of operators applied to the issPosition$ Observable in steps 4a through 4d. Assume that the stargazer is equal to:
Empty cells indicate that no action has been taken by the particular operator:
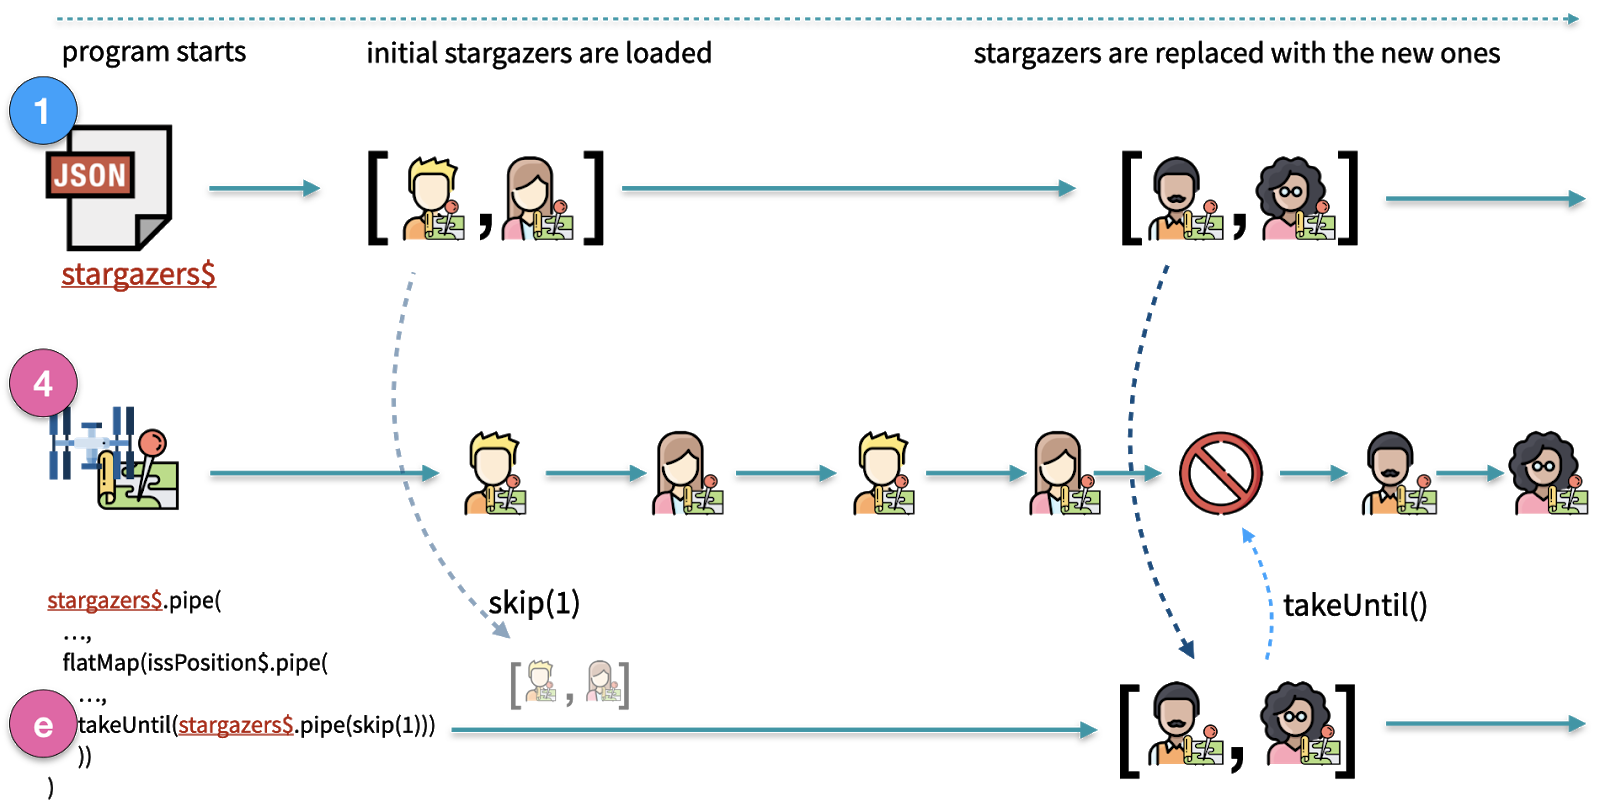
There is one more challenge to address. When the list of stargazers changes the program would still notify outdated stargazers. The Observables created in point 3 need to be notified that they should no longer emit data when stargazers.json changes.
The operation of the takeUntil operator in step 4e, which is used to stop notifying the outdated or deleted stargazers, is tricky. This operator emits values from a source Observable until a notifier Observable emits a value. In the code, the source Observables are the ISS position Observables after the transformations applied in step 4. The notifier Observable is stargazers$.pipe(skip(1)), which emits whenever the stargazers.json file changes, and skips the replay of the initial emission. The skip(1) operator is crucial, because without it the notifier will emit immediately and cause inner Observables to stop emitting, rather than when the change in the stargazers.json occurs: when a new list of stargazers is loaded.
The process for replacing the Observables created in step 3 is depicted in the diagram below:
Run the program and see how it works. Go to http://www.isstracker.com and check the current ISS position. Open the stargazers.json file and modify one of the entries to represent a point that will be reached by the ISS within the next 2 minutes. Once the ISS enters the area of the stargazer you should see the following output in the command line:
Stop the program to discontinue ISS position reporting.
The code up to this point is branch step3 in the companion repository.
Sending notifications with Twilio Programmable SMS
Thus far you’ve built a program that tracks the ISS position and checks to see if it is approaching locations specified in a JSON file. Now you can implement an enhancement to send SMS notifications to the stargazers associated with those coordinates when the ISS is passing nearby.
You can use the Twilio phone number you obtained at the beginning of this tutorial to send the SMS messages by creating an Observable wrapper function for the Twilio Node.js helper library.
For this purpose you are going to reuse code from the Confirming SMS Message Delivery with RxJS Observables, Node.js, and Twilio Programmable SMS post. You can learn more about Observables and creating RxJS wrapper functions in that post.
Create a file named rxjs-twilio.js in the root directory of the project and insert the following code into it:
The rxjs-twilio.js file exports the sendSMS function, which accepts two parameters: receiver phone number and message body. The function returns an Observable representing the current state of the SMS creation request.
The code in the rxjs-twilio.js initializes client, which is an instance of the twilio JavaScript client using the ACCOUNT_SID and AUTH_TOKEN loaded from the corresponding environment variables.
When the sendSMS function is invoked it sends a message creation request to the Twilio SMS API,then it polls the status of the request and emits it with the Observable returned by sendSMS.
The program flow for sendSMS is depicted in the diagram below:

To utilize the wrapper from the rxjs-twilio.js, import it into the tracker.js file by adding the following line at the top of the file:
Find the following line at the bottom of the tracker.js file:
Replace it with a flatMap operator that invokes the sendSMS function imported from the rxjs-twilio.js file:
After these modifications your program should look like this.
Ensure you’ve set up the environment variables TWILIO_ACCOUNT_SID, TWILIO_AUTH_TOKEN, and TWILIO_PHONE_NUMBER and run the program:
Testing the completed application
To see the completed application in action you’ll need to provide it with a telephone number you can use to receive SMS messages. You’ll also need to get out in front of the ISS as it orbits the earth.
With the application running, change the phone number associated with one of the stargazers to the phone number you registered when you created your Twilio trial account and stored as an environment variable.
Then use the ISS Tracker to determine a set of coordinates where the ISS will be in a few minutes. Since the application is checking the whole-number latitude and longitude you don’t need to be precise, which makes this easy: just add 1 or 2 to its current latitude and longitude.
Then update the element in stargazers.json with those values and wait.
Because the app is watching the stargazers.json file for changes it will detect your edits and start comparing the new values to the current ISS position. When the two points are close it will fire off an SMS message. You may have to wait a minute or two, depending on the values you used.

The app will also send the status of the SMS creation request to the console. This information is returned by the Twilio SMS API when the message is created. It looks similar to the following output:
Most SMS messages are delivered quite quickly, so you are likely to only see output once for each request. But if the message is delayed you’ll see multiple updates until the message is delivered. If you try to provide a phone number that can’t accept SMS messages, like a landline, you’ll see status updates until the app hits the timeout limit.
Stop the program to discontinue ISS position reporting.
The code up to this point is in branch step4 of the companion repository.
Potential enhancements
The program you’ve created implements basic functionality. You can improve it in various ways:
- The ISS isn’t visible during daylight or when it is not in sunlight itself, so you could modify the program to send notifications only when the station can be seen.
- You could set up a silent mode to not send alerts during particular time periods, such as during a portion of the night.
- You could also inform users about the direction the ISS is moving, such as from southeast to northwest.
If you have any other ideas, share them by adding a comment to this post.
Summary
In this post you saw how to use RxJS Observables to monitor a file and a REST API for changes and emit new values when that happens. You also saw how to use the ReplaySubject type of Observable and how to combine two observables when a condition is met. Most importantly, you saw how two Observables working together can be synchronized to provide real time notification of events.
Additional Resources
Twilio Programmable SMS – Send and receive text messages globally with the API that over a million developers depend on.
Confirming SMS Message Delivery with RxJS Observables, Node.js, and Twilio Programmable SMS – send and receive text messages with Twilio API using Node.js and RxJS Observables.
ReactiveX introductions and tutorials – The ReactiveX website has an extensive list of resources for learning more about Reactive Programming and the various language implementations. They’re 3rd-party productions, so watch and read at your own discretion.
RxJS – The RxJS website is the place for canonical information about the ReactiveX library for JavaScript.
Which Operator do I use? – A helpful tool for choosing the best Observables operator for a desired action.
TwilioQuest – An exciting interactive game you can use to sharpen your programming skills and defeat the forces of legacy systems!
If you want to learn more about JavaScript Promises, which are a better asynchronous tool for some programming situations, check out the following posts here on the Twilio blog:
- Asynchronous JavaScript: Introduction to JavaScript Promises
- Asynchronous JavaScript: Advanced Promises with Node.js
- Asynchronous JavaScript: Using RxJS Observables with REST APIs in Node.js
Maciej Treder is a Senior Software Development Engineer at Akamai Technologies. He is also an international conference speaker and the author of @ng-toolkit, an open source toolkit for building Angular progressive web apps (PWAs), serverless apps, and Angular Universal apps. Check out the repo to learn more about the toolkit, contribute, and support the project. You can learn more about the author at https://www.maciejtreder.com. You can also contact him at: contact@maciejtreder.com or @maciejtreder on GitHub, Twitter, StackOverflow, and LinkedIn.
Gabriela Rogowska contributed to this post.

Related Resources
Twilio Docs
From APIs to SDKs to sample apps
API reference documentation, SDKs, helper libraries, quickstarts, and tutorials for your language and platform.
Resource Center
The latest ebooks, industry reports, and webinars
Learn from customer engagement experts to improve your own communication.
Ahoy
Twilio's developer community hub
Best practices, code samples, and inspiration to build communications and digital engagement experiences.