Open Sesame: Control a Garage Door with Twilio Studio, Sync and a WiFi Module
Time to read:
December 21, 2017
Written by
This post is part of Twilio’s archive and may contain outdated information. We’re always building something new, so be sure to check out our latest posts for the most up-to-date insights.

Communication between the worlds of humans and machines doesn’t need to be apocalyptically hard or prohibitively expensive. In this project, we are going to build a voice call operated garage door opener with an ESP8266 dev board and a relay. In order to stitch all the parts together, we will use our visual workflow builder Studio and Sync for IoT.
We use Twilio Sync for IoT and Studio in this project, which are currently in Developer Preview. Sign up for the Sync for IoT preview and the Twilio Studio preview before you begin.
Gather the Garage Door Hardware
Our final flow will use an ESP8266 to link your garage door to a communications flow via Sync for IoT. Here’s what you’ll need:
- One Sonoff DEV or Wio Link board.
- One Grove Relay.
- A door actuator unit, which you might have already.
Alternatively, if you are good at soldering you can grab any ESP8266 board and attach a suitably rated relay.
Build the Dispatch Center
To build the garage door opener flow you will need a Twilio account. A trial account will serve you just fine; follow this link to create an account if you haven’t done so already.
Before you continue, make sure you are onboarded with the Sync for IoT preview and the Twilio Studio preview.
Set Up the Communications Flow
As a first step, let’s sketch out our application logic by creating a new flow in Twilio Studio. Navigate to Studio Dashboard and click the “Create New Flow” button. Give it a friendly name, e.g. “Open Sesame”.
The flow starts with the Trigger widget, which is already there. We will attach a number of widgets to dictate the behavior of our voice controlled garage door. Here’s an overview of what we’d like to do:
- Play out a greeting to an incoming caller
- Collect the caller’s inputs (and validate them)
- If the caller is recognized:
- Store a door opening instruction
- Confirm success with another message
- Hang up
When we are done building, our flow should look like something like this:
Let’s start rocking!
Speech Recognition with Twilio
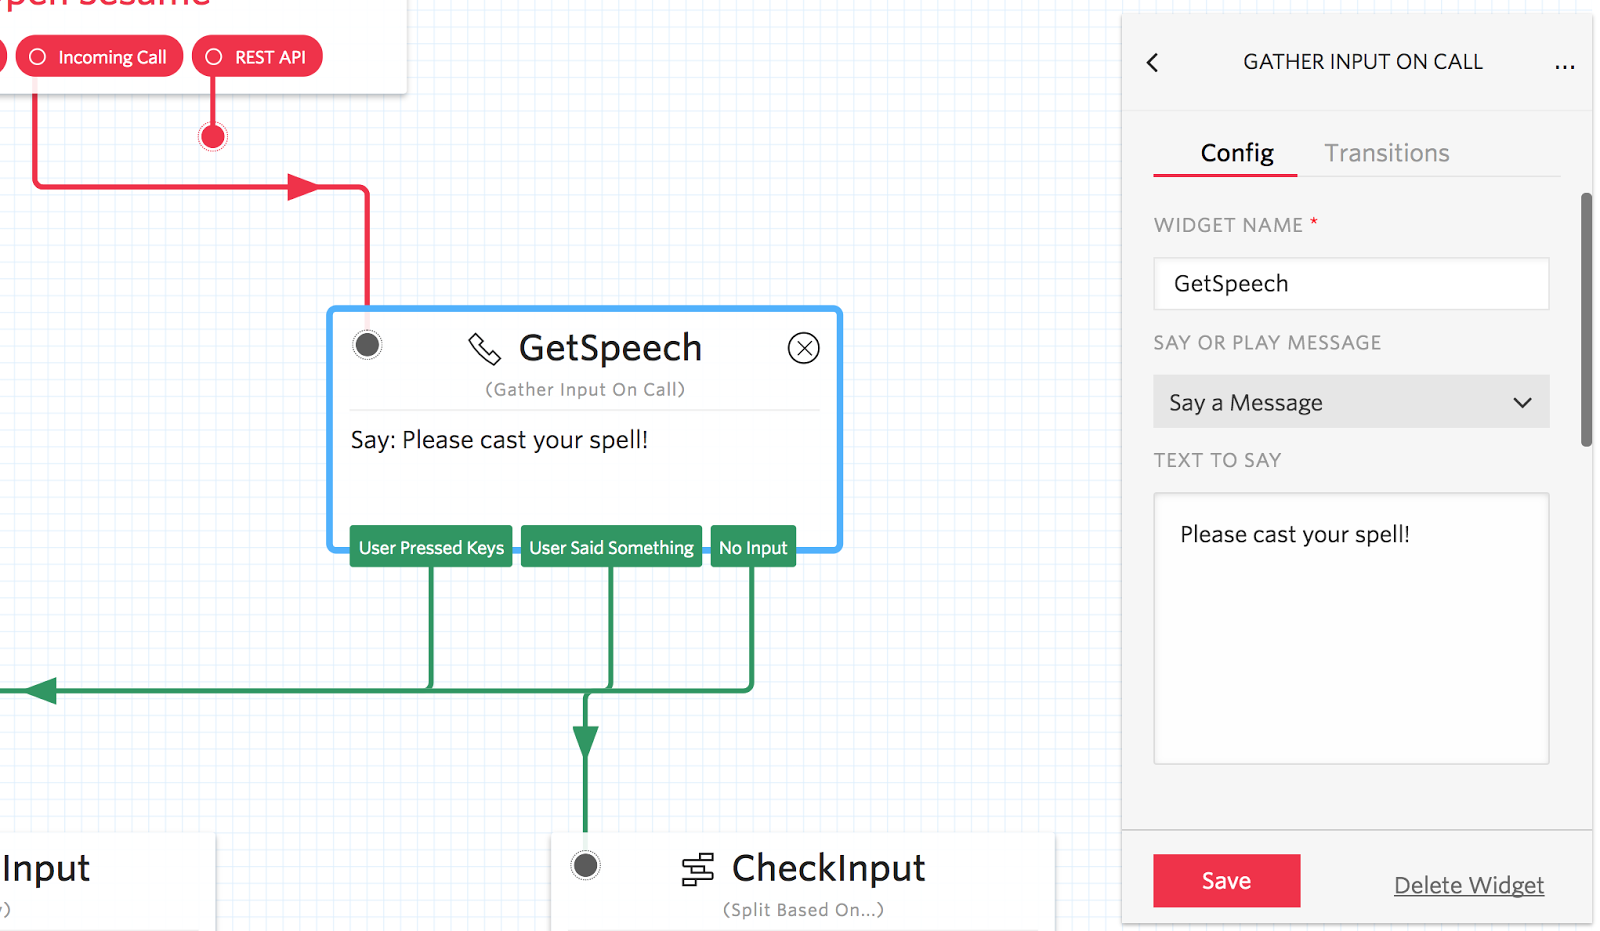
Locate the “Gather Input on Call” block in the widget library and drag it into the flow. Connect it to the “Incoming Call” pin of our Open Sesame widget above so it’s executed whenever someone calls a Twilio voice number.
Let’s call the widget “GetSpeech” and configure it with the following parameters:
- Widget name: type “GetSpeech”.
- Say or play message: select “Say a Message”.
- Text to say: type “Please cast your spell!”.
- Leave the rest as default.
- Click the “Save” button.
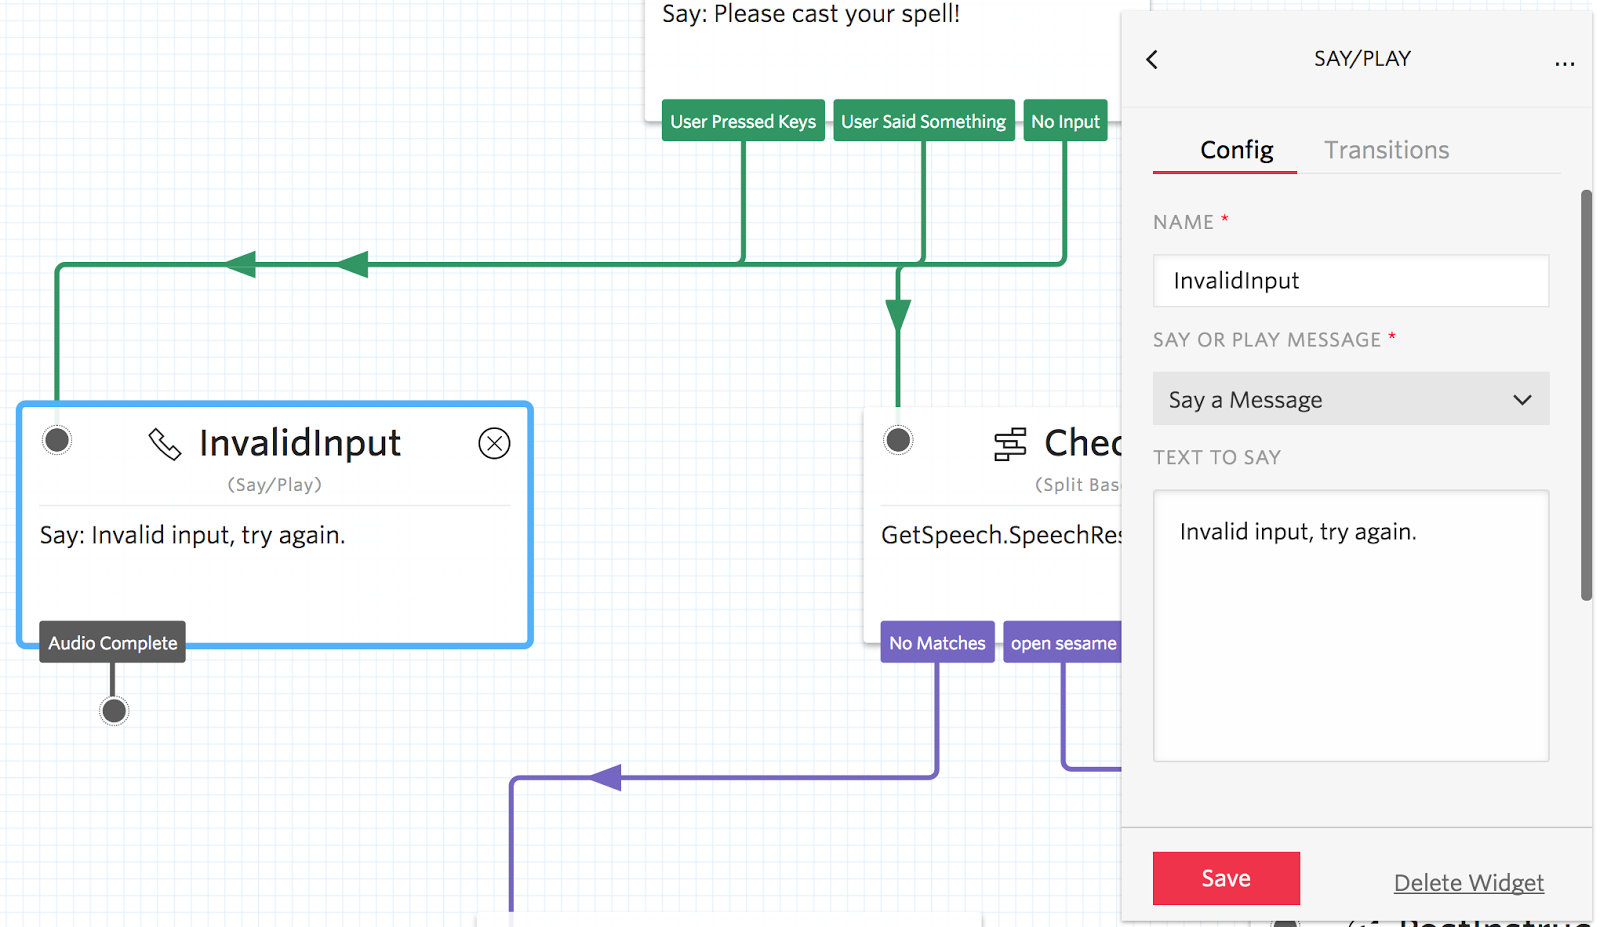
What if a caller calls in and doesn’t say anything reasonable?
Let’s gracefully report an error and hang up. Locate the “Say/Play” block in the widget library and drag it into the flow, connecting it to the “User Pressed Keys” and “No Input” pins of the “GetSpeech” widget we created earlier.
Let’s call it “InvalidInput”, and configure with the following parameters:
- Widget name: type “InvalidInput”.
- Say or play message: select “Say a Message”.
- Text to say: type “Invalid input, try again.”
- Click the “Save” button.
Garage Code Input Validation
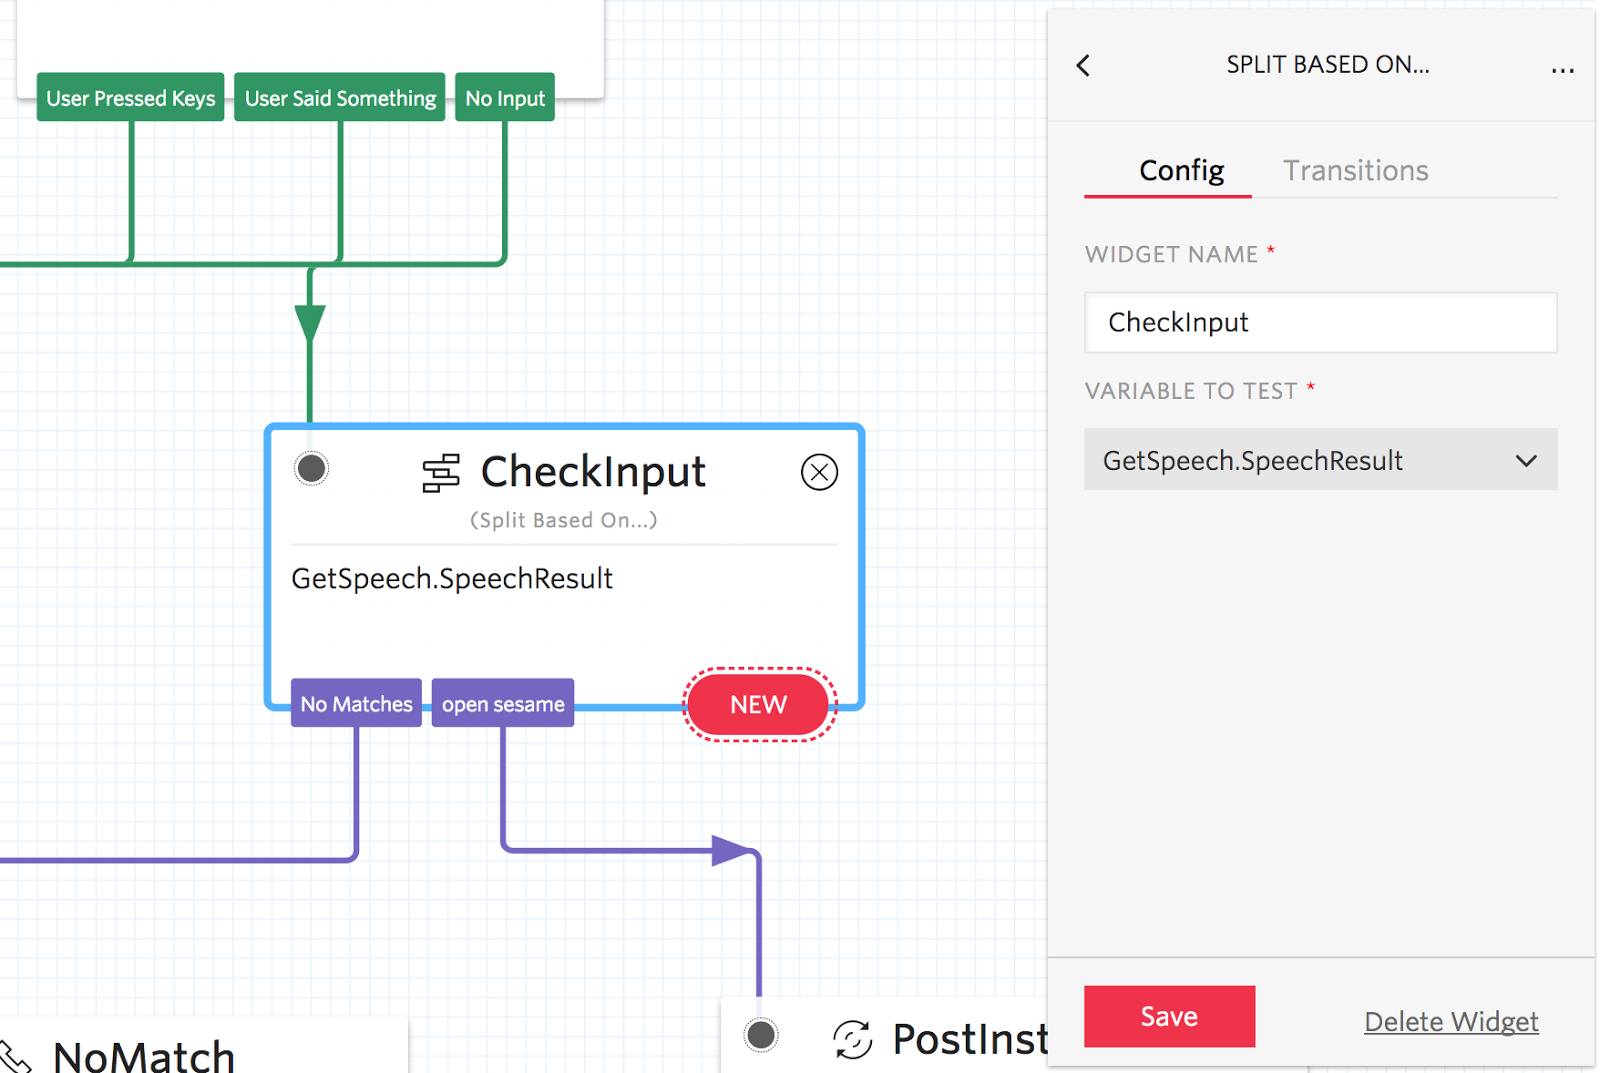
Following the voice input, we would like to validate it for correctness so we don’t let random callers open our garage. For a more robust solution, you might want to switch to a DTMF based PIN code instead, but in this tutorial we’ll do speech-to-text validation for the novelty.
Locate the “Split Based On…” block in the widget library and drag it into the flow. Connect it to the “User Said Something” pin of the “GetSpeech” widget we created earlier.
Let’s call the new widget “CheckInput”, and configure it with the following parameters.
- Widget name: type “CheckInput”.
- Variable to test: select “GetSpeech.SpeechResult”.
- Transitions tab: click “New Transition”, select “Equal To”.
- New transition value field: type “Open sesame”.
- Click the “Save” button.
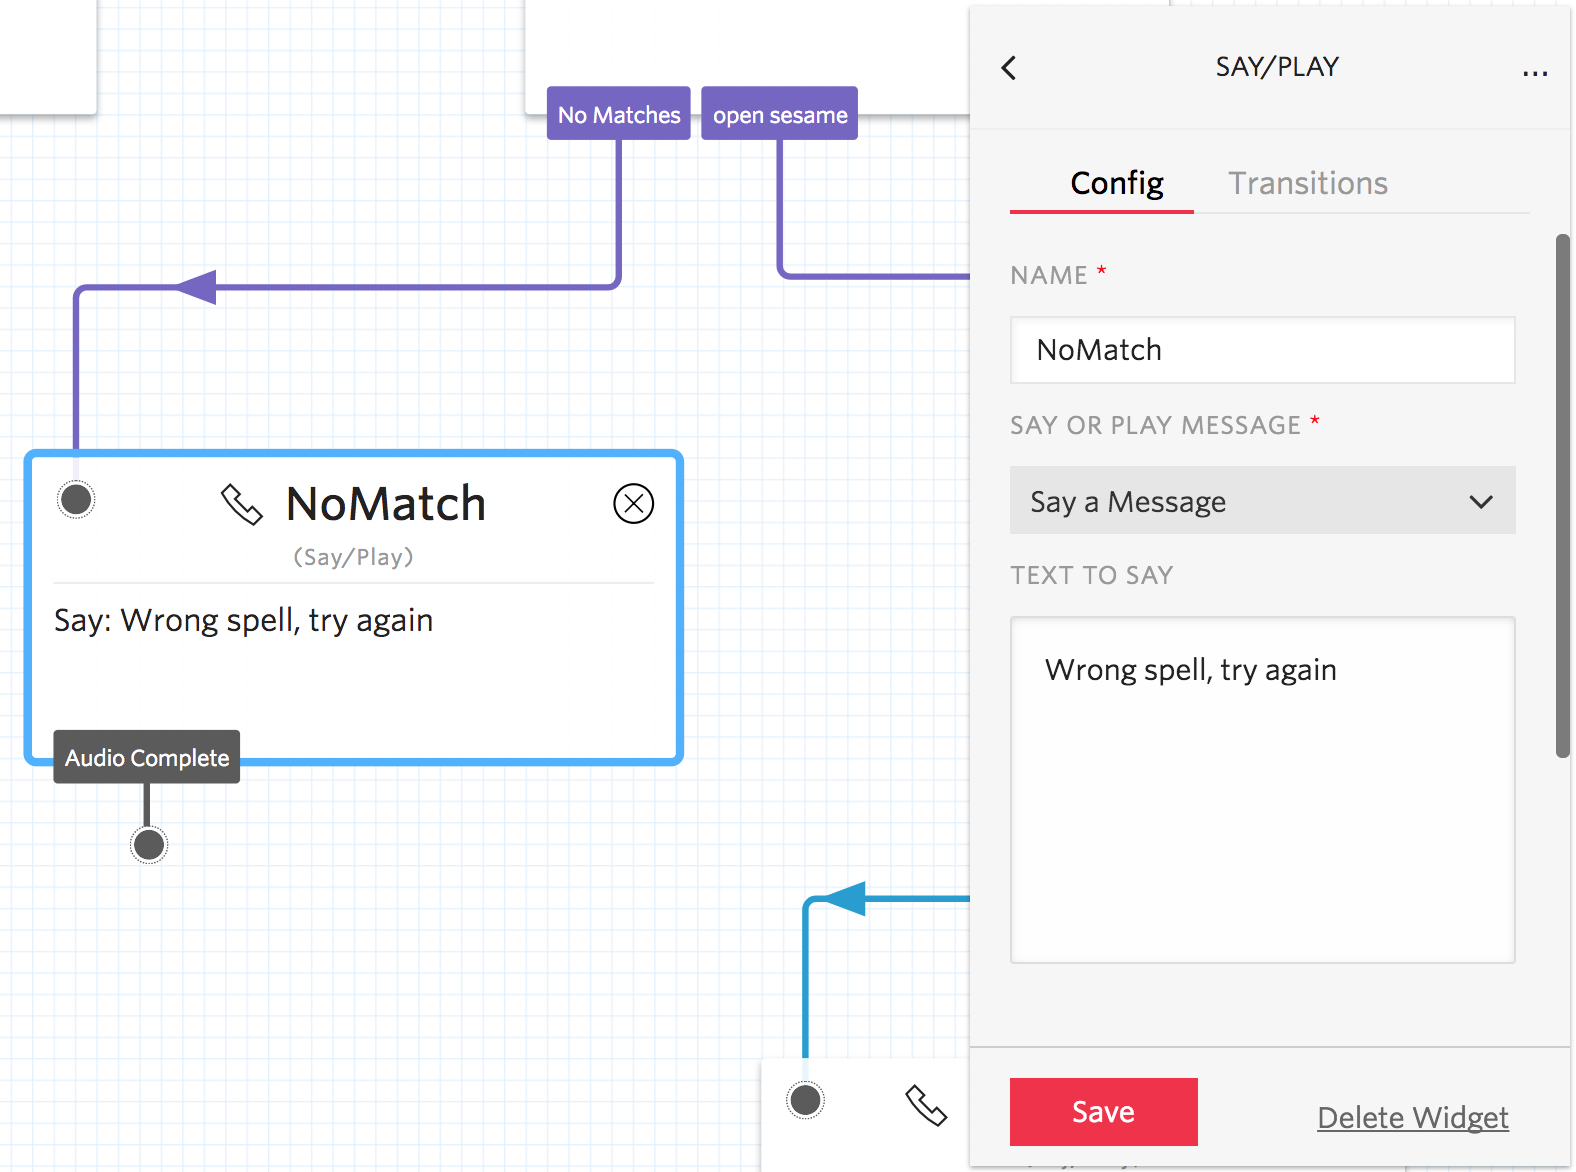
In case the caller forgot how to cast the right spell, let’s fail gracefully and play out a relevant voice message. Locate the “Say/Play” block in the widget library and drag it into the flow, connecting to the “No Matches” pin of the “CheckInput” widget we created earlier.
Let’s call the widget “NoMatch”, and configure with the following parameters:
- Widget name: type “NoMatch”.
- Say or play message: select “Say a Message”.
- Text to say: type “Wrong spell, try again.”
- Click the “Save” button.
Deliver Instructions to the Garage Door
At this point, we’d like to dispatch an opening instruction to our garage door actuator. Locate the “Update Sync Object” block in the widget library and drag it into the flow.
Let’s call this widget “PostInstruction” and configure it with the following parameters.
- Widget name: type “PostInstruction”.
- Sync service SID: leave as “default”.
- Object type: select “List”.
- Object SID or unique name: type “OpenSesame”.
- Value: copy & paste the following JSON string
- Click “Save” button.
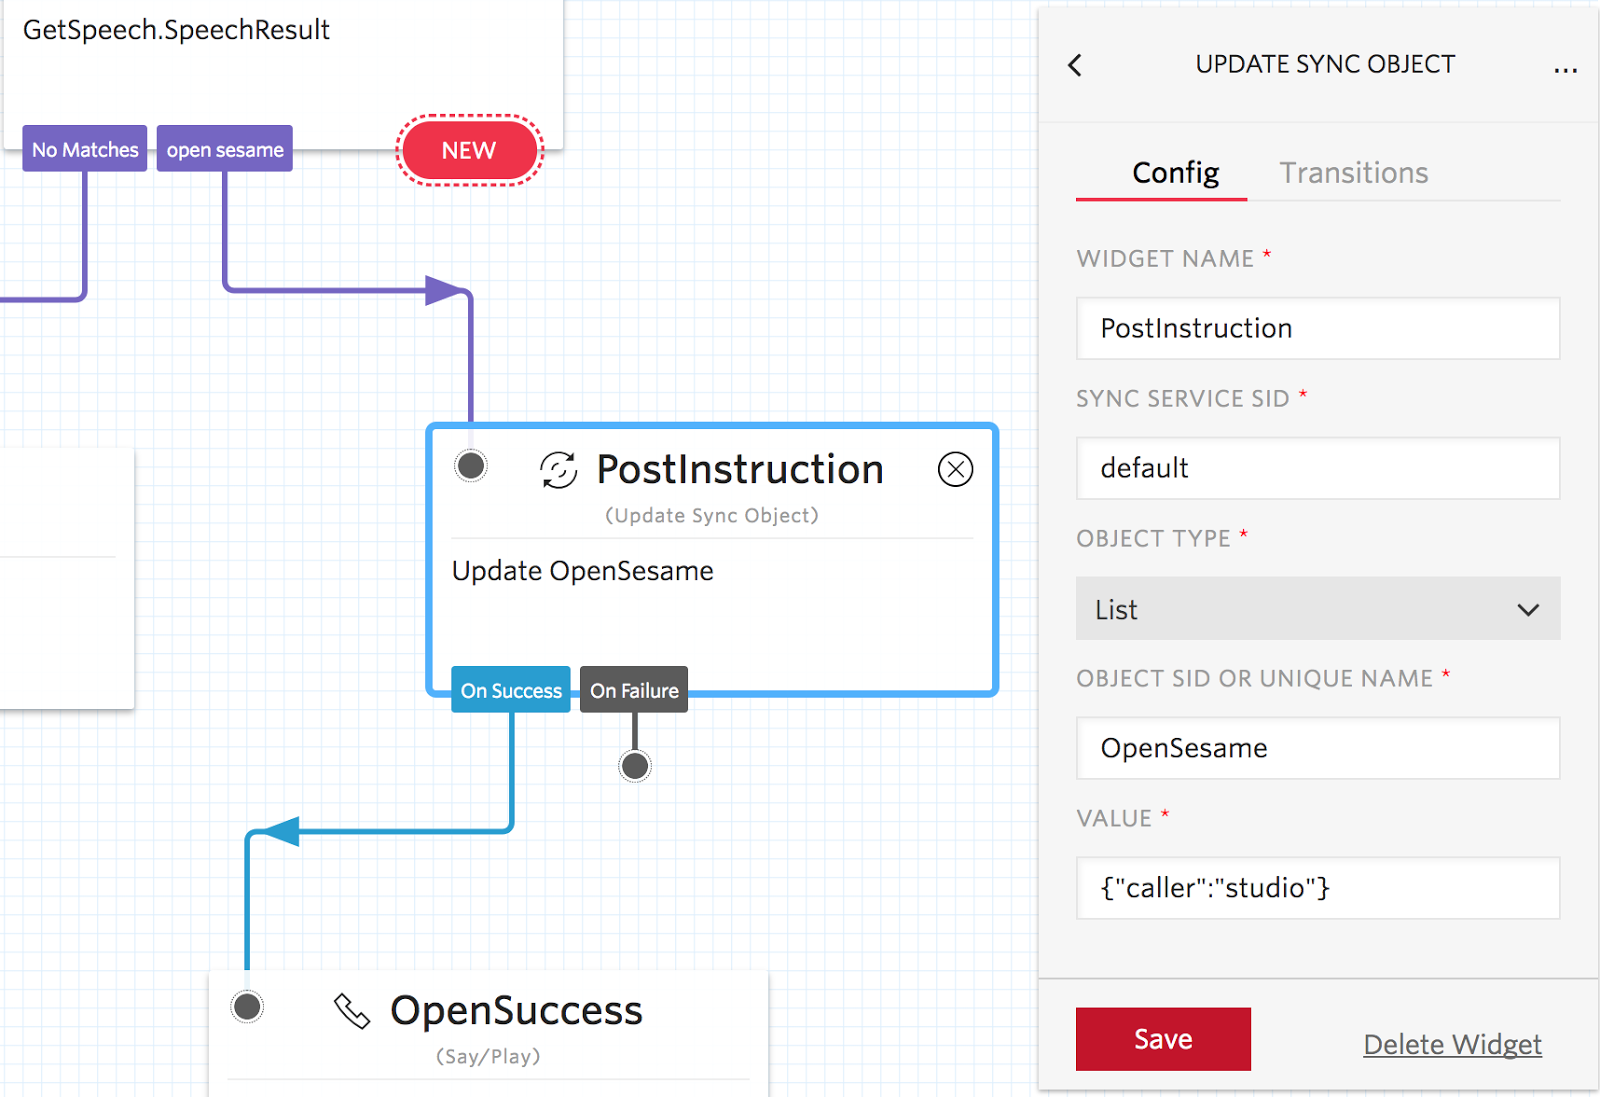
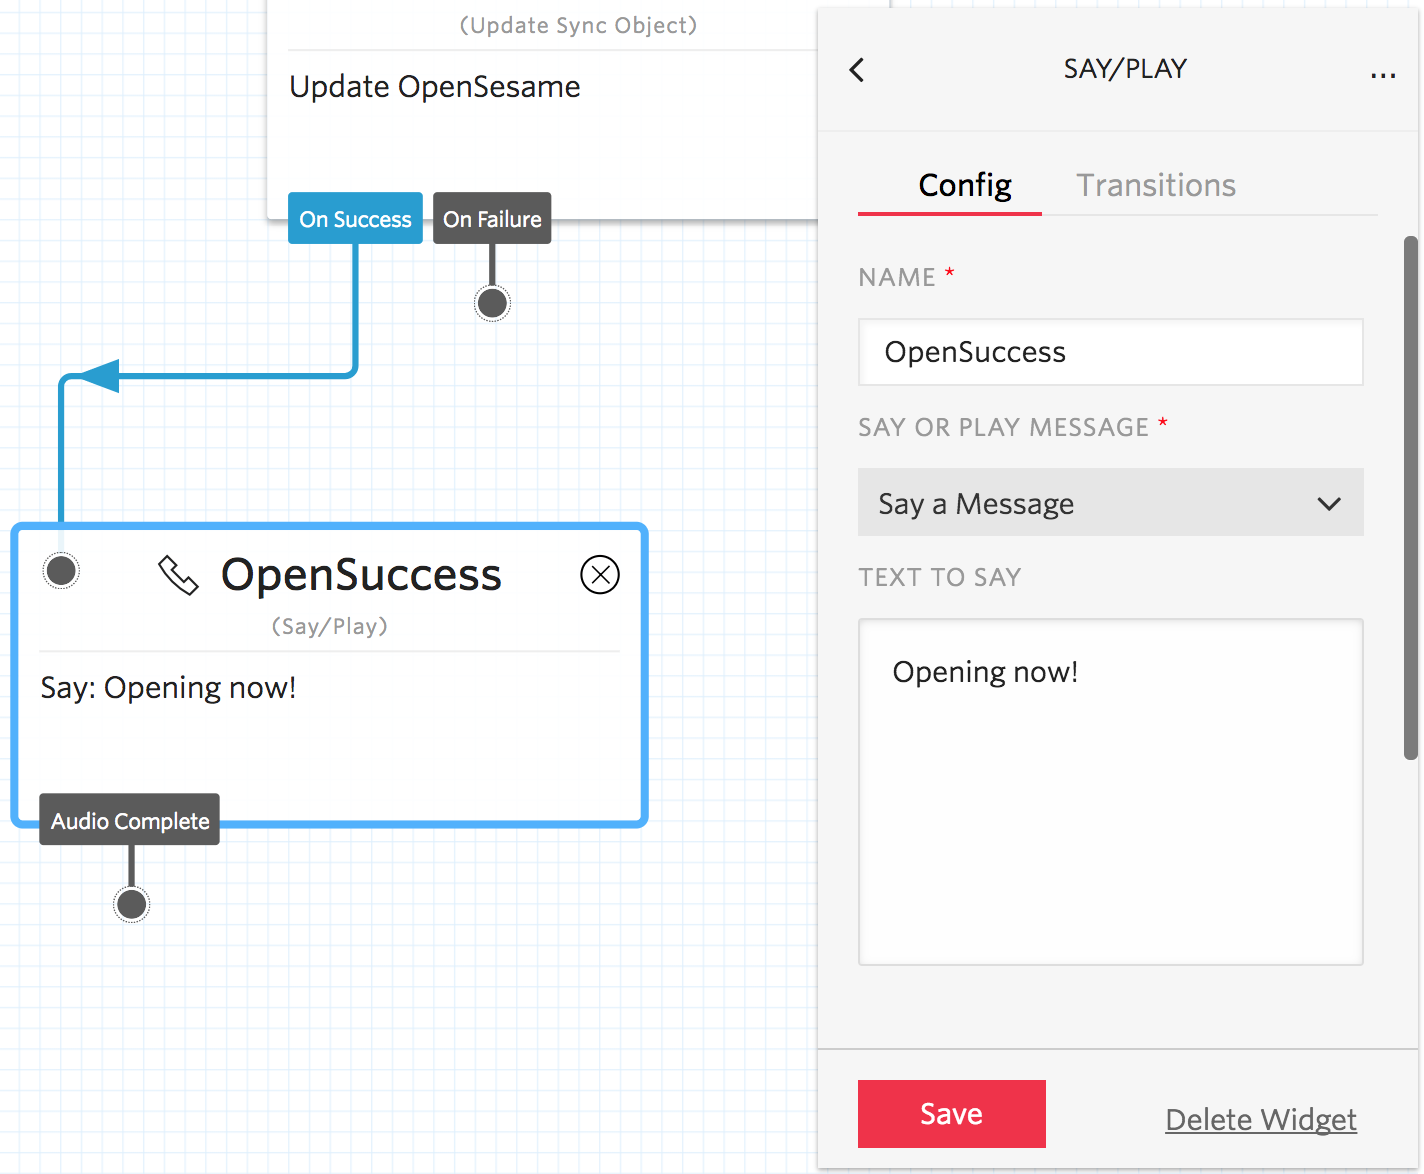
Finally, we are going to say some nice words back to the caller. Locate the “Say/Play” block in the widget library and drag it into the flow, connecting to the “On Success” pin of the “OpenSesame” widget we created earlier.
Let’s call the widget “OpenSuccess”, and configure it with the following parameters:
- Widget name: type “OpenSuccess”.
- Say or play message: select “Say a Message”.
- Text to say: type “Opening now!”.
- Click “Save” button.
Link a Phone Number to Your Garage Door
In order to get our garage door opener flow running, we need to hook it up to a voice phone number and react to an incoming call. Let’s start by purchasing a new phone number in the Phone Numbers dashboard.
- Click the “Buy a Number” button.
- Select your country from the list.
- Check “Voice” from capabilities filter.
- Click “Search” and pick the number you like best by clicking “Buy”.
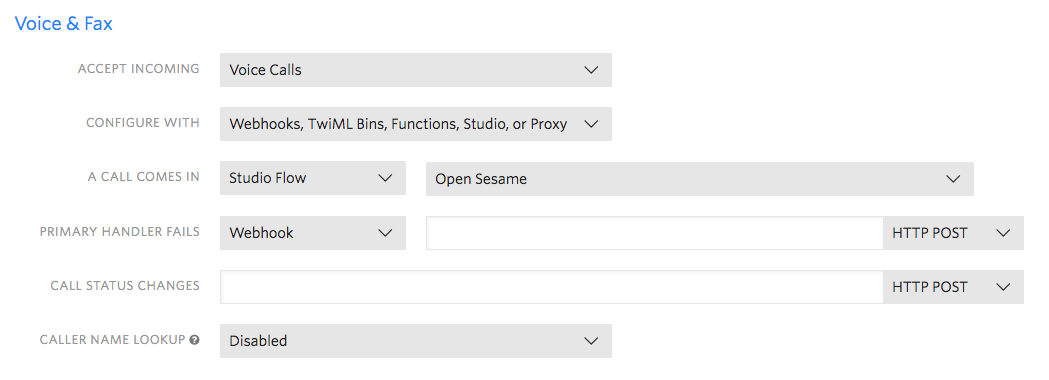
After you get the new number purchased, click the “Setup number” button to configure incoming call behavior.
- Under the “Voice & Fax” section, locate the “A call comes in” field, and switch it to “Studio Flow”.
- Select “Open Sesame” from the flow list.
- Click “Save” button.
Test the Door Flow
At this point we could already trigger the workflow to see how it works.
1. First, create a new Sync List object called “OpenSesame” that the workflow will populate. To do so, navigate to API Explorer (Create a Sync List) and supply the following parameters:
- Service SID: type “default”
- Unique name: type “OpenSesame”
- Click “Make Request”
Alternatively, if you prefer using the command line, use the following cURL snippet to create the List.
2. Using your phone, call the Twilio number you purchased above and talk to Alice, our senior garage door opener assistant.
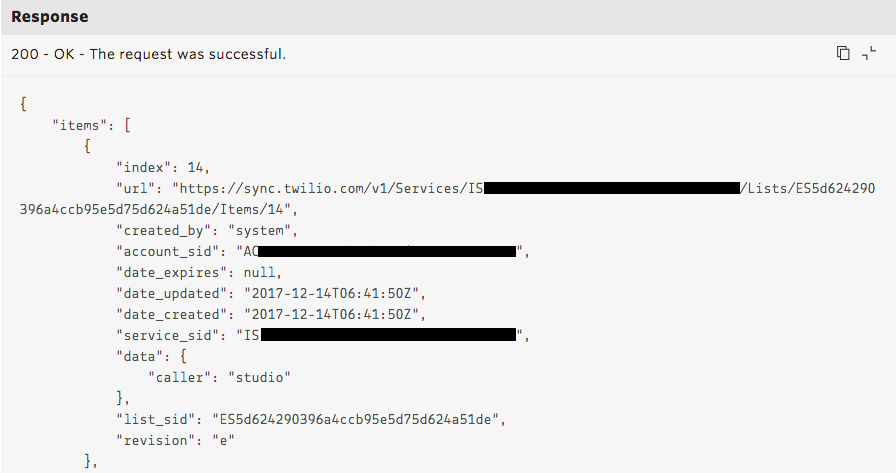
3. Finally, check the Sync List for newly added items with opening instructions. To do so, navigate to API Explorer (View Sync List Items List) and supply the following parameters:
- Service SID: type “default”
- List SID: type “OpenSesame”
- Click “Make Request”
In the “Response” panel you should see at least one item in the array, assuming your discussion with Alice was positive.
Alternatively, if you prefer using command line, use the following cURL snippet to query the List items.
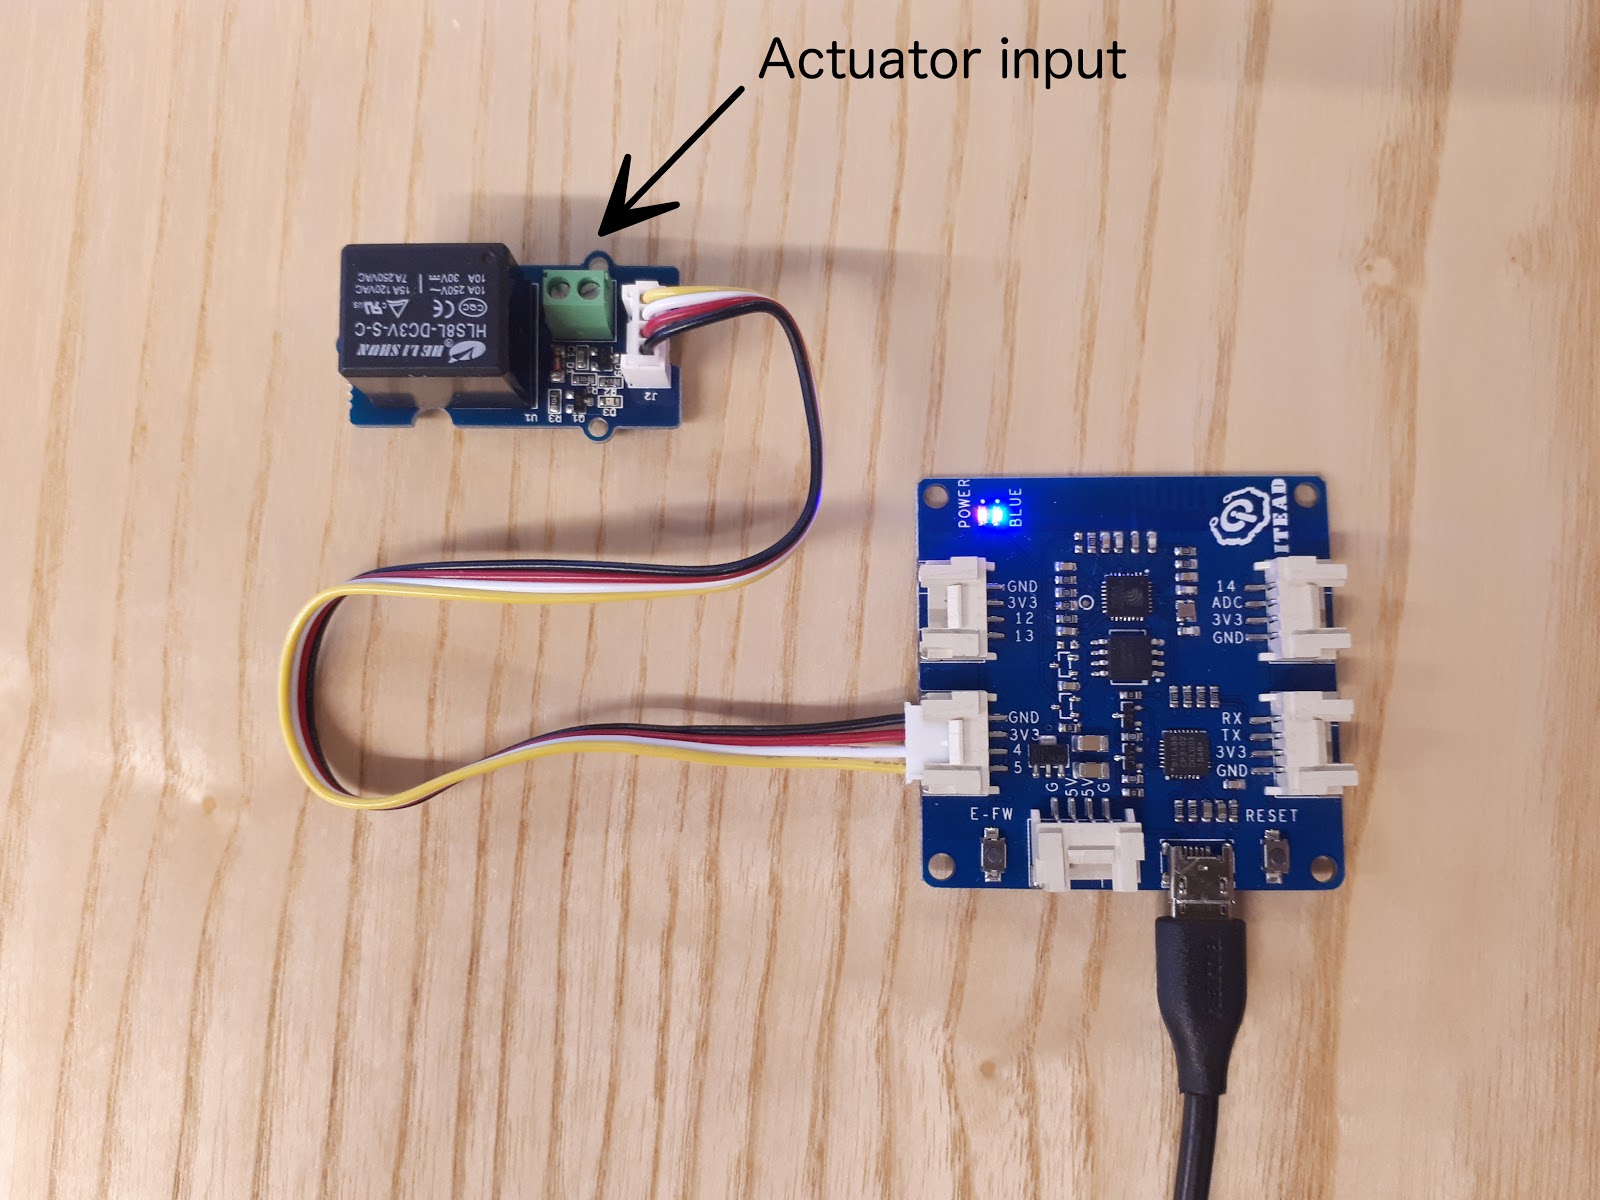
Build the Door Actuator
Let’s now move over to the hardware part of our little project. To keep things clean, simple and low-cost, we used the Grove prototyping system, and an IoT development board powered by the popular Wi-Fi enabled ESP8266 SoC. With this setup (assuming you already have a garage door opener installed) you should be out-of-pocket around $10.
Assemble the Hardware
We are going to assume that your garage door opener supports a hard-wired “button” input, which most commercial and industrial garage opener units do. If your unit does not, you’ll have to find an alternative and safe way to trigger the unit.
- Follow basic electrical safety rules, and power down the actuator first. Consult your door opener installation manual and ensure it has a normally open button/switch input. Double check that the input voltage and current ratings are compatible with your relay before you wire anything.
- Connect the Grove relay board to the Sonoff DEV top-left port (J5) or Wio Link bottom-right port (J8). Both of them should have a GPIO4 and GPIO5 pin label for the connector.
- Wire up the normally-open input of the door actuator to Grove relay board terminals.
Register the Device with Twilio
Up until this point, we didn’t know how to identify and trust this new device. Let’s fix that by creating its unique identity and an authentication key.
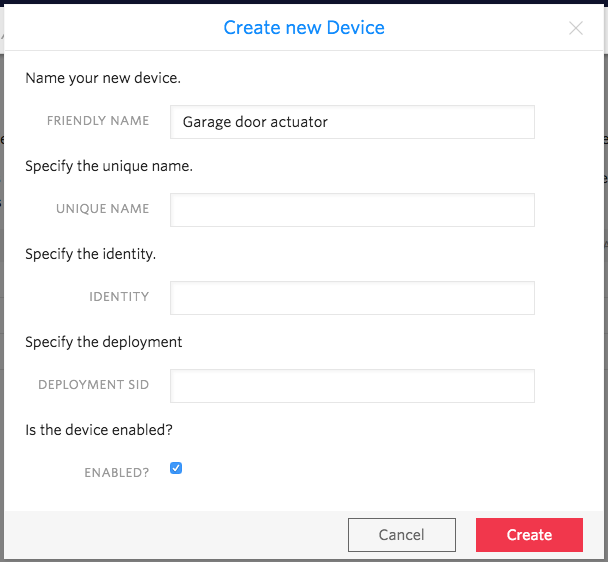
Navigate to Sync for IoT console and click on “Visit the Device Manager”. We have an empty fleet automatically provisioned for you, called “Default Fleet”.
- Under the default fleet, click the “Create a Device” button.
- Provide a friendly name (e.g. “Garage door actuator”) and make sure “Enabled” is checked.
- Click “Create” to finish.
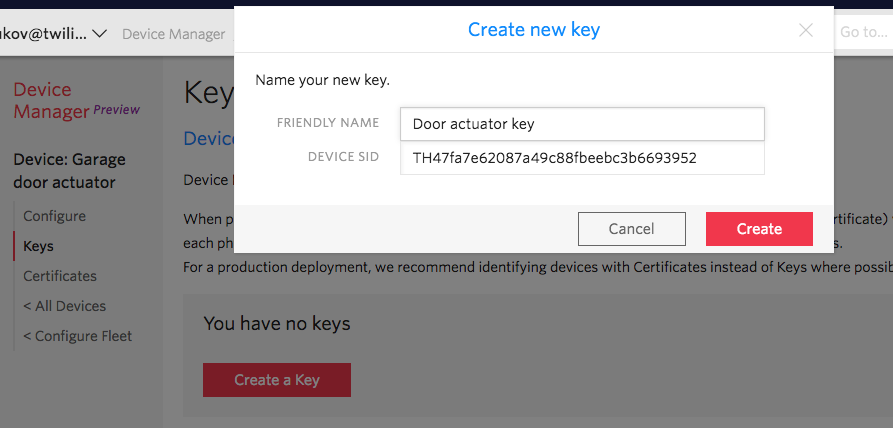
Now that we have a device identity, let’s add a device access key so it can authenticate with the back-end flow.
- Under the “Garage door actuator” menu, pick the “Keys” section and click “Create a Key”.
- Call it anything (e.g. “Door actuator key”) in the friendly name field.
- Leave the device SID unchanged.
- Click “Create”.
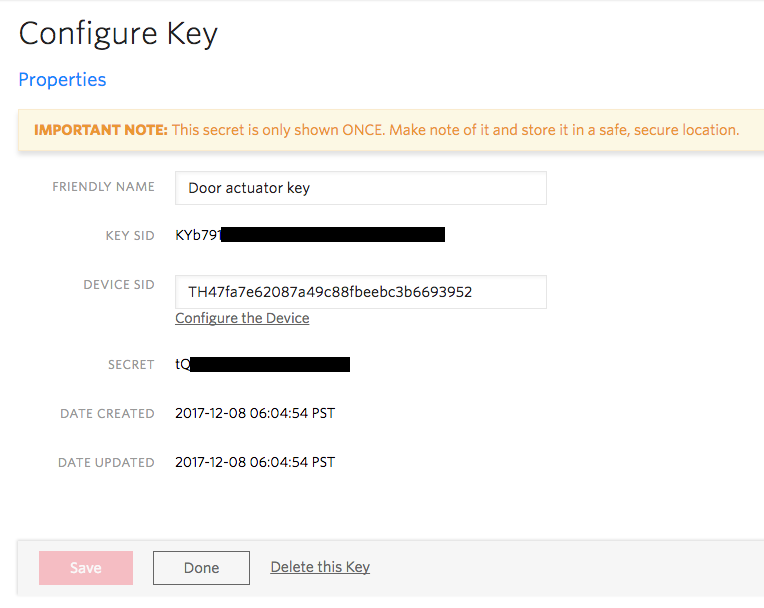
Keep the contents of “Key SID” and “Secret” fields around, we’ll need those in a moment.
Flash the ESP8266 Firmware
Finally, let’s prepare the firmware that goes into ESP8266 microcontroller and gets the garage door opener online. We are going to use the following open-source components to build it:
- Arduino core for ESP8266 (by Arduino team, GitHub)
- PubSubClient MQTT client (by Nick O’Leary, GitHub)
- ArduinoJson (by Benoit Blanchon, GitHub)
Most importantly, clone the garage door opener project code from our GitHub repository. Then:
- Open it in Arduino Desktop IDE (follow these instructions if you don’t have it installed.)
- Install the ESP8266 board support package using the Arduino IDE Tools -> Boards Manager menu entry and following these instructions.
- Install the PubSubClient and ArduinoJson libraries using the Sketch -> Include Library -> Library Manager and following these instructions.
Next, you will need to make some changes to the C Arduino sketch in order to get it working with your network and device setup.
Start by configuring your WiFi network/key. Replace YOUR_WIFI_SSID and YOUR_WIFI_PASSWORD values in the Arduino code to match your network setup.
Then, copy & paste your device key SID and secret from the “Registering the Device” step above, replacing the YOUR_DEVICE_KEY and YOUR_DEVICE_SECRET values in the source code.
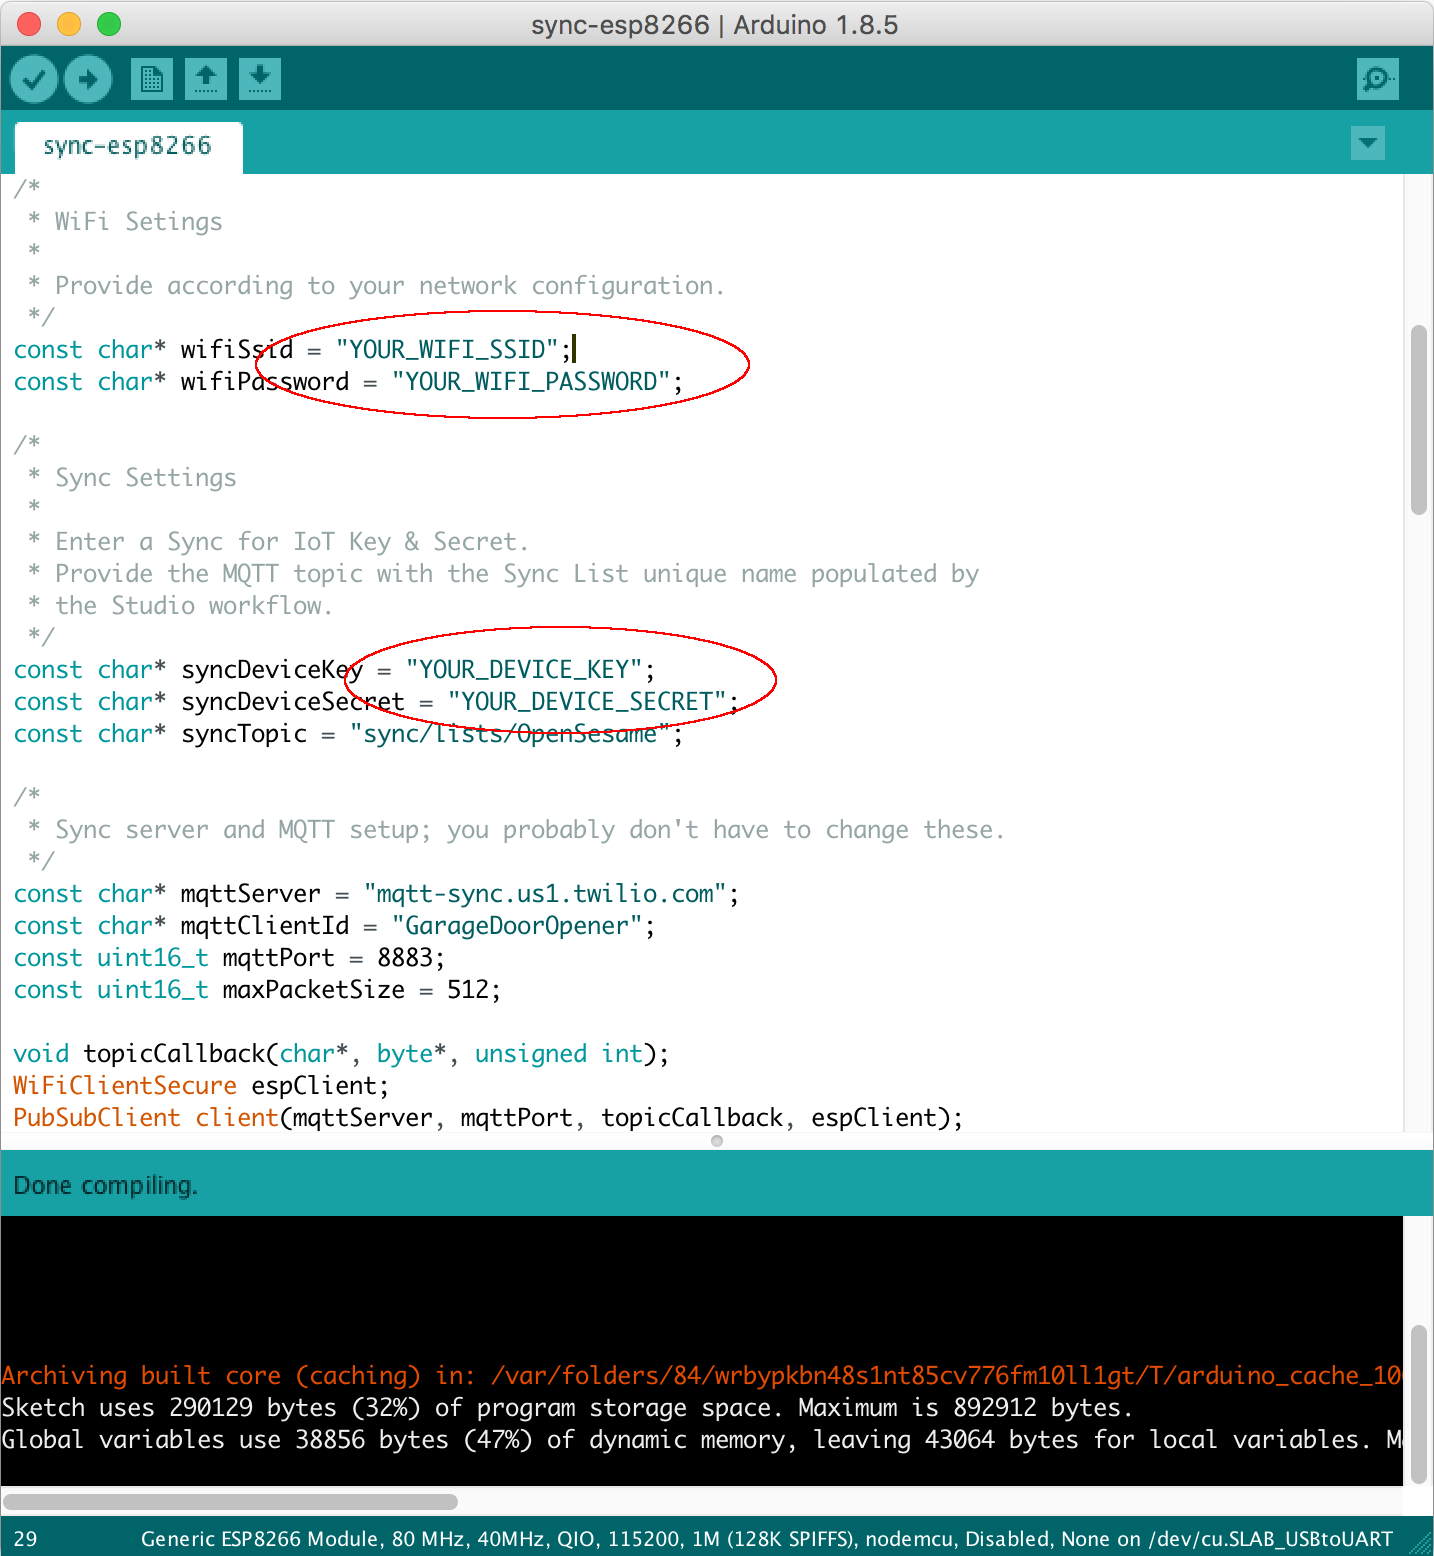
Finally, select the right board in the Arduino IDE and compile the sketch. For the boards mentioned above, the following settings will work:
- Board: Generic ESP8266 Module
- Flash mode: QIO
- Flash size: 1M (128K SPIFFS)
- Reset method: nodemcu
- Port: pick the newly added USB serial port (OS specific)
Connect your ESP8266 board via USB and upload the resulting binary.
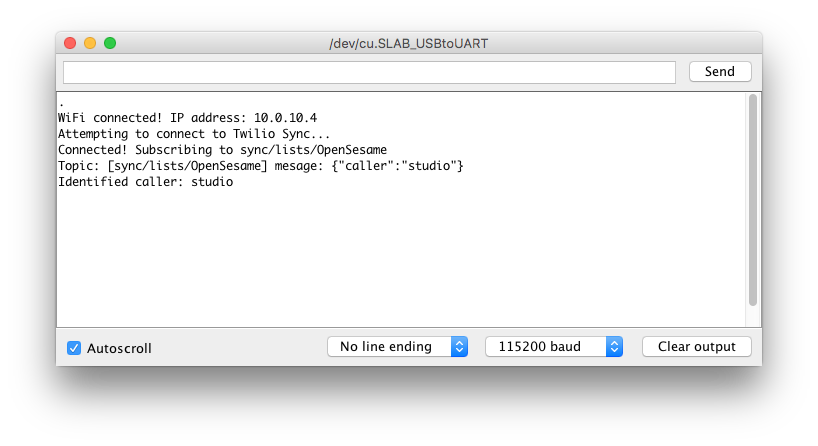
We should now be set for the final test:
- Open the Arduino serial monitor (Tools -> Serial Monitor)
- Reset the board
- Observe the serial output
Assuming everything went well, you should receive the following log of messages and hear the relay “click” when the Studio workflow executes:
Connect Humans to Machines with Twilio
What we have achieved here closes the gap between Contact Center use-cases and IoT Machine-to-Machine use-cases, with Twilio Sync bridging between the two. Flows initiated by humans are propagated through systems in real-time and trigger machines performing mission critical tasks.
After making the above basics happen, you can further grow this ESP8266 garage door project and apply Twilio services and tools to support more scenarios.
- Add PIN authorization via DTMF and make the voice responder more secure.
- Make the contact center multi-tenant and personalized, extending the workflow to invoke more logic using Twilio Functions.
- Extend the fleet of connected devices, adding more door actuators, locks, and other remotely controlled smart-building objects.
- Provide continuous feedback from connected sensors and build a real-time dashboard, rendering a live view of all your doors, elevators, and whatever else you need.
We can’t wait to see what you build next!
Andrei Birjukov is a technical lead at Twilio, living and working in Tallinn, Estonia. A long time gearhead and system software enthusiast, Andrei was formerly an engineer and development lead at Skype and Microsoft. You can reach him via email at andrei@twilio.com.


Related Resources
Twilio Docs
From APIs to SDKs to sample apps
API reference documentation, SDKs, helper libraries, quickstarts, and tutorials for your language and platform.
Resource Center
The latest ebooks, industry reports, and webinars
Learn from customer engagement experts to improve your own communication.
Ahoy
Twilio's developer community hub
Best practices, code samples, and inspiration to build communications and digital engagement experiences.