Secure Media Messaging Attachments with Protected Twilio Functions
Time to read:
December 06, 2021
Written by
Reviewed by

Multimedia messaging is getting more and more traction in the modern world. It is not enough to send and receive texts; people want to share pictures, videos, voice recordings, documents, and much more.
Twilio already provides a number of channels that support sending media such as MMS, WhatsApp, and Facebook Messenger. The only caveat? The URL of the media file you want to send has to be a publicly accessible URL on the web. With rising privacy and security awareness, that's not always an option – even if you're only sending a cinema ticket, you still don't want it to be stolen by somebody who has the URL.
Does that mean that you can't send multimedia messages to your customers? Absolutely not! In this blog post, I will show you how you can protect your media attachments while still being able to use them in multimedia messaging using protected serverless Twilio Functions.
Tutorial prerequisites
Before we can get started building, you need to make sure you have accounts with Twilio and AWS. For the purpose of this tutorial, I will be using a private AWS S3 bucket as the media attachments source. You will need:
- A Free Twilio Account. If you sign up through this link, you'll receive an extra $10 if you upgrade.
- An AWS Account. You can sign up here for a free tier AWS account.
- A private S3 bucket. You will store your media attachments there. Here you'll find instructions on how to create a private S3 bucket (refer to Block Public Access option).
- A media file in the S3 bucket. You will use this file as a media attachment. Here are instructions on how to upload a file to S3. If you are looking for a sample file, feel free to use: https://demo.twilio.com/owl.png
- An AWS credentials for programmatic access (aka key and secret). You will need these credentials to access S3 bucket, so please make sure to create credentials that have access to S3 bucket you created earlier. See here for details.
Once you've got all this done, note the following details – you will need them later:
- Twilio Account SID: You can find your account SID and auth token in the admin console.
- Twilio Auth Token: You can find your account SID and auth token in the admin console.
- AWS S3 Bucket name: For this tutorial, I named my S3 bucket 'mms-private-media'
- Media file key: I have uploaded a png file under the key 'owl.png'
- AWS credentials key: Looks like 'AKIAIOSFODNN7EXAMPLE'
- AWS credentials secret: Looks like 'wJalrXUtnFEMI/K7MDENG/bPxRfiCYEXAMPLEKEY'
- AWS region: The AWS region where you created your bucket.
And with that, you're ready to start.
How the protected Twilio Functions URL works
As I briefly mentioned, we will be leveraging Twilio Functions visibility levels, namely Protected level. Available visibility levels and how each work is described in detail here.
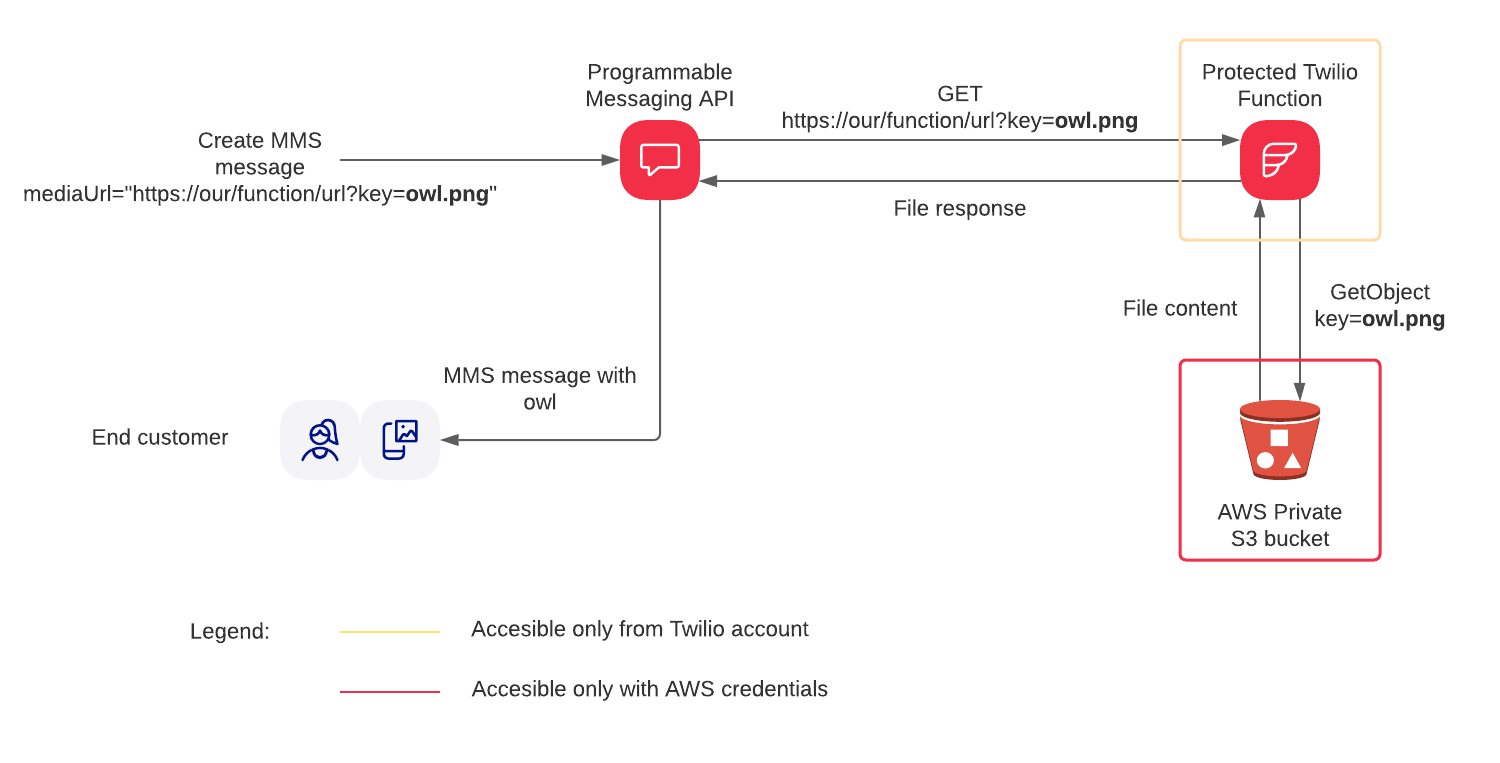
In short, Protected level makes assets or functions available to requests made from the Twilio platform and only from your Twilio account. Thus, while a URL or asset can be accessed by the Twilio platform to be used as a media attachment, it remains unavailable to the rest of the world. If anybody else tried to access the URL of your protected asset in their browser, they would get an Unauthorized error.
At the end of this tutorial, we will have a protected Twilio Function that:
- takes one single parameter - S3 file key
- programmatically accesses private S3 bucket using AWS credentials
- gets the file by key and returns it in response
We will be able to send an MMS message with a mediaUrl parameter set to the URL of our protected function, and pass the media file key as a parameter. This way, we will have used a private resource as a media attachment without making it publicly available via URL.
Here is a diagram of the solution we will be building:
Developer Environment Setup
Let's make sure you have the software you need:
I will use Typescript for this tutorial, but it should work just as well with JavaScript.
Now we can start coding!
Create project
We will start by creating a project using the Twilio Serverless Toolkit. For this run, issue the following command in your shell:
A couple of notes here:
- in the command, I used 'mms-private-media' as my project name, feel free to use a different name
- adding the '--typescript' parameter will create a project ready for Typescript. You can omit this parameter if you prefer JavaScript
With this step completed, you have a project that you can run in your local environment or deploy directly to Twilio Functions.
Configure environment
First things first, in order to run the code, we'll need environment variables to be in place. Go to .env in the root folder of the project and update the file to have following keys and values. Make sure to replace placeholders with the values you collected in previous steps.
Create function
Now it is time to create the file you will be working in. Navigate to src/functions, and create a file named get-media.protected.ts.
We will start with the following snippet as it contains a bare minimum code to complete a function:
We know what parameters our function will take and what environment variables it will use. Reflected in the code this will look like:
The next step is to get a file from your S3 bucket.
First, we create an S3 client using the region environment variable (line 25). Next, we make a get object request using the bucket name from the environment variable and the key from the request parameter (line 26).
You might be wondering: why do we not use the AWS access key and secret while creating S3 client? The AWS client automatically uses environment variables as one of the ways for credentials provisioning, so there's no need to worry about it.
Now we have the response from S3 at hand, but before we can return it we have to convert it to a Buffer object. A helper function streamToBuffer does the job.
We also need Content Length to build the response later – we can get it directly from S3's response.
Now we have all the data in the proper format to be able to construct a Twilio Response object and pass it to the callback function.
Note that we use a hardcoded value for the Content-Type header equals to image/png this is mostly to keep the code short and simple. In production, you should get this information from the file storage response and set it dynamically.
With this our function is completed!
Deploy function
The next step is to deploy our code to Twilio Functions. To do this, execute the following command in the root of your project:
Once deployment is complete, you will see the URL of your newly created function. It will look like the following:
Copy the URL – we are ready to send a first MMS with the protected media provided by the function!
Since you have the setup in place to send a media message go to the console and execute the command in the next code box.
Pay attention to the MediaUrl parameter, you use your Twilio function base URL from above, and augment it with key parameter with the file name available in your S3 bucket. For example, if I want to send a file named owl.png the URL would look like: https://mms-private-media-0000-dev.twil.io/get-media?key=owl.png
Conclusion
With the help of Twilio Functions and a couple dozen lines of code, we could make our multimedia messaging secure while maintaining the flexibility of using the media file we want. We used S3 as the source of media files, but the same approach could work with virtually any data storage that supports programmatic access with a couple of tweaks.
The full code of the project is available on GitHub at https://github.com/kuschanton/mms-private-media.
Like what you built? See some of our other Functions and serverless tutorials on the blog.
Anton Kushch is a Senior Solutions Engineer at Twilio. He is helping companies in Emerging Markets in EMEA build powerful customer engagement solutions powered by Twilio. He can be reached at akushch [at] twilio.com, or you can collaborate with him on GitHub at https://github.com/kuschanton.

Related Resources
Twilio Docs
From APIs to SDKs to sample apps
API reference documentation, SDKs, helper libraries, quickstarts, and tutorials for your language and platform.
Resource Center
The latest ebooks, industry reports, and webinars
Learn from customer engagement experts to improve your own communication.
Ahoy
Twilio's developer community hub
Best practices, code samples, and inspiration to build communications and digital engagement experiences.