Send Bulk SMS With Go and Twilio

November 29, 2022
Written by
Oluyemi Olususi
Contributor
Opinions expressed by Twilio contributors are their own
Reviewed by

Send Bulk SMS  With Go and Twilio

Sometimes, nothing beats a good old SMS. The delivery of an SMS is not reliant on the recipient having any form of connection to the internet. This makes it highly reliable when delivering critical notifications. In certain instances, such as Amber alerts, for example, these notifications need to be sent in bulk to a wide audience.

You might be wondering how difficult it would be to implement such a system. Well, with Twilio it’s actually a breeze. In this post, I will show you how to build a bulk SMS-sending application using Golang, powered by Twilio's Messaging Services.

Prerequisites

To follow this tutorial, you will need the following:

Set up the project

The first thing you need to do is to create a project directory and change in to it. To do that, run the following commands.

mkdir twilio_bulk_sms
cd twilio_bulk_sms

Next, create a new Go module by running the following command

go mod init twilio_bulk_sms

Then, add the project's two dependencies:

  1. GoDotEnv: This will help with managing environment variables.
  2. Twilio Go Helper Library: This simplifies interacting with the Twilio API.

To install them, run the command below.

go get github.com/joho/godotenv github.com/twilio/twilio-go

Next, create a new file named .env to store the environment variables that the application requires. In the new file, paste the following code.

TWILIO_MESSAGING_SERVICE_SID="<<TWILIO_MESSAGING_SERVICE_SID>>"
TWILIO_ACCOUNT_SID="<<TWILIO_ACCOUNT_SID>>"
TWILIO_AUTH_TOKEN="<<TWILIO_AUTH_TOKEN>>"

After that, create a local version of the .env file using the following command.

cp .env .env.local

Note: .env.**.local files are ignored by Git as an accepted best practice for storing credentials outside of code to keep them safe.

Make your Twilio credentials available to the application

The Account Info panel in the Twilio Console

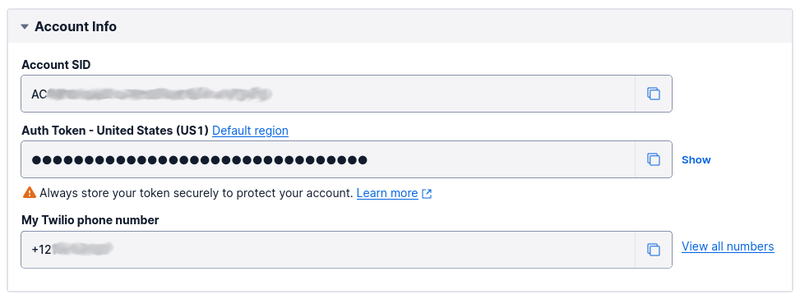
The next thing you need to do is to retrieve your Twilio Auth Token and Account SID. To do that:

  • Login to the Twilio Console
  • Copy the details from the "Account Info" panel
  • In .env.local, replace <<TWILIO_ACCOUNT_SID>> and <<TWILIO_AUTH_TOKEN>> respectively, with the copied details

Create a Messaging Service

The next thing to do is to create a new Messaging Service and retrieve its SID. To do that, in the Twilio Console, under Explore Products > Messaging > Services click Create Messaging Service.

Create a Messaging Service - Step 1

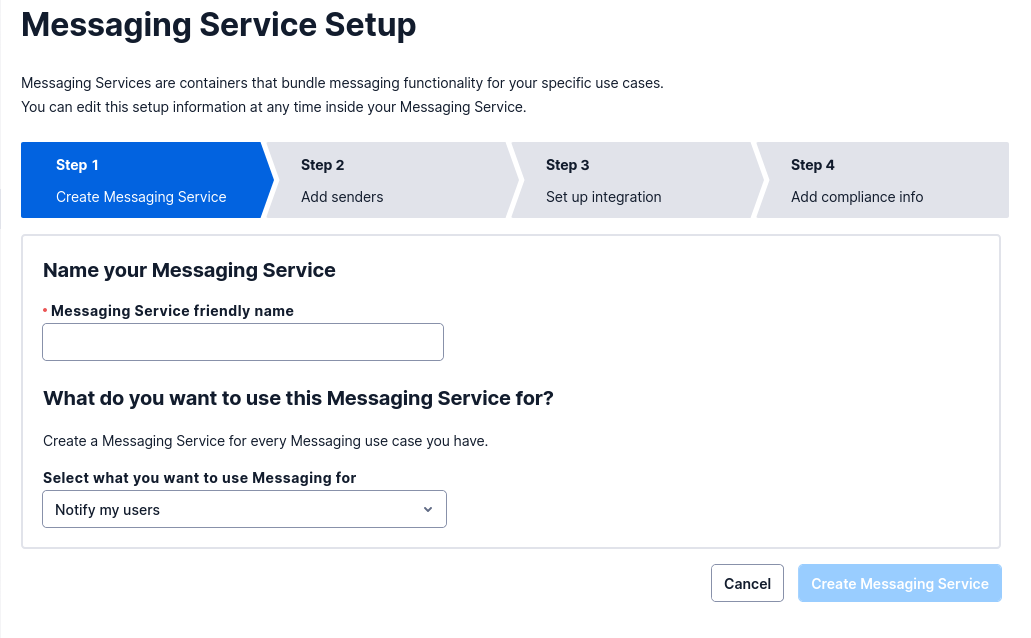
In Step 1, enter a name for the service in the "Messaging Service friendly name" field, then click "Create Messaging Service".

Create a Messaging Service - Step 2

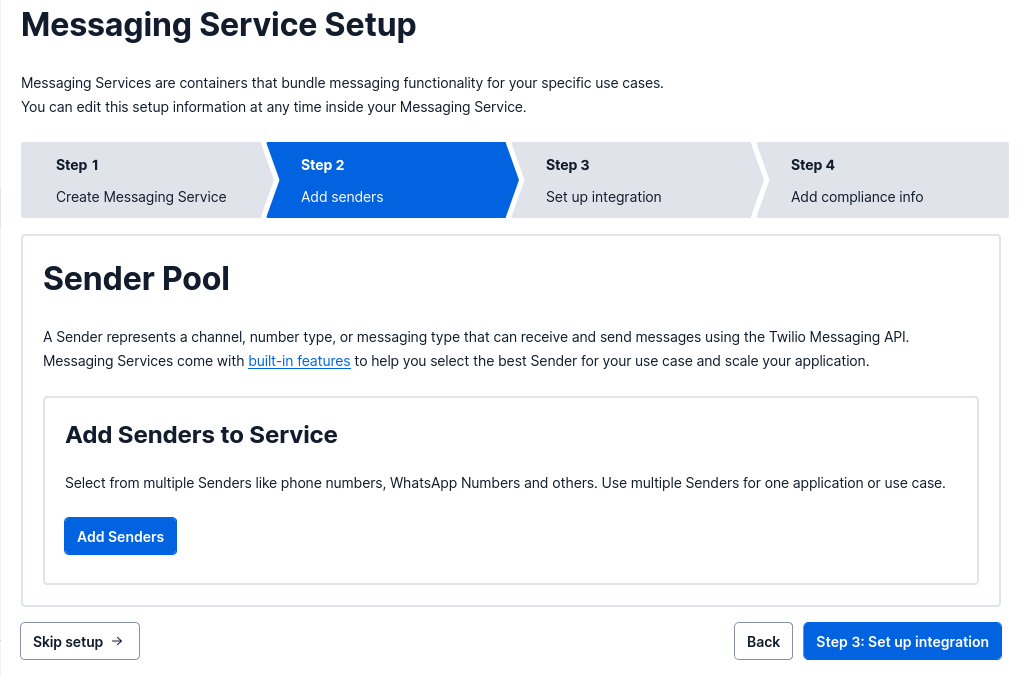
Then, in Step 2, click Add Senders to start adding senders to the service.

Create a Messaging Service - Step 3

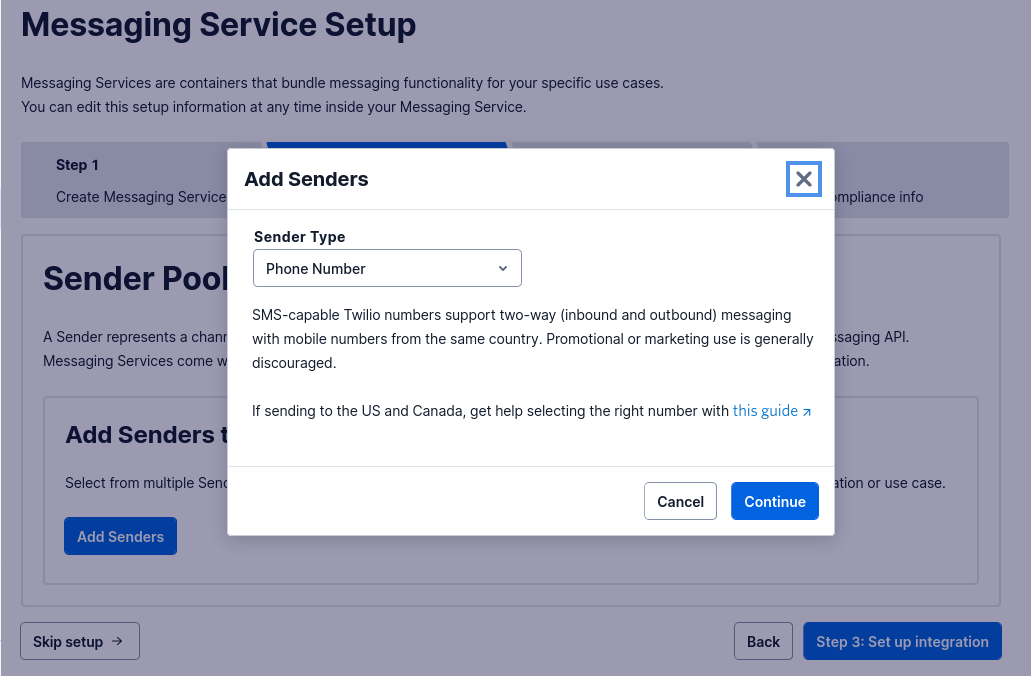
There are multiple sender types that you can choose from, but for the purposes of this tutorial, leave the Sender Type dropdown set to "Phone Number" and click Continue.

Create a Messaging Service - Step 4

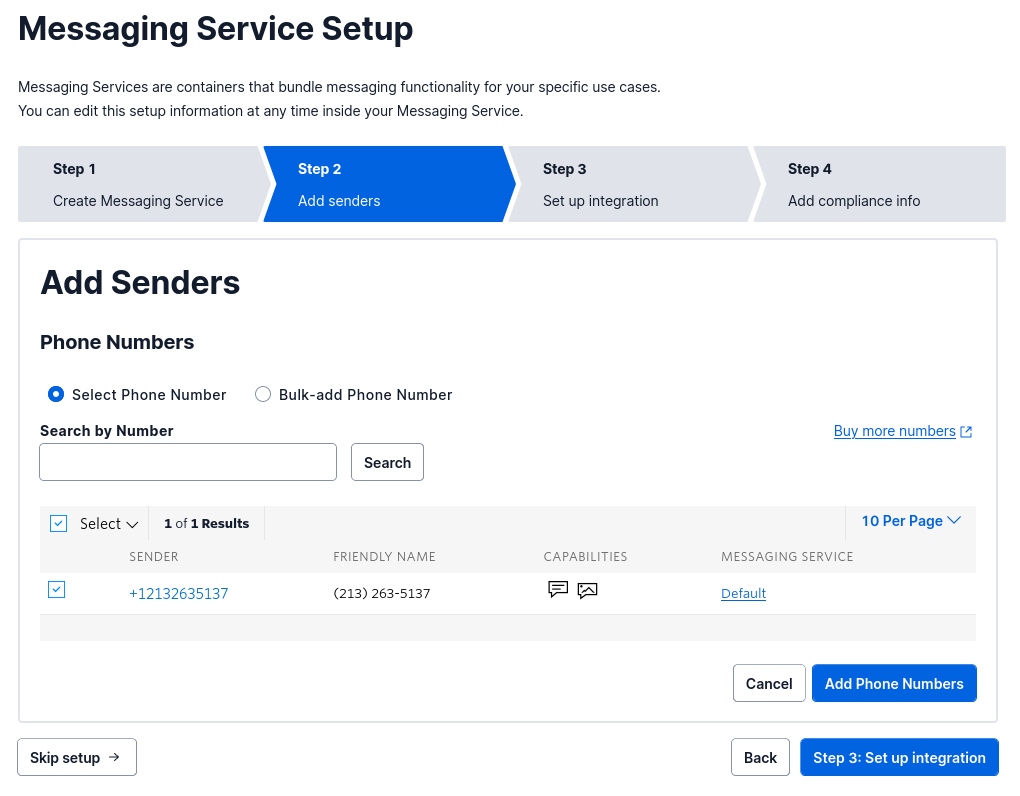
Next, check a Sender from the list that has SMS capabilities and click Step 3: Set up integration. SMS-capable phone numbers are indicated by the left of the two icons in the Capabilities column in the screenshot above.

In Step 4, leave the options as they are and click Step 4: Add compliance info. Finally, in Step 5, again, leave the options as they are, click Complete Messaging Service Setup, and click View my new Messaging Service in the modal dialogue that appears.

Messaging Service Properties

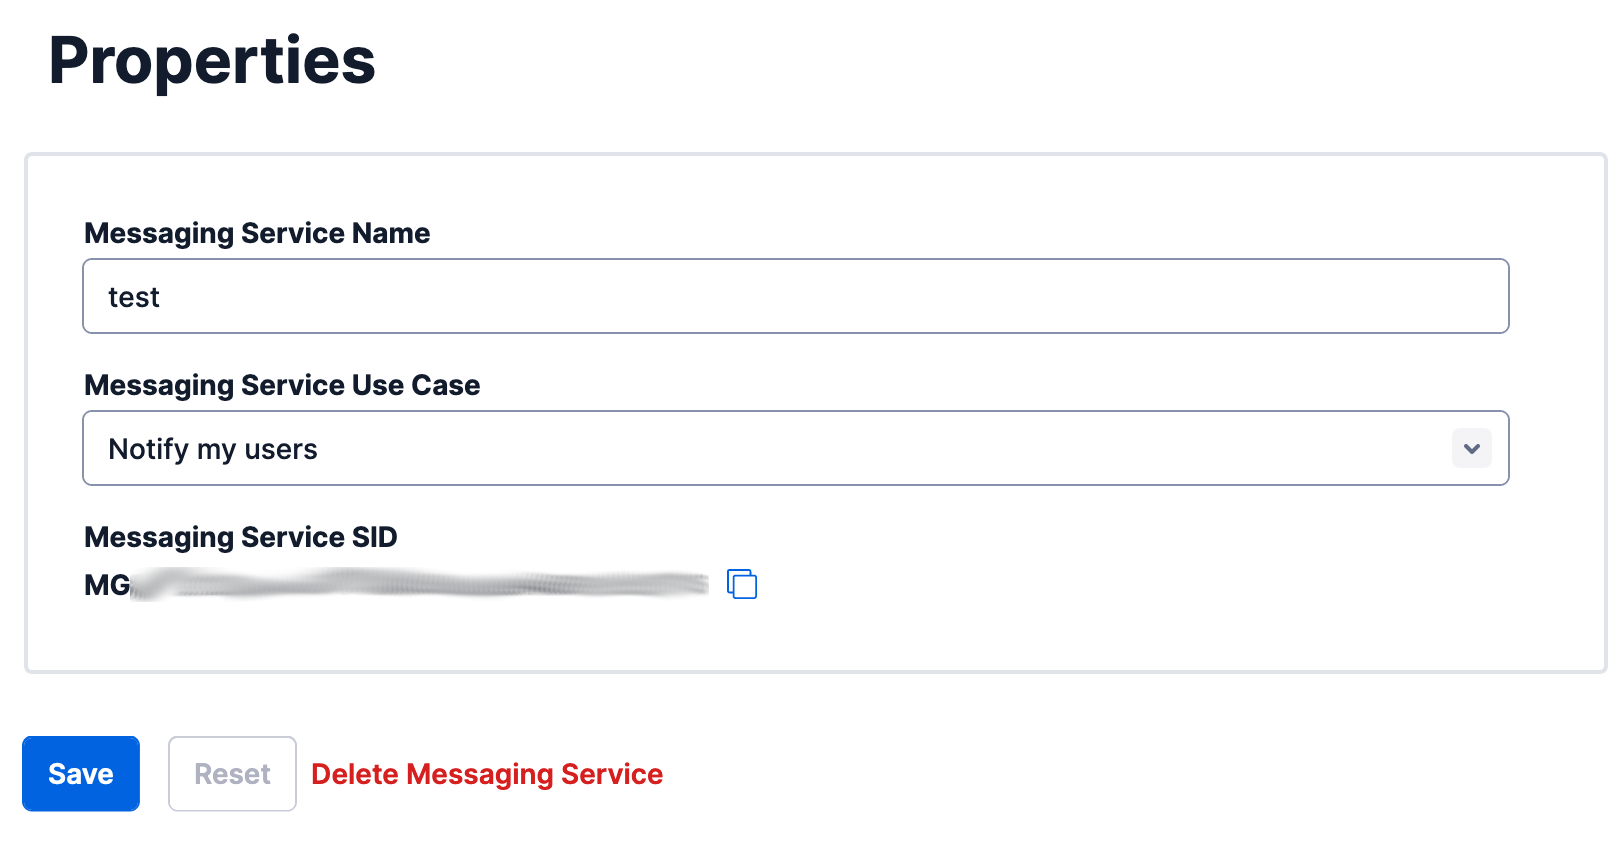
With the Messaging Service created, copy the Messaging Service SID and paste it into .env.local in place of <<TWILIO_MESSAGING_SERVICE_SID>>.

Build the backend

Prepare the request model

First, create a struct named SMSRequest. This struct will be used to marshal and validate POST requests to the endpoint responsible for sending bulk SMS. It will also be passed to the helper module responsible for making the relevant Twilio requests.

To do this, in the application’s top-level folder, create a new folder named model. In this folder, create a new file named SMSRequest.go and add the following to it.

package model

import (
        "errors"
        "log"
        "regexp"
)

type SMSRequest struct {
        Recipients []string `json:"recipients"`
        Message string `json:"message"`
}

func (smsRequest *SMSRequest) Validate() error {
        if smsRequest.Message == "" {
                return errors.New("message cannot be empty")
        }
        err := validatePhoneNumbers(smsRequest.Recipients)
        if err != nil{
                return err
        }
        return nil
}

func validatePhoneNumbers (phoneNumbers []string) error {
        for _,phoneNumber := range(phoneNumbers){
                err := validatePhoneNumber(phoneNumber)
                if err != nil {
                        return errors.New("all phone numbers must be in E.164 format")
                }
        }
        return nil
}

func validatePhoneNumber(phoneNumber string) error{
        e164Pattern := `^\+[1-9]\d{1,14}$`
        match, err := regexp.Match(e164Pattern, []byte(phoneNumber))
        if err != nil {
                log.Fatal(err.Error())
        }
        if !match {
                return errors.New("phone number must be in E.164 format")
        }
        return nil
}

The struct is made up of two fields: Recipients and Messages. The Recipients field is a slice of strings - the phone numbers to be contacted via SMS. The Message field is a string that corresponds to the content of the message to be sent. The appropriate JSON bindings are also specified for both fields.

A Validate() function is provided which ensures that the Message field is not empty, and that all the phone numbers specified are in the expected format (E.164).

Regex (regular expression) validation is used in this article for the sake of simplicity. You could use the Twilio Lookup API for a more robust validation if you prefer.

Prepare the helper module for sending messages

In the application’s top-level directory, create a new folder named helper. In this directory, create a new file named SMS.go and paste the following code into the file.

package helper

import (
        "errors"
        "fmt"
        "os"
        "twilio_bulk_sms/model"
        "github.com/twilio/twilio-go"
        twilioApi "github.com/twilio/twilio-go/rest/api/v2010"
)

func BulkSMS(request model.SMSRequest) (string, error) {
        accountSid := os.Getenv("TWILIO_ACCOUNT_SID")
        authToken := os.Getenv("TWILIO_AUTH_TOKEN")
        twilioMessagingServiceSID := os.Getenv("TWILIO_MESSAGING_SERVICE_SID")

        numberOfFailedRequests := 0

        client := twilio.NewRestClientWithParams(twilio.ClientParams{
                Username: accountSid,
                Password: authToken,
        })

        for _, recipient := range request.Recipients{
                params := &twilioApi.CreateMessageParams{}
                params.SetTo(recipient)
                params.SetMessagingServiceSid(twilioMessagingServiceSID)
                params.SetBody(request.Message)

                _, err := client.Api.CreateMessage(params)
                if err != nil {
                        fmt.Println(err.Error())
                        numberOfFailedRequests ++
                }
        }

        if numberOfFailedRequests > 0 {
                errorMessage := fmt.Sprintf("%d message(s) could not be sent, please check your Twilio logs for more information", numberOfFailedRequests)
                return "", errors.New(errorMessage)
        }
        
        return fmt.Sprintf("%d message(s) sent successfully", len(request.Recipients)), nil
}

The BulkSMS() function instantiates a Twilio client and iterates through the recipients in SMSRequest, sending a CreateMessage() request for each phone number. If, for some reason, the request fails, numberOfFailedRequests is updated accordingly.

The process is considered successful if there are no failed requests. Otherwise, an error is returned letting the user know the number of requests which failed. More information will be available in the errors in the Twilio logs.

Prepare the entry point for the application

Finally, you need an entry point for the application. This is usually a file named main.go. In the application’s top-level directory, create a new file named main.go. Then, paste the following code in the newly created file.

package main

import (
        "encoding/json"
        "fmt"
        "github.com/joho/godotenv"
        "log"
        "net/http"
        "twilio_bulk_sms/model"
        "twilio_bulk_sms/helper"
)

func main() {
        loadEnv()
        fileServer := http.FileServer(http.Dir("./static"))
        http.Handle("/", fileServer)
        http.HandleFunc("/messages", smsHandler)

        port := ":8000"

        fmt.Printf("Starting server at port%s\\n", port)

        if err := http.ListenAndServe(port, nil); err != nil {
                log.Fatal(err)
        }
}

func loadEnv() {
        err := godotenv.Load(".env.local")
        if err != nil {
                log.Fatal("Error loading .env file")
        }
}

func smsHandler(writer http.ResponseWriter, request *http.Request) {
        var bulkSMSRequest model.SMSRequest

        decoder := json.NewDecoder(request.Body)
        decoder.DisallowUnknownFields()
        decoder.Decode(&bulkSMSRequest)

        err := bulkSMSRequest.Validate()
        if err != nil {
                returnResponse(writer, err.Error(), http.StatusBadRequest)
                return
        }
        
        res, err := helper.BulkSMS(bulkSMSRequest)
        if err != nil {
                returnResponse(writer, err.Error(), http.StatusBadRequest)
                return
        }

        returnResponse(writer, res, http.StatusOK)
}

func returnResponse(writer http.ResponseWriter, message string, httpStatusCode int) {
        writer.Header().Set("Content-Type", "application/json")
        writer.WriteHeader(httpStatusCode)
        resp := make(map[string]string)
        resp["message"] = message
        jsonResp, _ := json.Marshal(resp)
        writer.Write(jsonResp)
}

The main() function loads the environment variables, serves the static files, and declares the handler for the API route which will handle sending the messages.

Build the user interface

In the application’s top-level folder, create a new folder named static. This folder will hold the HTML, CSS, and JS files for the application's interface.

Then, create a file named index.css in the new folder, and paste the following code into it.

.badge {
    padding-top: 0.1em;
    padding-bottom: 0.1rem
}

.hidden {
    display: none;
}

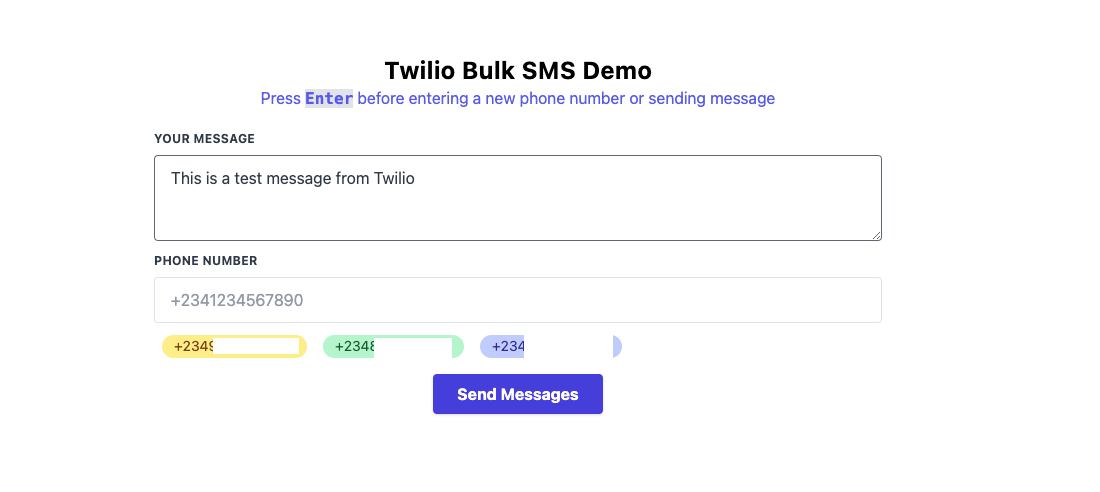
When phone numbers are entered, they are displayed as badges prior to submission, and the badge styles the padding for such elements. The .hidden property is used to hide elements when required.

Next, create a file named index.js in the newly created folder and add the following code to it.

const MAX_BADGES_PER_ROW = 5;

const possibleBadgeColours = [
  "red",
  "orange",
  "yellow",
  "green",
  "teal",
  "blue",
  "purple",
  "indigo",
  "pink",
  "gray",
];

const recipients = [];

const input = document.querySelector("input");
const textArea = document.querySelector("textarea");
const phoneNumberGrid = document.getElementById("phoneNumbers");
const alert = document.getElementById("alert");

input.addEventListener("keyup", (event) => {
  if (event.key === "Enter") {
    const recipient = event.target.value;
    if (recipient !== "") {
      recipients.push(recipient);
      input.value = "";
      let lastRow = phoneNumberGrid.lastElementChild;
      if (
        lastRow === null ||
        lastRow.childElementCount === MAX_BADGES_PER_ROW
      ) {
        lastRow = getNewRow();
        phoneNumberGrid.appendChild(lastRow);
      }
      const phoneNumberBadge = getNewPhoneNumberBadge(recipient);
      lastRow.appendChild(phoneNumberBadge);
    }
  }
});

const getNewRow = () => {
  const row = document.createElement("div");
  row.classList.add("flex", "space-x2");
  return row;
};

const getRandomBadgeColour = () => {
  const randomIndex = Math.floor(
    Math.random() * (possibleBadgeColours.length - 1)
  );
  return possibleBadgeColours[randomIndex];
};

const getNewPhoneNumberBadge = (phoneNumber) => {
  const badgeColour = getRandomBadgeColour();
  const badge = document.createElement("div");
  badge.classList.add(
    "badge",
    "text-sm",
    "px-3",
    "mx-2",
    `bg-${badgeColour}-200`,
    `text-${badgeColour}-800`,
    "rounded-full"
  );
  badge.textContent = phoneNumber;
  return badge;
};

const showButton = (buttonId) => {
  const button = document.getElementById(buttonId);
  button.classList.remove("hidden");
};

const hideButton = (buttonId) => {
  const button = document.getElementById(buttonId);
  button.classList.add("hidden");
};

const reset = () => {
    recipients.splice(0, recipients.length);
    phoneNumberGrid.replaceChildren();
    textArea.value = "";
    showButton("submit");
    hideButton("loading");
}

const handleSubmit = async () => {
  if (recipients.length === 0) {
    showAlert("Please provide at least one phone number");
    return;
  }

  const message = textArea.value.trim();
  if (message === "") {
    showAlert("Please provide a message for the recipients");
    return;
  }

  hideButton("submit");
  showButton("loading");

  const response = await fetch("/messages", {
    method: "POST",
    headers: {
      "Content-Type": "application/json",
    },
    body: JSON.stringify({ recipients, message }),
  });

  const { message: alertMessage } = await response.json();
  showAlert(alertMessage, response.ok);
  reset();
};

const hideAlert = () => {
  alert.classList.add("hidden");
};

const showAlert = (message, isSuccess = false) => {
  const alertColour = isSuccess ? "green" : "red";

  alert.classList.add(
    `bg-${alertColour}-100`,
    "border",
    `border-${alertColour}-400`,
    `text-${alertColour}-700`
  );

  const alertTitle = document.getElementById("alertTitle");
  const alertMessage = document.getElementById("alertMessage");
  const closeAlertButton = document.getElementById("closeAlert");

  closeAlertButton.classList.add(`text-${alertColour}-500`);
  alertTitle.innerText = isSuccess ? "Success! \n" : "Error! \n";
  alertMessage.innerText = message;
  alert.classList.remove("hidden");

  setTimeout(() => {
    alert.classList.add("hidden");
  }, 5000);
};

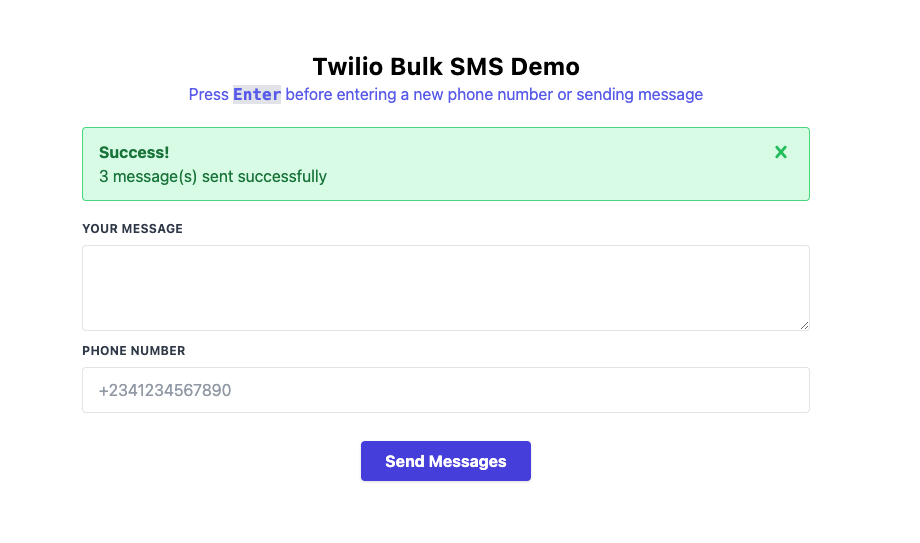
To add multiple phone numbers, the user will press the Enter key after typing each phone number. This is handled by the keyup event listener. For each new phone number, a badge is created with a random colour and rendered on the page. The phone number is also added to an array named recipients.

A handleSubmit() function is also declared which displays a loading indicator while the array of recipients is sent to the backend via a POST request. When a response is received, an alert is displayed to let the user know the outcome of the request.

Finally, create a new file named index.html in the static folder and add the following to it.

<!doctype html>
<html>

<head>
    <meta charset="UTF-8">
    <meta name="viewport" content="width=device-width, initial-scale=1.0">
    <link rel='icon' href='https://www.twilio.com/assets/icons/twilio-icon.svg' type='image/svg+xml' />
    <script src="https://cdn.tailwindcss.com"></script>
    <link rel="stylesheet" href="index.css" />
    <title>Twilio Bulk SMS Demo</title>
</head>

<body>
    <div class="max-w-screen-md mx-auto py-20 p-5">
        <div class="text-center mb-5">
            <h1 class="text-2xl font-bold">
                Twilio Bulk SMS Demo
            </h1>
            <p class="text-indigo-500">Press <code class="bg-gray-200 font-bold">Enter</code> before entering a new
                phone number or sending message</p>
        </div>
        <div id="alert" class="hidden px-4 py-3 mb-5 rounded relative" role="alert">
            <strong id="alertTitle" class="font-bold"></strong>
            <span id="alertMessage" class="block sm:inline">Something seriously bad happened.</span>
            <span class="absolute top-0 bottom-0 right-0 px-4 py-3" onclick="hideAlert()">
                <svg id="closeAlert" class="fill-current h-6 w-6" role="button" xmlns="<http://www.w3.org/2000/svg>"
                    viewBox="0 0 20 20">
                    <title>Close</title>
                    <path
                        d="M14.348 14.849a1.2 1.2 0 0 1-1.697 0L10 11.819l-2.651 3.029a1.2 1.2 0 1 1-1.697-1.697l2.758-3.15-2.759-3.152a1.2 1.2 0 1 1 1.697-1.697L10 8.183l2.651-3.031a1.2 1.2 0 1 1 1.697 1.697l-2.758 3.152 2.758 3.15a1.2 1.2 0 0 1 0 1.698z" />
                </svg>
            </span>
        </div>
        <div class="flex flex-col space-y-4">
            <div class="flex flex-wrap -mx-3 mb-3">
                <div class="w-full px-3">
                    <label class="block uppercase tracking-wide text-gray-700 text-xs font-bold mb-2">
                        Your message
                    </label>
                    <textarea rows="3"
                        class="appearance-none block w-full text-gray-700 border border-gray-200 rounded py-3 px-4 mb-3 leading-tight focus:outline-none focus:bg-white focus:border-gray-500"></textarea>
                    <label class="block uppercase tracking-wide text-gray-700 text-xs font-bold mb-2"
                        for="grid-password">
                        Phone number
                    </label>
                    <input
                        class="appearance-none block w-full text-gray-700 border border-gray-200 rounded py-3 px-4 mb-3 leading-tight focus:outline-none focus:bg-white focus:border-gray-500"
                        id="phoneNumber" type="tel" placeholder="+2341234567890">
                    <div class="flex flex-col space-y-2" id="phoneNumbers"></div>
                    <div class="mt-4 flex justify-center w-full px-3">
                        <button id="submit" type="button"
                            class="shadow bg-indigo-600 hover:bg-indigo-400 focus:shadow-outline focus:outline-none text-white font-bold py-2 px-6 rounded"
                            onclick="handleSubmit()">
                            Send Messages
                        </button>
                        <button id="loading" type="button"
                            class="hidden shadow bg-green-500 hover:bg-green-400 text-white font-bold py-2 px-4 rounded inline-flex items-center transition duration-150 ease-in-out cursor-not-allowed"
                            disabled>
                            <svg class="w-5 h-5 mr-3 -ml-1 text-white animate-spin" xmlns="<http://www.w3.org/2000/svg>"
                                fill="none" viewBox="0 0 24 24">
                                <circle class="opacity-25" cx="12" cy="12" r="10" stroke="currentColor"
                                    stroke-width="4"></circle>
                                <path class="opacity-75" fill="currentColor"
                                    d="M4 12a8 8 0 018-8V0C5.373 0 0 5.373 0 12h4zm2 5.291A7.962 7.962 0 014 12H0c0 3.042 1.135 5.824 3 7.938l3-2.647z">
                                </path>
                            </svg>
                            Sending
                        </button>
                    </div>
                </div>
            </div>
        </div>
    </div>
    <script src="index.js"></script>
</body>

</html>

Test that the application works

First, start the application using the following command.

go run main.go

Then, view the application in your browser by navigating to http://localhost:8000/.

View application

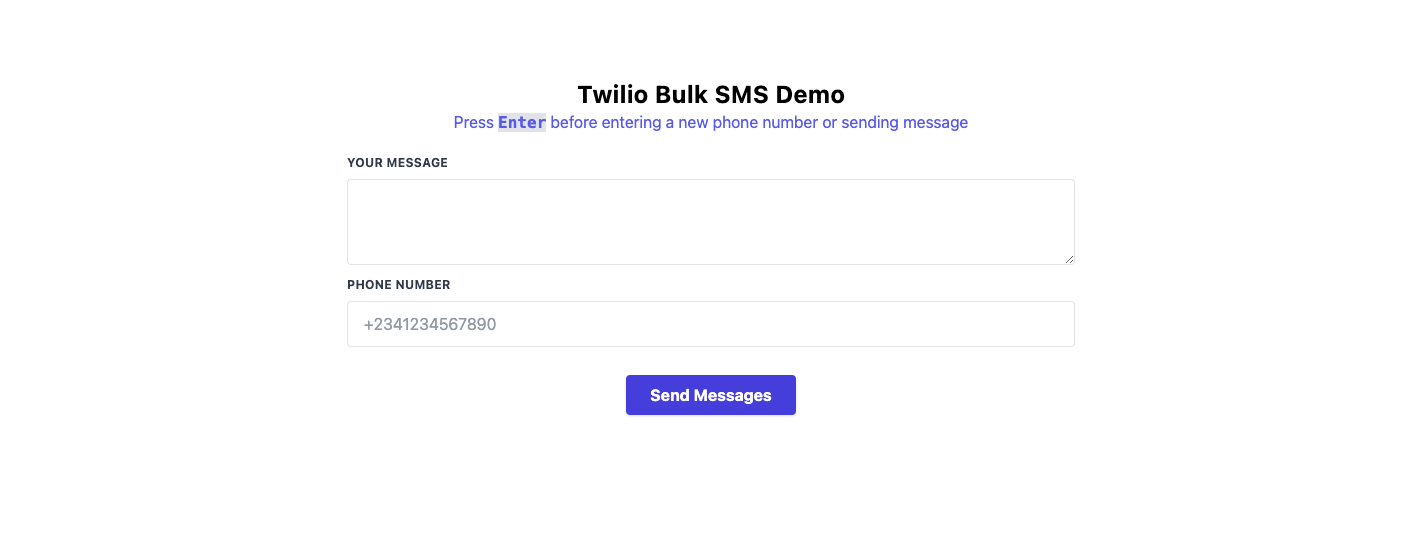
Add as many valid phone numbers as you want (remember to press Enter after each phone number). When you're finished adding phone numbers, click Send Messages.

Add phone numbers

Once the messages have been sent, an alert will be displayed.

SMS sent successfully

There you have it!

You’ve successfully built a Go-powered bulk SMS-sending application

Notice how you don't have to worry about either the queuing or the delivery process. Twilio's infrastructure is capable of handling notifications for your users in real-time.

The entire codebase for this tutorial is available on GitHub. Feel free to explore further. Happy coding!

Oluyemi is a tech enthusiast with a background in Telecommunication Engineering. With a keen interest to solve day-to-day problems encountered by users, he ventured into programming and has since directed his problem-solving skills at building software for both web and mobile.

A full-stack software engineer with a passion for sharing knowledge, Oluyemi has published a good number of technical articles and content on several blogs on the internet. Being tech-savvy, his hobbies include trying out new programming languages and frameworks.