Use SendGrid Event Webhooks in PHP
Time to read:
May 09, 2023
Written by
Reviewed by
Modern email is not your grandfather's email! Back then, you sent an email using apps such as Pine, Outlook, Eudora or Thunderbird. The recipient opened and read your email and responded to you (hopefully). Now, you have to manage mailing lists, handle unsubscribes, deal with spam reports, and so much more!
But how can you do that quickly, efficiently, and programmatically using PHP? Enter SendGrid's Event Webhooks. If you've not heard of them before Event Webhooks:
Will notify a URL of your choice via HTTP POST with information about events that occur as SendGrid processes your email.
These events include:
- Emails being delivered to the receiving server, bounced, dropped, and opened;
- When people click on links in your emails;
- When people unsubscribe
Your applications can react to these events as they're received, in ways that make sense for your organisation. This saves staff the need to do so manually.
In this tutorial, you're going to learn how to do so by logging when users unsubscribe, click on a link, and mark an email as spam.
Prerequisites
To follow along with this tutorial, you will need the following:
- Composer installed globally
- ngrok and a free ngrok account
- PHP 8.4 or later
- A free SendGrid account. If you are new to SendGrid, click here to create a free account
- An email address to send the email which has a verified identity
- Your preferred text editor or IDE; I recommend PhpStorm or VIM
- Prior experience with Mezzio would be ideal, though not required
How the application works
There's not that much to the application, as it only consists of two routes, the default route, and a route to send emails.
The default route receives signed event webhook requests from SendGrid. These requests contain three key things: a JSON array of event webhook data (which you can see an example of below) in the request's body, and two headers (X-Twilio-Email-Event-Webhook-Signature and X-Twilio-Email-Event-Webhook-Timestamp).
Using the webhook's public key, which will be generated later, and the X-Twilio-Email-Event-Webhook-Timestamp header, which contains the time when the data was signed, the application will verify the signature's webhook contained in X-Twilio-Email-Event-Webhook-Signature.
If the signature is valid, then it will log if any of the received events were a click, spam report, or an unsubscribe. Otherwise, it will print that the data did not validate successfully.
The second route is only there to simplify sending test emails (/email) which in turn trigger sending event webhook data.
Scaffold the base application
The first thing to do is to scaffold the application and change into the newly created project directory. We'll save some time by using the Mezzio Skeleton project to do this. Run the following commands wherever you store your PHP projects.
When prompted, answer the questions as follows:
Then, create a directory for the webhook log file, by running the following command.
Install the required packages
Back to the tutorial. Next, you need to add several packages which the project needs. These are:
- Monolog: PHP's de facto logging package will be used to log webhook information.
- laminas-sendgrid-integration: This package makes integrating the Official Twilio SendGrid PHP API Library in Mezzio projects virtually a breeze. All you need to do is set a single environment variable. The package registers a service named SendGrid with the application's DI container, which is a SendGrid object initialised with your SendGrid API key.
- PHP Dotenv: This package simplifies setting environment variables from dotenv files.
To install them, run the following command.
Set the required environment variables
Next, you need to set four environment variables. To do that, first create a new file named .env in the top-level directory of the project. In that file, add the code below.
The first variable is your SendGrid API key. If you don't already have one, log in to your SendGrid account and under Settings > API Keys click Create API Key.
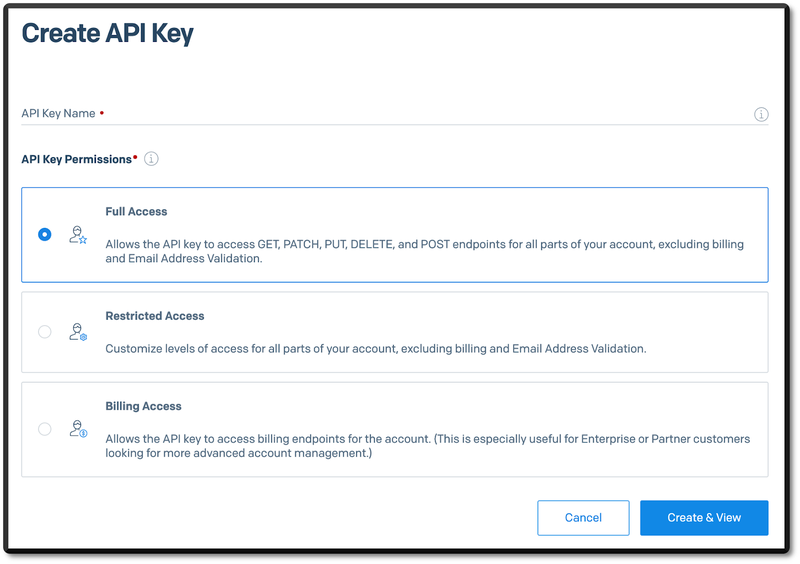
In the form that appears, enter a meaningful name for the key in the API Key Name field and click Create & View.
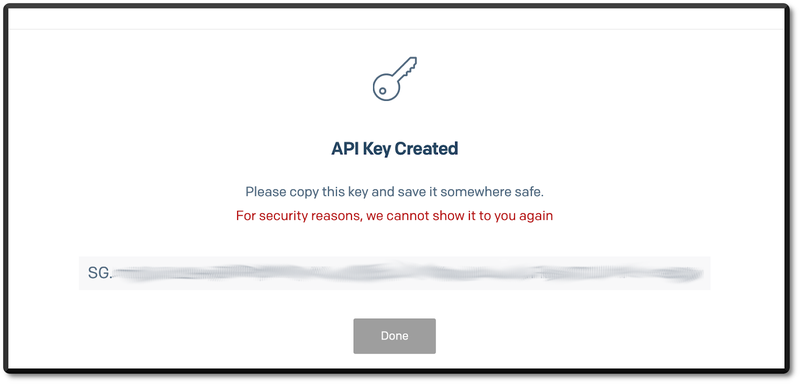
The SendGrid API key will now be visible. Copy and paste it into .env in place of the <<SENDGRID_API_KEY>> placeholder.
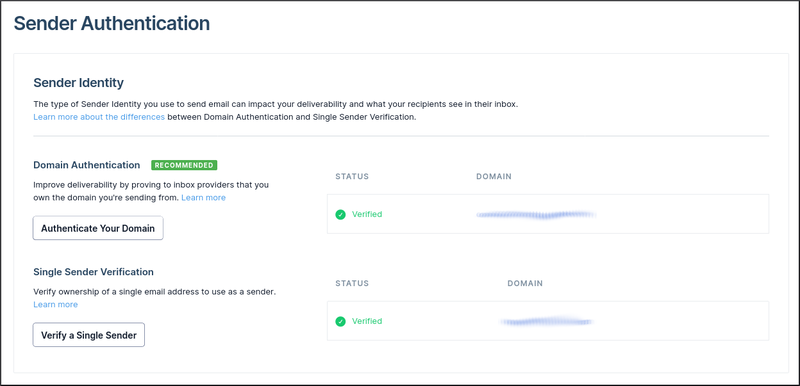
Then, back in the left-hand side navigation menu of the SendGrid Dashboard, click Settings > Sender Authentication. There, copy one of the email addresses from the Single Sender Verification section, and paste it into .env in place of the <<SENDGRID_SENDER_ADDRESS>> placeholder. Then, add a recipient email address in place of the <<SENDGRID_RECIPIENT_ADDRESS>>.
Start ngrok
Next, start ngrok so that you have a public-facing URL to which the event webhook can post, by running the command below.
You should see output similar to the following.
Make a copy of the Forwarding URL, as you'll need it next to create an event webhook.
Create an Event Webhook
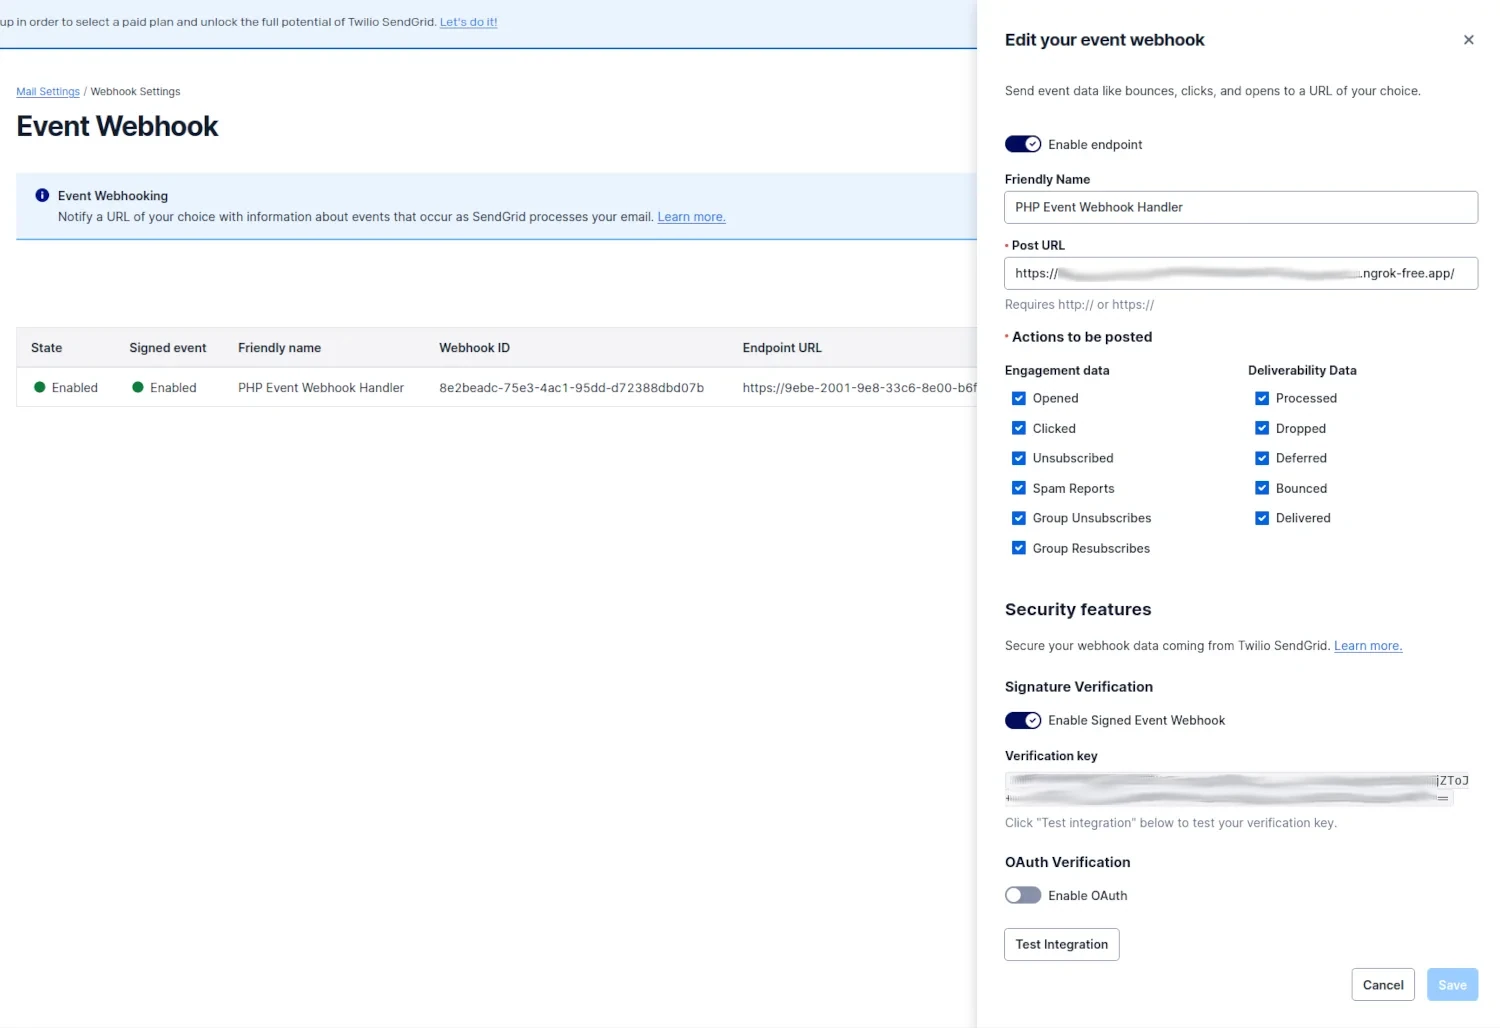
To create an Event Webhook, go back to the SendGrid Dashboard and navigate to Settings > Mail Settings. Then, under Webhook Settings, click Event Webhooks. From there, click Create new webhook on the right-hand side of the page.
In the dialog that opens:
- Enter a name for the webhook;
- Check all of the options under Actions to be posted;
- Under Signature Verification, enable Enable Signed Event Webhook; and
- Set the ngrok Forwarding URL you copied previously as the value of Post URL
- Click Save
During creation of the Webhook, a private key for signing webhook data and a public key for verifying it were created. To retrieve the public key, click the cog icon on the far right-hand side of the webhook to reopen the webhook settings. Then, under verification key, copy the webhook's public key and paste it in place of <<SENDGRID_WEBHOOK_PUBLIC_KEY>> in the .env file.
Create the route handlers
Next, create the handlers for the two routes, by running the following commands.
These commands will create two classes (PSR-15: server request handlers) in src/App/src/; one to receive and process event webhooks: SendGridWebhookHandler.php, and the other to send test emails: SendEmailHandler.php.
Update the event webhook handler
Now, it's time to flesh out the webhook handler. To do that, update src/App/src/SendGridWebhookHandler.php to match the code below.
In the handle method, the code first checks if both of the required headers were sent. If not, it logs which one wasn't and prints that to the application's output. Otherwise, the request's body and the two headers are retrieved. Then, using the generated public key, request body, and timestamp, it verifies if the received signature is valid or not.
If the received signature is invalid, that is logged to the log file and printed as the application's output. Otherwise, it uses the EventTypeFilterIterator, created next, to filter the received events to only events that were a click (click), spam report (spamreport), or an unsubscribe (unsubscribe), and logs receipt of each one.
Create an Event Webhook filter
To create the filter, in src/App/src/ create a new directory named Filter. Then, in the Filter directory, create a new file named EventTypeFilterIterator.php. In that file, paste the following code.
There's not a lot to the class. It extends FilterIterator in PHP's SPL. It does this because FilterIterator simplifies filtering out unwanted values from a set of data through the logic in the accept() method. It does this by returning true if the event's event property is set to click, spamreport, or unsubscribe or false otherwise.
Update the send email handler
Next, update the handler that sends test emails by updating src/App/src/SendGridWebhookHandler.php to match the code below.
This class first creates and populates a SendGrid Mail object, which models an email. The email will be sent to the email address set in SENDGRID_RECIPIENT_ADDRESS, from the email address set in SENDGRID_SENDER_ADDRESS. It will contain a short message: "Sending with Twilio SendGrid is Fun and easy to do anywhere, even with PHP".
Then, the email is attempted to be sent via SendGrid's API. If successful, a JSON string will be returned containing the status code, headers, and body of the response received from the request to SendGrid. If there was an exception, it is printed instead.
Update the application's configuration
Now, it's time to update the application's configuration by registering services in the DI container for the two handlers. To do this, update the getDependencies() method in src/App/src/ConfigProvider.php to match the following.
Then, add the following use statement at the top of the file.
The services are supplied or instantiated, by a combination of two factories: the Reflection-based abstract factory and the InvokableFactory.
The Reflection-based abstract factory is one of the classes I use most when developing Mezzio applications because it makes instantiation pretty trivial. It's able to do this because it uses PHP’s Reflection API to introspect a class' constructor parameters and, where possible, retrieve them from the DI container. By using it we don't need to create a separate factory class to do so.
InvokableFactoryinstantiates classes with no dependencies or which accept a single array. This makes it the right choice for instantiating SendGridWebhookHandler and removes any associated Reflection overhead.
Update the routing table
Now, there's one more step to go before testing the application: adding the required routes to the routing table. To do that, update config/routes.php to match the following.
Test the application
With the application complete, it's time to test it. First, start it by running the following command.
This will start the application listening on localhost, on port 8080. Now, replace https://<<the ngrok Forwarding URL>> in the command below, with your ngrok Forwarding URL and then run it.
You should see the HTTP status code, headers, and body of the request to SendGrid's API to send the email. A short while later, you should see an email arrive in your inbox. Now, open data/log/webhook.log, where you should see output similar to the example below.
That's how use SendGrid Event Webhooks in PHP
You now know how to use them to respond to them programmatically in PHP. I'm sure that your code would respond to event webhooks more imaginatively than the code in this tutorial did. However, it still showed how to retrieve them securely.
What ways would you respond to them?
P.S., check out this tutorial if you want to learn the essentials of sending emails with PHP.
Matthew Setter is a PHP and Go editor in the Twilio Voices team, and a PHP and Go developer. He’s also the author of Mezzio Essentials and Deploy With Docker Compose. You can find him at msetter[at]twilio.com. He's also on LinkedIn and GitHub.

Related Resources
Twilio Docs
From APIs to SDKs to sample apps
API reference documentation, SDKs, helper libraries, quickstarts, and tutorials for your language and platform.
Resource Center
The latest ebooks, industry reports, and webinars
Learn from customer engagement experts to improve your own communication.
Ahoy
Twilio's developer community hub
Best practices, code samples, and inspiration to build communications and digital engagement experiences.