Sending and Receiving SMS Messages In Windows Presentation Foundation Apps with Twilio Messaging
Time to read:
November 02, 2020
Written by
Reviewed by

The vast majority of SMS messages are sent and received from person to person on mobile phones. But there are also times it’s helpful to be able to send and receive SMS messages from a custom application running on a desktop or laptop computer.
If you’ve built an application with Windows Presentation Foundation (WPF) you can integrate bidirectional SMS capabilities into your custom user interface with Twilio Messaging. Twilio’s SMS service enables you to send and receive SMS messages programmatically through a Twilio phone number.
In this tutorial you’ll learn how to set up a Twilio phone number to send and receive SMS messages and how to interact with the Twilio APIs to use the Twilio phone number to send and receive SMS messages from a WPF application. You’ll see how a WPF user interface can be automatically updated when new messages arrive and you’ll learn how to group messages into conversation threads.
The tutorial project in this post includes complete code you can use in your own projects. There’s also a companion repository on GitHub containing the complete solution. You can use it under an MIT license.
Prerequisites
You’ll need the following tools and resources to build and run this project:
Windows 10 – It puts the Windows in the Windows Presentation Foundation.
.NET Core SDK 3.1 – The SDK includes the APIs, runtime, and CLI.
Although this tutorial uses the implementation of WPF in .NET Core, the techniques are similar for .NET Framework 4.8. A single implementation of WPF will be part of .NET 5.0, which will be the “main implementation of .NET going forward”.
Visual Studio 2019 with the following workloads and individual components:
- .NET desktop development workload (includes C#)
- GitHub Extension for Visual Studio (If you want to clone the companion repository.)
ngrok – The free version of this tool enables you to create a secure and stable tunnel from the internet to the endpoints of applications you’re developing.
Twilio account – Sign up for a free Twilio trial account and use promotional credit to try out Twilio products.
You should have a working knowledge of Visual Studio 2019, C#, and .NET Core, including dependency injection.
There is a companion repository for this post available on GitHub. It contains the complete source code for the tutorial project.
Understanding the tutorial project
In this tutorial you’ll build a Visual Studio 2019 solution containing one .NET Core 3.1 Windows Presentation Foundation (WPF) project. You’ll define the user interface for one WPF window that will show SMS messages that are sent and received from the application, grouped by phone number into conversation threads.
The application will include an HTTP POST endpoint implemented with the ServiceStack web service framework. The endpoint will be used to receive communications from a Twilio phone number webhook.
Operational workflow
Here’s a step-by-step overview of the sequence of operations:
- A person sends an SMS message to a Twilio phone number set up for the project.
- Twilio sends the message to a URL assigned to a webhook associated with the Twilio phone number. To maintain your computer’s security while allowing access to the application’s REST API endpoint, the URL for the webhook will be one generated by an instance of ngrok running on your computer.
- ngrok will pass the message from the Twilio webhook call to the REST API endpoint in the WPF application.
- The running WPF app will automatically update the user interface with the new message.
- When a reply is sent from the WPF application’s user interface it passes from the application to the Twilio Messaging API through the Twilio helper library for .NET. The message will include the Twilio phone number set up for the project as the “from” number, so the recipient will see the reply as coming from the same number to which they sent their message.
- The person who sent the original message will receive the reply on their mobile phone.
While the user interface in this tutorial will show the phone number initiating the conversation, you don’t have to do this. This can be helpful in scenarios where it’s not appropriate for the application user to have access to personally identifiable information (PII) like customer phone numbers.
Application architecture
Here’s a breakdown of the individual class files that will make up the project. This tutorial provides the code for each of them.
The user interface components that make up the application are:
MainWindow.xaml – a WPF user interface component defined in a XAML file. This is where the user interface elements and their style and layout are defined.
MainWindow – a C# class that inherits from the Window class and implements the events for the user interface. This is a code-behind class for MainWindow.xaml.
There are also C# classes that provide other functionality.
Message – this C# class defines the data model for an SMS message, including its direction from the application (inbound or outbound).
ViewModel – this C# class provides data structures bound to the user interface, including messages and conversations, and implements the INotifyPropertyChanged interface so the user interface can be updated automatically when the data changes.
MessageSender – sends SMS messages using the TwilioClient object from the Twilio helper library for .NET.
TwilioService – provides a REST API endpoint for a webhook to call with an inbound message, enabling Twilio Messaging to forward SMS messages to the application.
MicrosoftDependencyInjectionAdapter – provides a bridge between the Microsoft Dependency Injector extension and the ServiceStack library.
The application will also include an implementation of the ServiceStack AppSelfHostBase class:
AppHost – creates an HTTP server within the application that will host the TwilioService REST API endpoint.
In addition to the components that are specific to this application, the project also includes the following components that are standard parts of WPF apps:
App.xaml – the startup object for WPF apps.
App – the implementation of the WPF Application class that provides startup functionality. This is the code-behind file for the App.xaml file.
Two external components provide other functionality for the complete system:
ngrok – securely makes the app’s REST API endpoint visible to the internet so the Twilio webhook associated with a Twilio phone number can reach it.
Twilio phone number – provides the Twilio Messaging services for outgoing SMS messages from the application and a webhook that will call the REST API in the app’s host when incoming SMS messages are received.
As you work through each section of the tutorial you’ll implement these components. Each section provides additional information on the design and operation of the component. When you’re done you’ll be able to test the end-to-end process using your Twilio trial account.
Getting and securing your Twilio credentials
This project uses Twilio Messaging to send and receive SMS messages. If you haven’t already done so, sign up for a free Twilio trial account using the link above.
Your Twilio account credentials enable you to use Twilio services through the Twilio APIs and the Twilio helper library for .NET. The helper library is a NuGet package you’ll install in the next section.
Sign into the Twilio console and get your Twilio Account SID and Auth Token from the upper right-hand side of the dashboard. These are user secrets, so handle them securely.
Using the Visual Studio 2019 Secret Manager
One way to handle user secrets is to use the Visual Studio 2019 Secret Manager. It is not very safe concerning encryption as the values are stored in plain text. Still, it allows for sensitive material to be referenced programmatically, external to the code, instead of embedding it in the code that may be shared.
Perform the following steps to create a secrets.json file for the project:
Open a PowerShell prompt in the folder where the project file (.csproj) is stored and enter:
This creates the secrets.json file and adds an identifier to the WpfMessenger.csproj project file.
Next, use the .NET CLI user-secrets command to add name and value pairs to the list of user secrets:
Note that if you’re keeping the solution file and project file in separate directories you’ll need the path to the project directory.
The project in this article will access the account credentials in the secrets.json file created by the Secret Manager.
Using environment variables
Another way to handle these account credentials on a development system is to store them as environment variables. This helps prevent them from accidentally being checked into a publicly accessible source code repository.
Storing your account credentials as environment variables makes them automatically accessible to the Twilio CLI. While the CLI isn’t necessary for this tutorial, it’s a handy thing to have.
To store these values as environment variables on Windows, open a PowerShell or Windows Command Prompt console window and execute the following command-line instructions, substituting your credentials for the placeholders:
These credentials will be available in any subsequent session for the current user.
Creating the .NET Core WPF project
Start by creating a WPF App (.NET Core) project for C# named WpfMessenger. You can put the solution and project folders wherever it’s most convenient for you.
When the project appears, there will be App.xaml and App.xaml.cs files, as well as MainWindow.xaml and MainWindow.xaml.cs files. You will be modifying each of these files in addition to adding files for other classes. In total, there are ten files.
Adding dependencies
First, add the dependencies required for the project. Using the NuGet Package Manager, Package Manager Console, or .NET CLI, add the following packages:
- Microsoft.Extensions.Configuration
- Microsoft.Extensions.Configuration.UserSecrets
- Microsoft.Extensions.DependencyInjection
- ServiceStack
- ServiceStack.Kestrel
- Twilio
The Message class
The Message class defines the representation of an SMS message in the application.
Add a new C# class file, Message.cs, to the project and replace the template code with the following:
This class implements the INotifyPropertyChanged interface so the UI is aware when the object changes. The class defines three properties:
FromMessageBodyDirection
The Direction is an enum used to specify if the Message is received (inbound) or sent (outbound).
The MessageSender class
The MessageSender class provides a link between the application code and the Twilio SMS service API. The SendSms() method uses the Twilio helper library for .NET to communicate with Twilio Messaging SMS service.
Add a C# class file to the project and name it MessageSender.cs. Replace the contents of the file with the code below:
The TwilioClient object is instantiated with a static method rather than using the new keyword to create a new instance through constructor invocation. This is so that an application can only have one instance of the object in scope at any given time.
The SendSms method is called when the user clicks the Send button in the UI. Using the Twilio credentials from secrets.json, the Create method of the MessageResource object of the Twilio helper library sends the message to Twilio. From there, it is directed to the Twilio phone number specified in the toNumber argument.
The MainWindow user interface
MainWindow.xaml defines the single window that’s the user interface in this project.
Open the MainWindow.xaml file and replace the boilerplate markup with the following:
The DockPanel element is the top-level container. The window is divided into sections, as shown below:
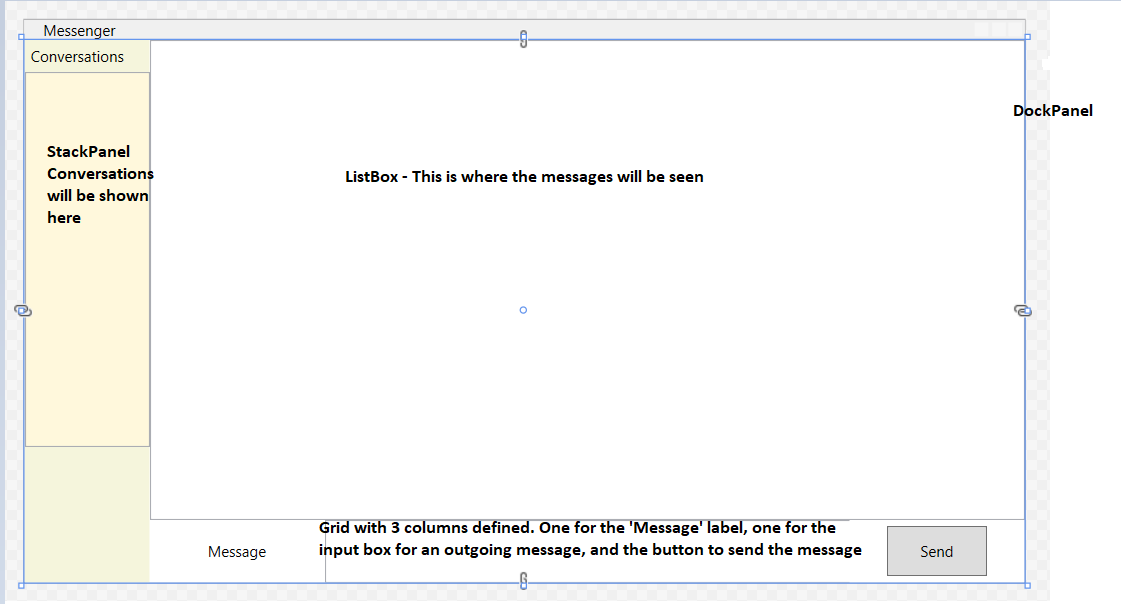
An area of interest is the ListBox, ChatBox. The ItemSource is bound to Messages. The binding associates the control with the data object, Messages, a collection of Message class objects.
Identifying the data source of a user interface element is insufficient to describe which properties of the data object should be displayed or how they should be arranged. An ItemTemplate which is a type of DataTemplate, defines the presentation of the data. In MainWindow, a TextBlock element is bound to the MessageBody, a property of the Messages class.
Replace the template code in the MainWindow.xaml.cs code-behind file with the following C# code:
The class has a constructor and two event handlers. The lbConversations_SelectionChanged method is called whenever the selection changes for the conversations listbox. The other method, Button_Click, sends a message.
The ViewModel class
A view-model is a class that abstracts the data and actions of the view(s) with which it is associated. . The class properties define the view-model’s data and its methods define actions which can be performed with the data. The view-model does not have access to, or knowledge of, the view. In WPF, a Window object is a view.
Add another class file to the project and name it ViewModel.cs. Replace the contents of the file with the following C# code:
There are two collections: Messages and Conversations. By default, the Messages collection is filtered, so only messages from the selected conversation are seen. By adding “View All” to the Conversations collection in the constructor, the user can opt to see all messages. Selecting any individual conversation will only show messages from that phone number.
Adding the REST API endpoint and the host
The project implements the ServiceStack framework. ServiceStack is an alternative to using ASP.NET Core to build web services. In this application, ServiceStack will make it simple to set up the self-hosted endpoints the Twilio SMS service webhooks will call.
There are three components to the host:
- routing – the endpoint that is specific for this call
- service – in this case,
TwilioService, which will do the processing for the HTTP POST call - AppHost – listens on the assigned port (after doing some configuration)
Add another C# class file to the project and name it TwilioService.cs. Replace the contents of the file with the code below:
The TwilioService contains a method Any. The Any method is a fallback that can handle any HTTP method. Since the Twilio SMS service will be doing an HTTP Post call, the method name could be changed to Post.
The application will use .NET dependency injection and the ServiceStack framework for inversion of control. The MicrosoftDependencyInjectionAdapter class is the mechanism that enables ServiceStack to use the Microsoft IoC to resolve dependencies.
Add another C# class file, MicrosoftDependencyInjectionAdapter.cs, to the project and replace the contents of the file with the code below:
Add another class file to the project and name it AppHost.cs. Replace the contents of the file with the code below:
The AppHost class does all the heavy lifting to set up the self-hosting and route messages to the correct endpoint.
Configuring application startup
Open the App.xaml file and replace the contents of the file with the code below:
Note the change to the Startup attribute from StartupUri to OnStartup. This change calls the code in the OnStartup method before continuing with the default initialization sequence.
The last file to modify is App.xaml.cs, which is responsible for initializing the application. After the application finishes initializing, the flow of control is passed to the MainWindow class.
Open the App.xaml.cs file and replace the contents of the file with the code below:
The App method handles initial startup tasks like loading environment variables and user secrets from secrets.json. It also configures an instance of the ServiceCollection and adds classes that will be available through dependency injection.
The OnStartup method configures and starts the AppHost that provides the REST API endpoint and launches the MainWindow.
Connecting the application to Twilio
When you run the app it will create a web service host listening on HTTP port 1337 and a REST API endpoint, /TwilioCallBack, supported by the TwilioService class. This endpoint is protected behind your firewall and is not exposed to the internet.
Since the Twilio phone number you created for the project needs an endpoint it can call for the webhook associated with the phone number, you’ll need a secure web address accessible from outside your firewall. That’s where ngrok fits in.
In the directory where you installed ngrok, execute the following command:
The output will appear something like this:
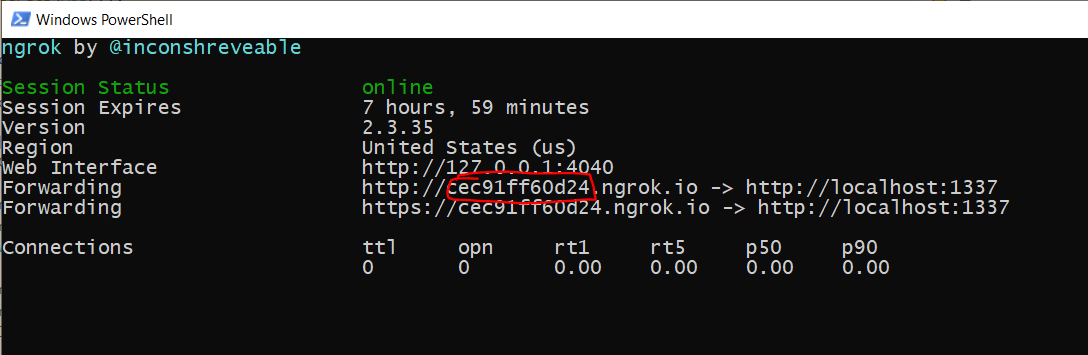
As you can see, ngrok creates a random, externally-accessible URL and maps it to the port on which the application’s HTTP host will listen.
Copy the random forwarding URL someplace handy and add the REST API endpoint name from the TwilioServices class to it. The result should look something like this:
Sign into your Twilio console and go to Phone Numbers > Manage Numbers > Active Numbers and select the number you’ve set up for this project.
In the Messaging section of the Configure tab, under A message comes in, select “Webhook” from the first dropdown list, enter the full URL for the app’s /TwilioCallBack endpoint in the text box, and select “HTTP POST” in the second dropdown list.
Your results should look something like this:
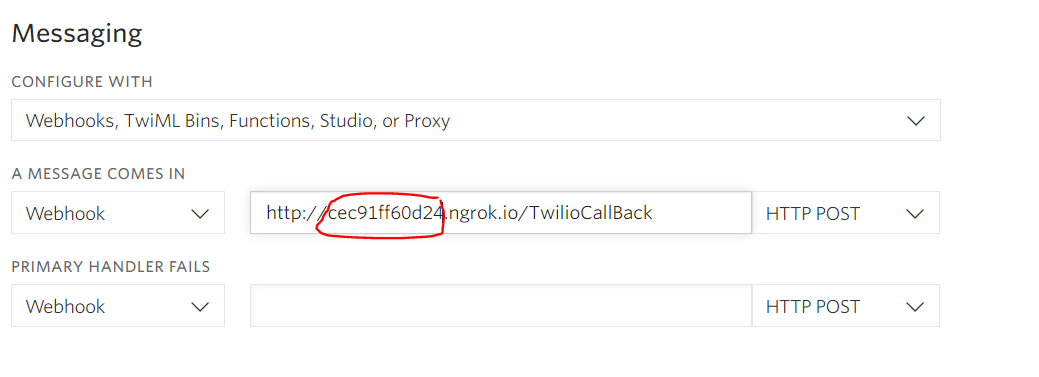
Click Save. The Twilio Messaging SMS service will now be able to reach the application when it’s running.
Note that if you stop and restart ngrok it will generate a different random URL, so you’ll have to enter the new random URL in your Twilio console.
Testing the completed application
At this point, you have implemented all the application components and can build and run the application.
The first time you run the application the Windows firewall will request access to the specified port. Grant the application the suggested access level that’s requested. The access request only happens the first time you run the app. Once you’ve granted access the MainWindow window will appear.
From your mobile phone, send an SMS message to the Twilio phone number you created for the application. The message should appear in the application window. Notice that the sending telephone number appears under Conversations.
Click on the phone number to select it and type a reply in the Message text box. Click the Send button.
The reply message should appear as an SMS message on your mobile phone. There may be a brief delay, depending on wireless network congestion and other factors.
If all that happened, you accomplished a complete round trip of SMS messaging using a Windows Presentation Foundation application and the Twilio Messaging SMS service. Good job!
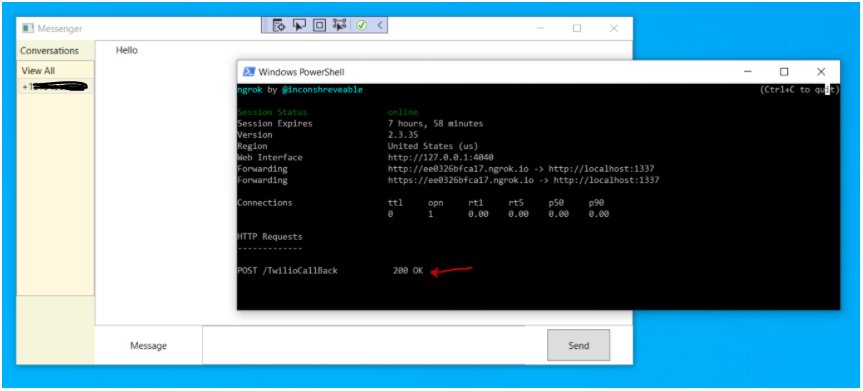
For your reference, there’s a screenshot of the application running below. A message of “Hello” was sent from a mobile phone to a Twilio phone number set up for the application.
Twilio sent the message as a REST API call to the URL and endpoint at ngrok.io. The ngrok.io server forwarded the POST request to the instance of ngrok running on your computer, which passed the request to the endpoint at which the application’s host was listening. From there, the application’s code and .NET Core WPF middleware took care of displaying the message in the application’s window.
If you need to debug, look at the Messages Log and Events Log tabs in your Twilio console. You can get more information on the Details page for each entry. An example of a message is shown below:
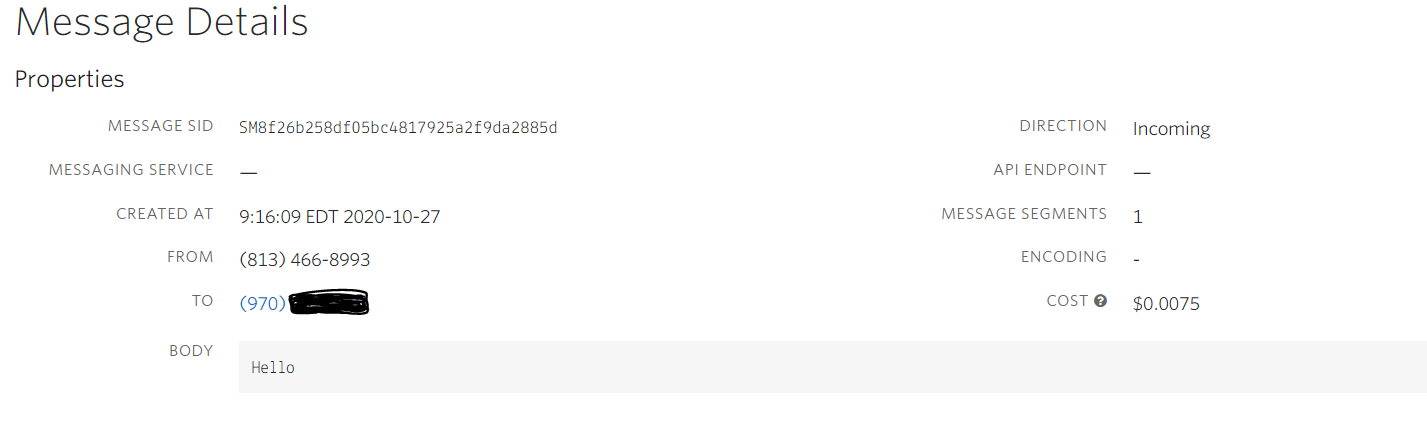
Using the logs you can determine if messages are reaching the Twilio phone number and if the webhook call is successful. Message logs also provide delivery steps, which give you detailed information on the transmission of SMS messages for up to seven days after the message is created.
Potential enhancements
There are a number of ways you can take the demonstration code from this tutorial and move it in the direction of a production-ready application:
- Integrate a database so the phone numbers for incoming messages can be used to locate, retrieve, and display customer information.
- Use stored customer information to make it possible for application users to be able to initiate SMS conversations with customers. (Be sure to follow Twilio’s 7 Best Practices for SMS & Text Marketing if that’s what you plan to do.
- Add the ability to send and receive images using the instructions in the Twilio Docs article, Send SMS and MMS Messages in C# and .NET.
- Use Twilio to Track Delivery Status of Messages.
In a production deployment you might want to build a separate web server application to handle the interface between the internet and your intraweb. In that architecture the webhook endpoint called by Twilio would be located on your web server, and the web server would take care of passing messages to the endpoints on each instance of your WPF app. You’d need a methodology for determining which messages go to which application instance, and you’d need a way of persisting that information.
Summary
In this tutorial you saw how to integrate Twilio Messaging’s SMS service with a Windows Presentation Foundation application to both receive and send SMS messages. Using a Twilio trial account you saw how to buy a Twilio phone number and configure it for SMS. Using the tutorial code you integrated the Twilio helper library for .NET to send messages and you saw how to configure a webhook for Twilio phone number to send incoming SMS messages to your application. You learned how you can use ServiceStack in a WPF application to create a web host and REST API endpoint to receive incoming messages from Twilio.
Additional resources
The following resources will enable you to explore other aspects of the technologies discussed in this post:
Getting Started with Windows Presentation Foundation (WPF) in .NET Core – The first post in this series introduces the basic concepts of WPF and walks you through creating a working example.
How to: Implement Property Change Notification – This article in the docs.microsoft.com Desktop Guide describes how to set up OneWay and TwoWay binding and provides a code sample.
ServiceStack – One framework that’s intuitive and easy to use for all your web services and web apps!
Using Twilio Lookup in .NET Core WPF Applications – Learn how to use the Twilio Lookup API to verify phone numbers and find caller information for numbers entered in a WPF application.
TwilioQuest – If you’d like to learn more about programming C# and other languages, try this action-adventure game inspired by the 16-bit golden era of computer gaming.
Jeffrey Rosenthal is a C/C++/C# developer and enjoys the architectural aspects of coding and software development. Jeff is an MCSD and has operated his own company, The Coding Pit, since 2008. When not coding, Jeff enjoys his home projects, rescuing dogs, and flying his drone. Jeff is available for consulting on various technologies and can be reached via email, Twitter, or LinkedIn.

Related Resources
Twilio Docs
From APIs to SDKs to sample apps
API reference documentation, SDKs, helper libraries, quickstarts, and tutorials for your language and platform.
Resource Center
The latest ebooks, industry reports, and webinars
Learn from customer engagement experts to improve your own communication.
Ahoy
Twilio's developer community hub
Best practices, code samples, and inspiration to build communications and digital engagement experiences.