Create SMS Notifications from Tweets, Retweets, and Mentions with JavaScript and Twilio SMS
Time to read:
October 24, 2019
Written by
This post is part of Twilio’s archive and may contain outdated information. We’re always building something new, so be sure to check out our latest posts for the most up-to-date insights.

Social media has become one of the biggest hits of the 21st century. It has become predominant in both personal and professional lives of millions of people. This has made social media marketing a powerful tool for businesses of all sizes to reach prospects and customers.
Twitter recently announced Q1 2019 revenues of $787 million, a year-on-year increase of around 20%. This means the platform is seeming ever more attractive to advertisers looking for high return on spend. Receiving real-time SMS notifications for activities on a Twitter account is a good way for businesses to build better customer engagement.
In this post you will learn how to get SMS notifications whenever an event occurs on your Twitter account.
Prerequisites
To build the case study project for this post you need to have the following development tools installed on your system:
Node.js JavaScript runtime environment (The Node.js installer includes the npm package manager, which is also required.)
Ngrok cloud proxy service client
You will also need the following accounts:
Twilio (Sign up for a free trial account.)
Twitter Developer (Only the free Standard API level is required.) Note: There is an approval process for new Twitter Developer accounts. Approval usually takes less than an hour, but may take longer if there are questions about the information you submit. Be sure to answer the registration questions completely and be sure to watch your email inbox in case Twitter wants more information on your application.
This post requires basic knowledge of JavaScript. If you don’t have the above prerequisites on your computer, ensure you download them before continuing with the post.
The companion repository for this post is available on GitHub.
Create a Twitter app
To get real-time activities on a Twitter account, Twitter provides an Account Activity API. The Account Activity API provides different events for a number of account activities. This project will use the tweet_create_events activity, which sends out events when tweets, retweets, replies, @mentions, quote tweets, and retweets of quote tweets that occur on an account.
On the Apps page of your approved developer account, click the Create an app button to create a new Twitter app. The following app details are required to create a Twitter app:
App name: This is whatever name you want to give your Twitter app. Your app name will appear as the source of Tweets and in user-facing authorization screens.
Application description: This should contain a description of your app and what it does. Like the app name, it will be visible to users of your app.
Website URL: This should contain a URL that links to a website related to your Twitter app. For the purpose of the demo app, you can enter your company website, your personal web page, or your ngrok forwarding URL here.
Tell us how this app will be used: This should contain a detailed explanation of what you intend to do with your Twitter app. The information here helps Twitter employees understand how your app will be used.
The Enable Sign in with Twitter option is an optional one that should only be selected if the Twitter application will be used to sign in with Twitter. If it is selected, a “Callback URL” should be provided. For the purpose of the demo app, this option will remain unchecked.
Note: Do not use twilio.com for any of the URLs you provide.
After entering the required details, click the Create button to create your Twitter app.
Once the app is created, navigate to the Permissions tab of the app, click the Edit button and select Read, write, and Direct Messages. Click the Save button to save the updated permissions.
Navigate to the Keys and tokens tab, click the Create button to generate an Access token & access token secret. Copy your Consumer API keys, Access token, and Access token secret keys somewhere safe.
Get Account Activity API Access
To begin using any of Twitter’s APIs, you’re required to set up a dev environment for the endpoint. Visit the Dev environments page from the link in the list under your username, and in the Account Activity API / Sandbox section, click the Set up a dev environment button. The Set up Account Activity API dev environment dialog box should appear. In the Dev environment label box, enter a convenient description, such as “development”. In the App box, select the name of the app from the list. Click Complete setup. You should be returned to the Dev environments page and you should see a “Dev environment successfully set up” message.
Take note of the “development” development environment name in the Account Activity API / Sandbox section. It will be used when subscribing to activity events.
Set Up Twilio Account And Phone Number
To send SMS using the Twilio API, a Twilio account is required. If you don’t have a Twilio account, head over to the Twilio Sign Up page to create one. After creating an account, on the Twilio console dashboard, navigate to the Buy a Number page. Check the "SMS" box and click the Search button to find an SMS-capable phone number you can use in your code. A list of phone numbers and their capabilities will be displayed. Click the Buy button to add one of them to your account.
Get Twilio Credentials
Twilio uses two credentials to determine which project an API request is coming from: The Account SID, which acts as a username, and the Auth Token which acts as a password. These credentials are sent as part of every request to Twilio’s API, to verify the Twilio application making the request.
To access these credentials, log in to your Twilio project console dashboard. As with your Twitter credentials, copy and store them somewhere safe.
Set Up Development Environment
Start by creating a project directory, twilio_twitter_sms, on your computer.
In the twilio_twitter_sms folder, create a new Node.js project by running the commands below in a console window:
The -y flag in the first command above automatically populates your package.json file with the default values. The next line creates a .gitignore file that excludes the files in the project’s node_modules directory so you won’t be managing 3,000+ package files in your project’s repository. The last line adds an open source software license. For more Node.js project initialization options, check out How to Start a Node.js Project by Twilio Software Evangelist Phil Nash.
To complete the project setup run the commands below in your console window to install the required dependencies:
In the project’s root folder, open the package.json file in any text editor of your choice. Under the scripts key, add a start script:
The start script uses nodemon, one of the installed dependencies, to start an index.js file which will be created later.
Set Up Express Server
Express is a popular Node.js web application framework. It provides a lot of mechanisms for web application development, including the ability to create a server and handle requests with different HTTP verbs at different URL paths (routes).
In the root directory, create an index.js file. This will be the entry point to the application. Paste the following code into the index.js file:
The index.js file creates an Express app which starts a server and listens on HTTP port 3000 for connections. It also contains a root route that simply returns a welcome message.
To start the application, run npm start in your console window and visit http://localhost:3000/ in your browser to see a welcome message sent from the server.
The application is currently running on a local server and will not be reachable by any other user on the Internet. To make a local server reachable on the Internet, ngrok helps to expose local servers to the public internet over secure tunnels.
With ngrok downloaded locally and the local server running, open a new console window, move to the download location of ngrok on your computer and run the following command:
Running the command above while connected to the Internet should give you output similar to the image below:
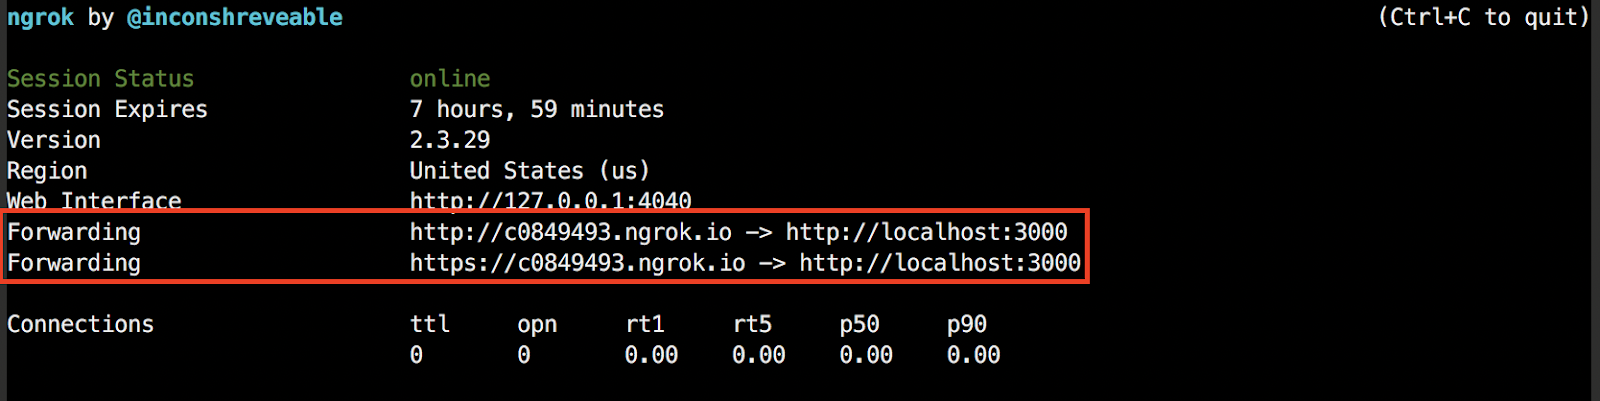
The image shows two forwarding URLs which expose the localhost URL. The application can now be accessed using any of the two URLs. Go ahead and any open any of the forwarding URLs in your browser. You should see the same welcome message as before.
Note: Leave the ngrok session running as you complete the following steps so you won’t have to update the references to the external URL in your code and re-register your webhook.
Store Environment Variables
Communicating with both Twitter and Twilio requires authentication and authorization. This is managed using API secret keys and tokens. To ensure these tokens are private and safe, they will be stored as environmental variables.
In the root directory of the project, create a .env file and add the following to the file, replacing the specific values with the corresponding information from your Twitter and Twilio accounts:
Note: Use the phone number you registered when signing up for a Twilio account as your recipient phone number, as trial accounts are limited to sending to only registered numbers.
To ensure that the credentials in your .env file are safe, add *.env to the .gitignore file in your root directory, then save it. This tells Git to ignore the .env file.
Implement SMS logic
Before going ahead to create a webhook, create a sendSms.js file in the root directory of the project. This file will contain the logic for sending SMS using Twilio. Paste the following code into the sendSms.js file:
The sendSms.js file contains a sendSms function that receives a message body and sends it as an SMS using the Twilio Node.js helper library.
Create and Register a Webhook
Twitter uses a Challenge Response Check (CRC) for confirming the security of your webhook server. This process involves Twitter making a GET request to your application with a crc_token parameter. When the request is received, Twitter expects a JSON response within three seconds containing an encrypted response_token based on the crc_token parameter and your app's Consumer Secret. When successful, a webhook id will be returned.
Create a webhook.js file in the root directory and paste the following code in it:
The code snippet above requires the following libraries, which you’ve previously installed or created:
dotenv – A library for accessing the API secret keys and tokens stored in the .env file.
crypto – A library for handling encryption.
twit – A Twitter API Client for Node.js.
sendSms – The helper function for sending SMS using Twilio.
In addition to the required files, the required API secret keys and tokens are assigned to variables.
Add the following code to the end of the webhook.js file, replacing “6fc692c8” with the comparable code from the console window containing your ngrok session status:
In the code above a Webhook class is created with two static methods; challenge and register. The register method is used to make the webhook verification request to the Account Activity API, passing the webhook url as part of the request.
Twitter sends a GET request to the webhook URL sent in the verification request. The challenge method checks for a crc_token, encrypts it, and sends a response back to the Account Activity API.
Add Event Logic To The Webhook
With the webhook now registered, add a listen method to the Webhook class. This method will receive account activity data from Twitter and send them as SMS. In the webhook.js file, add the following code below to the end of the code in the Webhook class:
The listen method checks the request body for a tweet_create_events key. If it exists, a message is created based on the event details and is passed to the sendSms function.
With the webhook in place, update the index.js file in the root directory with the following, to add the webhook routes to the application by replacing the existing code with the following:
In the code above, three new routes are added to the Express app:
/register_webhook – an endpoint which will be used to register the webhook.
GET /webhook – an endpoint which the Account Activity API will call to verify the webhook.
POST /webhook – an endpoint which will receive incoming Twitter webhook events.
To register the webhook, visit https://6fc692c8.ngrok.io/register_webhook in your browser replacing “6fc692c8” with the comparable value from the console window containing your ngrok session status. You should see a “Webhook successfully registered!” message.
Test The Webhook
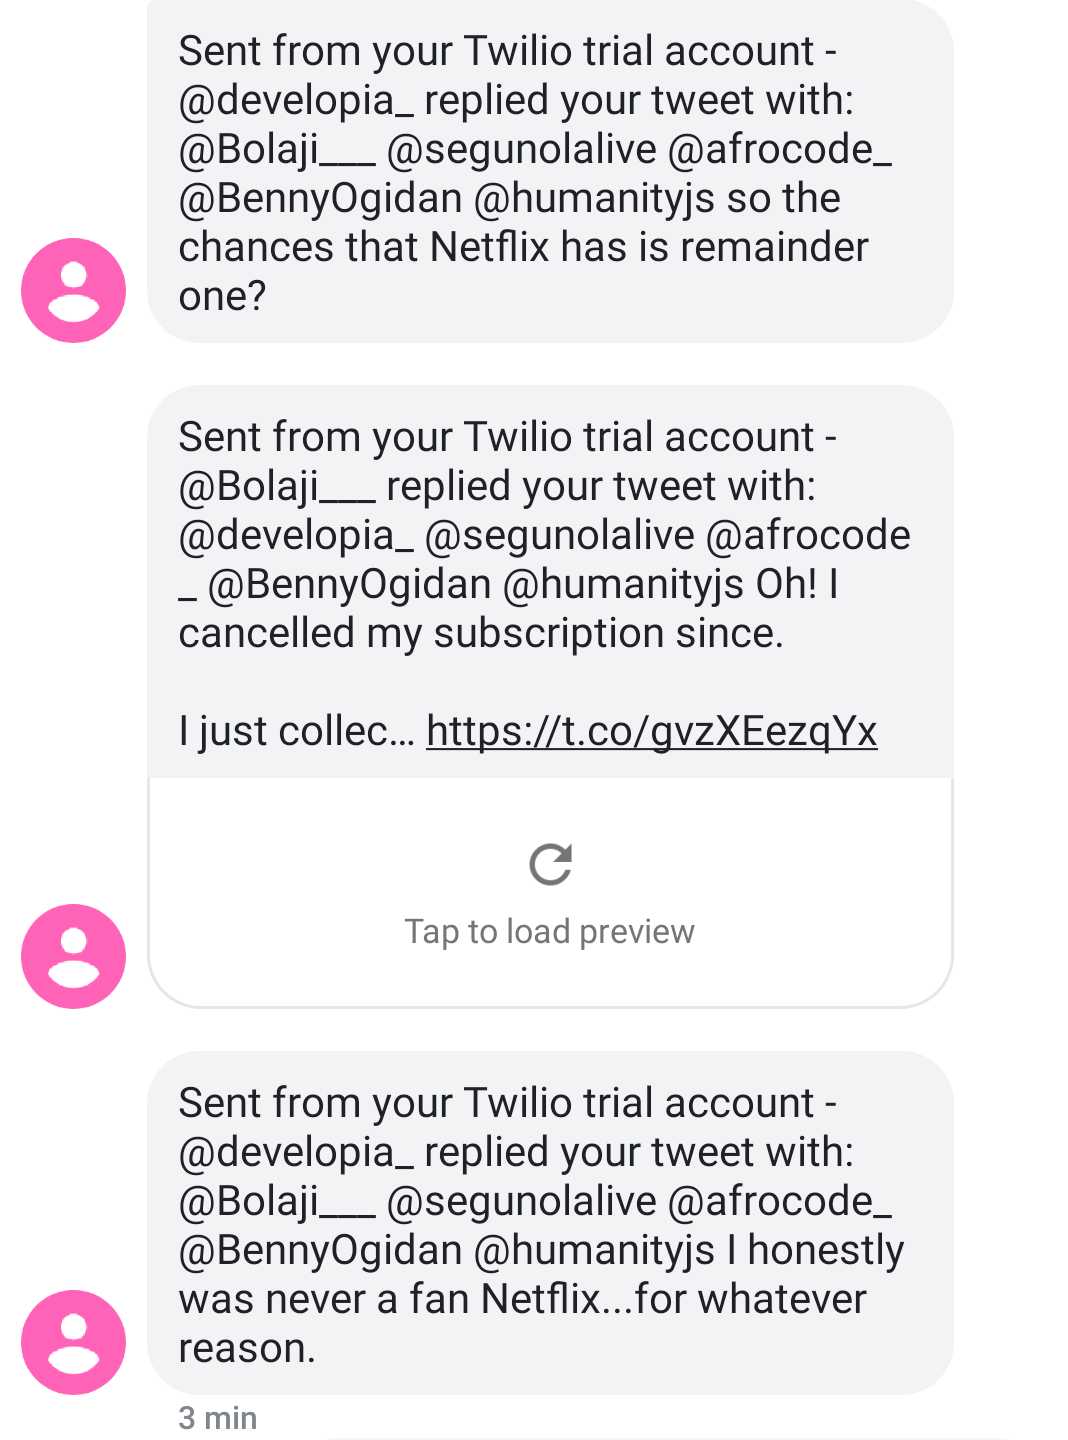
Now that the webhook is completely set up, go ahead and test it. Have a friend mention you, reply or retweet your tweets, you should get messages similar to these:
Summary
In this post, you learned how to set up a webhook to listen to Twitter events and send corresponding SMS using Twilio. Twitter’s Account Activity API offers many more features than we have explored in this post. Among other things, it can be used to build chatbots that help drive customer engagements.
Additional Resources
You can learn more about Twitter’s Account Activity API by visiting it’s documentation here.
You can find the complete code for this post on GitHub.
Chuks Opia is a Software Engineer at Andela. He is also a technical writer and enjoys helping out coding newbies find their way. If you have any questions please feel free to reach out on Twitter: @developia_ or GitHub: @9jaswag.

Related Resources
Twilio Docs
From APIs to SDKs to sample apps
API reference documentation, SDKs, helper libraries, quickstarts, and tutorials for your language and platform.
Resource Center
The latest ebooks, industry reports, and webinars
Learn from customer engagement experts to improve your own communication.
Ahoy
Twilio's developer community hub
Best practices, code samples, and inspiration to build communications and digital engagement experiences.