TaskRouter and the Internet of Things
Time to read: 13 minutes
February 20, 2015
Written by

There are millions of devices hooked up to the Internet and generating data, from refrigerators monitoring their contents to webcams tracking intruders. These connected devices, collectively referred to as the “Internet of Things” often create work that needs to be done by humans. How do we keep track of all that work? How do we assign that work to an appropriately skilled and available worker? How do we know when it’s done?
To solve problems like these Twilio just launched TaskRouter, a service to distribute work that needs to be done to workers who can do it.
In a recent post, Greg Baugues showed how to build an Arduino Yún powered photobooth. In this post we’re going to take the images generated from the photobooth and create a task that only humans can do — coming up with funny captions.
How Does It Work?
The photobooth tutorial culminated in uploading photos to Dropbox. This tutorial picks up where it left off.
- When a new file is uploaded to Dropbox a task gets created
- Volunteers text into the system and are added as a worker
- Workers are set to “Idle,” indicating that they are available to do work
- TaskRouter matches a picture that needs captioning with an idle worker. Our app sends them a photo via MMS
- The worker is marked as “Busy” until they reply with a caption
- Once a caption is received, worker is changed back to “Idle” and waits for their next assignment
Getting Started
We’re going to build our distributed photo captioning app using Ruby and Sinatra.
You don’t need a fully functional Arduino powered photobooth to follow along with this post. You do, however, need to set up a Dropbox app. You can find those instructions in the “Arduinos and Dropbox” section in the photobooth tutorial. Once you have your Dropbox app setup you can mimic the photobooth by manually uploading files to Dropbox.
In addition to a Dropbox app, you’ll need:
- a free Twilio account
- an MMS-enabled Twilio number (only available on US and Canadian numbers)
- ngrok, free IP tunneling software
A Note on Ngrok
Your development machine is most likely hiding behind a router and lacks a publicly accessible IP address. However, both Dropbox and Twilio need to make HTTP requests to this app, so you’ll need to create a tunnel from the public internet to your local server.
Our favorite way to do this is ngrok. If you haven’t already, download ngrok and move it to your home directory. Also sign up for a free ngrok account and follow the instructions on how to set up custom domains. This way you won’t have to change your webhook urls on the Twilio and Dropbox dashboards everytime you restart ngrok. If you’d like to learn more about ngrok, check out Kevin Whinnery’s great tutorial on ngrok.
Once you’ve got ngrok installed, start it up with a custom subdomain (your name perhaps) and point it at port 9292:
Leave ngrok open in a terminal window for the rest of this tutorial.
Setting Up TaskRouter
The best place to start building a TaskRouter application is the TaskRouter dashboard. TaskRouter applications are scoped to a Workspace. Let’s make one:
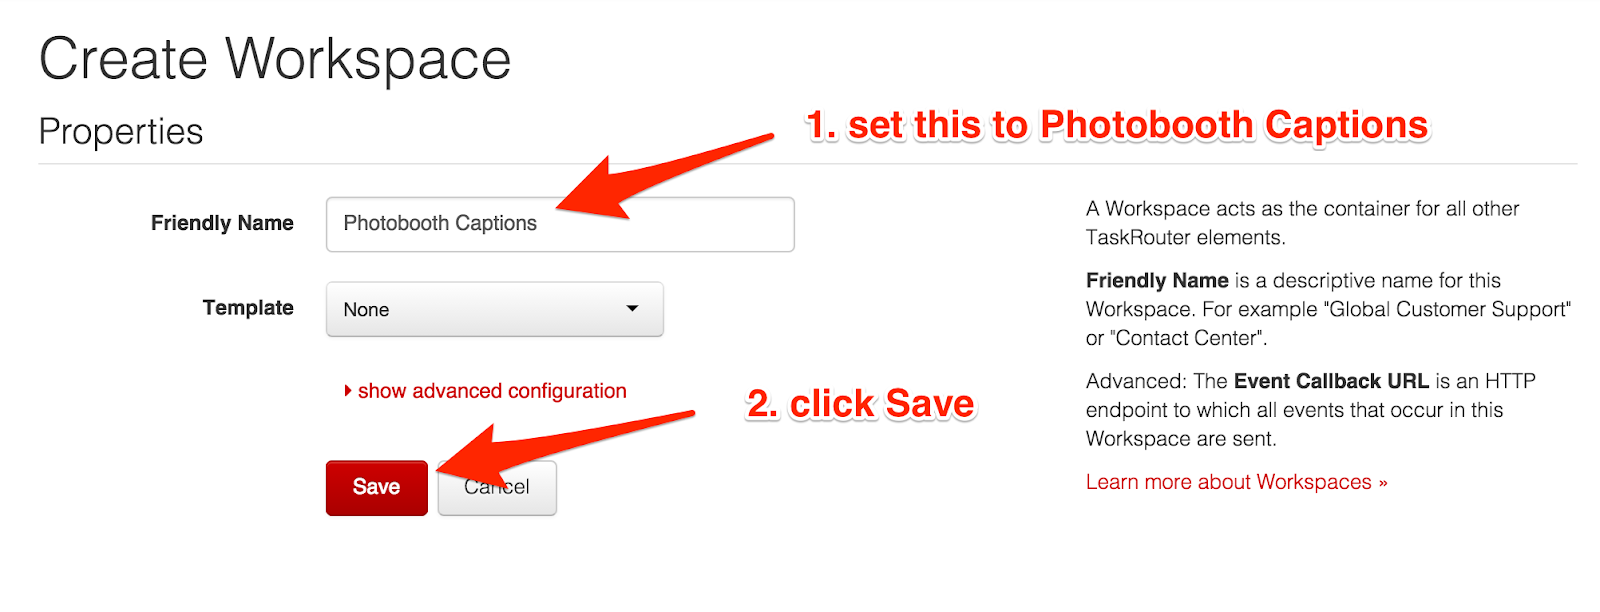
- Click Create Workspace
- Give your workspace a friendly name of “Photobooth Captions”
- Leave Template set to None
- Click Save
Once your workspace is created, change the Default Activity from “Offline” to “Idle.” We’ll discuss why in a few minutes but the short answer is that we want our workers ready to receive work as soon as they enter the system.
Next we need to create a Task Queue. Click Task Queues at the top of the dashboard, then click Create Task Queue and configure it with the following properties:
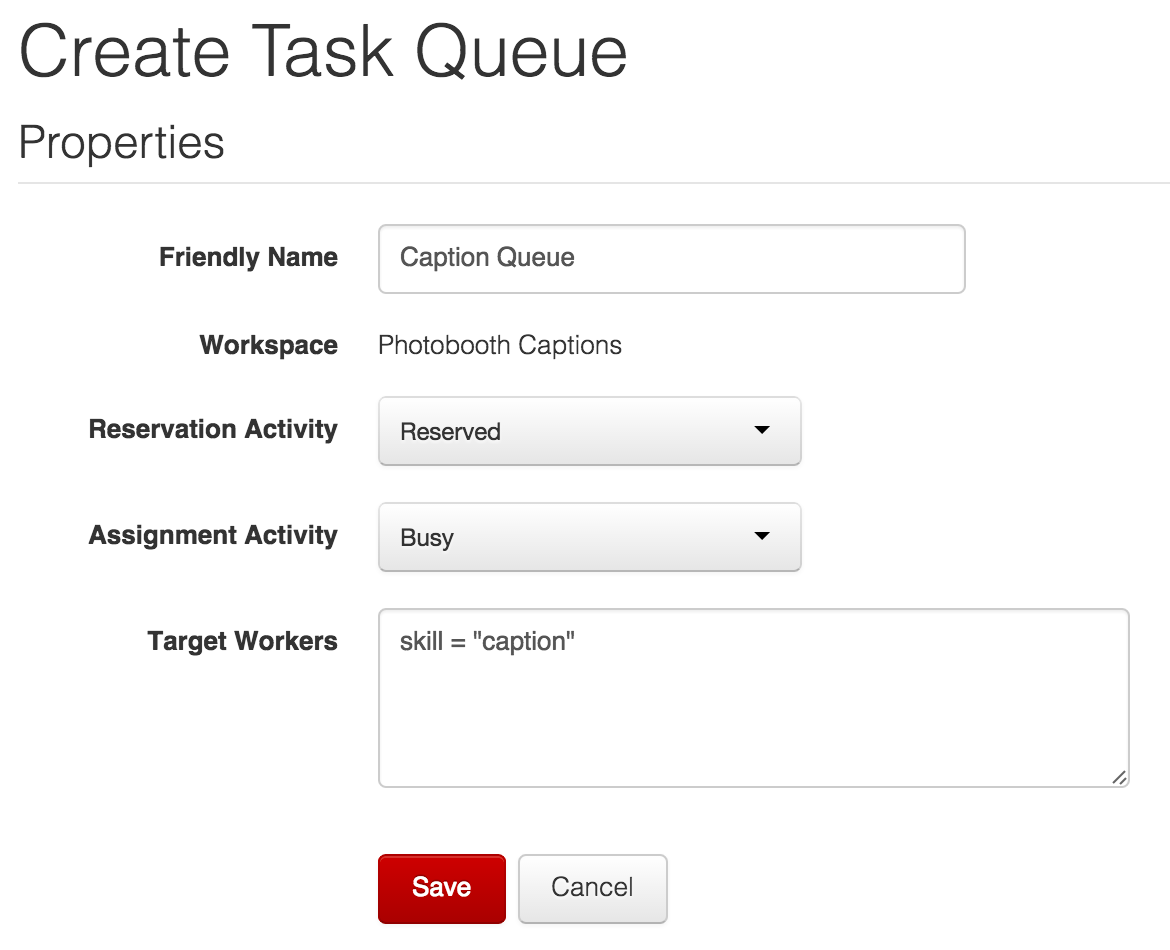
The key property here is Target Workers which states that workers eligible to complete Tasks in this Task Queue must have a skill of “caption”. For the purposes of this tutorial we’ll only have one kind of worker but Task Queue really starts to shine when you have a multitude of task types requiring a multitude of skillsets. Once you’ve completed this tutorial you’ll be in a great position to create something more complex.
Once you’ve configured your Task Queue, click Save.
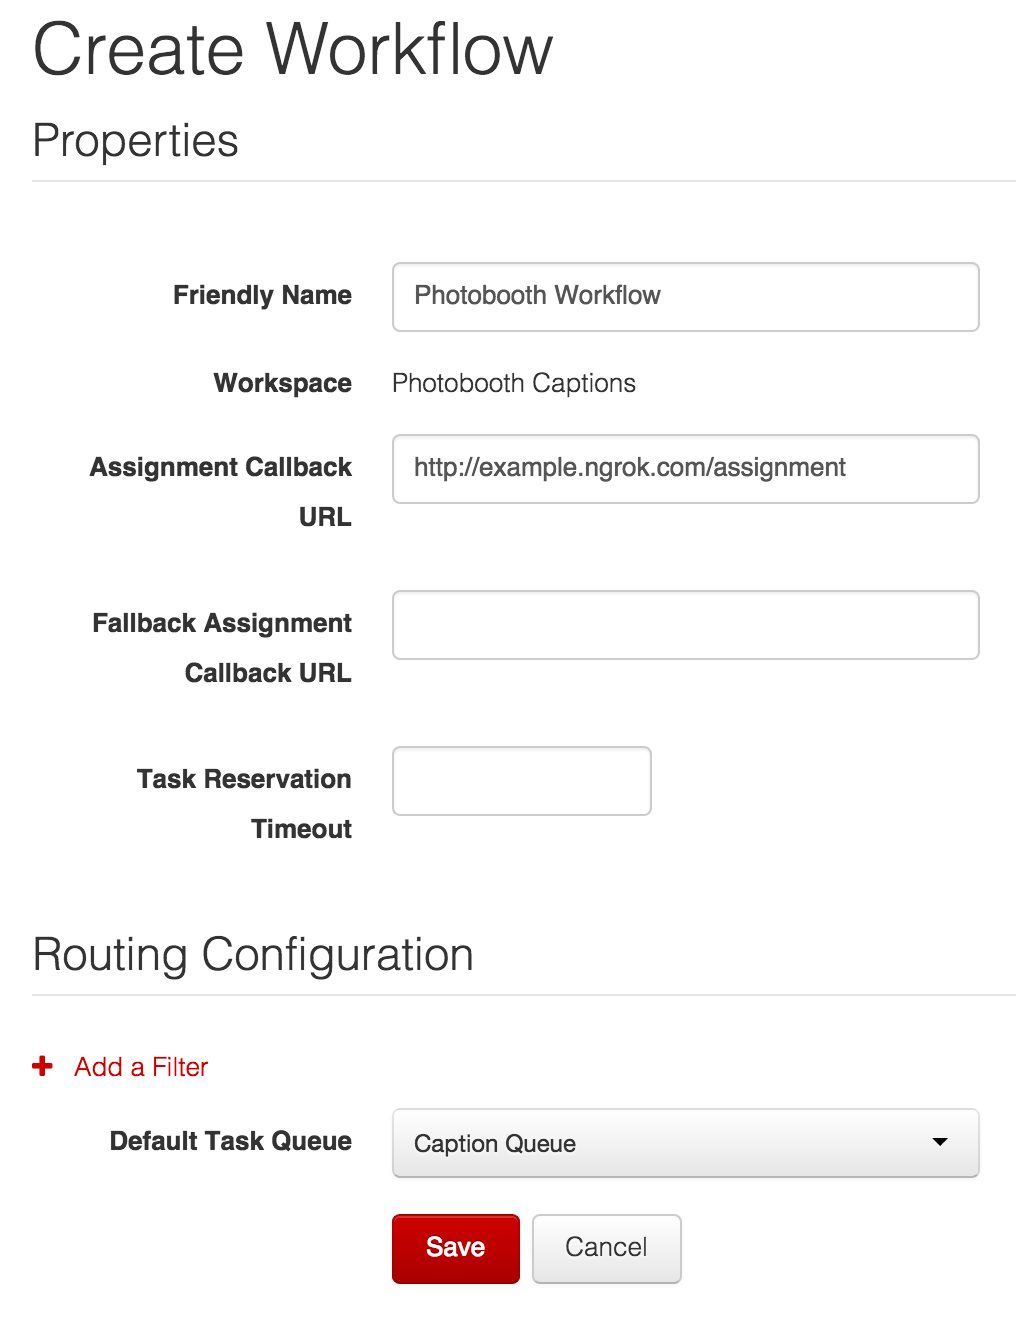
Next we need to create a Workflow which will route Tasks into our Task Queue. Click Workflows at the top of the dashboard, then click Create Workflow. Configure it with these properties:
- Friendly Name: Photobooth Workflow
- Assignment Callback: http://example.ngrok.com/assignment (replace
examplewith your ngrok subdomain) - Leave Fallback Assignment Callback URL and Task Reservation Timeout blank
- Leave “Caption Queue” as the default task queue
- Click Save
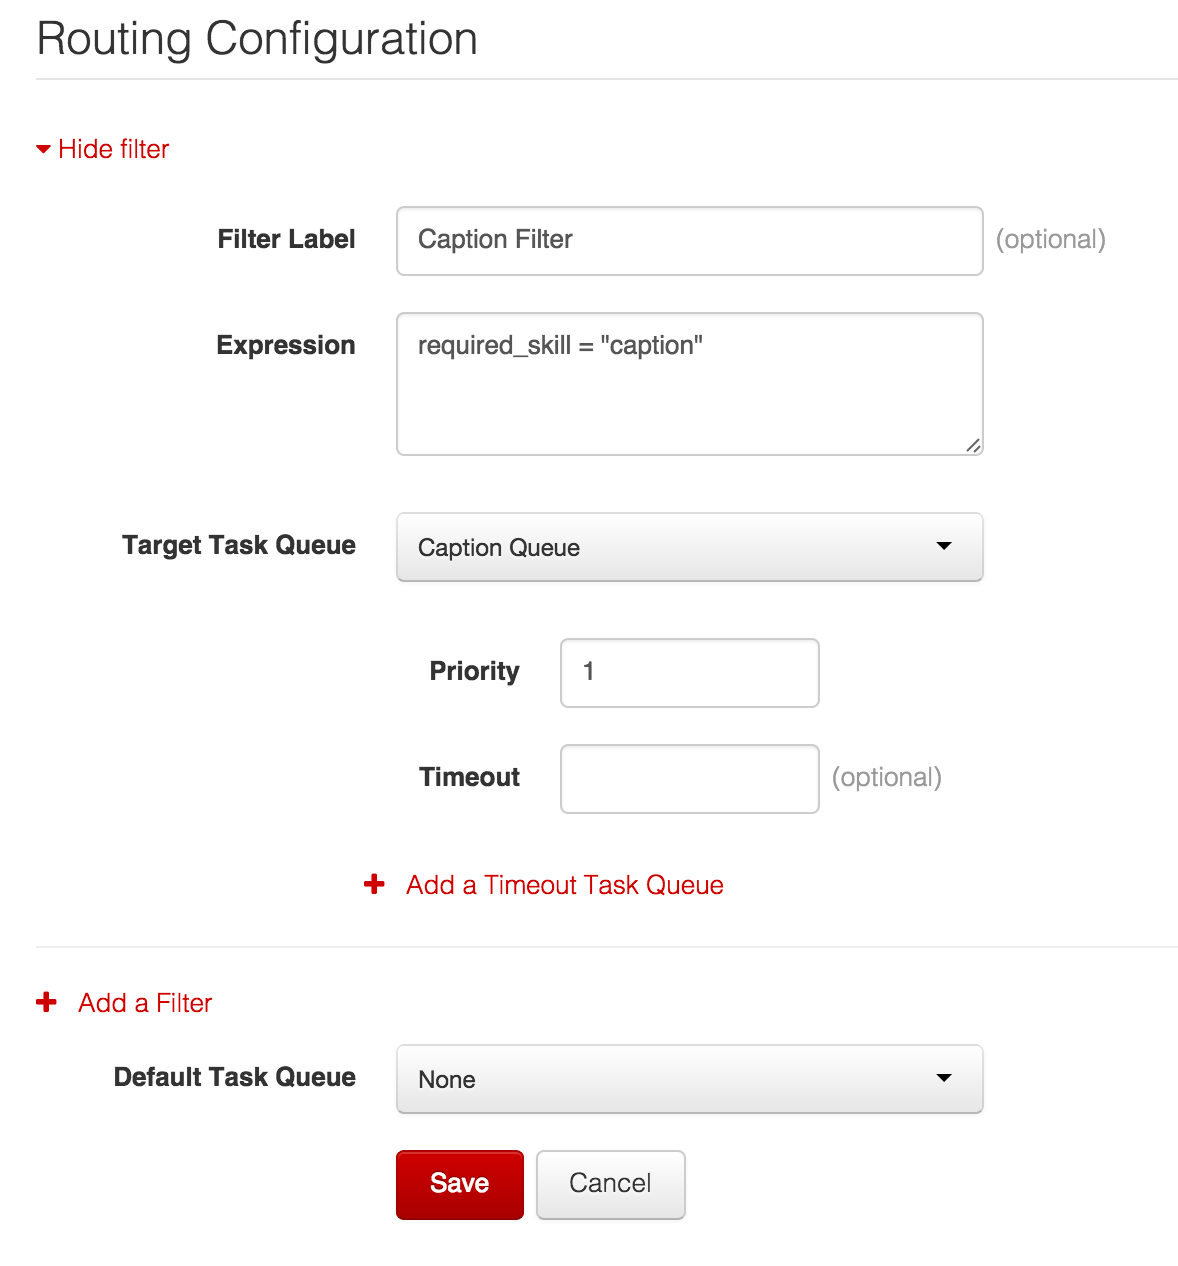
By default, the Workflow will place Tasks into the Caption Queue because of the Default Task Queue setting. If we wanted to be more explicit about this to prepare for a more robust system, we could create a Filter in the Routing Configuration section. Let’s configure a filter for our captioning tasks. Click the Add Filter button and set the following properties:
- Filter Label: Caption Filter
- Expression:
required_skill = "caption" - Target Task Queue: Caption Queue
- Priority: 1
With this filter in place, a Task with required_skill set to “caption” in its attributes will be routed to the Caption Queue. Your Routing Configuration should look like this:
Click Save to complete the Workflow creation. This is all the setup we need to do on our dashboard. Let’s get into the code.
Creating the Sinatra App
Our application will be built in Ruby using Sinatra. Let’s create a directory for our app and a few of the files we’ll need to get started:
Then edit the Gemfile:
Install bundler if you haven’t already:
Then install your gems:
Along with the gems for the Dropbox and Twilio, we’ve included Envyable, a gem to manage environment variables. (For more on this, read Phil Nash’s excellent post on managing environment variables in Ruby).
To use envyable we need to create a config directory and a env.yml file:
Open env.yml and add the following YAML:
Copy in the values for your Twilio Account SID, Twilio Auth token — you can find these by clicking “Show credentials” in the top right of the Workspace dashboard. Then copy in the Workspace SID and Worklow SID — you can find these on their respective pages. Then paste in the phone number of one of your MMS enabled Twilio phone numbers.
For the Dropbox token, visit the Dropbox App Console and click into the app you created earlier. In the OAuth 2 section, click Generate under “Generated access token” and copy the resulting token into the YAML.
With our env.yml in place, our environment variables will now be accessible via ENV['NAME_OF_VARIABLE'].
Now let’s start on our Sinatra app. Open ‘app.rb’, paste these lines, and save the file.
Finally, edit the config.ru which tells our server what to do when we run rackup.
If you want to test that this works so far, see if you can start your server without getting any errors:
Configuring the Dropbox Webhook
Our application will utilize Dropbox’s webhook to receive notifications when files are uploaded. This allows us to create Tasks for our app as the photos come in. Before we use the webhook though, we have to verify our app with Dropbox.
For the verification process, Dropbox will make a GET request to our webhook with a challenge parameter. Our HTTP response must simply include the text of that challenge.
Create a new route in app.rb to handle this request:
Restart the app. Then visit the Dropbox App Console and add http://.ngrok.com/dropbox to the Webhook URIs field.

Once you click Add, Dropbox will verify our domain. We could delete the GET /dropbox route after that, but if we ever change domains (e.g., deploy to production) then we’re going to need to reauthorize again. Might as well leave it there.
If you’d like to learn more about this authorization process or about interacting with the Dropbox API in general, check out their well-written API docs.
Using the Dropbox API’s /delta Endpoint
When a photo is uploaded, Dropbox will make a POST request to our /dropbox webhook (this is in addition to the GET /dropbox we used to verify our app). The information provided in the POST request is pretty limited. It only contains an array of User IDs that have new file changes in the Dropbox app we configured but it doesn’t contain any additional information about the actual file upload itself.
Since we the webhook request doesn’t tell us which files were added, we need to request a list of recent Dropbox changes via their delta method. In order to make sure we’re not getting duplicate changes, we need to save a “cursor” returned to us by Dropbox and pass it back in on subsequent delta calls. For the sake of moving fast in this tutorial, we’re going to do this the wrong way and store the cursor in a global variable. Please use a proper datastore in a real app.
Below Envyable.load('./config/env.yml', 'development') in app.rb, add this:
Now we’re going to create a post /dropbox route which will:
- create a REST client using our Dropbox access token
- retrieve a list of changes to our Dropbox folder since our last cursor
- save the new cursor
Then it will iterate through each file in the list of changes and:
- grab its filename
- request a publicly accessible url from dropbox using our REST client
- create a new task in TaskRouter (we’ll leave a placeholder for this for the moment)
And finally, it will return a 200 — otherwise Dropbox will keep trying the request over and over and over again.
Here’s the code:
If you’d like to learn more about what we’ve done here, check out Dropbox’s core API docs.
Create a Task with TaskRouter
We’re going to be doing a lot of work with Twilio, so let’s create a twilio_helpers.rb file to keep our code clean:
Now let’s create a helper method in twilio_helpers.rb to instantiate a TaskRouter REST API client:
Then let’s require the twilio helpers in our app.rb:
We’ll use our client helper to create a new task with the image_url as an attribute. Replace the # create task comment with:
Let’s test what we’ve build so far. Restart your Sinatra server and upload a file to Dropbox — either via your Photobooth or by simply dragging an image into the folder of the your Dropbox app.
Once the file uploads, the webhook will fire and hit the /dropbox route, which will then create a task in TaskRouter. Open the TaskRouter dashboard and go to the Tasks page. You should see a new Task. If you click on the Task, you’ll see the image_url.
Create a Worker in TaskRouter
Now that we can create tasks, we need workers who can complete those tasks.
Workers will join the system by texting our Twilio number. We need to configure the webhook that Twilio will use when it receives a new text. Open the numbers list on your Twilio dashboard, click on the phone number you entered earlier into the env.yml, and configure the number by setting the Messaging Request URL to http://.ngrok.com/message.
For the sake of this post, we’re going to concern ourselves with two scenarios when someone texts in:
- They’re texting in for the first time. We’ll create a worker using their phone number as a friendly name.
- They’re providing a caption. We’ll save it, then set the worker as ready to receive more tasks.
Before we create the route to handle the webhook, let’s create two more helper methods in twilio_helpers.rb.
First, a method to check if a worker exists for a given phone number:
Second, a method to simplify the generation of TwiML responses which we’ll use to reply to people when they text into the system:
Now let’s head back to app.rb and create a /message endpoint.
For now we’ll focus on the first use case: someone texts in and a worker with that number does yet not exist:
In that case we will create a new worker with:
- an attribute defining their phone number
- the friendly name set to their phone number to make them easier to identify
We’ll also reply with a text message telling them to hold tight and wait for their photo.
Let’s test this out. Restart your server, then send a text message to your Twilio number. Once you get a reply, check the workers tab on the TaskRouter dashboard. You should see a new worker that has your phone number as a friendly name.
Something else is afoot though. If you look at your server, you’ll see that TaskRouter tried to make an HTTP request at /assignment, but we haven’t defined that route yet. Let’s do that now.
Assign Work
When we have a task in the system and an idle worker who’s qualified to do the work, TaskRouter starts to perform its magic. When TaskRouter sees a potential match, it makes an HTTP request to the assignment webhook defined on our Workflow dashboard. This HTTP request sends information about the task and asks if you’d like the worker to accept it.
In that request, we have everything we need to send a worker their task: the image_url and worker’s phone number.
Let’s create a route that will:
- respond to a POST request at /assignment
- extract the
phone_numberfromworker_attributes - extract the
image_urlfromtask_attributes - store the image_url for later
- call a twilio_helper named
send_photowhich we will define in just a second - return JSON instructions to TaskRouter to tell it that the worker accepts the task
We also need to store data about our image urls and captions. We’re not going to tell you how to do that in this post. Feel free to use MySQL, DynamoDB or the storage engine of your choice. For the purposes of this post, we’ll just leave a comment where you would save the pieces of data you want to persist.
Create your route to handle assignment:
The first four lines extract the image_url and phone_number from the parameters sent to us by TaskRouter. Then we send a photo using a Twilio helper we’ll define in a second. The last two lines return JSON telling TaskRouter that our worker accepts the task.
Now let’s create our send_photo method in twilio_helper.rb:
We’ve got everything in place to assign a task to a worker and to send them an image to caption. Let’s try it out.
We need your phone number to be a “new” worker for this to work, so go back into your dashboard, click on the worker you created previously, toggle their Activity to “Offline” and then delete it.
Then restart your server to load the changes we just made. After that, send a text to your Twilio number again, and our app will respond with the introductory text like last time.
Now TaskRouter makes a POST request to your newly created /assignment route. You can watch this happen by visiting localhost:4040 in a browser. That route will fire off the MMS with the Dropbox picture to your phone.
Responding to the Worker’s Message
We’ve created a worker in the ‘Idle’ state and they’ve just received their first captioning task. What happens when they text back? After we’ve saved the worker’s caption, we’ll transition them back to the ‘Idle’ Activity so that they will receive more photos to caption.
Let’s create a Twilio helper to retrieve a worker based on their phone number. In twilio_helper.rb:
Let’s create another helper to retrieve the SID for the ‘Idle’ activity:
And then we’ll use those two methods to change the worker’s activity back to “Idle”:
With these helpers in place we can respond to the existing worker’s incoming message. In the /message endpoint of app.rb let’s add the following code to the if worker_exists? block that we said we’d come back to:
That’s all the code for this app. Restart your server to reload the changes. Then send a hilarious text to your Twilio number. You’ll get a thank you back and your activity in TaskRouter will be switched back to Idle. If there are more tasks waiting in the taskqueue, TaskRouter will make another POST request to the /activity route and your phone will light up with another picture. You’ll respond with a funny caption, and so it goes.
Next Steps
Let’s recap. In this post we:
- Created a new workspace, workflow and task queue in TaskRouter
- Created tasks in response to a Dropbox upload
- Allowed volunteers to sign up as workers via text message
- Assigned photos to be captioned by workers
- Updated a worker’s status once the task was completed
TaskRouter has given us a solid foundation for our application that is easily extendable to an even more diverse set diverse set of tasks across workers with varying skills. Consider extending what we built in this post with the following suggestions:
- Create specialized captioners (for instance, some people might be better at captioning wedding photobooth pictures while others are better at office party photos).
- Create a second Task Queue for people who can rate captions (the Internet is great at quantity but we might want some quality control).
- Build a website to show off these hilarious captions.
I’m really excited to see what you build with TaskRouter. If you have any questions while you’re building your application, please reach out to me via email at brent@twilio.com or hit me up on Twitter @brentschooley.

Related Resources
Twilio Docs
From APIs to SDKs to sample apps
API reference documentation, SDKs, helper libraries, quickstarts, and tutorials for your language and platform.
Resource Center
The latest ebooks, industry reports, and webinars
Learn from customer engagement experts to improve your own communication.
Ahoy
Twilio's developer community hub
Best practices, code samples, and inspiration to build communications and digital engagement experiences.