Transcribing Phone Calls using Twilio Media Streams with Java, WebSockets and Spring Boot
Time to read:
February 03, 2020
Written by

Websockets are a web technology used to create long-lived bidirectional connections between a client and web server over the internet. With Twilio Media Streams you can stream real time audio from a phone call to your web application using WebSockets.
This blog post will show how to create a WebSocket server in Java using Spring Boot which will receive real time audio from a phone call, and forward the audio data to Google’s Speech-to-Text to provide a live transcription of the voices on the call.
Requirements
In order to follow along, you will need to have:
If you just want to skip to the end, you can check out the completed project on GitHub.
Getting Started
The fastest way to create a new project with Spring Boot is to use the Spring Initializr. Leave Project, Language and Spring Boot version at their defaults, and for Group and Artifact in the Project Metadata you are free to choose, so long as you follow the Maven naming conventions. In the example code, I used lol.gilliard as the Group and websockets-transcription for the Artifact.
Lower down the page, add the WebSocket dependency then click the “Generate” button to generate and download the project. It will be downloaded as a zip file which you can unzip and import into your favourite IDE.

Building the Websocket Server
Spring will be able to manage the creation of the WebSocket connection, leaving the job of handling the data to us. Data is sent over WebSockets in small chunks called “Messages”.
Spring expects us to write code that can handle these messages. The easiest way to do this is to extend Spring’s AbstractWebSocketHandler.
Creating the WebSocket Handler
The project you downloaded from the Spring Initializr will have a single class in a subdirectory under src/main/java called <your_artifact_name>Application.java, and in the same package as that you should create a new class called TwilioMediaStreamsHandler, with this code:
When a new WebSocket client connects the afterConnectionEstablished method will be called. Then the handleTextMessage method will be called repeatedly, every time there is a message. When the connection is closed the afterConnectionClosed method will be called.
Notice that the WebSocketSession is passed into all these methods, which enables the app to keep track of multiple WebSocket connections at once.
Spring’s WebSocket support can handle binary messages and text messages using separate methods. Twilio Media Streams supplies the audio data encoded as JSON which is why it’s only necessary to override the handleTextMessage. The first iteration of this code will print the size of each message to System.out to verify that messages are being received, which is done in the body of the handleTextMessage method:
Configuring Spring to use our Handler
A WebSocket connection is established by the client sending a regular HTTP request. The server lets the client know that this endpoint expects WebSocket data with a handshake that starts with a response of HTTP 101 Switching Protocols. The client will acknowledge this and start sending messages. Spring can handle all this for us, with a little configuration.
In the same package as your existing classes create a new class called WebSocketConfig. This class will configure Spring to ensure that requests to a particular path (in our case /messages) will be handled by our WebSocketHandler code from above.
This doesn’t compile as-is because implementing WebSocketConfigurer means we need to implement a method called registerWebSocketHandlers:
Streaming a Phone Call
This is enough to handle WebSocket clients - we now need to configure something to send data to our WebSocket endpoint. Enter Twilio Media Streams.
Twilio 101
You can buy a phone number from Twilio and configure what happens when someone calls it by creating a webhook which responds with a configuration language we like to call TwiML.
The Spring Boot application will serve this TwiML, as well as handling the WebSocket connections. Use the Twilio Java Helper Library, by adding the following to the <dependencies> section of pom.xml, next to the spring-boot-starter-websocket dep:
Next, create a class called TwiMLController in the same package as your others which will serve the TwiML:
The TwiML created here has 3 parts:
- Say a welcome message
- Start the Media Stream, using the same hostname as the TwiML request and a path of
/messages - Pause for 30 seconds, to give the caller time to speak. After 30s the call will be ended, but of course the caller can hang up before that if they want.
Configuring Twilio to use the Application
In order for Twilio to call your app, it will need to be available on a publicly accessible URL. As it is currently configured, the app will listen only on localhost, which is probably (hopefully!) not accessible from the internet. There are several options for public hosting, such as AWS, DigitalOcean or Azure, but for our purposes it is simpler to use ngrok. Ngrok is a free tool that once installed can create a temporary tunnel from a public URL to your localhost.
Start your application running by using this command in a terminal, or through your IDE:
Then start ngrok with
You will see a public URL in the output for ngrok, different from the one below, but similarly composed of random letters and numbers:
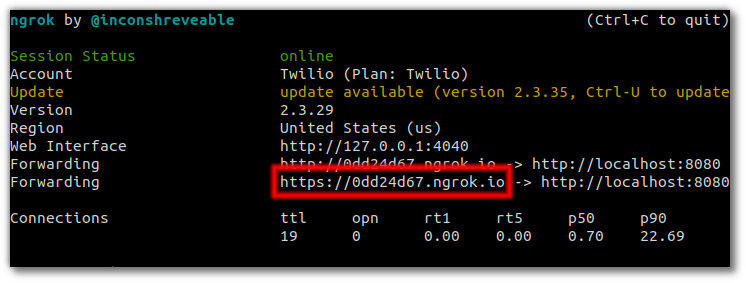
You can test it by loading https://<YOUR_NGROK_SUBDOMAIN>.ngrok.io/twiml in your browser, and you will see a response like:
Setting up a Twilio phone number
Buying and configuring a phone number with Twilio only takes a couple of minutes. If you don’t already have a Twilio account, then a free trial account will work just fine for this app.
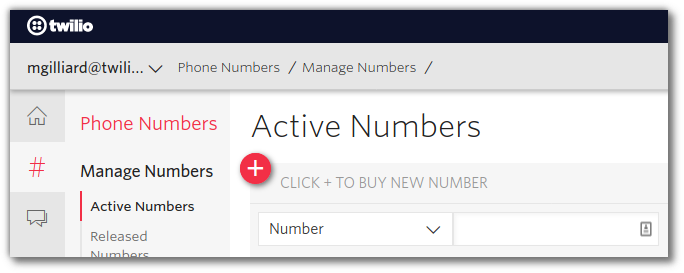
Buying a Phone Number
On the phone numbers page in your console you can buy numbers from hundreds of countries:
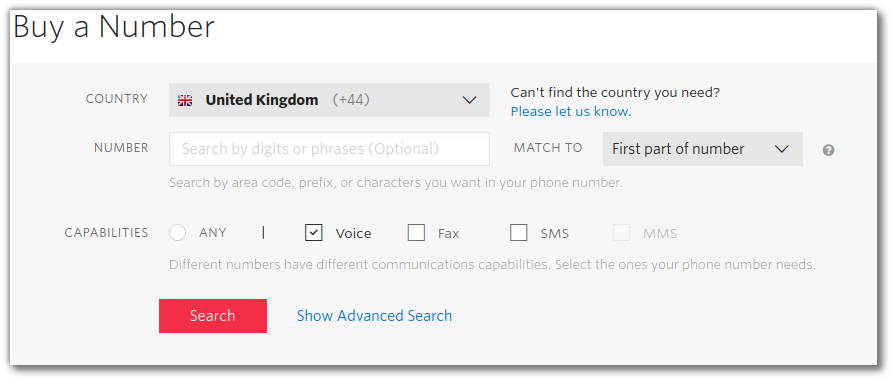
Choose one which is local to you, making sure that you select Voice capability:
After buying the number, you will be looking at the phone number configuration screen. Use the ngrok URL as above (don’t forget the /twiml at the end), and because we used the @GetMapping annotation in code, change the method to HTTP GET:
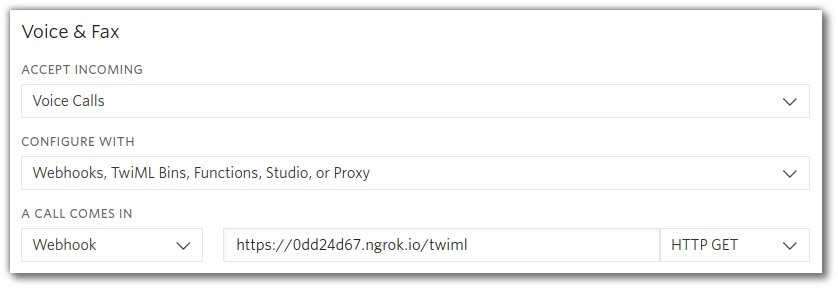
Save this configuration and you are all ready to call the number
Call your new phone number, and you’ll hear the <Say> message read out by a robot, then the Media Stream will start and the console will show something like this as you talk:
🎉🎉 Congratulations 🎉🎉
You’ve got a WebSocket server up and running with Spring Boot, receiving live audio data from a phone call to your Twilio number.
There are loads of things you could do with the audio stream. The next part of this post will show one example: forwarding the data to Google’s Speech to Text service for live transcription.
Streaming Data to Google’s Transcription Service
Google’s Speech to Text service can accept streaming data, which makes it a good fit for our project. To use it you will need to set up a project and download your credentials to a file whose location is stored in the GOOGLE_APPLICATION_CREDENTIALS environment variable. It’s free to do but you need a credit card to create the account. You can follow Google’s instructions to do all that, and I’ll have a cup of tea and wait for you to come back.

Now that you’ve set up your Google project, we can continue.
You will need to add a new class to extract the data from Twilio’s WebSocket messages and send it to Google in the right format. Based on Google’s example code, I have created a class which can be copied from the repo on GitHub and used directly. Remember that your package name will probably be different depending on what you chose for Group and Artifact at the beginning. Your IDE should help you out here.
You will need to add a couple more dependencies into your pom.xml (next to where you added the dependency on the Twilio Helper Library):
Now, the last thing to do is change the code in TwilioMediaStreamsHandler to use the GoogleTextToSpeechService:
On line 13 a Map from WebSocketSession to GoogleTextToSpeechService is created, so that it is possible to support multiple inbound calls simultaneously without confusing Google by mixing up all the audio streams. Then on line 26, each incoming message’s payload is sent to a GoogleTextToSpeechService, which is configured to print out the transcription whenever Google sends it back.
You should still have ngrok running - if not, restart it with ngrok http 8080. Restart the server with ./mvnw spring-boot:run and call your number again.
After the spoken message you can talk and you will see something like this in your console:
Isn’t it wonderful what you can achieve with a few classes and some powerful cloud services?
What next?
There are tons of possibilities now: You could stream the text to a translation service, record it into a file, try your hand at some sentiment analysis or pick out keywords that can trigger a follow-up text message after the call. I’m excited to hear what you do next with Java, WebSockets and Twilio’s Media Streams. Let me know in the comments below, or find me online:
Twitter: @MaximumGilliard
Email: mgilliard@twilio.com

Related Resources
Twilio Docs
From APIs to SDKs to sample apps
API reference documentation, SDKs, helper libraries, quickstarts, and tutorials for your language and platform.
Resource Center
The latest ebooks, industry reports, and webinars
Learn from customer engagement experts to improve your own communication.
Ahoy
Twilio's developer community hub
Best practices, code samples, and inspiration to build communications and digital engagement experiences.