ServiceNow and Twilio IVR: Integrated for More Responsive IT Management
Time to read:
November 01, 2022
Written by
Reviewed by
This post is part of Twilio’s archive and may contain outdated information. We’re always building something new, so be sure to check out our latest posts for the most up-to-date insights.

According to Gartner, the average cost of IT downtime, in terms of lost business and sales, is $5,600 per minute. In this post, I want to demonstrate how Twilio can enable customers to minimize their exposure to these costly outages and manage their digital and IT operations more efficiently by integrating with leading digital workflow platforms, such as ServiceNow.
- Twilio is a next generation fully programmable customer engagement platform.
- ServiceNow IT Service Management (ITSM) is a cloud-based platform designed to improve IT services, increase user satisfaction, and boost IT flexibility and agility. ServiceNow ITSM is a de facto standard for building digital workflows for IT operations using ITSM.
- With Twilio Event Streams and AWS Kinesis, it is straightforward to build a fully event driven incident management platform to automate more processes and improve the customer experiences.
In the following example I will show how to integrate Twilio Event Streams to capture events from a Twilio IVR and ingest them into Amazon Kinesis in real-time.
High Level Architecture: Event Streams, IVRs, ServiceNow, and Kinesis
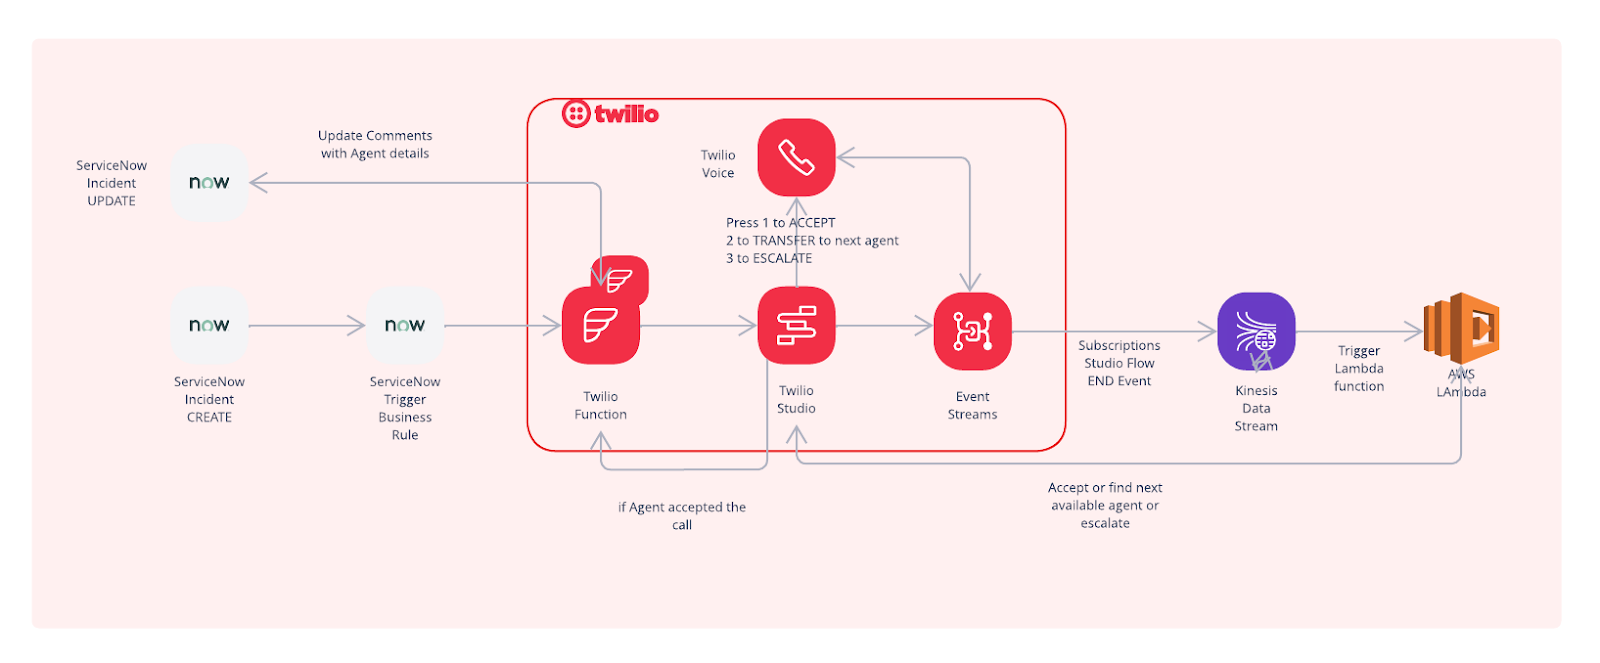
When a new incident is recorded in ServiceNow, an automated IVR workflow will be triggered based on the high priority incident business rules created in ServiceNow. The programmable IVR flow (built with Twilio) will try to find and call an agent who can accept the incident, reject it so that the next available agent can be called, and so on. The agent has the ability to escalate to the appropriate resources until either someone acknowledges the incident by accepting the call or exits the flow. At the end of the flow, the incident ticket is updated with the appropriate comments.
The application is targeted to improve the incident management workflows for internal IT operations employees and the line of businesses within the company.
Find Agent Or Escalate Flow
Let's look at a typical workflow of an incident management IVR system.
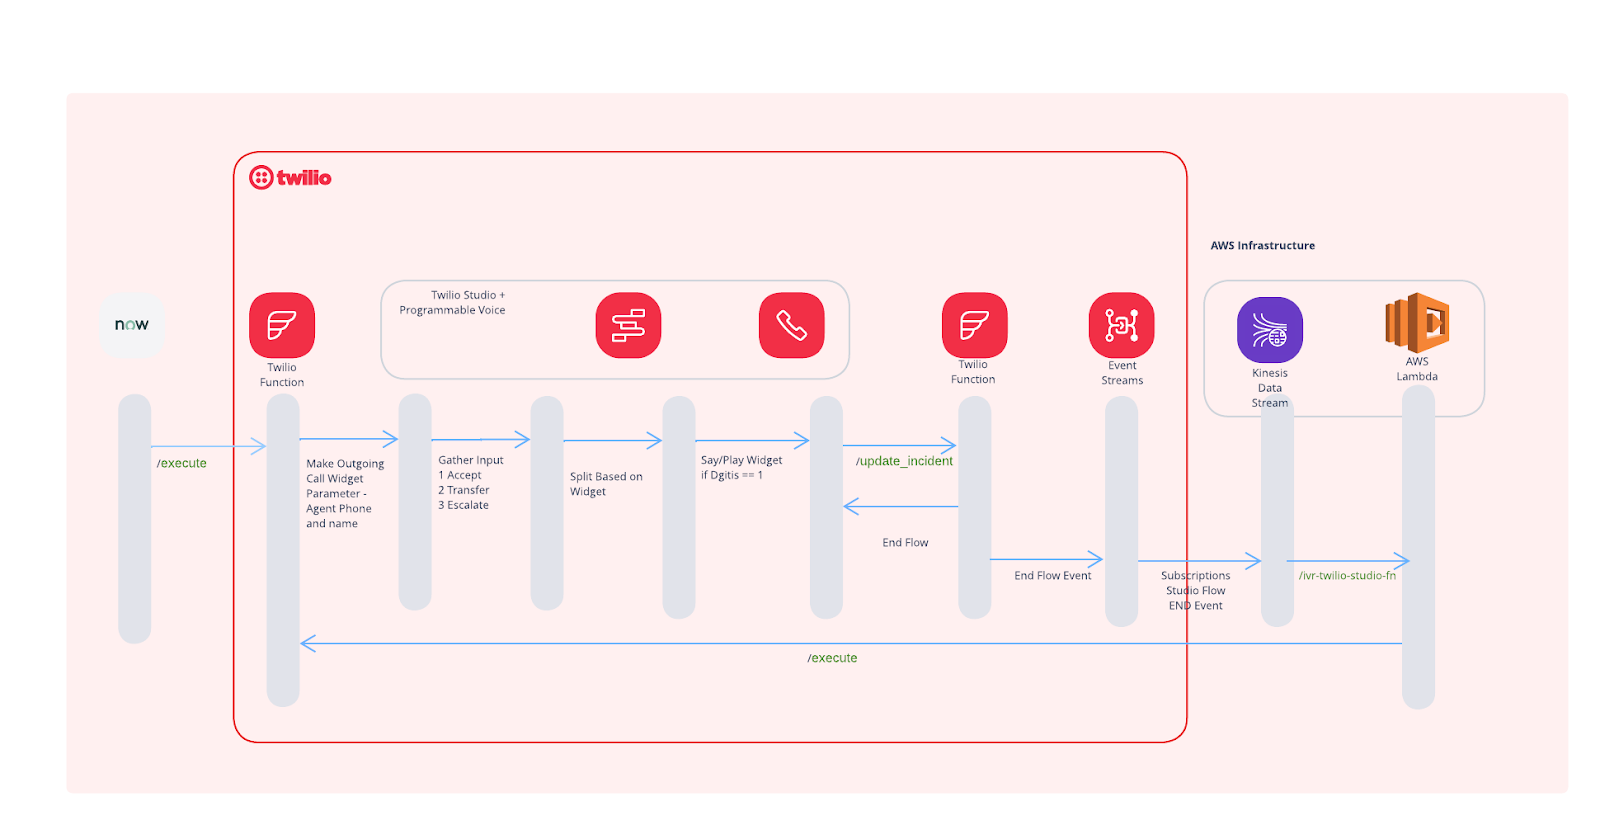
ServiceNow flow that will trigger the call from Twilio Studio. As the call progresses the call events are sent from EventStream to AWS Kinesis stream
IVR Flow
The Twilio Studio IVR flow is triggered from 2 places
- When the ServiceNow incident is created from the developer instance.
- When the Twilio Flow ends, an event is created in the sink created in Twilio Event Streams (backed by AWS Kinesis)
IVR Flow States
|
Action |
IVR Flow |
Description | |
|
1 |
A new ServiceNow incident is created |
First available agent receives Call. User is presented with option
| |
|
2 |
Agent selects 1 |
Updates ServiceNow ticket and ends the flow. | |
|
3 |
Agent selects 2 |
a. Current execution flow ends. b. An event is generated c. Triggers Flow again with information of the next available manager. |
Continues with same flow as #1 |
|
4 |
Agent Selects 3 |
a. Current execution flow ends. b. An event is generated Triggers Flow again with information of the escalation manager. |
Continues with same flow as #1 |
|
5 |
No Agents available |
Executes #2 with comments |
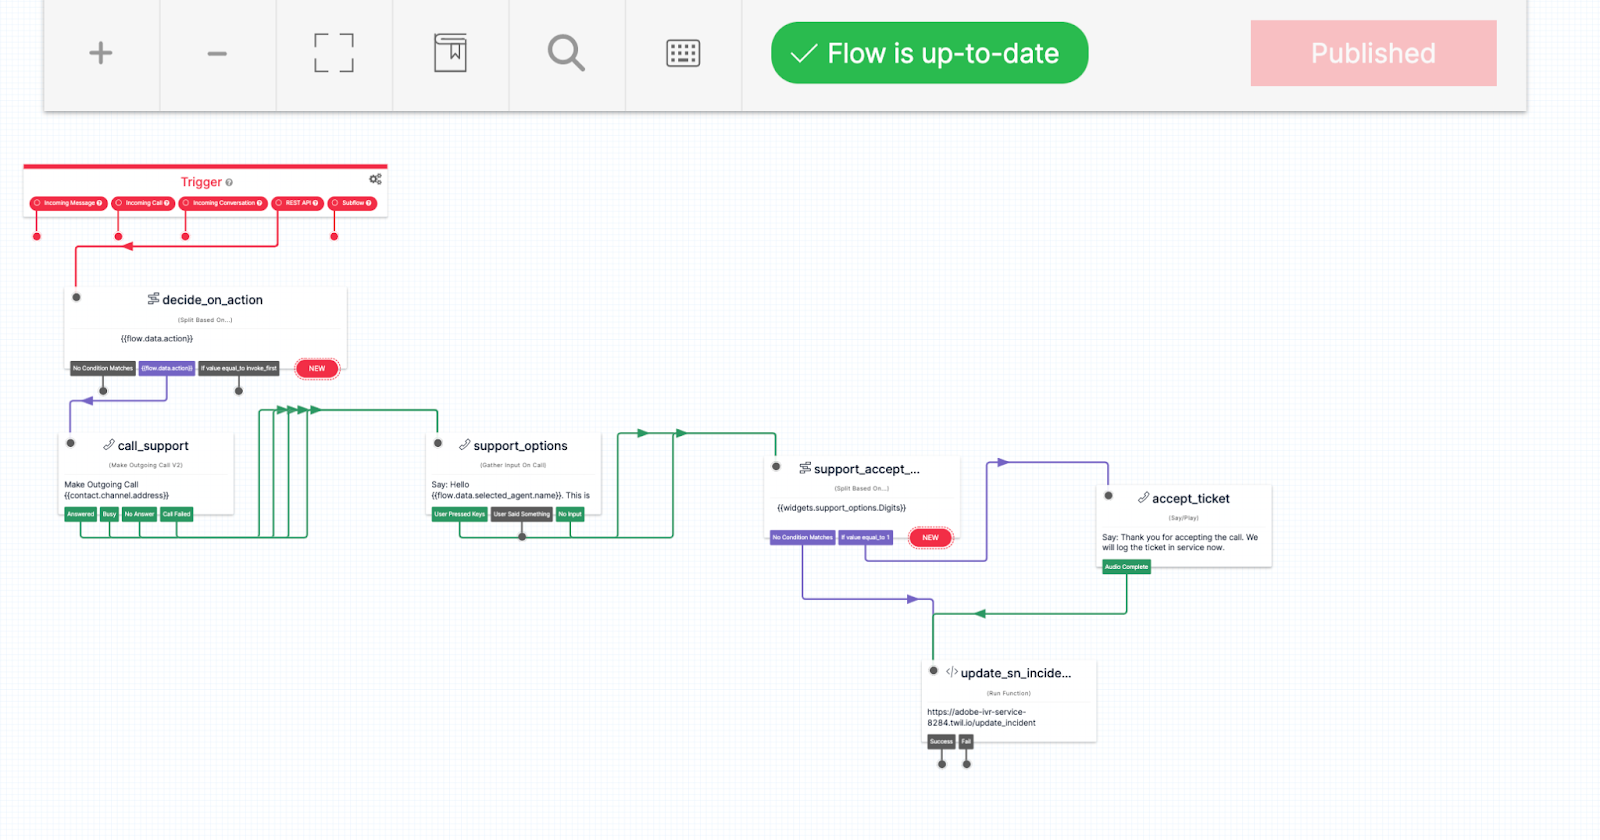
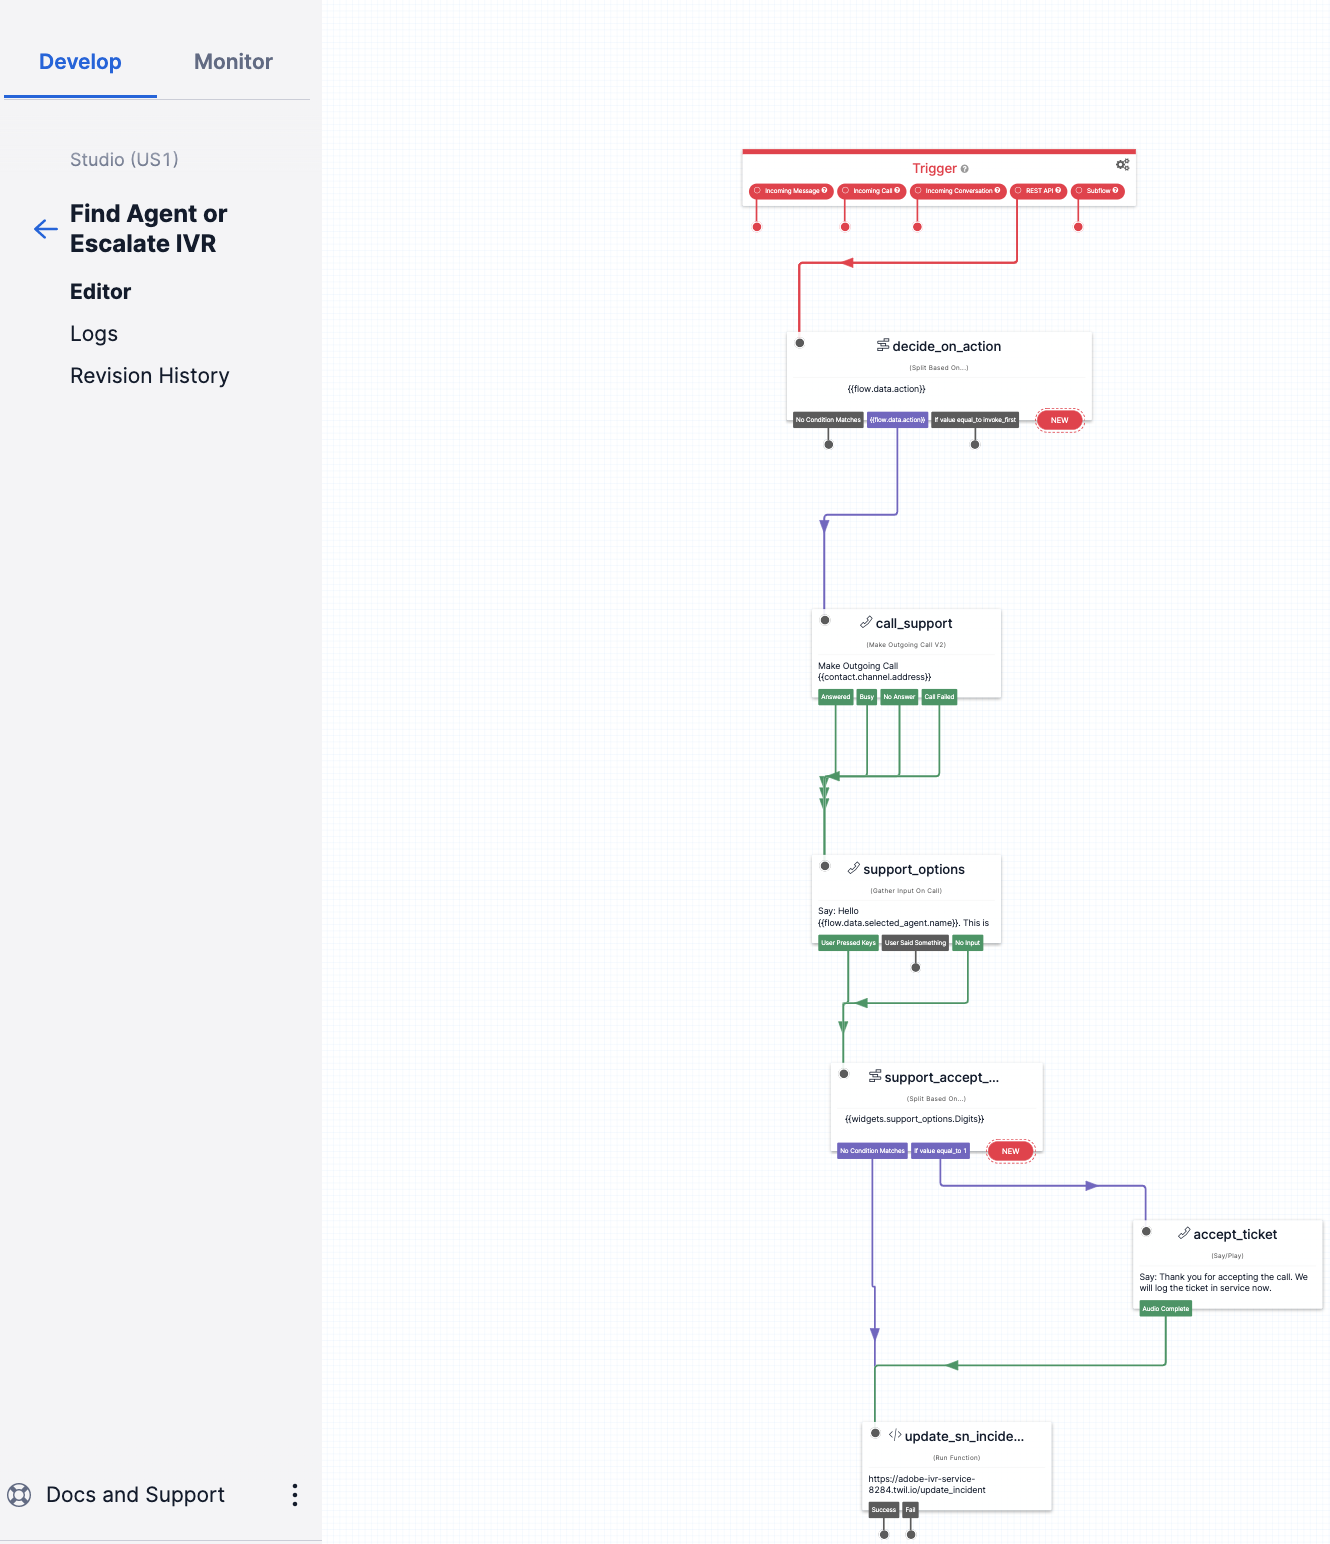
IVR Flow Diagram
Demo Setup
Before you can get started on the solution, you will need to set up – or log into – a few accounts.
Prerequisites
- An AWS account - Required to set up Amazon Kinesis and AWS Lambda for this demo.
- A ServiceNow developer account - Required to set up Business Rules, users with rights to call the REST API.
- A Twilio account - Required to set up Phone numbers, Twilio Studio, Serverless Functions & Assets, and Twilio Event Streams.
- A Github Account - Required to clone the GitHub repo.
Setup Steps
Also before you begin, the tutorial is more straightforward if you install a few tools locally. You’ll want to set up local GitHub, the Twilio CLI, a ServiceNow Developer Instance, and the AWS CLI.
If you don’t have one (or more than one!) of those set up, here are the dedicated instructions:
Awesome, you’re now ready to begin.
Let's Get Started
A complete setup is detailed in the Readme file in the Readme in the repo.
Get the code from Github
First, you’ll want to clone the code locally so you can work on it. From a command line, run the following commands:
Setup AWS components
Create IAM Policies
Before the rest of the AWS work, you’ll need to set up Users and Groups in IAM. We’ll start work in the AWS console.
First, create a user:
- Go to AWS Console > IAM > Users > Create User
- Select the Security Credentials tab and create an access key and secret. Note this down, as it will be required for local AWS configuration.
Now, set up a group:
- Go to AWS Console > IAM > User Groups > Create Group
- Provide name =
TwilioGroup - Add the above created user to this group
- Add following permissions to the group
IAMFullAccessAmazonKinesisFullAccessAWSLambda_FullAccess
- Provide name =
After the group is set up, set up your credentials locally using AWS Configure.
And finally, create a Lambda execution role:
- Go to AWS Console > IAM > Roles > Create Role
- Provide name =
TwilioLambdaRole - Select AWS Service > radio button Use Case Lambda
- Add
AWSLambdaKinesisExecutionRole - Create Role
- Provide name =
Deploy the AWS Lambda Function
Now we’re ready to deploy the Lambda function. I’ll walk you through the steps here.
Locally, on your command line, run the following command:
Now, create a function. You need to copy the ARN from TwilioLambdaRole in the above step.
Next, create a Kinesis trigger.
Now, optionally, set up a concurrency level. I highly suggest you do this – it’s best practice to set this for a demo.
Excellent! Now you can move onto the Twilio components.
Setup Twilio components
On the Twilio side, we are going to set up a Serverless function, a Studio Flow, and Event Streams.
But first, we need a phone number! If you haven’t got one yet, follow this article. It will be available in our Studio Flow below as the variable {{flow.channel.address}}.
Deploy a serverless Twilio Function
To get to a Function, we’ll start in the Twilio Console.
- Click Functions and Assets > Services > Create Service
- Provide a service name =
findagent-or-escalate-ivr-service - Click Add > Add Asset
- Provide a name =
agent_list.json. Change the scope topublic - Copy the contents of
twilio-servicenow-aws-findagent-or-escalate-ivr/assets/agent_list.jsonto the editor - Modify the phone numbers to use for agent and escalation list to match the test phone numbers to be used for the demo.
- Save
- Provide a name =
- Click Add > Add Function
- Provide function name =
/execute. Change the function scope topublic - Copy the contents of
twilio-servicenow-aws-findagent-or-escalate-ivr/demo-ivr-twilio-fns/execute.jsto the editor. - Modify
AGENT_LIST_URLin execute.js to point to the url of the asset deployed above - Save
- Provide function name =
- Click Add > Add Function
- Provide function name =
/update_incident. Change function scope topublic - Copy the contents of
twilio-servicenow-aws-findagent-or-escalate-ivr/demo-ivr-twilio-fns/update_incident.jsto the editor - Modify
AGENT_LIST_URLin execute.js to to point to the url of the asset deployed above - Save
- Provide function name =
- Click Settings > Dependencies
- Add
axiosdependencies
- Add
- Click Settings > Environment variables. Set the following variables:
SN_API_TABLE_ROOT- Your ServiceNow developer instance "Table" urlhttps://[URL].service-now.com/api/now/table/SN_USER- ServiceNow username(twilio_demo_user)SN_PASSWORD- Password of the above user.FROM- Phone number provisioned in Step2 aboveFLOW_SID- Flow Sid. This is available from the Studio > Flows
- Deploy All
Create a Studio Flow
Now, let’s move onto the Studio flow. You’ll be able to import most of this step – I’ll walk you through it. Again, we’ll start in the Twilio Console.
- Click Studio > + to create a new flow.
- Provide a flow name =
Find Agent or Escalate IVR - Select the Import from JSON template > Next > Copy the json from
twilio-servicenow-aws-findagent-or-escalate-ivr/demo-twilio-studio-flows/findagent-or-escalate-ivr.json - The Studio Flow is created!
Set up Event Streams
For Event Streams, we’ll be moving back to the console – and we have a dedicated post. All the code is available in twilio-servicenow-aws-findagent-or-escalate-ivr/demo-twilio-aws-kinesis/*.
Before you go through these steps, ensure your AWS CLI is set up with the proper credentials. You’ll also need the Twilio CLI running.
Awesome – now walk through the steps of the Kinesis Quickstart and I’ll meet you back here.
Back already? That’s great – we’re ready to move onto ServiceNow.
Set up a ServiceNow Developer Instance
If you haven’t yet, log into your ServiceNow Developer account. Create a ServiceNow instance in any location (we tested this demo in SanDiego). Then, click Start Building
Here’s how to set up the demo:
- Create a demo user – this user will be able to create the incident.
- Click All > System Security > Users and Groups > Users
- Click on New
- Provide Username =`twilio_demo_user`
- Add `email`, `Firstname` and `Lastname`
- The user should have access to call the ServiceNow APIs
- Once user is created setup password
- Copy the username (
twilio_demo_user) and password. This will be required while setting up Twilio Serverless Functions
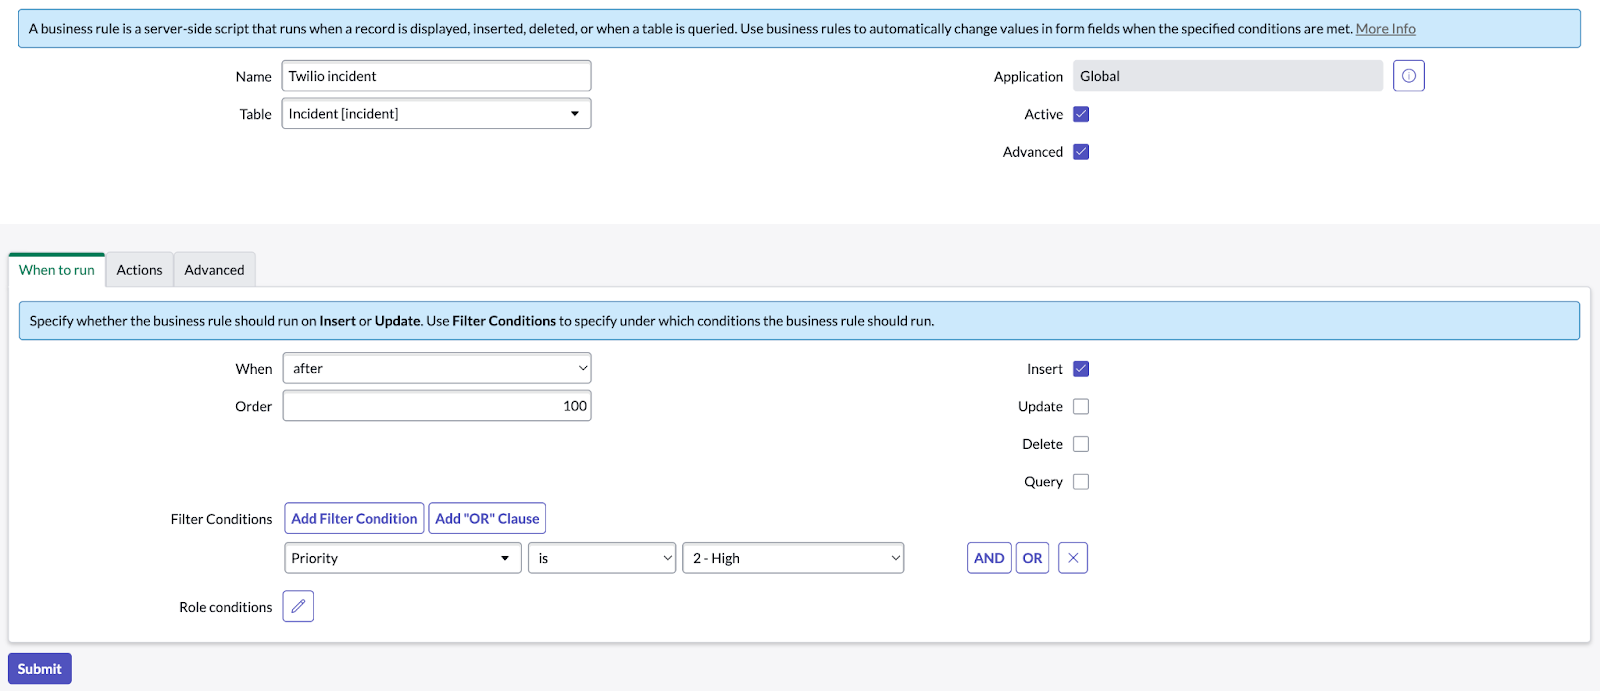
- Create business rules – this business rule will be triggered when a high priority incident is created in ServiceNow.
- Click All > System Definition > Business Rules
- Click on New
- Provide Name=`Twilio incident response`
- Select table=`Incident`
- Under `When to run` select `after`
- Add filter condition
- Select field=`priority` `is` and value=`2-high`
- Check the advance box.
- Click on the Advanced tab.
- Open
twilio-servicenow-aws-findagent-or-escalate-ivr/twilio_studio_new_incident.js - Modify the
TWILIO_FUNCTION_URLvalue to point to the Twilio Serverless functionexecute.jsfunction, deployed in the steps above - Copy the contents of
execute.jsinto the Advanced Script tab in ServiceNow. - Submit to create the business rule
Great! You’ve got all the pieces in place – you’re ready to run the demo.
Run the demo
If you logged out, you’ll need to log back into the ServiceNow Developer Instance.
- Go to Menu All > Incidents > New
- Fill in all the required details, including a short description of the incident
- Select
Urgency = Highand Submit. This will invoke the business rule to trigger the Twilio IVR Flow - The IVR flow will call the phone number configured as a part of Twilio Serverless Functions setup. (Refer to the Section above on setting up Twilio)
- Listen to the options: Press 1 to accept the call, 2 to transfer to the next agent or 3 to escalate.
- Try out all the options and check the status of the incident in ServiceNow. The Additional comments (Customer visible) section will be populated with the appropriate comments.
And that’s it! Hopefully you saw everything working – great work.
Integrating Twilio and ServiceNow to escalate high-priority incidents
Congratulations! You now have a deep integration with ServiceNow that lets you quickly respond to high-priority incidents. I want to encourage you to customize this IVR demo to you needs. A few areas that can be customized or I’d like your feedback include:
- Try the demo and provide feedback, if any.
- Customize the IVR flow to try more widgets like Send SMS messages and Wait to send messages to the agent in case he is unable to pick up the call. Refer to the rich Twilio Studio Widget Library
- It is quite common that our customers make extensive use of Webhooks with Twilio. Customize Twilio Event Streams to integrate with Webhook Sink. Webhook Quickstart
- Currently the demo uses a hard-coded agent-list and escalation list using Twilio Serverless Functions. This can be easily extended to connect to your own databases or CRM systems. An example to integrate with Airtable can be found here. Twilio Serverless Function integration with Airtable
Arun Wagle is a Solutions Architect - Enterprise ISV
Pathik Soni is a Solutions Architect helping Enterprise ISV partners reimagine their customer engagement experience using Twilio

Related Resources
Twilio Docs
From APIs to SDKs to sample apps
API reference documentation, SDKs, helper libraries, quickstarts, and tutorials for your language and platform.
Resource Center
The latest ebooks, industry reports, and webinars
Learn from customer engagement experts to improve your own communication.
Ahoy
Twilio's developer community hub
Best practices, code samples, and inspiration to build communications and digital engagement experiences.