Validating Webhook Signatures with Python & Flask
Time to read:
March 31, 2022
Written by

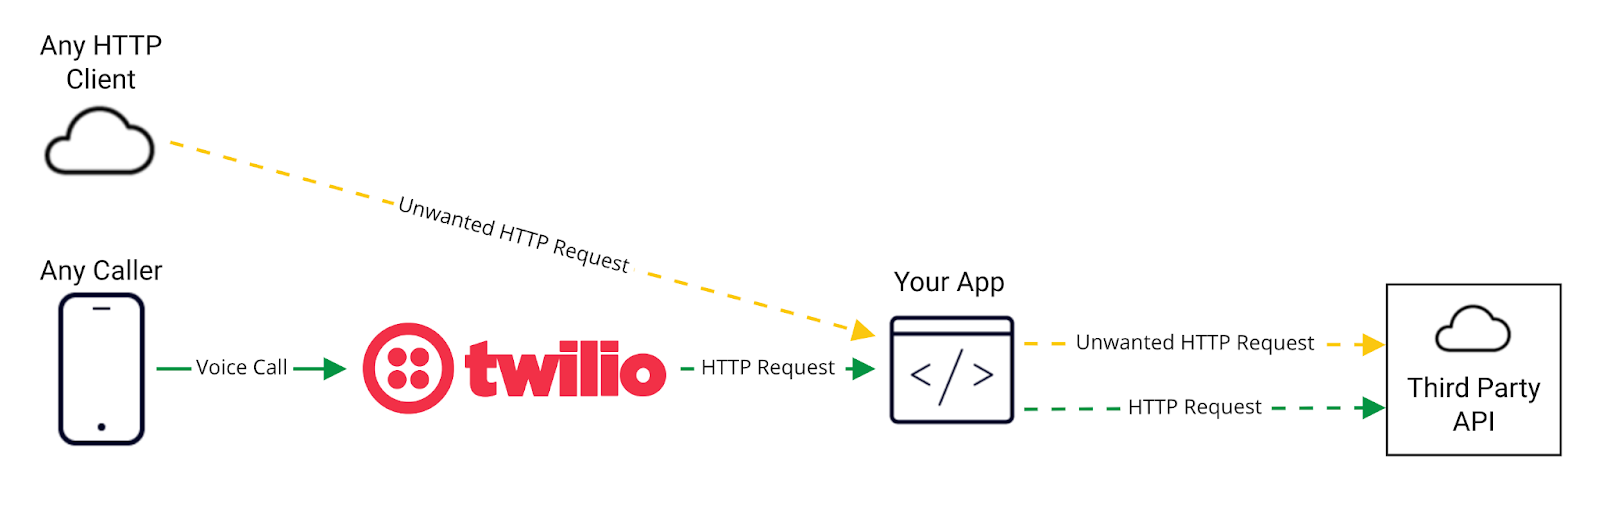
The Internet can be a dark and scary place. As recent headlines remind us, it makes sense to be cautious when opening your web app to the internet.
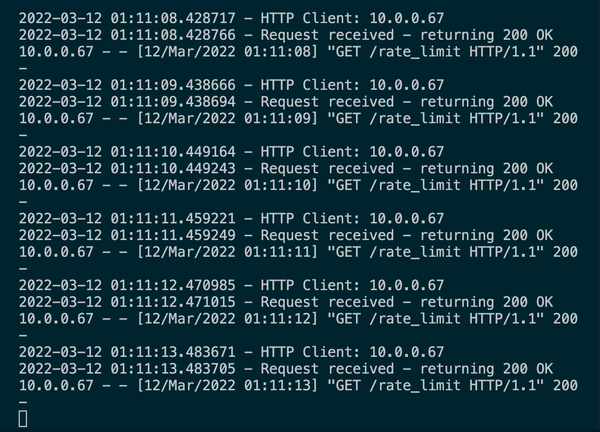
You don’t even need to belong to a cybercrime hacking syndicate to do damage with HTTP. Any script kiddie can take down a vulnerable server. For example, running something like the following code will make repeated GET requests to a targeted server, potentially overwhelming and crashing it.
Despite the risk, if you are going to build an awesome communication experience for your customers, you need to expose your app to the public Internet at some point.
To help secure your app against malicious actors and bad code, Twilio cryptographically signs all HTTP requests that leave our edge. You can use this hash (provided in the X-Twilio-Signature header), to validate the authenticity of the request, and know that it came from Twilio.
This happens by default on every webhook that egresses Twilio’s infrastructure. No opt-in or enabling required!
In this post, we will discuss the mechanics behind Webhook Signature Validation, review how to use the Twilio helper libraries to level up your implementation, and run through a real world example of why this feature is so important.
Prerequisites
The code used here is fully commented on GitHub.
If you wish to follow along, you should have a Twilio account (if you don’t yet, sign up for a free account here), a free API key from OpenWeather, and familiarity with the following:
Software
- Python 3
- flask
- pip
- ngrok
- HTTP Client (Postman, Curl, etc.)
Key Terms
- HMAC (Hash-Based Message Authentication Code)
The result of a hash function run on a message signed with a key.hmac = hash_function(message, secret_key) - Hash function
Used to map data of arbitrary size to fixed-size values - SHA-1 (Secure Hash Algorithm 1)
Common hash function which typically produces 40 digit hexadecimal number - Base64
Base64 helps represent binary data in an ASCII string format
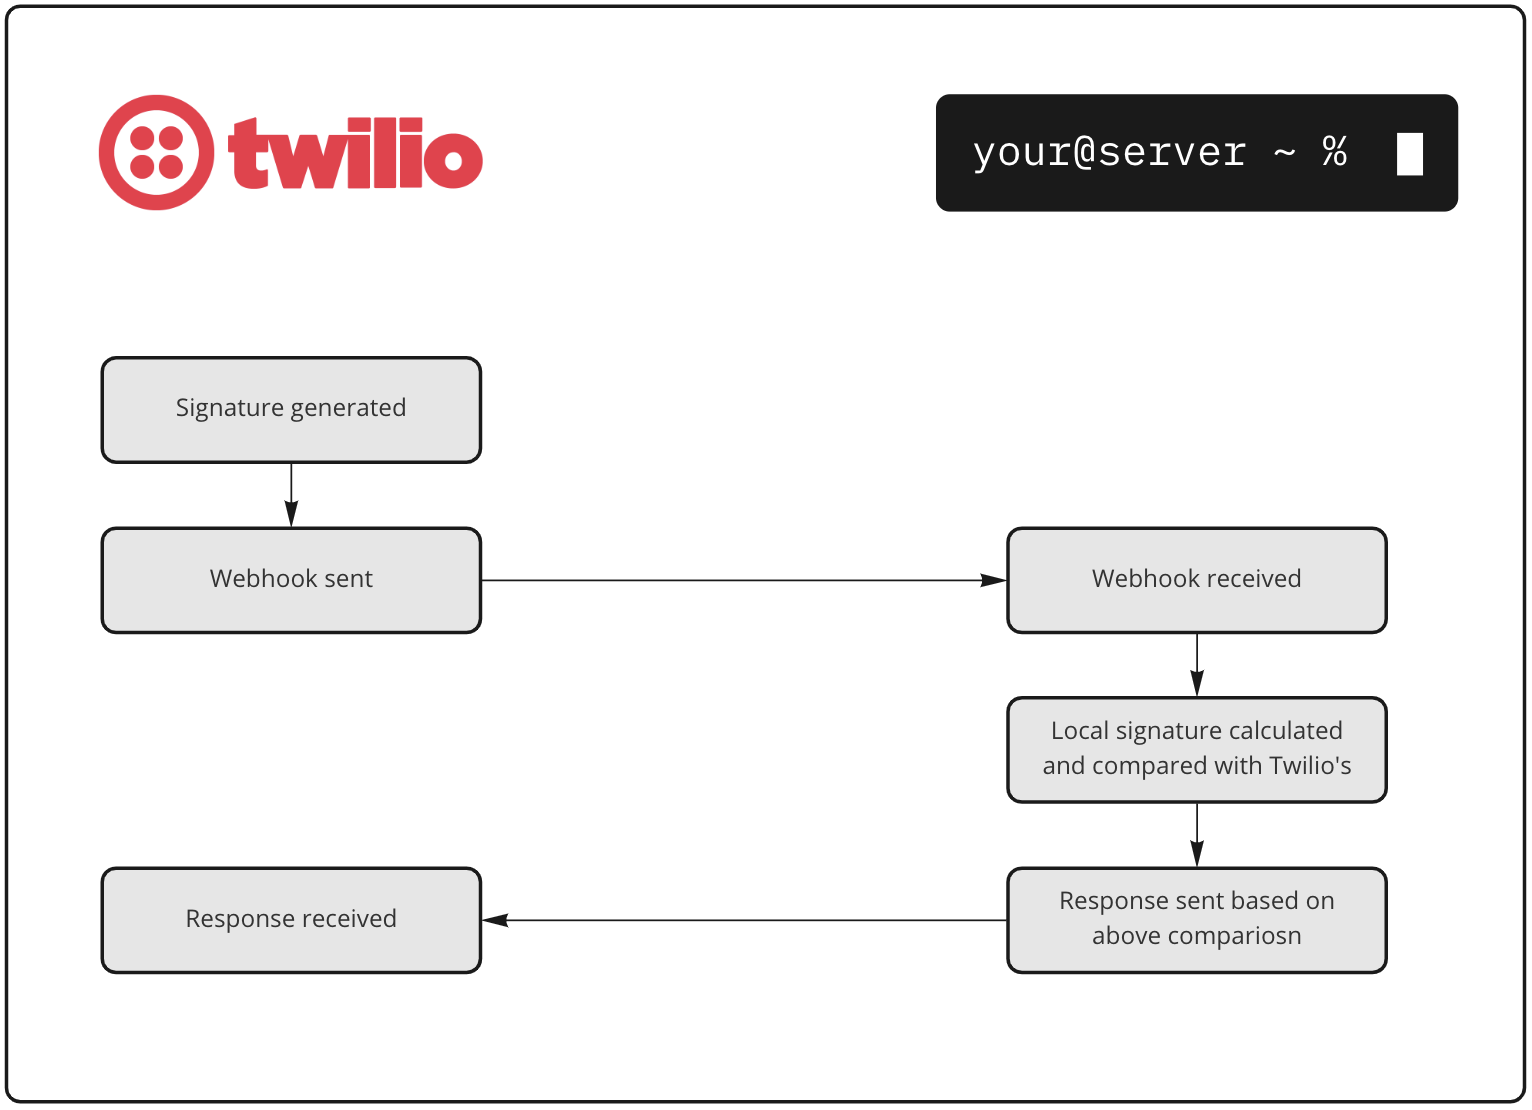
How Does Signature Validation work?
The Twilio docs describe the basic steps taken to generate a webhook signature.
Let’s deep dive into the process using Python and Flask.
If you haven’t used Flask before, its beauty lies in its simplicity. You can get started by simply installing Flask with the pip package manager.
The Flask docs provide more detailed installation instructions, and info about dependencies and virtual environments.
Once installed, we can spin up a basic app with something like this:
But wait – Twilio can’t communicate with your localhost.
From the docs: “Twilio webhooks require a publicly accessible URL of some kind.”

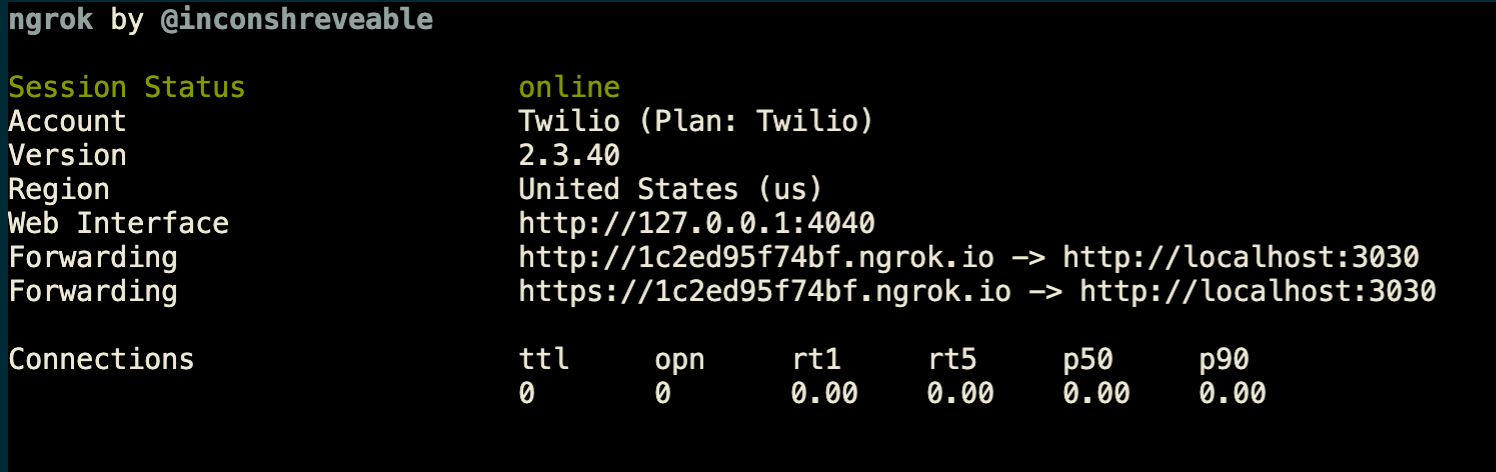
For testing purposes, ngrok can be used to quickly open localhost to the internet via a unique tunnel.
First, set an environment variable TWILIO_AUTH_TOKEN using the Auth Token from your Twilio console.
Now create a fresh route in your new flask app, which will be used to return TwiML.
If no X-Twilio-Signature header exists, we should reject the request. The lack of this header means the request definitely did not come from Twilio, so there is no point in going any further. Since we are 'home brewing' this validation, a 418 response seems apropos.
From here, we can refer to the steps outlined in the docs:
1. Take the full URL of the request URL you specify for your phone number or app, from the protocol (https...) through the end of the query string (everything after the ?).
2. If the request is a POST, sort all of the POST parameters alphabetically (using Unix-style case-sensitive sorting order).
3. Iterate through the sorted list of POST parameters, and append the variable name and value (with no delimiters) to the end of the URL string.
The sorted() function returns an alphabetically sorted list of the specified iterable object.
The items() method returns a view object, containing the key-value pairs of the dictionary as tuples in a list.
As an additional protective measure against malicious requests, we should reject requests without any form params. HTTP 400 Bad Request is best for this situation, as it generally indicates a client-side failure resulting from incorrect, incomplete, or corrupt input.
4. Sign the resulting string with HMAC-SHA1 using your AuthToken as the key (remember, your AuthToken's case matters!).
This is where the magic happens. The string you just concatenated is run through a SHA-1 hash function, using your private Auth Token as the secret key.
hmac.new() returns a new hmac object, so to get the digest (the result of the signing of the domain string with the secret key), we run the digest() method on the hmac object.
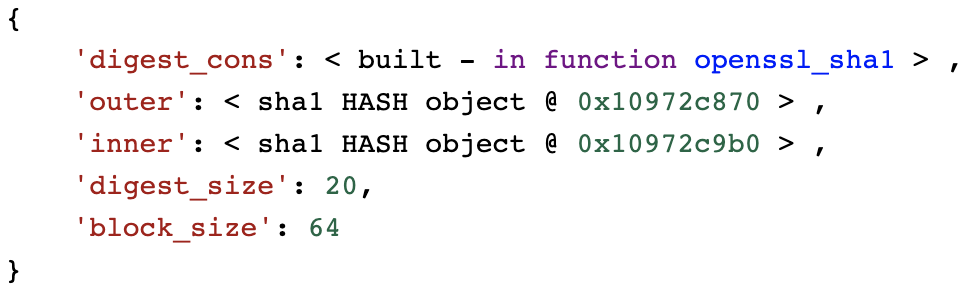
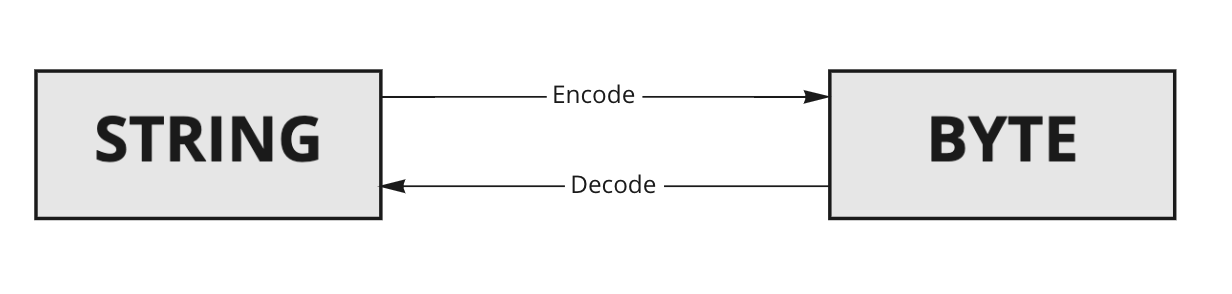
The signature returned is a byte string.
While byte strings are ambrosia for computers, they are useless for our soft fleshy brains:
5. Base64 encode the resulting hash value.
By ‘base64 encoding’ the resulting byte string, we can finally decode it to a UTF-8 string for usability.
strip() removes any leading and trailing spaces, just in case.
If you really want to get mathematical, check out brilliant.org’s brilliantly detailed walkthrough of the SHA-1 algorithm.
Finally, the payoff.
6. Compare your hash to ours, submitted in the X-Twilio-Signature header. If they match, then you're good to go.
If the signature you just generated does not match with the X-Twilio-Signature header, then we should return a 403 Forbidden response indicating your server received the request, but won’t authorize it.
If the signatures match, then return valid TwiML. In this example, we are not using the helper library for signature validation, so no TwiML preprocessing either!
You can try it, quickly. Start your flask app, then fire up ngrok with ngrok http 3030 on your command line – changing 3030 if you are using a different port. Then, choose a Twilio phone number (or purchase a new one), and set a webhook in “A Call Comes In” to your ngrok url, plus the /twimlroute – for example, it might look like https://3019bb2e4ab7.ngrok.io/twiml.
Now, call the number. Neat – great job! Your new flask route is now protected with your very own house-made artisan signature validation workflow.
Using Twilio Helper Libraries
If you prefer, the Twilio helper libraries can do all of the heavy lifting. For example, a signature can be validated with just two lines of code:
If this returns True, the signature provided by Twilio matches the one generated by your code.
However, adding a little more detail allows us to truly harness the power of this feature. Since we are using Python with Flask, this is the perfect excuse to implement a custom view decorator, which wraps functions with additional functionality.
If you haven’t seen decorators before – or want to brush up on the topic – find a great decorator deep dive here or here.
So, by defining a function like this (which is just a more compact version of the above):
You can apply it to the different routes we need to protect.
Real World Example
Many users might ask, “isn’t basic auth enough?” or, “why should I protect my static TwiML URL if it doesn’t return sensitive information?”.
Basic auth can help, but if your credentials are compromised then anyone can still hit your server.
And it’s not just sensitive data bad actors are after – the goal of a basic DDoS attack is to take down your server, making it unavailable to your users.
Let’s run through a hypothetical example that could happen to anyone.
Imagine for a moment you are in charge of tech for your local pickleball league. Your task is to implement a weather hotline for team members to call and check current conditions. If it’s too cold out, no tournament!
This flask route returns <Say> TwiML, which reads the current temperature based on the caller’s phone number.
Before running the code, set the environment variable WEATHER_API_KEY to your OpenWeather API Key. Then, with your flask app running (and ngrok pointing to the correct URL), pick a Twilio phone number, and set the “A Call Comes In” webhook to your ngrok url, followed by /weather. (For example, https://3019bb2e4ab7.ngrok.io/weather).
Call the number and you should get an awesome – and protected(!) – weather payoff.
The code is fully documented on GitHub, but here are the relevant takeaways:
- We pull the location data of the calling number from the request parameters sent by Twilio, or set defaults if that value is not available.
- Using the OpenWeather API, we use the lat/long coordinates of the given location to retrieve the current temperature.
- We use all these values to dynamically populate <Say> TwiML, which is read to the caller.
Great job - works like a charm! You name your app Pickle:30, and distribute the number for use!
Since there are only a few teams, your OpenWeather API key is only scoped for 60 API calls per minute. No need for more, right?
Well, this URL is open to the internet. This is okay, as you are providing a service to your club members. But designing your app like this essentially gives everyone access to your OpenWeather API key, by way of your publicly accessible URL.
Remember the recursive loop I mentioned earlier? It turns out a well funded Anti-Pickleball Coalition is using a similar method to impact the systems of Pickleball leagues around the globe, and they have set their sights on Pickle:30!
In a matter of minutes the OpenWeather API rate limit has been blown out and your OpenWeather API Key has been revoked. Now, all requests to OpenWeather API using that key will fail, which means your users cannot use Pickle:30. The web server hosting Pickle:30 may be configured to handle the influx of the requests, but since Pickle:30 is making calls to an external API, it is as good as hard down when connectivity to said API (or database, or other web app etc) is severed.
To fix this, implement Signature Validation to ensure you are only processing requests from Twilio.
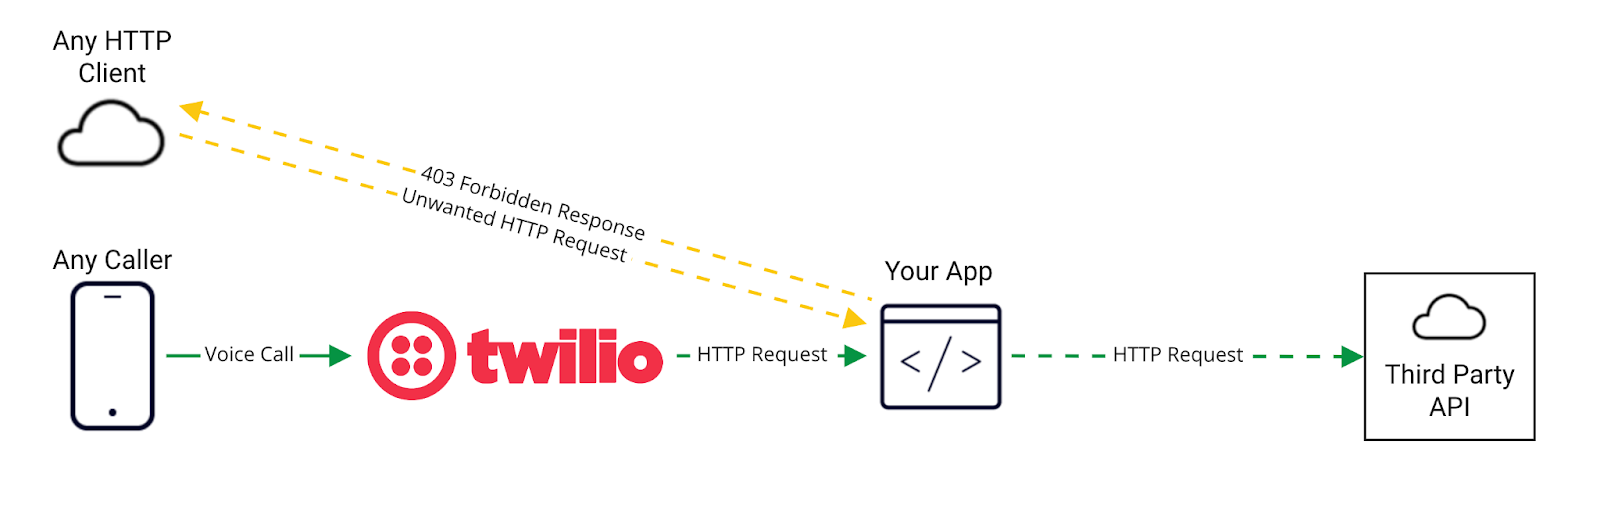
Even though your TwiML URL is still accessible over the public Internet, next time those baddies come knocking, they will get the 403 response they deserve. Any subsequent external API calls will only be hit when a call comes into the Twilio number.
Conclusion
Signature validation is the added layer of security your web app needs. It is free, based on security best practices (and science), and included with every webhook we send. We can’t wait to see what you build, securely!
Head over to the documentation to get started implementing it today
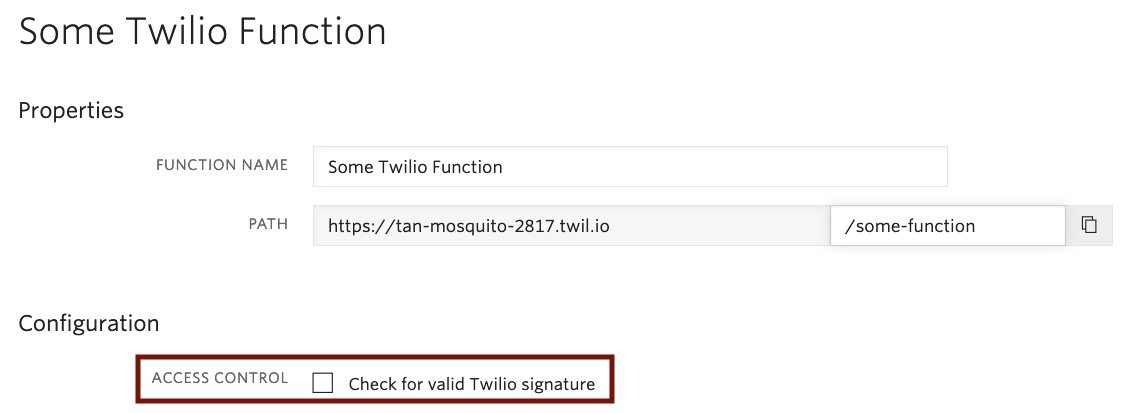
By the way – Twilio Functions has Signature Validation built right in!
Matt Coser is a Senior Field Security Engineer at Twilio. His focus is on telecom security, and empowering Twilio’s customers to build safely. He can be reached at mcoser [at] twilio.com


Related Resources
Twilio Docs
From APIs to SDKs to sample apps
API reference documentation, SDKs, helper libraries, quickstarts, and tutorials for your language and platform.
Resource Center
The latest ebooks, industry reports, and webinars
Learn from customer engagement experts to improve your own communication.
Ahoy
Twilio's developer community hub
Best practices, code samples, and inspiration to build communications and digital engagement experiences.