Build a Feedback Collection App with SendGrid, Node.js, and React
Time to read:
May 22, 2024
Written by
Reviewed by
Build a Feedback Collection App with SendGrid, Node.js, and React
Introduction
In this tutorial, you will learn how to build a feedback collection app, a versatile tool that you can integrate into your projects, websites, or applications to gather valuable user feedback. This tutorial guides you through the process of enhancing your app with email notifications using the combination of Twilio SendGrid, Node.js, and React.
Before delving into the details, take a quick look at what you'll be building.


In this tutorial, I will walk you through the development of both the backend and frontend components of the feedback collection app. This powerful tool empowers you to seamlessly gather valuable insights and opinions from users, contributing directly to the enhancement of your products and services.
By integrating this feedback form into your projects or websites, you'll unlock new avenues for continuous improvement. Whether it's soliciting feedback on new features, user experiences, or customer support interactions, the feedback collection app provides a versatile solution for gathering and analyzing user insights.
Prerequisites
Before you begin this tutorial, there are a few prerequisites you should have in place:
- Node.js and npm installed.
- Text Editor or IDE, VSCode is highly recommended.
- A Sendgrid account.
- Postman or any API client of your choice.
- Basic Knowledge of JavaScript.
- Basic Knowledge of React.
- Install MongoDB if you haven’t or use the cloud-based MongoDB service.
Creating the Backend: Setting Up the Node.js Project
To begin crafting the backend of your feedback collection app, you need to set up the Node.js project.
Open your terminal or command prompt, navigate to your desired project location, and create a new directory for your Node.js project. You can name it feedback-app-backend or choose a name that suits your preference. Use the following command to achieve this:
Inside your project directory, initialize a Node.js project by running the following command:
The -y flag is used to accept the default configurations, making the setup process more streamlined.
Your backend will rely on several key dependencies to operate effectively. Install these dependencies using npm:
Here's a brief overview of these dependencies:
- express: a powerful Node.js web framework that simplifies the creation of robust APIs. It will serve as the foundation for your backend, handling HTTP requests and routing.
- mongoose: an elegant MongoDB object modeling tool designed to work with MongoDB, a NoSQL database. You'll use Mongoose to interact with your MongoDB database, define data schemas, and perform database operations.
- nodemon: a development utility that monitors your Node.js application for changes. It automatically restarts the server whenever you make code modifications, saving you from manual server restarts during development.
- validator: a library for data validation in JavaScript. You can use it to ensure that user input adheres to specific validation rules, such as email format or password complexity.
- @sendgrid/mail: This library provides a straightforward way to send email notifications using the SendGrid email service. It will enable your app to send email notifications to designated recipients, such as support teams when feedback is submitted.
- dotenv: a zero-dependency module used to load environment variables from a .env file into the process.env object. This is essential for securely storing sensitive information like API keys and configuration settings.
- cors: CORS (Cross-Origin Resource Sharing) is a middleware that enables cross-origin HTTP requests from your frontend to your backend. It's important to ensure that your React frontend can communicate with your Node.js backend without security issues.
- @babel/core: This is the main Babel package and it's a compiler for writing next-generation JavaScript. Babel is used to convert ECMAScript 2015+ (ES6+) code into a backwards compatible version of JavaScript that can be run by older JavaScript engines. This is particularly useful as you're using modern JavaScript features that aren't supported in some environments in this tutorial.
- @babel/cli: allows you to compile files from the command line. This is useful for compiling your JavaScript code as part of a build step in your development process.
- @babel/preset-env: allows you to use the latest JavaScript without needing to micromanage which syntax transforms (and optionally, browser polyfills) are needed by your target environment(s). It configures Babel to use the specific transformations that are required for the browsers or environments you are targeting.
- @babel/plugin-transform-runtime: is used with Babel to enable the re-use of Babel's injected helper code to save on code size. It also allows you to use new built-ins such as Promise or WeakMap.
These dependencies collectively empower your backend to handle data storage, validation, email notifications, and server management efficiently. They are fundamental building blocks that contribute to the functionality and security of your Feedback Collection App.
Defining the Backend Structure
With the necessary dependencies installed, it's time to establish a well-organized backend structure.
To begin, create a src directory at the root of your backend project. Within this src directory, set up important subdirectories and files to keep the components well-structured.
The aim is to create a framework that simplifies the development and maintenance of your feedback collection app's backend. Use the following commands to create the necessary directories and files:
Updating the package.json Configuration
Before you proceed with writing the code, ensure that your package.json file is configured correctly to manage your project's dependencies and scripts. In this tutorial, ES6 (ECMAScript 2015) syntax will be used for writing JavaScript code. ES6 introduces several enhancements and modern features that make code cleaner and more maintainable. To ensure that your project can seamlessly handle ES6 modules:
Open your project’s root directory, and locate the package.json file. Update the first 8 lines in the file with the following:
This sets the stage for ES6 module usage throughout your codebase.
“main”: "dist/index.js" points to the compiled version of your code in the dist directory, which will be created by Babel. This is where nodemon will look to start the application.
The ”dev” script first runs Babel to compile the code from the src directory into the dist directory. After compiling, nodemon starts your application from the dist/index.js, monitoring for any changes in the dist directory to restart the server automatically.
These adjustments will ensure that your feedback collection app benefits from the advantages of modern JavaScript syntax.
The next step involves the configuration of the express server. Within the src/index.js file, establish a fundamental express server that will listen on your specified port, which can be 8080 or a port of your choice. Below is the code to achieve this:
Configure .env File
To configure your application, navigate to the .env file located in the src directory and insert the following variables:
Substitute the placeholders as follows: replace YOUR_SENDGRID_API_KEY with your SendGrid API key, YOUR_EMAIL_SOURCE with the email address you wish to use as the sender for your application's emails, YOUR_APPLICATION_SUPPORT_EMAIL with the email address designated to receive support notifications, YOUR_EMAIL_SOURCE_NAME with the desired sender name for your emails, and finally, YOUR_MONGODB_URI with your MongoDB URI.
How to Get Your MongoDB URI
To get your MongoDB URI, start by visiting the MongoDB website and creating an account if you don't already have one. After logging in to MongoDB, the next step is to create a project or select an existing one. If you're new to MongoDB, creating a project involves giving it a name and optionally adding tags to it like the image below:

Once your project is set up, you’ll need to create a deployment/cluster which is where your MongoDB database will live. MongoDB provides an option to create a free-tier cluster for small projects and testing, which is often sufficient for many beginners. Click the Create button as shown in the image below and follow the next steps:


With a project and cluster in place, the next step is to create a user for your database. This user is different from your MongoDB account login; it's a database-specific user with its username and password. Having separate users for your databases adds a layer of security and allows you to control access levels based on your application's needs.

Next, choose a connection method, for this tutorial, choose Drivers:

With the user created you should see your MongoDB URI as shown below, copy and replace it with YOUR_MONGODB_URI in your .env file. You can toggle the Show Password button to display your password.

Setting up MongoDB
Open your database.js file located in your src/config directory and paste the following code:
Now, replace the code in the src/index.js file with the following:
These steps will ensure that your feedback collection app is well-equipped with MongoDB support and a connection to your database, enabling seamless data storage and retrieval.
Setting Up the Feedback Model
In your src/models directory, locate and open your Feedback.js file and insert the following code:
This code defines the structure of the feedback data, including fields for the user's name, email, and feedback content. Additionally, it enforces validation rules for email format, and feedback length, and ensures that timestamps are automatically added to each feedback entry.
With the Feedback model set up, your application is ready to store and manage user feedback in the database.
Setting Up the SendGrid Service
Now that you've successfully defined the data model for feedback in your Feedback Collection App’s backend, it's time to integrate the SendGrid service, a powerful email delivery platform by Twilio. SendGrid offers robust features for sending and managing emails, making it an excellent choice for incorporating email notifications into your application.
To set up your SendGrid service, start by signing up for a SendGrid account if you haven't already. Click on the Start for Free button to initiate the registration process. Once you've signed up and logged in to SendGrid, proceed to obtain your API key. Navigate to the Settings menu in the SendGrid dashboard, then click on API Keys. From there, create a new API key, providing it with an appropriate name and granting it full access. After generating the API key, remember to copy it to your .env file.dd the following line to define your SendGrid API key, replacing YOUR_SENDGRID_API_KEY with the actual API key you obtained earlier:
Then, within your src/services/SendgridService.js file, define your SendGrid service implementation. Copy and paste the code below:
Setting Up the Feedback Controller
In your controllers directory, you'll find the FeedbackController.js file. Open this file and add the following code:
In the provided code snippet, the Feedback model, along with two additional functions, notifySupportTeam, and sendAcknowledgmentEmail, are imported from your SendGridService.
The submitFeedback controller function is responsible for managing the submission of user feedback. Upon receiving a request, this function extracts relevant information such as the user's name, email, and feedback from the request body.
Subsequently, it performs the following tasks: Firstly, it sends an acknowledgment email to the user who submitted the feedback using the sendAcknowledgmentEmail function. Secondly, it notifies the support team about the new feedback by invoking the notifySupportTeam function. Lastly, it saves the user's feedback to the database utilizing the Feedback.create method. In case of successful execution, it responds with a status code 200 along with a success message. However, in the event of an error occurring at any stage, it handles the error gracefully, ensuring a smooth user experience through an appropriate error message.
Defining the Routes
With your controller in place, it's time to establish the routes for handling feedback submissions. To do this, open your feedback.js file located in the routes directory and add the following code:
This code sets up a POST request route at /feedback, which will trigger the submitFeedback function from your controller when feedback is submitted. It's an essential step to ensure that your app can receive and process user feedback effectively.
Updating the index.js file
With your routes defined, you can now connect it to the Express application. You need to update your src/index.js file to include these routes.
In your index.js file, add the following line at the top of the file to import the feedback routes:
The app.use("/api", routes); in your src/index.js file ensures that any requests made to /api/feedback will be handled by the submitFeedback function defined in your FeedbackController. This connects your routes to your express application and allows it to process feedback submissions.
After this step, you're ready to test your feedback collection app’s backend with the added functionality for email notifications.
Developing the Frontend: Setting Up the React.js Project
Now, as you delve into the frontend, you'll use Vite, a potent development tool, to craft a dynamic and responsive user interface with React.js. This section guides you through structuring the frontend, designing the interfaces, and seamlessly connecting them with the backend. It's time to shape the face of your app!
To begin designing the frontend of your feedback collection app, you need to set up the React.js project. Begin by opening your terminal or command prompt and navigating to your desired project directory. Execute the following command to create a new React.js project with Vite:
This command initializes a new Vite project named feedback-collection-frontend using the React template. Once the project is initialized, navigate to your project directory using the following command:
With your project directory set, install the required dependencies for your React.js project by running:
Finally, start the development server to see your app in action:
This command launches the development server and will display its localhost URL on the terminal. You can access your React app by opening a web browser and navigating to this address.
Before delving deeper into the development process, take a moment to familiarize yourself with the project structure. Vite provides a well-organized layout for your project, ensuring clarity and ease of navigation. Key directories and files to note include:
- The src directory: This directory serves as the primary location for your application's source code.
- The src/App.jsx file: This file houses the main React component, serving as the entry point to your application.
- The public directory: Here, you'll find assets such as images and icons, intended for public access.
- The index.html file: This HTML template acts as the foundation for your application, providing the structure for rendering content.
- The vite.config.js file: Within this file lies Vite's configuration settings, allowing for customization and optimization of your development environment.
Creating Essential React Components.
Now that your project structure is in place, it's time to start creating the essential React components that will make up your feedback collection app.
FeedbackForm Component
The FeedbackForm component serves as the gateway for users to provide their valuable feedback. To integrate this component into your project, follow these steps:
Begin by creating a dedicated components folder within your project's src directory; this folder will house your React components.
Inside the newly created components folder, create a file named FeedbackForm.jsx. Then, copy and paste the following code into this file:
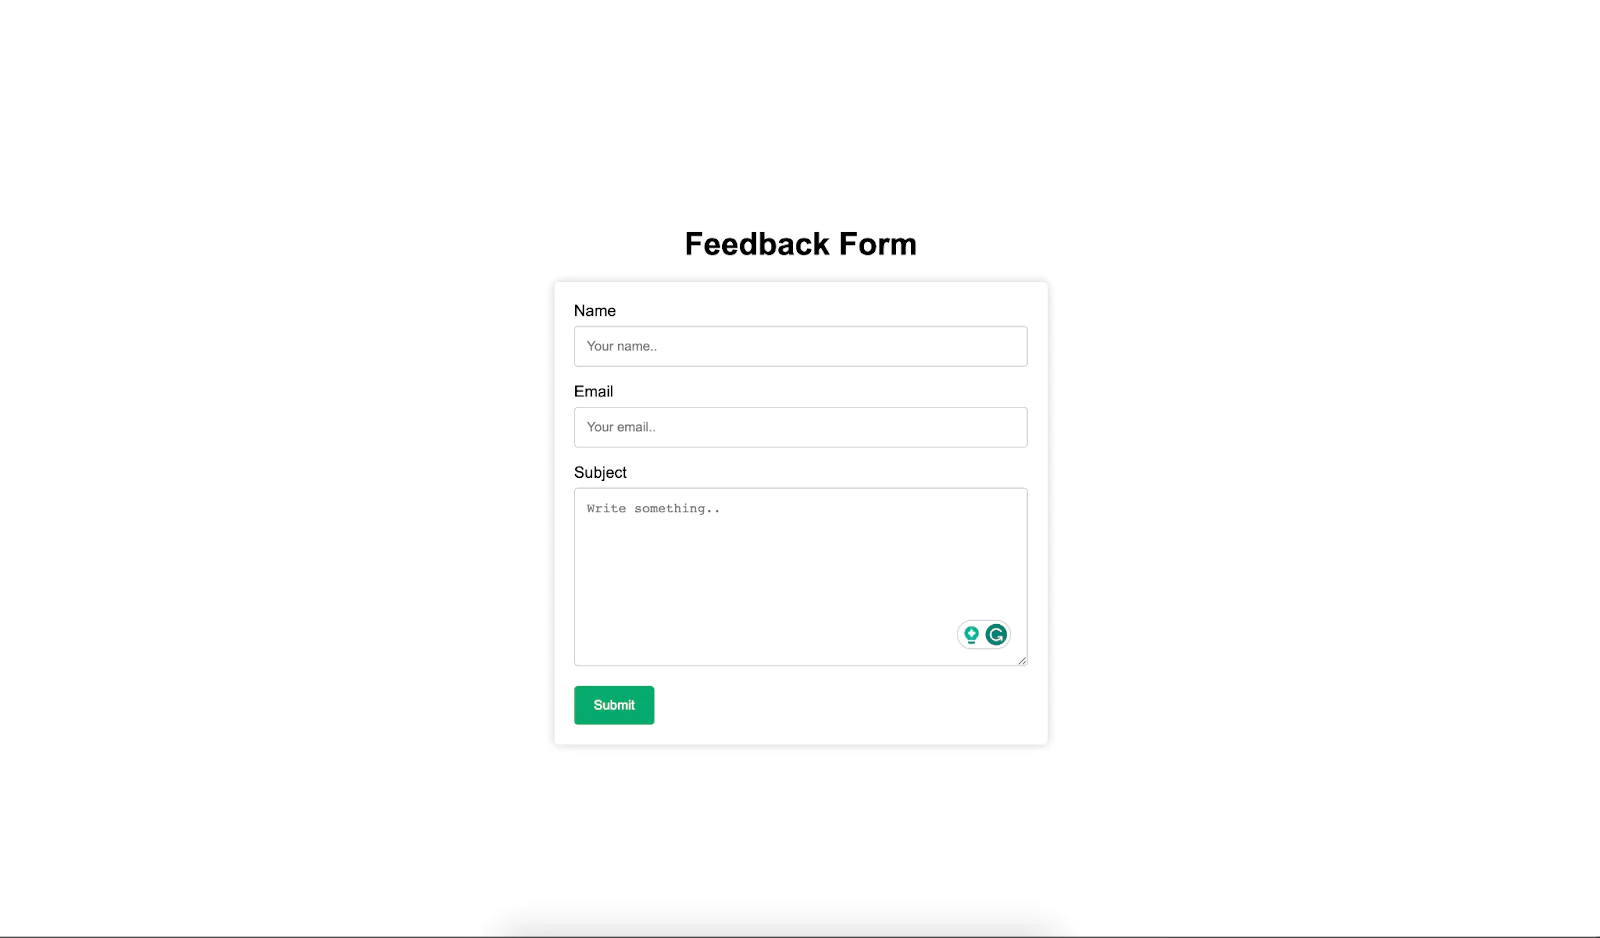
This component includes a straightforward feedback form with fields for name, email, and feedback.
Now, it’s time to style your feedback form and preview it in the browser.
Replace the content of your App.css file located in the src folder with the following CSS code:
This file is already imported into your App.jsx file, so there’s no need to import it again. Next, import your FeedbackForm component into your App.jsx file at the top of the file:
Replace the App function with the following to display your feedback form component:
Once your changes are applied, start your React app’s development server using the following command:
Alternatively, if you're using yarn, you can use:
Once your development server is running, open your web browser and navigate to http://localhost:5136. You will be able to preview your form, which should appear similar to the following:
Now that you've successfully created the FeedbackForm component, it's time to move forward and build the Modal component.
Modal Component
The Modal component will handle the display of feedback submission status to users. It will provide a way to confirm the successful submission of feedback. Begin by creating a Modal.jsx file inside your components folder, and copy and paste the following code:
This component includes a simple modal that displays a message to the user and has a close button that users can click to close the modal. Also, it accepts a prop, `handleCloseModal()` from the `FeedbackForm` component. This function is responsible for closing the modal.
Next, you'll need to add some CSS to style the modal. Open your App.css file, which is located in your src folder, and add the following CSS code at the end of the file:
The above CSS code styles the modal and ensures that it's centered on the screen. It also provides styles for the close button.
Next, import the Modal component into your FeedbackForm.jsx file and replace the code with the following to update it:
The updated FeedbackForm.jsx file utilizes the useState hook from React to manage the component's state. It defines the showModal state variable to track whether the modal should be displayed, initially set to false.
Upon form submission, the handleSubmit function is triggered. It prevents the default form submission behavior, sets the showModal state to true to display the modal, and logs a placeholder message for the feedback submission logic.
The handleCloseModal function is invoked when the user clicks the close button on the modal. It sets the showModal state to false, hiding the modal.
The JSX rendering code presents the feedback form and dynamically manages the modal's visibility based on user interactions. If showModal is true, the Modal component is conditionally rendered.
This component oversees the rendering of the feedback form and governs the modal's appearance or disappearance in response to user actions. Upon form submission, the modal becomes visible and can be closed by clicking the close button.
Implementing Feedback Submission Logic
Now, it’s time to implement the actual logic for the feedback form submission. To handle the actual submission of feedback from the FeedbackForm component, Axios, a popular JavaScript library for making HTTP requests, will be used. To begin, create an Axios instance to simplify the configuration of requests. Below are the steps for implementing this logic:
Create an Axios Instance
Navigate to the backend project directions, then set up an Axios instance in your project to manage API requests. This instance is configured with a base URL pointing to your backend API.
First you’ll need to install the axios package into your project. Run the following command on your terminal within your frontend directory:
Create a folder named services within the src folder and within the src/services folder, create a file named api.js. Add the following code to the src/services/api.js file:
This instance, named api, will be used for making HTTP requests to your API endpoint.
Next, import and utilize this Axios instance within the FeedbackForm component, specifically in the handleSubmit function. When the user submits the feedback form, send a POST request to your backend API to store the feedback data.
Here's a simplified example of how you can achieved within your FeedbackForm.jsx file, firstly, import your Axios instance:
Next, replace the handleSubmit function with the following:
Also, add this handleClearForm function:
Here, a formData object is created by extracting values from the form fields. Inside the try block, the Axios instance api is used to make a POST request to the /feedback endpoint of the backend API, sending the formData. Then, it opens the success modal using setShowModal(true) and clears the form fields by calling the handleClearForm function.
Testing the Application
Before proceeding to test your application, ensure that your backend server is running. Navigate to the root directory of your backend project and execute the command npm run dev or yarn dev in your terminal to start the server. Your backend server should be accessible at http://localhost:8080.
Next, initiate your frontend development server by running npm run dev in the root directory of your frontend project. It should be accessible at http://localhost:5136 . Open this link in your preferred web browser, fill out the feedback form, and submit it.
Upon successful submission, you’ll see a modal similar to the one below:
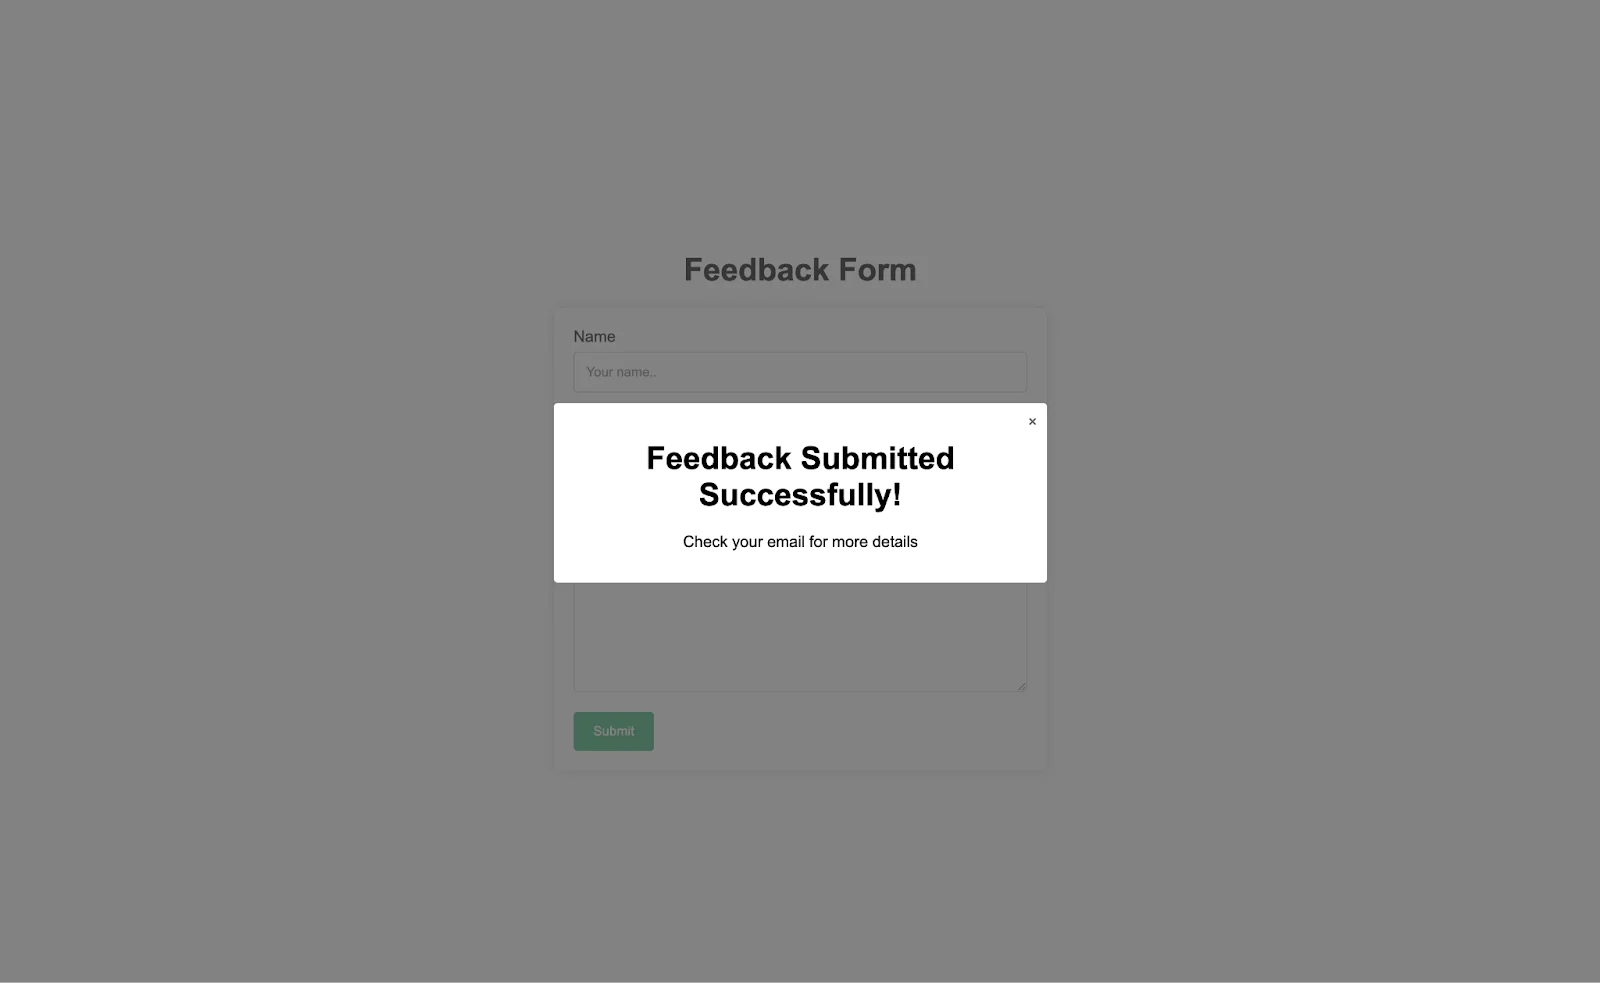
Also, an acknowledgment email will be sent to the email address you provided in the form and a notification email, to the support email you provided in your backend .env file.
Conclusion
Congratulations on successfully building your feedback collection app, a powerful tool for gathering valuable insights and opinions from users. Throughout this tutorial, you've ventured into the realms of both backend and frontend development, crafting a robust application that seamlessly combines user-friendly interfaces with efficient data management. Consider deploying it to a hosting platform like Vercel or Netlify for worldwide accessibility. Keep exploring advanced features to enhance your application further.
You can find all the code for this tutorial here. I hope you've enjoyed building this application as much as I've enjoyed guiding you through the process.
David Ndubuisi is a passionate software engineer and technical writer with a love for crafting elegant solutions to complex problems. With years of experience in both frontend and backend development, David is dedicated to sharing knowledge and helping fellow developers with their coding journey. You can reach out to him via the following:
Linkedin: https://linkedin.com/in/davydocsurg
GitHub: https://github.com/davydocsurg
Twitter: https://twitter.com/davydocsurg


Related Resources
Twilio Docs
From APIs to SDKs to sample apps
API reference documentation, SDKs, helper libraries, quickstarts, and tutorials for your language and platform.
Resource Center
The latest ebooks, industry reports, and webinars
Learn from customer engagement experts to improve your own communication.
Ahoy
Twilio's developer community hub
Best practices, code samples, and inspiration to build communications and digital engagement experiences.