Installing Twilio Client for iOS using CocoaPods
Time to read:
This post is part of Twilio’s archive and may contain outdated information. We’re always building something new, so be sure to check out our latest posts for the most up-to-date insights.

When I first started digging into writing apps for the iPhone, one of the first things I looked for in Xcode was some kind of package manager. It being the 21st century, I thought that obvious that nearly every IDE would have some kind of package manager built in, but to my surprise I found nothing in Xcode. But my search did not end there. I could not believe that iOS developers lived without a package manager of some kind. Thankfully a search on Google told me about CocoaPods, a great package manager for iOS developers that makes it pretty quick and painless to install and manage project dependencies.
After discovering CocoaPods, my next thought was “OK, why doesn’t Twilio have a CocoaPods package for our Twilio Client for iOS library?”. So I set out to make one and in this post I’ll show you how you can use it to make installing Twilio Client for iOS into your Xcode project a snap.
Getting Going with CocoaPods
Installing CocoaPods is pretty straight forward. It’s a ruby gem and the CocoaPods website has great instructions on installing and using it from the command line.
Once you have CocoaPods installed, all you need to do to add dependencies to your project is to create a podfile in your Xcode project directory and include the packages you want to install. For example, if you wanted to add Twilio Client to your project, your podfile would look like this:
The platform value tells CocoaPods to use libraries built for iOS 5 or greater and the pod value tells CocoaPods to install the TwilioSDK pod, which contains Twilio Client for iOS. If you had other libraries that you wanted to use in your project you can add those by adding multiple pod values in your podfile.
Once you’ve created the podfile, make sure Xcode and any simulators are closed and then back head over to the command line and navigate to your Xcode projects directory. Once there, install the pods using the command:
That’s all there is to it. Once CocoaPods finishes installing the pods, you can open your project by using the new workspace that was created by CocoaPods and check out what each library added.

When you open your project in Xcode you’ll see a new Pods project is included in the workspace. This is where CocoaPods installs library files. If you expand the folders in the Pods project you can see that CocoaPods added a number of Frameworks, the header files for the Twilio Client library, and a bunch of WAV files that the library uses for sounds. The static libraries are also there, just not directly referenced in the project.
One Last Step
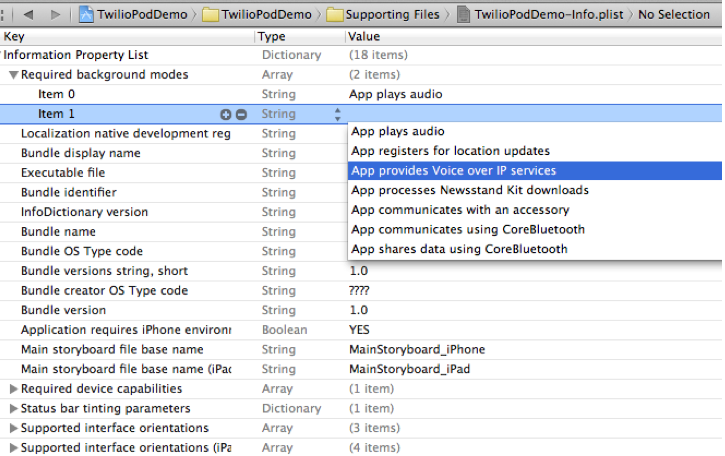
While CocoaPods does a great job at simplifying the install of the Twilio Client for iOS SDK, there is unfortunately one thing that CocoaPods cannot do. In order to let iOS know that this app is a VoIP application and will need Audio even when the application is running in the background, you need to add two values to your applications plist file. Without these, if a user places your app into the background while its connected to Twilio, the calls audio will stop, but the call continues. The user would have to reactive the app in order to continue the call.
The image below shows using the Property List editor to add the Audio and Voip values to the Required background modes key in a project’s plist file:

And now with the Twilio Client library now fully installed in the Pods project, and the plist values added, you can use the library’s APIs to write code that can make and receive VoIP calls without ever leaving your app.
Related Posts
Related Resources
Twilio Docs
From APIs to SDKs to sample apps
API reference documentation, SDKs, helper libraries, quickstarts, and tutorials for your language and platform.
Resource Center
The latest ebooks, industry reports, and webinars
Learn from customer engagement experts to improve your own communication.
Ahoy
Twilio's developer community hub
Best practices, code samples, and inspiration to build communications and digital engagement experiences.


