How to Build a Trivia Game For Your Friends Using Java and SMS
Time to read:
October 24, 2023
Written by
Reviewed by

Header photo credits to SantosSocialClub.
What better way to unite attendees and engage with fans before a music festival than with a lively and engaging music trivia contest? Using Twilio's SMS API, you can quickly develop and host a music trivia game that is sure to keep your guests interested and delighted whether you're holding a small gathering or a big festival.
This article will go over the procedures for building a Twilio-enabled music trivia game for your festival group, including how to set up the game, develop the questions, and oversee the game while it is taking place, using Twilio’s Programmable API Suite. So, get ready to make your festival even more memorable with a fun and exciting music trivia game powered by Twilio!
In this music trivia game, participants respond to music-related questions. Questions on musicians, songs, albums, genres, and other relevant topics could be asked of the participants. The game is won by the person who correctly answers the most questions.
Prerequisites
- IDE such as IntelliJ IDEA.
- A basic understanding of Java and Spring Boot or willingness to learn.
- An understanding of MySQL databases or willingness to learn.
- Postman to test the game.
Set up the project
You need to ensure that your project is set up properly before starting to create the app. Start by creating a new Spring Boot project using the Spring Initializr. In the Project selection menu, select "Java" and then "Maven." Select Spring Boot 3.0.5 as it is the most recent and stable version as of this article's authoring.
The application Artifact should be renamed to something such as "musiktrivia" in the Project Metadata. This name will be used as the display title and entrance title for the project. Include a project description if you think it will help you plan more effectively. Please note that, if you want to have the same import statements as I do, you would have to use the same name in the Project Metadata. This would help you achieve import conventions such as:
With Java 17 and the built-in Tomcat server that Spring Boot offers, choose "Jar" as the packaging type for the application.
Click the Generate button at the bottom of the page and the browser will download a .zip file with the project's boilerplate code. Now you can launch your IDE and open the project. Make sure the pom.xml file for your project contains the following dependencies. To add them to the file, simply copy and paste.
Save the modifications to the file.
Find the little icon with a "M" shape in the top-right corner of IntelliJ IDEA. Click it to load Maven modifications.
Set up the MySQL database
The database will be a MySQL database, for storing objects and events of the trivia game app. Please note that you can use any database provider of your choice. Open your favorite SQL Client Tool - in my case, it is the MySQL Workbench.
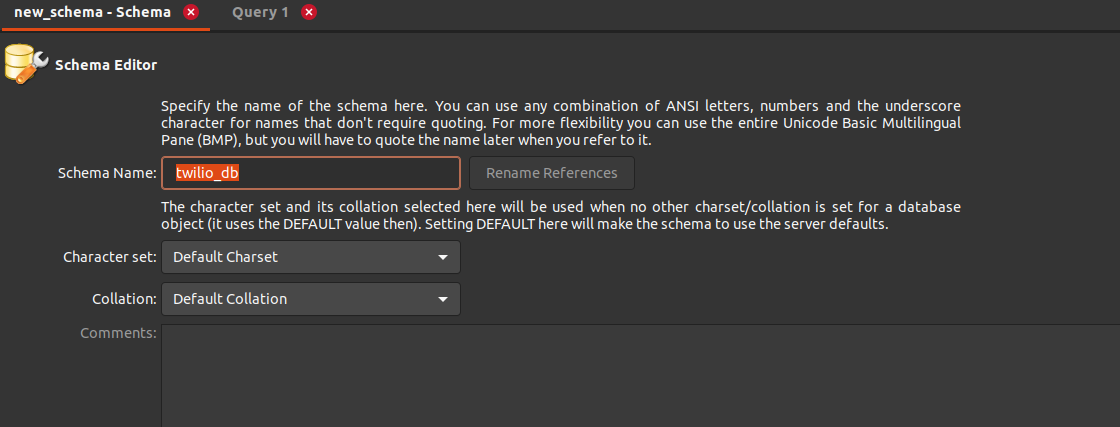
In the workbench, create a table with any name of your choice. In my case, the table is named "twilio-db". Save and exit the tool.
Navigate to the resources subfolder in your project directory and open the application.properties file. Paste the following information into it:
spring.datasource.url specifies the URL for connecting to the MySQL database. In this case, it is set to jdbc:mysql://localhost:3306/twilio-db?serviceTimezone=UTC. Here, jdbc:mysql://localhost:3306 indicates that the application will connect to a MySQL database running on the local machine (localhost) on port 3306. /twilio-db is the name of the database being used, and ?serviceTimezone=UTC sets the timezone to UTC.
spring.datasource.username specifies the username used to authenticate with the MySQL database.
spring.datasource.password specifies the password used to authenticate with the MySQL database.
spring.datasource.driver-class-name specifies the JDBC driver class name for MySQL. In this case, it is set to com.mysql.cj.jdbc.Driver, which is the driver class for MySQL.
spring.jpa.properties.hibernate.dialect specifies the Hibernate dialect to be used with MySQL. It is set to org.hibernate.dialect.MySQL5Dialect, which indicates the use of the MySQL 5 dialect.
spring.jpa.hibernate.ddl-auto configures the behavior of Hibernate's schema generation tool. Setting it to "update" means that Hibernate will attempt to update the database schema automatically based on the entity mappings. If the schema doesn't exist, it will be created. If it exists, Hibernate will update it to match the entity mappings, but existing data will not be modified.
Your database is now set up and ready for development.
Initialize the port
By default, Spring Boot projects run on port 8080. However, you can change this port to a value of your choice. In the case of this tutorial, we set the port to 9090. Here’s how to do it in the application.properties file. Paste the following text into the file:
Create project models
To interact with the trivia game, a number of entities are required. Essentially, there has to be people playing the game. There are also questions to be answered and a way to keep track of the score so that an eventual winner can be determined.
Create the User Model
Under the model subfolder, create a file called User.java. The code below should be copied and pasted into the newly generated file. This model stores information about each user playing the game, including their name, score, and any other relevant data.
@Getter and @Setter: These annotations are part of the Lombok library and automatically generate getter and setter methods for the private fields in the class. In this case, it generates getters and setters for the fields id, name, and phoneNumber. These methods allow accessing and modifying the values of the class attributes.
@AllArgsConstructor: This annotation is also from the Lombok library and generates a constructor that accepts arguments for all the fields in the class. In this case, it generates a constructor with parameters for id, name, and phoneNumber. This constructor allows creating an instance of the class with all the necessary data.
@NoArgsConstructor: This annotation, also from Lombok, generates a constructor with no arguments. In this case, it creates a constructor without any parameters. This constructor allows creating an instance of the class without providing initial values for the fields. It can be useful in certain scenarios when you want to create an empty instance and later set the values using the generated setters.
The class itself has the following fields:
name, phoneNumber: These fields represent the attributes of the User entity. They are annotated with @Column(nullable = false), which means that these fields cannot be null when persisting the User object in the database. The name field is of type String, the phoneNumber field is also a String, and the "score" field is an integer.
Create the Question model
Create a file called Question.java in the model subfolder, just like you did with the user model. Into the newly generated file, copy and paste the following code snippet below. This model stores information about each question in the trivia game, including the question itself, answer options, correct answer, and any other relevant data.
questionText: This String field represents the text of a question. It is annotated with @Column(nullable = false), indicating that it cannot be null when persisting the object in the database.
correctAnswer: This field represents the index of the correct answer among any four options. It is an integer and does not have any annotations associated with it. The value of this field should be between 1 and 4, corresponding to the options mentioned above.
gameId: This field represents the identifier of the game to which the question belongs. It is a String and does not have any annotations associated with it. This field is likely used to associate the question with a specific game in the system.
Create the Game model
This model would store information about each game session, including the start time, end time, game ID, and any other relevant data. Create a file called Game.java in the model subfolder, copy and paste the following code snippet below.
isOngoing: This field indicates that the game, which has just been created, is on-going. When the game ends, this field is set to false, specifying that the game is no longer being played.
startTime: This field represents the starting time of an event or activity. It is of type LocalDateTime, which is a class in Java that represents a date and time without any time zone information. The @Column(nullable = false) annotation indicates that this field cannot be null when persisting the object in the database. Therefore, a valid value for startTime must be provided.
endTime: This field represents the ending time of an event or activity. It is also of type LocalDateTime and is annotated with @Column(nullable = false). Similar to startTime, this annotation indicates that endTime cannot be null when persisting the object in the database. It is required to provide a valid value for endTime.
Create the real-time data sync model
Finally, in the same subdirectory where other models have been created, create a file named RealTimeData.java and paste in the code below. This model is responsible for managing the real-time data synchronization between different players in the game, including updating the scores and game progress in real-time as players answer questions.
playerIds: This field represents a collection of player emails. It is annotated with @ElementCollection. This annotation indicates that the field is a collection of simple values (in this case, Long values) that will be stored separately from the main entity. It allows for mapping a collection of values without the need for a separate entity. In this case, it represents a list of player IDs stored in the "playerIds" field. The initial value of the field is an empty ArrayList.
scores: This field represents a mapping between player IDs (Long) and their respective scores (Integer). It is annotated with @ElementCollection. This annotation signifies that the field is a collection of key-value pairs that will be stored separately from the main entity. In this case, it represents a mapping between player IDs and their scores stored in the scores field. The initial value of the field is an empty HashMap.
gameId: This field represents the identifier of the game. It is of type String and does not have any annotations associated with it. This field is likely used to uniquely identify the game associated with the entity.
winnerId: This field represents the identifier of the winner of the game
Create the CreateQuestionRequest model
In the model directory, create a file named CreateQuestionRequest.java and paste the code snippet below in this file. The purpose of this class is to receive requests for creating a question object.
Build the repositories
Create four new files under the repository subdirectory: UserRepository.java, GameRepository.java, RealTimeDataRepository.java and QuestionRepository.java. Paste the following code snippets below in each of their respective files:
Implement UserRepository
Build the services
The business logic for how the user will interact with the app is implemented in this section.
Integrate the Twilio API
The logic for communicating with the Twilio Programmable SMS API must be implemented by the TwilioConfigService.java class within the service package. Always avoid directly displaying your Twilio credentials or any other sensitive information in this or any other file. This may be done in a variety of ways. Declaring your environmental variables in the application.properties (or application.yml) file is nonetheless a popular strategy.
Go to the application.properties file in the resources directory and paste the configuration below into it:
Paste the following code snippet into the TwilioConfigService.java file.
The sendMessage() function requires two parameters: toNumber, which is the receiver's phone number, and messageBody, which is the text message that will be delivered to the recipient.
The accountSID and authToken are used to initialize the Twilio API client using the Twilio.init() function. The Message.creator() function generates a new SMS message with the message body, sender phone number, and receiver phone number specified. The new() function transmits the message and returns a Message object with the message's specifics, such as the SID.
You must update the default values for accountSID, authToken, and fromNumber with your Twilio account SID, authentication token, and phone number from the Twilio dashboard in order to utilize this TwilioService class. You can then use the Twilio API to send SMS messages by creating an instance of this class in your application and calling the sendMessage() function.
Implement the Trivia Services
This class is responsible for starting, playing and ending a game. In the Service package, create a file named TriviaGameService.java and paste the code below in it. The full class and its explanation are given below:
The class is annotated with @Service, indicating that it is a Spring service component.
The service has several dependencies autowired using the @Autowired annotation, including repositories such as UserRepository, QuestionRepository, GameRepository, and RealTimeDataRepository. Additionally, there is a dependency on TwilioConfigService.
The createUser() method creates a new user by saving the provided user object using the UserRepository.
The startGame() method initializes a new game by creating a new Game object, setting the start time using LocalDateTime.now(), and saving it to the GameRepository. It also creates a new RealTimeData object associated with the game and saves it to the RealTimeDataRepository.
The addUserToGame() method adds a user to a specific game by updating the RealTimeData object associated with the game in the RealTimeDataRepository. It adds the user ID to the list of player IDs and initializes their score to 0.
The createQuestion() method creates a new question by mapping the request data to a Question object and saving it to the QuestionRepository. It also sends a message to all players in the game using the twilioConfigService.sendMessage() method.
The sendAnswer() method handles a player's answer to a question. It retrieves the corresponding question from the QuestionRepository, checks if the answer is correct, updates the player's score in the RealTimeData object, and marks the question as answered.
The endGame() method marks the game as ended by retrieving the game object from the GameRepository and updating its end time and ongoing status.
The sendWinnerNotification() method sends a notification to all players in the game, notifying them about the winner. It retrieves the scores from the RealTimeData object, determines the player with the highest score, sends a message to all players using the twilioConfigService.sendMessage() method, and returns a notification message.
Build the controller
In the root package of your project, create a project named controller. Inside it, create a file with the name TriviaGameController.java. Paste the code below into it:
The class is annotated with @RestController, indicating that it is responsible for handling incoming requests and returning responses in a RESTful manner.
The @RequestMapping("/api") annotation defines the base URL path for all the endpoints defined in this controller.
The controller has a dependency on the TriviaGameService class, which is autowired using the @Autowired annotation. This allows the controller to utilize the services provided by the TriviaGameService for handling requests.
The controller defines several request mapping methods to handle different types of requests:
The createUser() method is mapped to the HTTP POST request with the path "/create-user". It expects a User object in the request body and returns a ResponseEntity containing the response body and HTTP status.
The addUserToGame() method is mapped to the HTTP POST request with the path "/game/add-user/{userId}/{gameId}". It extracts the user ID and game ID from the path variables and returns a ResponseEntity containing the response body and HTTP status.
The startGame() method is mapped to the HTTP POST request with the path "/start-game". It starts a new game by invoking the startGame() method from the TriviaGameService and returns a ResponseEntity containing the response body (a Game object) and HTTP status.
The sendQuestion() method is mapped to the HTTP POST request with the path "/send-question/". It expects a CreateQuestionRequest object in the request body and returns a ResponseEntity containing the response body and HTTP status.
The submitAnswer() method is mapped to the HTTP POST request with the path "/submit-answer/{userId}/{gameId}/{correctAnswer}". It extracts the user ID, game ID, and correct answer from the path variables and invokes the sendAnswer() method from the TriviaGameService.
The endGame() method is mapped to the HTTP POST request with the path "/end-game/{gameId}". It extracts the game ID from the path variable and invokes the endGame() method from the TriviaGameService.
The concludeGame() method is mapped to the HTTP POST request with the path "/send-notification/{gameId}". It extracts the game ID from the path variable and returns a ResponseEntity containing the response body and HTTP status.
The methods in the controller delegate the actual processing of the requests to the corresponding methods in the TriviaGameService by invoking the appropriate methods and passing the necessary parameters.
The responses from the TriviaGameService methods are wrapped in ResponseEntity objects, allowing customization of the response body and HTTP status codes.
Test your SMS trivia game
The code for this game can be found in this GitHub repository.
The app will now be tested to ensure that it performs as intended. Click the green start button in the top-right corner of your IDE to launch the project. On the terminal of your IDE, you ought to see a notification that says "Started application..."
Try out the endpoints established in the controller class by opening Postman. API testing may be done with Postman. Create a fictitious user, begin a game, add users to it, set the questions, receive entries as answers, get and announce a winner.
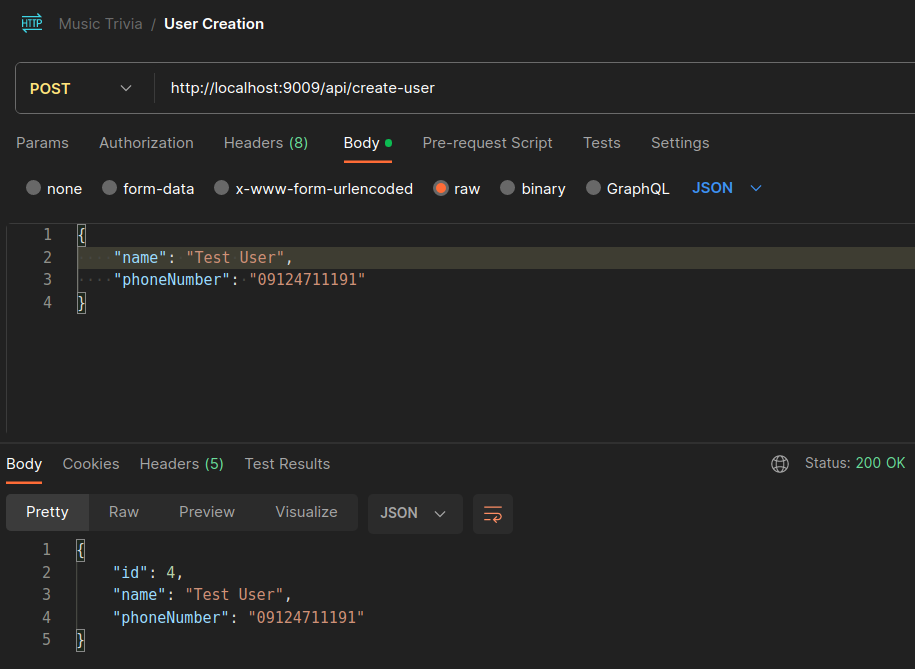
Create a user
Paste the URL "http://localhost:9009/api/create-user" in the URL field of the Postman program after starting it up. Select the 'Body' tab. pick 'raw' from the alternatives listed beneath it, and then click the dropdown arrow to the extreme right of the same list to pick 'JSON'. Paste the following text into the available space and make a POST request to the URL:
Push the send button, then. The creation of a user would be successful.
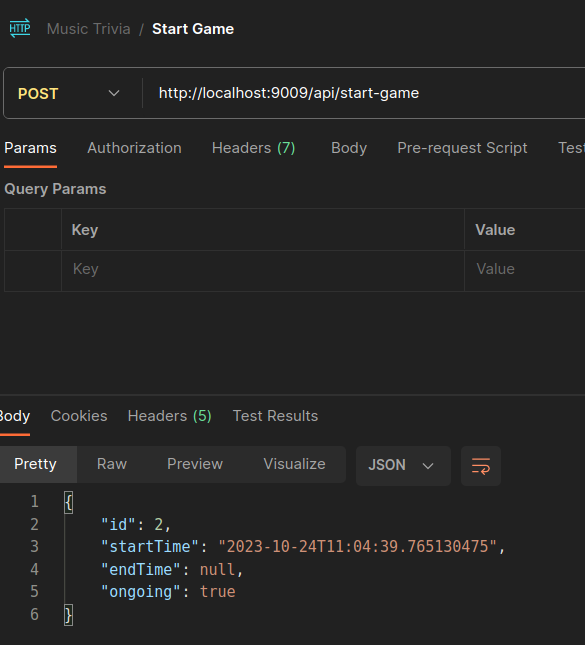
Start a game
To start a game, paste the URL in the text box and click send or press Enter; making a POST request in order to start a game. A Game object should be created now.
Add users to the game
Follow the steps above to create a user; add a number of users. For sake of brevity, I will use two pre-added users, with IDs 2 and 3 respectively.
Now, add the two new users to the game. Paste the URL into the URL box: "http://localhost:9009/api/game/add-user/{userId}/{gameId}" . Replace the placeholders (userId and gameId) with their actual values.
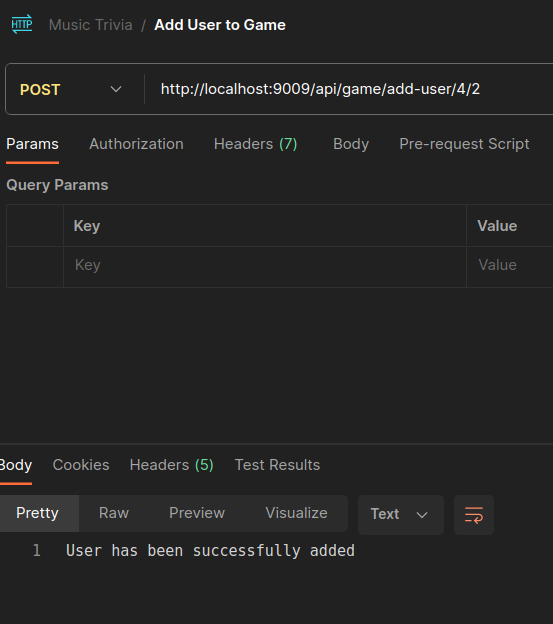
In the image above, we added a user with the ID 4 to the game with the ID 2. You can add more users with the same approach. I have gone ahead to add two more users to the game - users ID 2 and ID 3.
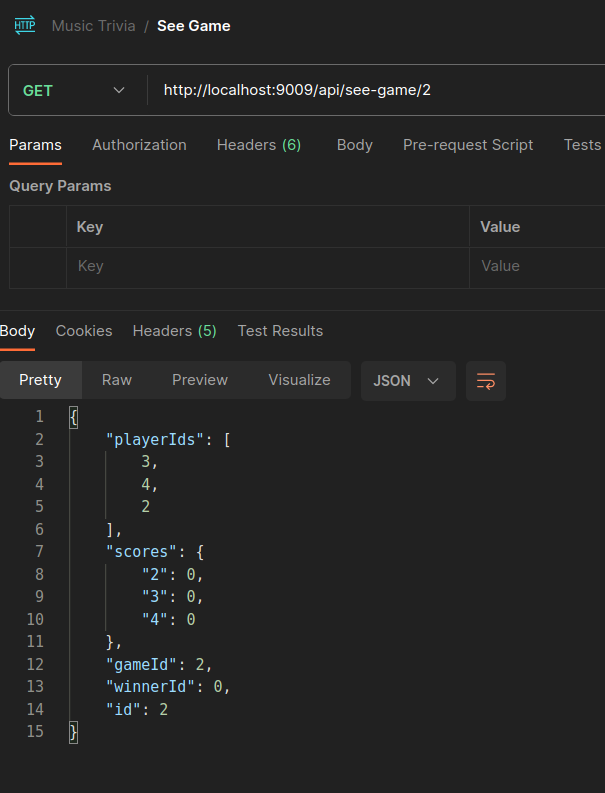
In the TriviaGameService.java, we wrote that, when a game is started, a RealTimeData object is also created at that time. To confirm that this happened, paste the following URL in the Postman URL text box ("http://localhost:9009/api/see-game/<gameId>") and make a GET request. Remember to replace the gameId with the actual value. You see the two players we added to the game and their score counts:
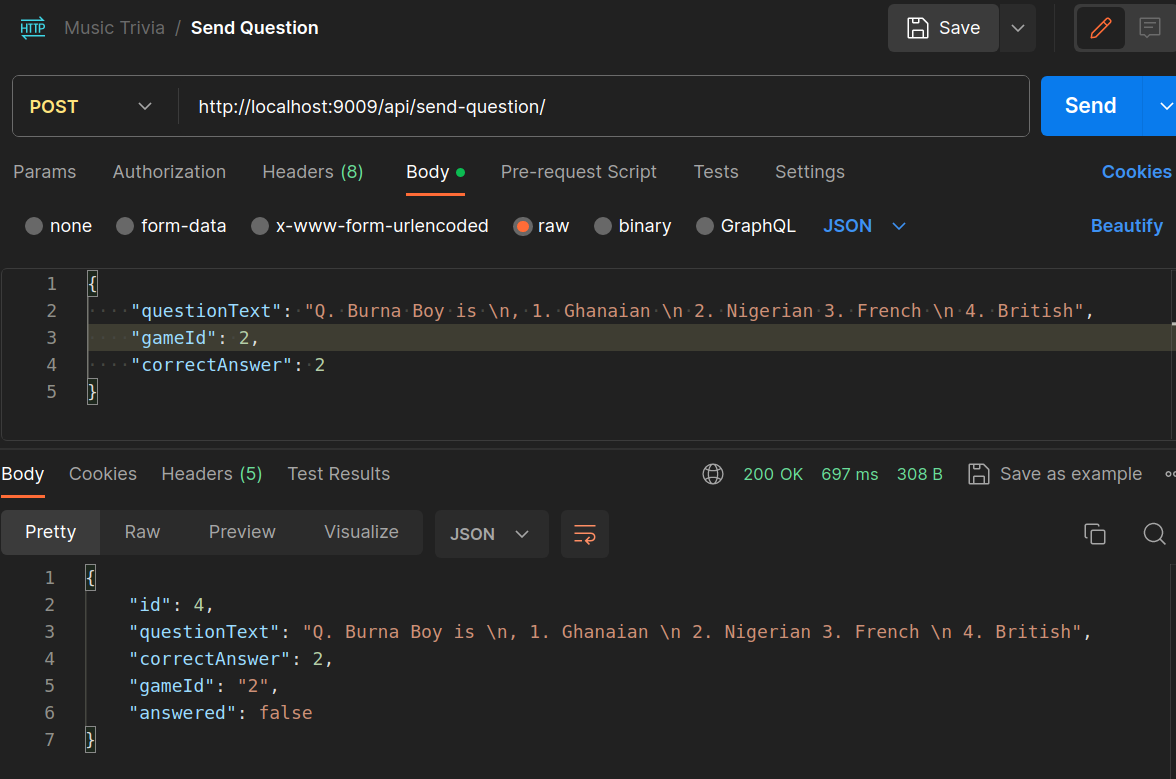
Send questions to players
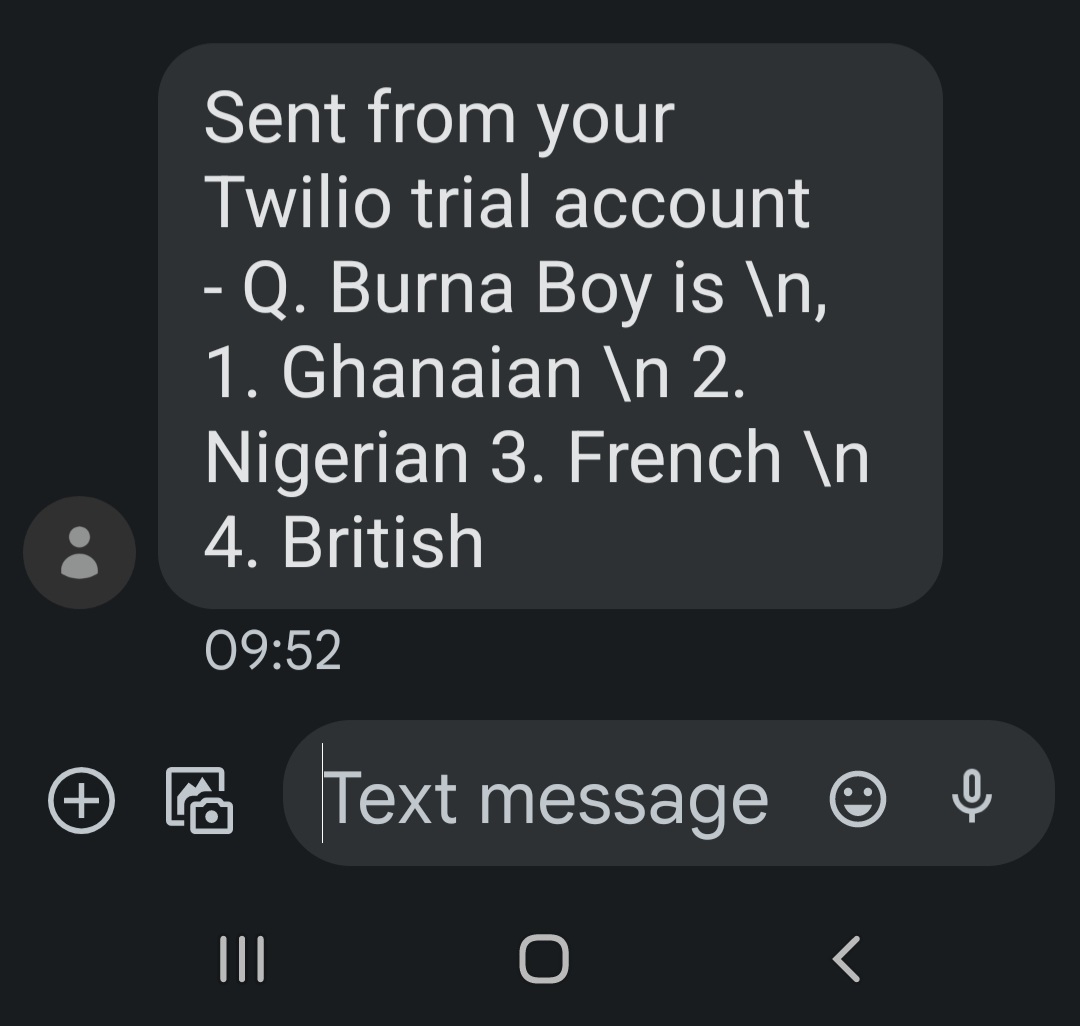
Now, time to put out the question. Paste the following in the URL box "http://localhost:9009/api/send-question/>" and then paste this following request in body section:
Make a POST request.
Send an answer to the question
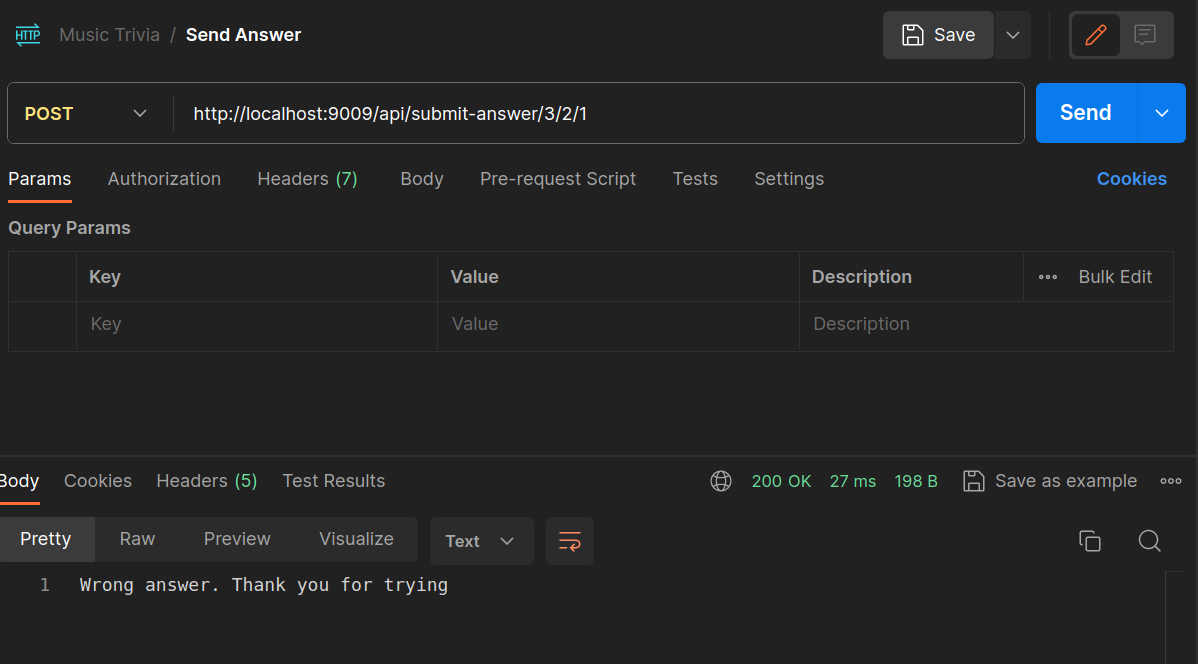
This time, the players get to respond to the question by sending in their preferred answers. Recall that our game has two players. We will assume that one player got the answer correctly and the other was wrong. Then we check the real time data for the game for updates. First, paste the URL in the text box:
"http://localhost:9009/api/submit-answer/{userId}/{gameId}/{correctAnswer}". Replace the placeholders in the URL with their actual values.
First we will test the incorrect answers from players with userId 2 and 3.

Then a correct answer from a player with userId 4.
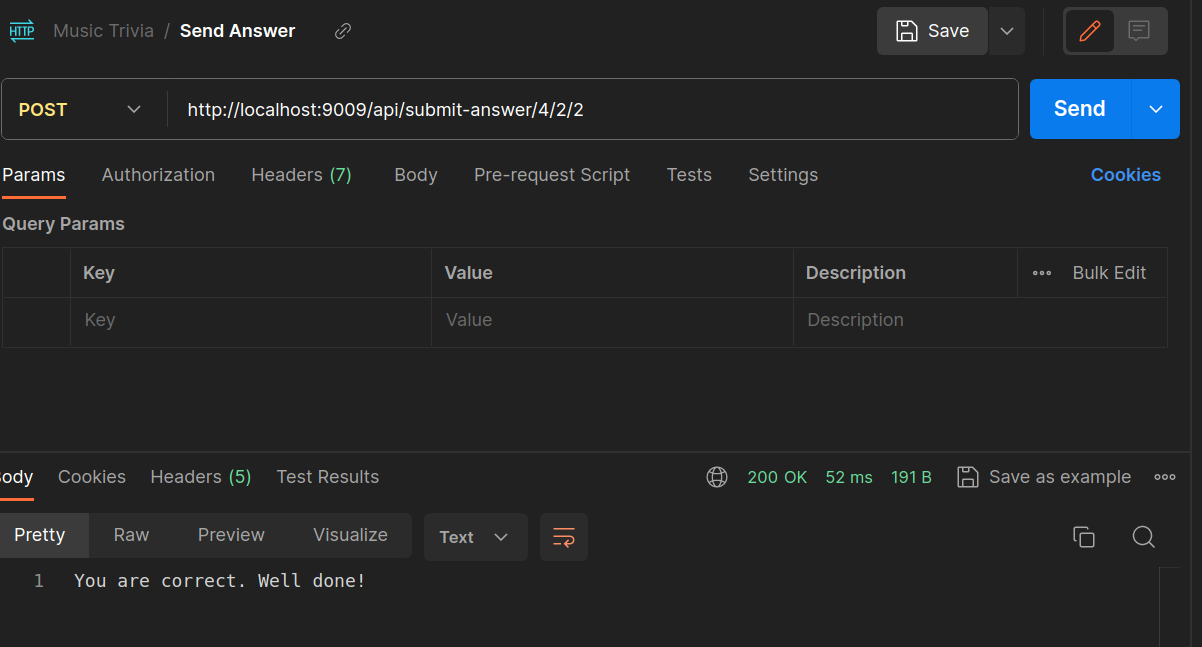
Now, check the real time data to see that there is progress in the game. The player with ID "2" should have a score of 1 and the player with ID "1" should still remain at 0. Go to "http://localhost:9009/api/see-game/<gameId>" and make a GET request.
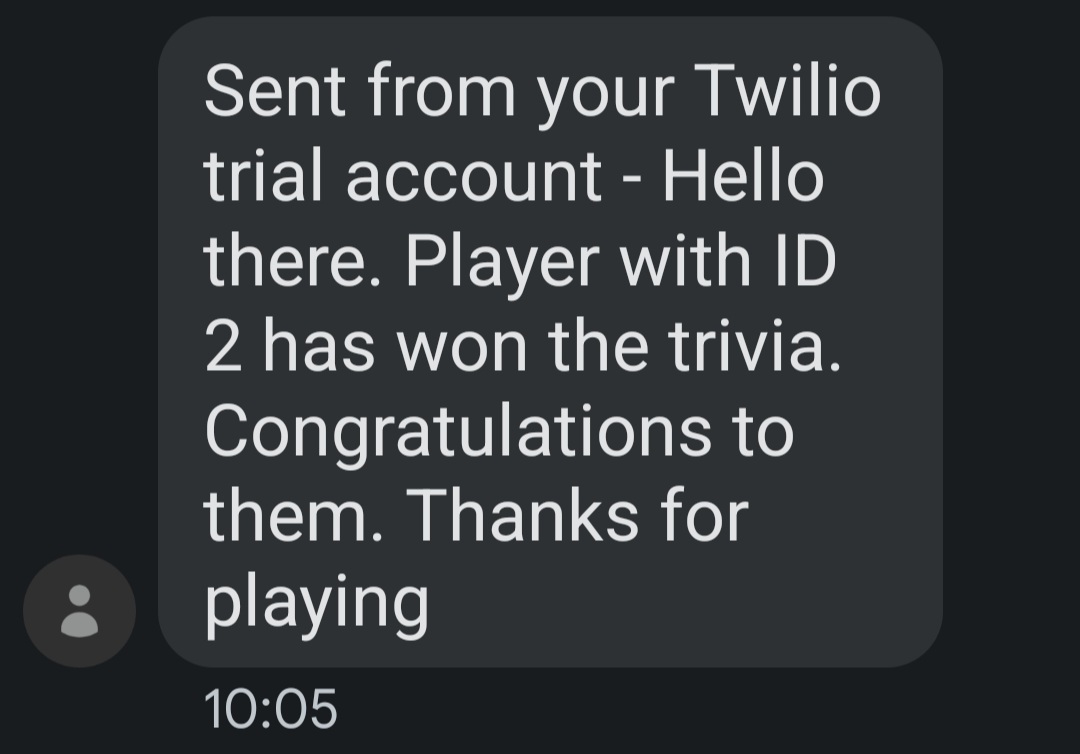
Finish the game and send the winner update
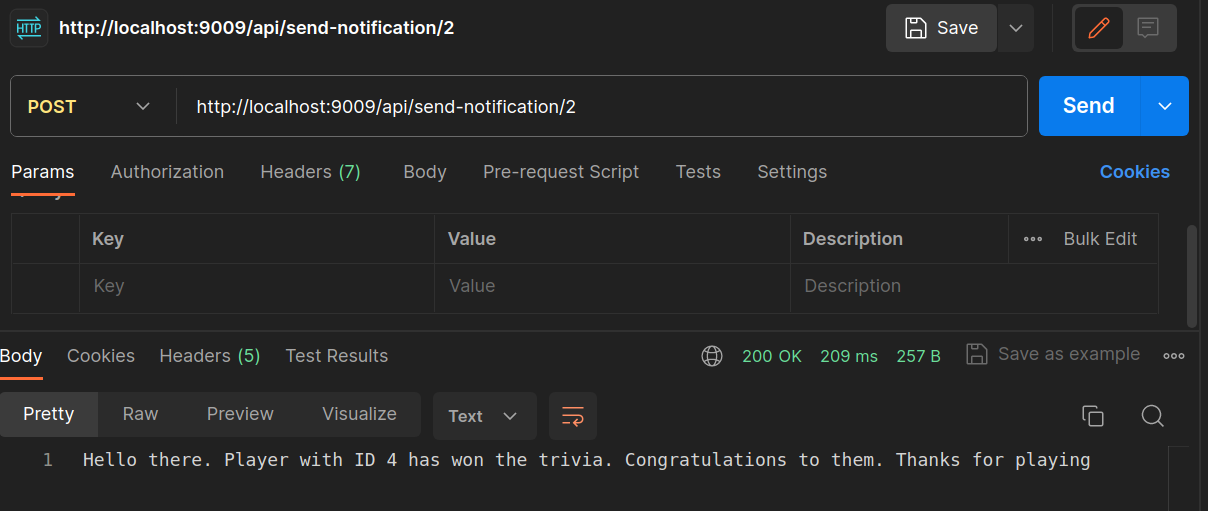
The game can continue for as long as it is wanted. At the end, a winner should emerge and a notification should be sent to all players, as shown below. Paste the URL in the text box "http://localhost:9009/api/send-notification/{gameId}". Replace the placeholder with the actual value for the game ID and make a POST request.
What's next for SMS trivia games in Java?
You will need a model to store information about the music tracks or artists featured in the game, or a model to store information about the festival group hosting the game.
Creating a successful music trivia game requires careful consideration of various factors, such as the difficulty level of the questions, the format of the game, and the prizes or rewards for winners. It's important to strike a balance between challenging questions and questions that are accessible to everyone. Additionally, the format of the game should be direct; whether it's a traditional quiz format or a more interactive game that involves physical challenges or team collaboration.
Building a music trivia game for your festival group can be an excellent way to enhance the overall festival experience. Happy coding.
Tolulope is a growing software engineer who loves coding and writing about what he does. When he's not coding, he enjoys his time as a disc jockey.

Related Resources
Twilio Docs
From APIs to SDKs to sample apps
API reference documentation, SDKs, helper libraries, quickstarts, and tutorials for your language and platform.
Resource Center
The latest ebooks, industry reports, and webinars
Learn from customer engagement experts to improve your own communication.
Ahoy
Twilio's developer community hub
Best practices, code samples, and inspiration to build communications and digital engagement experiences.