Passwordless SMS Authentication: Part 2 – Building iOS Front End With Swift
Time to read:
March 04, 2015
Written by
This post is part of Twilio’s archive and may contain outdated information. We’re always building something new, so be sure to check out our latest posts for the most up-to-date insights.

I have to fill out a “forgot password” page at least once a week. That’s probably why I’m so excited about passwordless authentication. Passwordless authentication is a system where the application you’re logging into generates a one-time use token for you to log in with and delivers that token via SMS or some other means. You can then verify this password from the device you were attempting to log in with.
In January we started a series of blog posts building out our own application that supports passwordless authentication with Twilio SMS. For me, this series is about trying and learning new things. In part 1 of the series we walked through building the API we’ll use for our passwordless SMS authentication application using Laravel and Twilio. Today we’re going to move on to building the iOS front end. This seemed like the perfect opportunity to dive deeper into using Apple’s new-ish programming language, Swift.
Our Tools
We’ll be using the following tools to build our app. We’ll introduce them each throughout the post:
- Xcode 6.1+
- SwiftRequest – A simple HTTP client for Swift.
- The API we built in Part 1
Hi, I’m An iPhone
We last left off with a simple server side application with three API endpoints:
- /user/validate/ – POST requests to this endpoint with a phone number validate that a user account is associated with that phone number and send a verification token.
- /user/auth/ – POST requests to this endpoint with a token validates that the token is correct for current session.
- /profile – GET requests to this endpoint will return some super secret data. This endpoint can only be accessed after a user has authenticated.
Today we’re going to build out our iOS front end that interacts with these endpoints using Swift. Let’s launch Xcode and get started. We’ll be creating a new Single View Application:

Give your project a name (feeling uninspired? “PasswordlessAuth” will work), make sure the language is set to Swift and the device is set to iPhone.
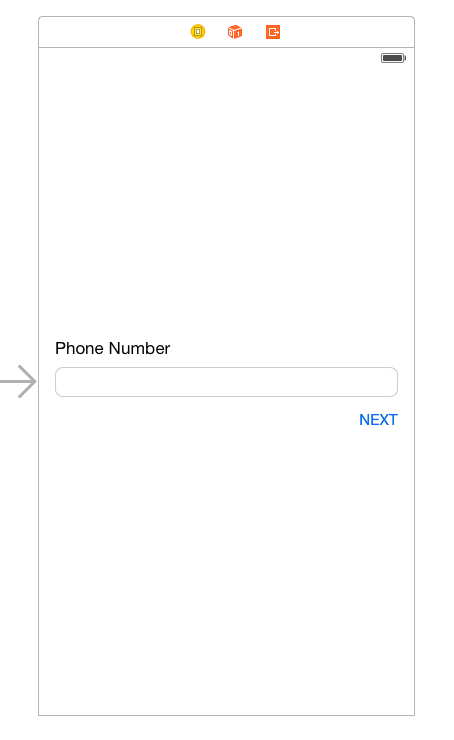
In an attempt to do things the Apple way we’ll be building out a our basic interface using Storyboards instead of nib files. Open Main.storyboard and start by adding a label with the text ‘Phone Number’, a text field and a button with the text ‘Next’ to our view. Our view should now look something like this:
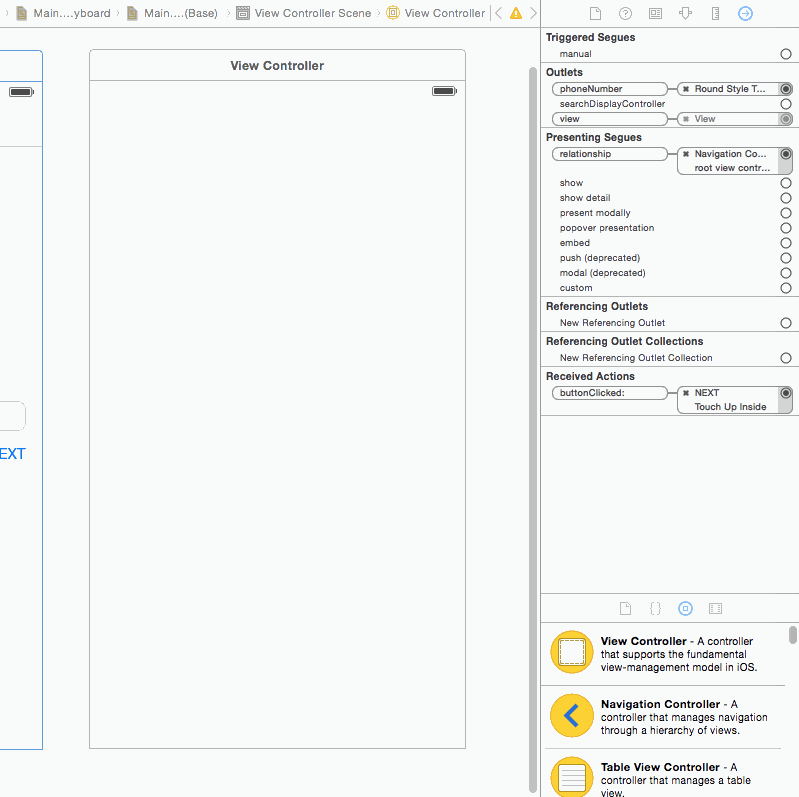
Now that we have our first view setup we can start writing our Swift code. Open up ViewController.swift. We need to add one outlet and one action to our class:
This will allows us to access the information in our UITextField and to detect when someone clicks on our UIButton. Before this will work properly we need to wire them up in our Storyboard. To connect our UITextField control+click on the View Controller in our Storyboard, drag to the UITextField and select the phoneNumber outlet:

To connect our UIButton control+click on it, drag to the View Controller and select buttonClick from Send Events like this:

Let’s make sure everything is working as we expect. Run your app (command+r), enter a phone number and press the next button. We now see our phone number logged to our Xcode console. It’s ok to do a little dance, I am.
Of course, when we press our button we want to do a little more than output to our console. Let’s update our buttonClicked code to make our request to the Laravel API we built. We’re going to make the request this using a library called SwiftRequest that I’ve been building as I learn Swift. See anything in SwiftRequest that’s missing or broken? I accept pull requests! Follow the instructions on the SwiftRequest github to install the library.
Let’s update our buttonClicked method to make a request to our API using SwiftRequest:
If you’re running your app in the simulator you can keep running your API on local host. If you want to test this on a device or move into production make sure to move your API to a publicly accessible location and update your code to use that url. Run your application, enter the phone number you have associated with your user and press next. You should see our JSON response in the xcode console:

Now that we’re making the request to our API we can add the code that takes the appropriate action based on our response. Let’s start with handling the error case. Firs, we’re going to add a new function to our view controller called showAlert that helps us avoid writing duplicate code:
Now let’s add the code to show an alert whenever we don’t have a successful response back from our API:
Give this a try by running the app and passing an invalid phone number.
In order to handle the success condition for this view we need to update our application to no longer be a single view application. First, let’s embed our current view into a navigation controller. This will allow as to travel between each our views easily. In your storyboard, select your view and then in the toolbar pick Editor -> Embed In -> Navigation Controller.
Now add a new view controller to your Storyboard. We’ll worry about setting this up in the next section, but for now we just need to make sure that it exists. Now drag the Manual reference under Triggered Segues on our current view controller to the new view controller we just created and then select Show:
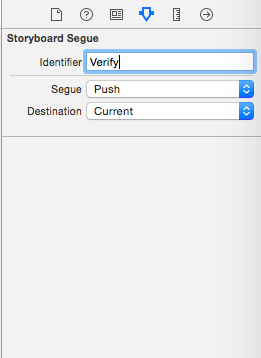
Finally select the segue we just created and call it Verify:
Head back to ViewController.swift and we can add the code within our SwiftRequest callback that performs the segue:
You’re probably wondering what this dispatch code we’re using is all about. Because we’re performing this segue from within a callback, it’s no longer running on the main thread. For our segue to run properly we’re using the dispatch to run the code back on the main thread. Now that we’ve got our segue set up, run your application again and enter your phone number. The application will then segue to our new empty view controller.
Turning The Page
We now have an application that allows a user to enter their phone number, send them a verification token and move them over to a new view where they should be able to verify that token. The first step in making that possible is creating a new Swift file for our AuthViewController. Select File -> New -> File… -> Swift File and call it AuthViewController.swift. We can then set up our AuthViewController class to inherit from UIViewController:
Like our previous ViewController, we’re going to have two connections to our view, a UITextField which will house our token and a buttonClicked function that will be called when the user wants to submit their token:
Now that we have the foundation of our Swift ViewController, let’s head back to our Storyboard and set up our view. Right now our view is empty so let’s add a new label with the word “Token”, text box and button. The end result should look something like this:

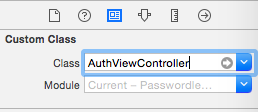
Before we can wire up our text field and button, we need to set this ViewController to be our class AuthViewController:
Now we can connect our UITextField with the token variable in our AuthViewController:

And our button to our buttonClicked function:
Now that we have everything wired up, let’s jump back to our AuthViewController and write the code to make the request to our auth method:
This code is almost identical to what we did to send our verification token. The only differences are we’re passing the token (not phone number) and the endpoint we’re making the request too. You’ll notice we’re using the showAlert function again. In our final application we would want to abstract this function out so we can share it between our ViewControllers and not repeat ourselves. But in an effort to keep this post simple and focused we’ll just add the showAlert directly to AuthViewController:
Run your application, submit your phone number and see that your token verifies correctly. You can find the final code for our application on github. There’s one last thing missing in this application which is accessing the secure data. Can you add the code that access this data after the token is verified? Spoiler alert: the code is going to look a lot like what you’ve already written twice in this post.
Hope You’re Ready for the Next Episode
In part 1 of this series we explored how to build the API for our passwordless authentication system using Laravel and Twilio. Today, in part 2, we built the iOS front end for our passwordless authentication system using Swift. What do you think we’ll build in part 3? I’ll give you a hint – expect to get your daily dose of Java in the next post. Have questions or what to show off what you’ve built? Holler at me on twitter (@rickyrobinett) or e-mail (ricky@twilio.com)


Related Resources
Twilio Docs
From APIs to SDKs to sample apps
API reference documentation, SDKs, helper libraries, quickstarts, and tutorials for your language and platform.
Resource Center
The latest ebooks, industry reports, and webinars
Learn from customer engagement experts to improve your own communication.
Ahoy
Twilio's developer community hub
Best practices, code samples, and inspiration to build communications and digital engagement experiences.