How to Build an Automated Survey Using Programmable Voice and Python
Time to read:
March 04, 2024
Written by
Reviewed by
In this post, we'll learn how to build an advanced automated survey system using Twilio Programmable Voice and Python in Visual Studio Code. This system will allow users to call a phone number and participate in an automated voice survey, making it ideal for businesses that need to collect customer feedback or conduct market research.
What is an Automated Survey System?
An automated survey system is a solution that allows businesses to conduct surveys automatically over the phone. With Twilio's Programmable Voice, we can build a system that handles calls automatically, asks survey questions, and records the responses.
Prerequisites
To complete this tutorial, you will need the following:
- A basic understanding of Python.
- A Twilio account (If you haven't yet, sign up for a free Twilio trial).
- Python installed on your local machine.
- A phone number purchased from Twilio.
- Visual Studio Code installed on your local machine or your preferred IDE.
- Python extension for Visual Studio Code installed.
Once you have all these prerequisites, you can start building your Automated Survey System.
Build an Automated Survey System
In this section, we will walk through exactly what it takes to build your use case.
Set up the Python environment
Create a new directory for your project and initialize a new Python virtual environment by running the following commands in your terminal:
NOTE : The above commands are for Windows and you need to use the appropriate syntax and file names for your operating system
These commands will create a new directory named automated-survey-system. Navigate into the directory, create a new Python virtual environment named venv, and activate the virtual environment.
Once you have your Python virtual environment set up and activated, you can start building your automated survey system app.
Next, install the flask and twilio packages, which are necessary for creating your Flask app and handling Twilio voice responses with the following command:
This command installs the flask and twilio packages using pip – a package manager for Python. The command output shows the progress of the installation, the version and location of each package, and any dependencies or requirements that are also installed.
Handle voice calls with Twilio
Now, let's create a new Python file named app.py and add the following code:
This code sets up a phone survey using Flask and Twilio. When a call comes in, the caller is greeted and given the option to answer two questions or end the survey. Their responses are recorded and handled accordingly. This is a powerful way to gather feedback from users over the phone.
Now let's break down the code into smaller parts and explain each one:
Here, we're importing the necessary modules. Flask is a web framework for Python, which we'll use to set up our web server. request and Response are used to handle HTTP requests and responses. VoiceResponse and Gather are from the Twilio library, which allow us to build the voice response and gather user input.
Set Up the Flask Application and Defining the /survey Route
app = Flask(__name__)
We're creating an instance of the Flask class named "app". This instance will be our WSGI application.
Then, define a /survey route that accepts both GET and POST requests.
When this route is accessed, it creates a VoiceResponse and a Gather object.
The Gather object is set up to collect one digit of user input and then send a POST request to the /gather route. The say method is used to relay a message to the user. The Gather object is then appended to the VoiceResponse object, which is returned as an XML response.
The gather() function is triggered when the user inputs a digit. Depending on the digit entered, it asks a question and records the user's response.
The last route is called after the user's response is recorded. It thanks the user for their response and redirects them back to the survey. If no recording is received, the call ends.
Test your Automated Survey System Locally
To test your automated survey system locally, you can use a tool like Flask's built-in development server. Run the following command in a new terminal window:
python app.py

This will start the Flask development server, which you can use to access your local server from your machine. Your local server is only accessible from your machine, not from the internet. Twilio needs a public URL that can access your Flask app and receive the TwiML responses that you create and we will set up this in the next step.
For complete code reference, please visit this GitHub repository .
Expose your local server to the Internet
To make your automated survey system accessible from the internet, you need to expose your local server to the internet. One way to do this is to use a tool such as ngrok . This creates a secure tunnel between your local server and a public URL.
To use ngrok, you need to download and install it on your machine. Refer to this article to install and set up ngrok properly. Then, run the following command in a new terminal window:
This will start ngrok and generate a public URL for your local server, which will look something like https://1234567890.ngrok.io.
Copy this URL and paste it in your Twilio console, where you can configure your Twilio phone number.

Go to the Phone Numbers section of the Twilio Console and select the phone number you purchased.
Scroll down to the "Voice Configuration" section and select Webhooks, TwiML Bin, Functions, Studio Flow, Proxy Service from the drop-down menu.
In the "A Call Comes In" field, paste your ngrok URL followed by /survey, like this: https://1234567890.ngrok.io/survey. Click Save configuration.

Run the automated survey system
Your automated survey system is ready to receive calls from the internet. You can test it by calling your Twilio phone number from your personal cell phone and participating in the survey.
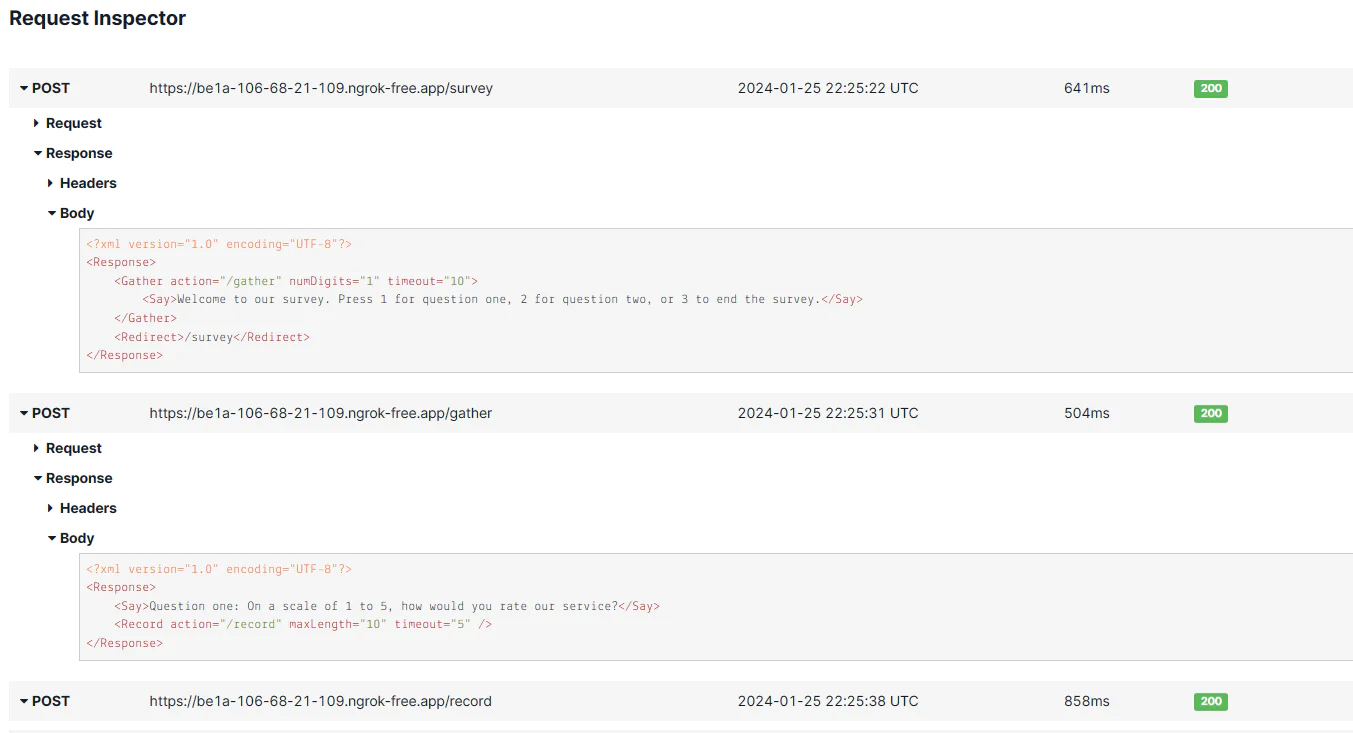
You should hear the survey introduction message: "Thank you for participating in our survey. Press 1 for question one, 2 for question two, or 3 to end the survey."
Depending on the option you choose, you will hear the corresponding question. If no input is received, the call will end with a goodbye message. If an invalid option is chosen, the caller will be informed that their choice was not understood. You can also use the Twilio console to check the recorded responses under the Call Logs section of your Active Numbers.
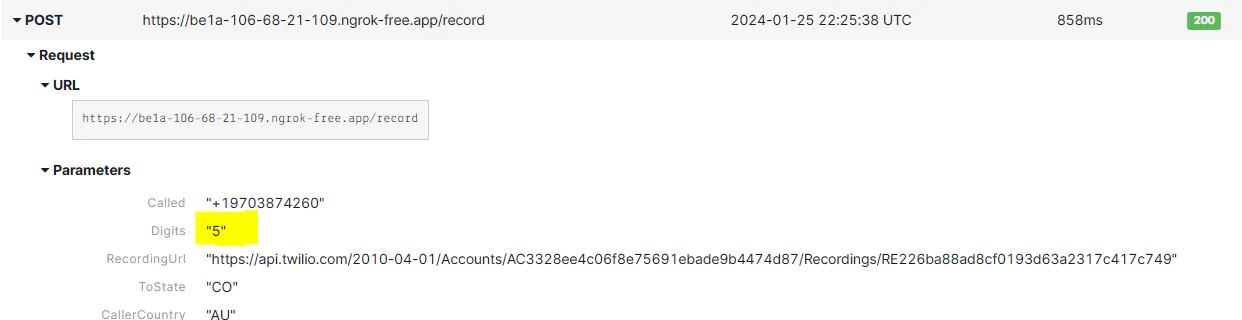
After this, you can click on the individual requests in the Twilio console to view the user’s inputs, which include the ratings they provided for the survey. In this example, the user responded with "5" as seen in the Digits section of the screenshot below:
What's next for building an automated survey system with Twilio Voice?
Congratulations! You've built an advanced automated survey system using Twilio Programmable Voice and Python in Visual Studio Code. This system can be integrated into any business that requires phone surveys.
So, what's next on your journey? Here are a few suggestions:
- Integrate with Other APIs:You can integrate your survey system with other APIs to enhance its functionality. For example, you could use the Twilio SMS API to send survey links to users via text message .
- Implement OTP Verification:To ensure the authenticity of the responses, you can implement OTP verification in your survey system. There's a great article on the Twilio blog about Building an Simple SMS Phone Verification with Twilio Verify and Python .
- Use Twilio Messaging:Twilio Messaging can be used to send survey reminders or follow-ups to participants. You can learn more about this from the article Introducing Engagement Suite from Twilio Messaging .
- Leverage Twilio's Message Scheduling Feature:You can also schedule messages for future delivery, which would be helpful for follow-up messages to your participants..
Remember, the journey of learning and building never ends. Keep exploring, keep building, and most importantly, have fun along the way!
Rollend Xavier is a Microsoft Certified Cloud Architect with 16 years of experience. He is the author of the book “ Automate Your Life: Streamline Your Daily Tasks with Python: 30 Powerful Ways to Streamline Your Daily Tasks with Python ”. You can follow him on Linkedin at Rollend Xavier .

Related Resources
Twilio Docs
From APIs to SDKs to sample apps
API reference documentation, SDKs, helper libraries, quickstarts, and tutorials for your language and platform.
Resource Center
The latest ebooks, industry reports, and webinars
Learn from customer engagement experts to improve your own communication.
Ahoy
Twilio's developer community hub
Best practices, code samples, and inspiration to build communications and digital engagement experiences.