Send Automated Surveys by SMS with Python and Twilio
Time to read:
April 28, 2023
Written by
Reviewed by

A great way to engage with your users and get feedback is to offer them the chance to participate in a survey. In this short tutorial you will learn how to create an SMS survey management application using Python and Twilio Programmable Messaging.
Requirements
To work on this tutorial you will need the following items:
- Python 3.7 or newer. If your operating system does not provide a Python interpreter, you can go to python.org to download an installer.
- A Twilio account. If you are new to Twilio click here to create a free account.
- A phone that is able to send and receive SMS, to test this project.
Buy a Twilio phone number
If you don’t have a phone number in your Twilio account, your first task is to purchase one. This is the number that your users will exchange messages with during the course of a survey session. If your account already has a number assigned, you can skip to the next section.
Log in to the Twilio Console, select Phone Numbers, and then click on the “Buy a number” button to buy a Twilio number. Note that if you have a free account, you will be using your trial credit for this purchase.
On the “Buy a Number” page, select your country and check SMS in the “Capabilities” field. If you’d like to request a number that is local to your region, you can enter your area code in the “Number” field.
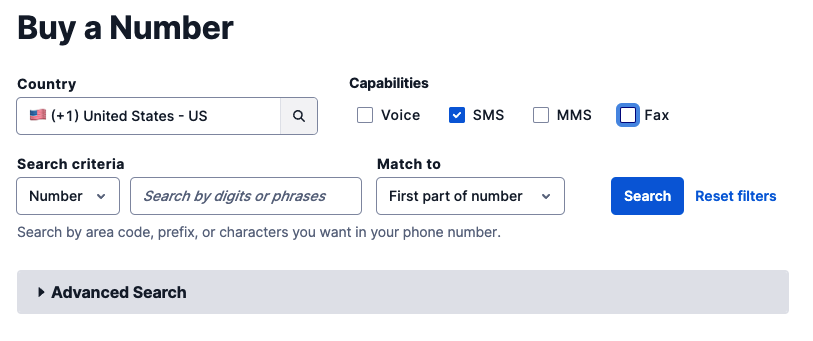
Click the “Search” button to see what numbers are available, and then click “Buy” for the number you like from the results. After you confirm your purchase, click the “Close” button.
Python project setup
In this section, you are going to set up a brand new Python project. To keep things nicely organized, open a terminal or command prompt, find a suitable place, and create a new directory where the project you are about to create will live:
Create a virtual environment
Following Python best practices, you are now going to create a virtual environment, where you are going to install the Python packages needed for this project.
If you are using a Unix or Mac OS system, open a terminal and enter the following commands:
If you are following the tutorial on Windows, enter the following commands in a command prompt window:
With the virtual environment activated, you are ready to install the dependencies needed for this project:
Set up a webhook
The Twilio Programmable SMS API uses a webhook to notify an application when there is an incoming message to the Twilio phone number. The survey application presented in this article will implement a webhook that will be called by Twilio each time the user sends an SMS. The webhook will then send a response back to the user. This is going to form the basis of the exchanges that occur during a survey session.
The Flask web framework greatly simplifies the task of creating a webhook. Below is a skeleton application with a webhook definition. Copy the following code into a new file called app.py, in the sms-survey directory:
This code creates a Flask application that has an endpoint with the root URL, or “/”. Later when Twilio is configured to know about this endpoint, it will send a request each time an SMS is received on your Twilio phone number. The application can read the incoming message, do some processing and generate a response, which is returned at the end of the function. This first version of the endpoint retrieves the incoming message, but it does not use it for anything. Instead, it always returns the same response.
You can start the above application as follows:
The application is now running on your computer at the http://localhost:5000 URL, but it is not accessible from the Internet. The next step is to provision a temporary public URL that we can give to Twilio, so that it can send requests to this webhook.
For this you are going to use the ngrok tool. Leave the application running and open a second terminal. Activate the virtual environment on this terminal as you have done on the first at the start of the tutorial and then enter the following command:
You should see a screen similar to this:
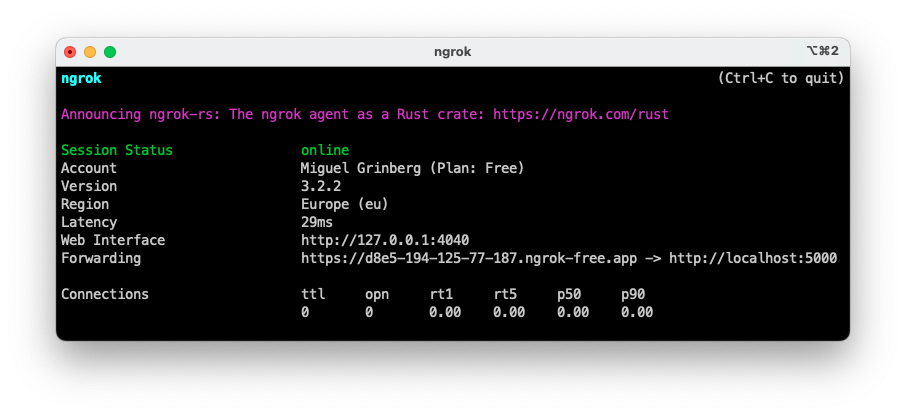
Note the line beginning with “Forwarding”. This line shows the public URLs that ngrok uses to redirect requests into the local Flask web service.
Go back to the Twilio Console, click on Phone Numbers / Manage / Active numbers, and then on the phone number that you purchased above. Scroll down to the “Messaging” section, copy the forwarding URL from ngrok and then paste it in the “URL” field of the “A message comes in” section. Make sure the request method is set to HTTP POST, and that the “Configure with” field right above is set to “Webhook, TwiML Bin, Function, Studio Flow, Proxy Service”. Don’t forget to click the blue "Save" button at the bottom of the page to record these changes.

To test your webhook, send an SMS to your Twilio phone number from your personal phone. You should get the generic response that comes from the Flask application:

When you reach this point, you have a fully working Twilio webhook. In the next section you’ll add the survey logic to it.
A survey webhook
The most interesting and important part of this project is the part that manages the survey questions and the responses from users. To have a solution that offers the most flexibility, the configuration of the survey is going to be provided as a set of global variables that are easily editable. Below you can see the simple survey that is going to be used as an example in this project:
The survey is going to be controlled with two session variables. In Flask, the user session is a storage where the application can save information independently for each user.
Flask stores the user session in a signed cookie. In a standard web application, the user’s web browser would be in charge of storing this cookie and sending it back to the server with each client request. When working with Programmable Messaging, Twilio manages cookies in the same way as the web browser.
Below is the complete version of app.py, including the survey management logic:
Let’s review the survey logic in small chunks. Here is how the welcome message is handled:
When the user initially sends a message to the Twilio number, the survey_step session variable is not going to be defined, so it is given a default value of -1. In this case, the WELCOME_MESSAGE text is sent as a response, and survey_step is incremented to 0. The answers variable is also initialized as an empty list. These values are going to be recalled when the user replies to the welcome message.
At this point the user is going to reply with yes or with some other text. Twilio will call the webhook again, and this time, survey_step is going to be 0.
If the user responded with anything other than yes, then the survey is aborted. Here is the logic that handles this case:
When survey_step is 0, the webhook checks that the incoming_msg has the value yes, allowing for any case combinations. If the message is something else, then ABORT_MESSAGE is sent as response and the session variables are deleted, effectively canceling the survey session.
What happens when the user responds yes? Here is how that case is handled:
For this case, the response text is generated using SURVEY_QUESTIONS[survey_step], which maps to the first question. To make the survey a bit more user friendly, a count of questions is also included in the response. For this first question, the counter will show as (1/3). To advance the survey, the survey_step counter is incremented, so that in the next interaction the next question is returned.
Now the user received the first question, and needs to provide an answer for it. The last code snippet will execute again when the user sends a response to the first question, and this time survey_step is going to be 1, which means that the response is going to be generated with the second question, which has index 1 in the question list. The counter in this question is going to show as (2/3). The incoming_msg variable, which has the response to the first question, is appended to the (currently empty) answers session variable.
This flow will repeat until all the questions are presented to the user. When the response to the final question is received by the server, a different code path is taken because the survey_step < len(SURVEY_QUESTIONS) condition is going to be False. Here is the code that handles this final answer:
The response to the user is now the goodbye message. The answers local variable, which accumulated all the questions except the last, is extracted from the user session, and the incoming_msg is added to it to have the complete list of answers. Since the survey is now completed, the two session variables are deleted.
In this small application, the list of answers is printed to the terminal. In a real survey application, the answers could be saved to a database, or added to a CSV file, depending on the application’s needs.
Are you ready to see the survey application in action? If you are still running the first version of the application, stop the server by pressing Ctrl-C. Make sure the app.py script is updated with the survey logic, and then start the application once again:
If you are still running ngrok in your second terminal window, make sure that the session is still active. If your ngrok session expired, you will need to stop it with Ctrl-C and restart it as follows:
Each time you restart ngrok, your forwarding URL changes. If you did restart ngrok, go back to the Twilio Console and update the webhook URL for your Twilio number as shown above.
Once you have the Flask application and ngrok running, and the webhook is configured in the Console, initiate a session with your application by sending an SMS with a greeting to the Twilio phone number. From there, follow the prompts to fill out a survey.
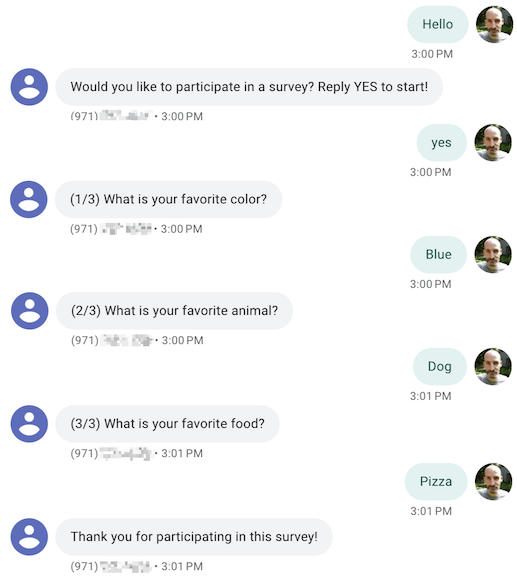
Here is an example session:
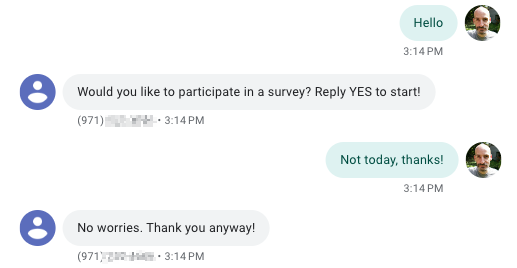
You can also test the case of a user declining the survey. Here is an example of that:
Conclusion
I hope you had fun writing this application! If you are interested in deploying the application to be used for real, you have two more tasks to do. First of all, you have to secure your endpoint by verifying the Twilio signature that comes with all requests, which is important to prevent fake or malicious requests from reaching your application. Next, you will want to deploy your webhook on a production server, so that you do not have to run it on your computer relying on Ngrok. If you are interested in some suggestions, this blog includes Python deployment guides for repl.it and pythonanywhere, but any deployment solution for a Flask application should work.
I can’t wait to see what you build with Twilio Programmable Messaging!
Miguel Grinberg is a Principal Software Engineer for Technical Content at Twilio. Reach out to him at mgrinberg [at] twilio [dot] com if you have a cool project you’d like to share on this blog!
Related Resources
Twilio Docs
From APIs to SDKs to sample apps
API reference documentation, SDKs, helper libraries, quickstarts, and tutorials for your language and platform.
Resource Center
The latest ebooks, industry reports, and webinars
Learn from customer engagement experts to improve your own communication.
Ahoy
Twilio's developer community hub
Best practices, code samples, and inspiration to build communications and digital engagement experiences.