Getting started with the Arduino Yun – the Arduino with WiFi
Time to read:
February 05, 2015
Written by

One of the most common complaints of Arduinos is their lack of connectivity. You build these cool hardware hacks, but then you can’t make them apart of the Internet of Things (IoT) unless you plug in a bulky Arduino WiFi shield.
The Arduino Yun solves that problem. The Yun is an Arduino with WiFi built in. Additionally, the Yun has a second microprocessor that runs a lightweight version of Linux and comes with Python preinstalled. This means that for $75, you can have sensors and buttons trigger Python scripts, and Python scripts trigger LEDs, motors and other actuators. And Python’s just the language that comes with it — you can install Ruby, Node or PHP if that’s your jam.
Before you start hacking though, you need to make some preparations. In this tutorial you’ll learn how to:
- format an SD card to work in the Arduino Yun
- upgrade OpenWRT, the version of Linux that runs on the Yun
- connect your Arduino Yun to the wifi network
- SSH into your Yun
- install the Arudino IDE on your computer
- run Blink, the “Hello World” of Arduino programs
My guess is that it’ll take you 30-45 minutes to complete this tutorial. To follow along, you’ll need an Arduino Yun (~$75 at Spark Fun or Ada Fruit), a microUSB cable (~$5) and a micro SD card (~$8).
Once you’ve finished this tutorial, you may want to put your newly acquired skills to use to:
- Build an Arduino Yun powered photo booth
- Send SMS and MMS from your Arduino Yun
- Teach your dog to text selfies with the Arduino Yun
Get a primer on the Twilio SMS and MMS docs here. Check out our IoT Tutorials for Sync for IoT as well.
Overview of the Arduino Yun
This is what the Arduino Yun looks like:
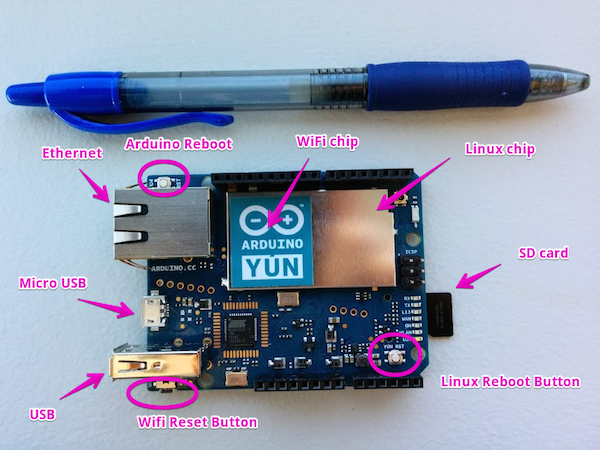
The Yun’s primary components are:
- Atmel ATmega32U4 – this is the “Arduino chip” that controls the pins and lets you do all the hardware hacking that you associate with Arduinos. When you send a sketch (Arduino code) to the Yun via the Arduino IDE, it’s running on this chip.
- Atheros AR9331 – This is the “Linux and WiFi chip.” It runs OpenWRT, “a Linux distribution for embedded devices.”
- Three ports: a standard USB, a micro USB, and an ethernet port
- Three buttons: WiFi reset, “Arduino chip” reset, and “Linux chip” reset. You’ll use the WiFi reset most often.
- A microSD slot for external storage
A few tidbits worth noting:
Unlike the standard Arduino, the Yun does not have a dedicated port for power. Instead, it gets its juice from the micro USB port. You’ll spend a lot of development cycles with the Yun plugged into your computer, but actually sending data to it over WiFi. The Arduino Yun I bought from Adafruit did not come with a microUSB cable.
If you hold down the Arduino’s WiFi reset button for more than 30 seconds, your Yun will reset to factory conditions! (Though, if you’ve upgraded OpenWRT, the new version will remain.) If you hold the WiFi button for more than 5 seconds but less than 30, it will reset the WiFi networking settings.
For instance, let’s hypothetically say that you’re writing a “Getting Started with the Yun” guide at your office in Chicago, then it snows 19 inches, so you decide to work from home the next day. Since your Yun is set up for the office WiFi, you’ll need to hold down the WiFi reset button for somewhere between 5 and 29 seconds, then go through the steps below to connect to your home WiFi network.
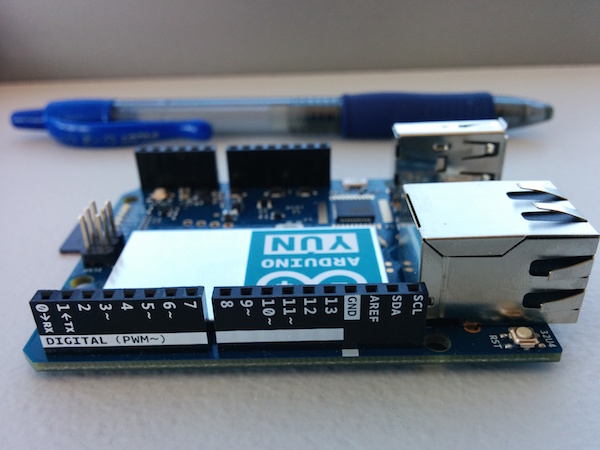
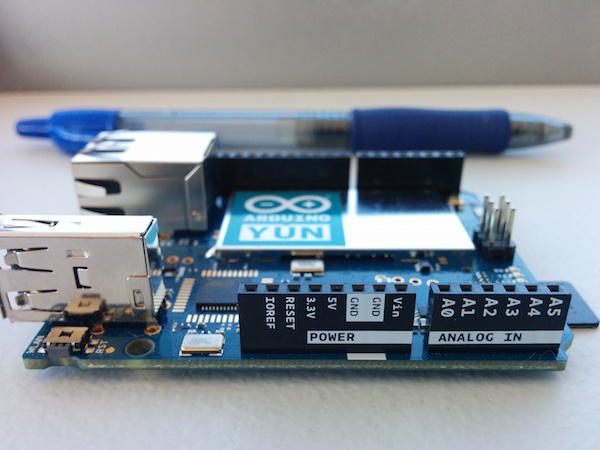
The Yun also has all the pins that you’d expect to see on an Arduino (we’ll cover those in a future tutorial):
Prepare the Arduino SD card
You’re going to need a micro SD card with your Yun. The official getting started guide says, “You’re discouraged from using the Yún’s built-in non-volatile memory, because it has a limited number of writes.” I don’t know what that means, but it sounds bad, so I’m going to take it at face value.
So before we do anything with the Yun itself, let’s prepare the microSD card. If you’re using a brand new SD card, it will probably work out of the box. If you’re pulling your SD card out of a camera like I did, you’ll need to format it to a FAT file system (Not FAT 32!).
To format an SD card on OSX, plug it into your machine (you’ll need one of those adapters to make it look like a big SD card), open up the Disk Utility and do this:
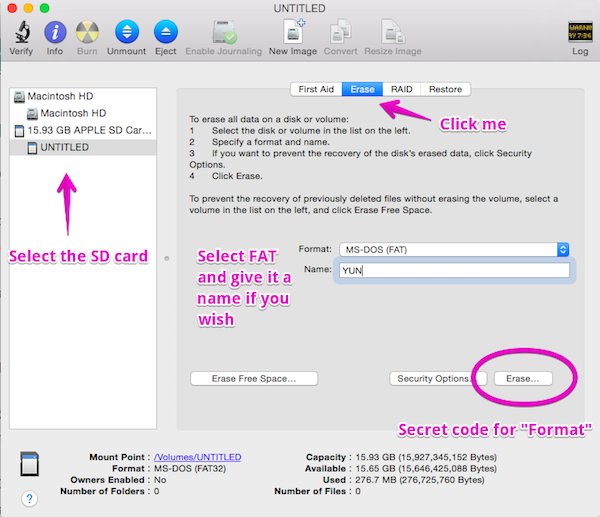
Don’t unplug the SD card from your computer just yet! We need to put some software on it before we move it over to the Yun.
Upgrade OpenWRT-Yun
Your Yun ships with a lightweight version of Linux called OpenWRT-Yun. In the time that has passed since your Yun shipped off the factory line, a newer and better version of OpenWRT-Yun has been released. (As of writing, the image released on Nov 14, 2014 is the most recent).
I know… It’s tempting to just jump right into playing around with the Yun, but you’re going to save yourself a lot of headache if you upgrade to the latest version of OpenWRT-Yun now. (If you want to know all the details of why, check out the OpenWRT release notes). This process will take less than ten minutes.
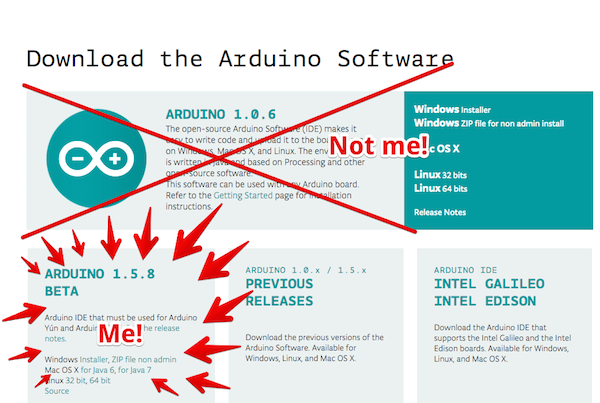
- Visit the Arduino Software page
- Scroll halfway down the page
- Click the link for the OpenWRT-Yun upgrade image
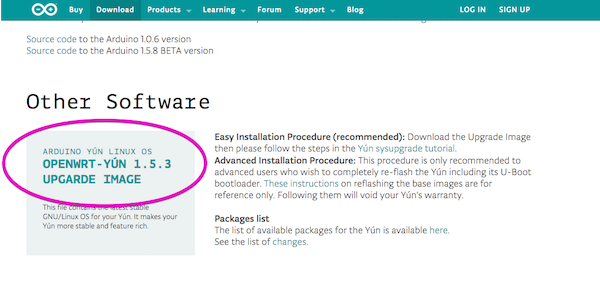
- Unzip the file and copy the .bin into the root of the SD card
- Eject the SD card, remove it from your computer, and plug it into the Yun
Now we’ve got an OpenWRT image lying in wait on our SD card. Let’s fire up the Yun.
Connect to the Ardunio Yun over Wifi
If you have not previously connected your Yun to WiFi, it will create its own WiFi hotspot. You’ll connect your computer directly to the Arudino’s WiFi, open up the control panel in a browser, configure the Yun to connect to the wireless network of your choosing, then meet it back on that network.
- Plug the small end of the micro USB cable into your Yun and the other end into your computer
- Wait about 60 seconds for the Yun to boot up. When the Yun’s ready to go, you’ll see the white USB LED turn on.
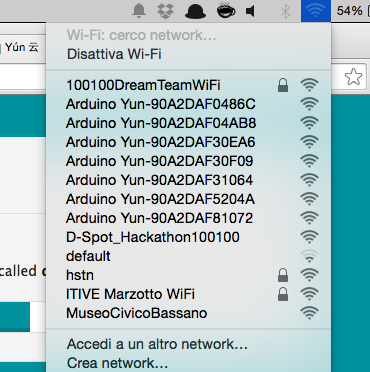
- On your laptop, check the available WiFi Networks for a new one called something like: ARDUINO-YUN90XXXXXX. Tangentially, here’s a pic from a thread on /r/arduino titled This happens during Arduino Yun Hackathon:
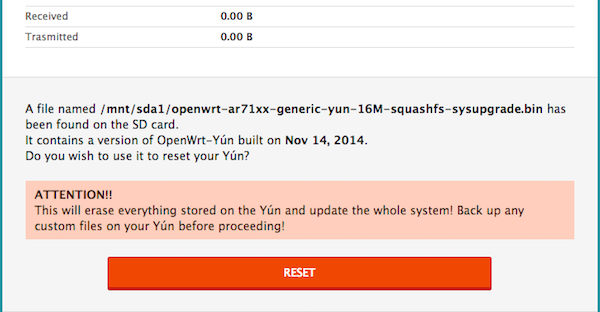
Once you’ve connected to your Arduino’s WiFi, open a browser and visit arduino.local. If that doesn’t work, visit 192.168.240.1 (I’m not sure why, but I found the former to be flakey). When asked for a password, enter “arduino”
You’ll see a lot of information that we’re going to come back to. For now, ignore it and scroll all the way to the bottom where you’ll see an option to upgrade OpenWRT. Click RESET.
While you’re waiting the few minutes for the thing to reinstall and reboot, pat yourself on the back. Seriously… I know how much fun it is to dive in and start playing around. I’m proud of you for delaying gratification.
Now let’s have some fun.
Connect your Arduino WiFi
Once your Arduino Yun reboots:
- ensure you’re still connected to the Arduino YUN-09XXXX WiFi network
- revisit arduino.local or 192.168.240.1
- click the Configure Button in the top right
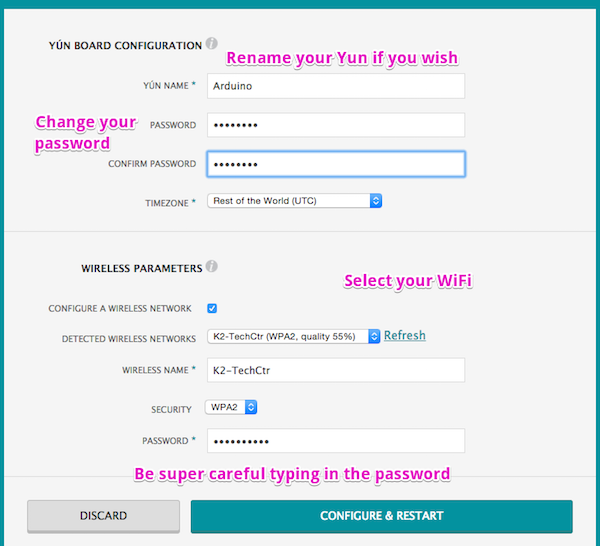
Here you can:
- Change the name of your Arduino Yun
- Change the password. You should do this… especially if you’re at one of the aforementioned Yun hackathons
- Connect your Arduino to a WiFi network.
Select your WiFi network from the dropdown and carefully enter your password. If you get the password wrong you will not get an error message. If your Arduino reboots but you still see its Arduino Yun-902XXXX as an available option, there’s a good chance you typed in the wrong WiFi password.
When all the settings are to your liking, click Configure and Restart. While you’re waiting, switch your laptop over to the WiFi network you just punched in to your Arduino Yun and wait for it to join you there.
Once it’s back up and running, you have arrived at the moment of truth.
- Open up a terminal
- Type ssh root@arduino.local (or, if you changed the name, root@yourarduinoname.local)
- Type yes to add your Yun as a known host
- Punch in your password
- Rejoice!
You have just SSHed into a $75 hardware hacking computer that’s smaller than a deck of playing cards.

Install the Arduino IDE
The last bit of setup is to install the Arduino IDE on our computer. This will let us write Arduino programs that will interact with the pins on the board so that we can do the kind of things that you associate with a traditional Arduino.
Make sure you have either Java 6 or Java 7 installed on your machine. If you don’t, download and install Java 7. (Java is currently at version 8, though the Arduino IDE seems to only support 6 or 7.)
Visit the Arduino software page and download Arduino 1.5 or greater! This is not the most obvious option on the page! The Yun requires the latest and greatest Arduino IDE, not that old boring stuff all the other Arduinos are running. Make sure you download the correct package for your OS and Java version.
This file is about 150 MB. After it downloads, install it, then open the Arduino IDE. Then we need to do two things to set up the IDE to work with your Yun:
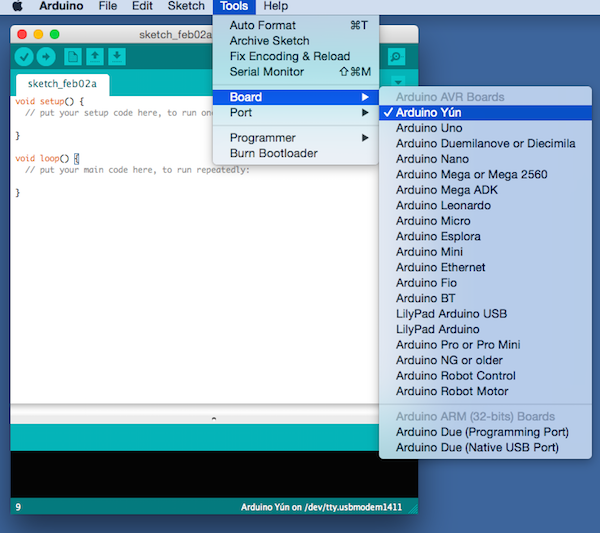
First, click Tools -> Board and select Arduino Yun.
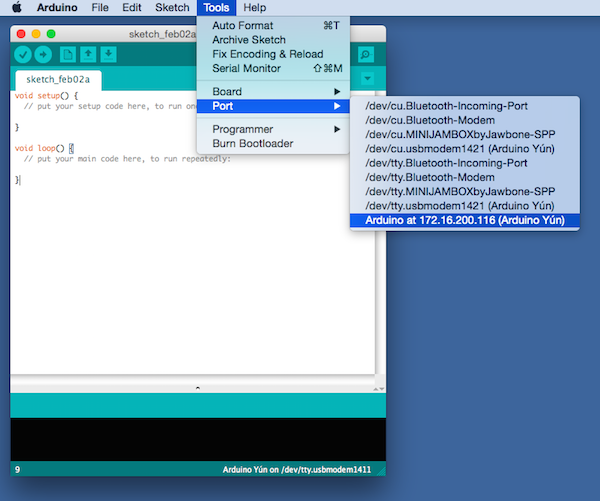
Second, click Tools -> Port and select the option with the IP address (it’s probably the last one).
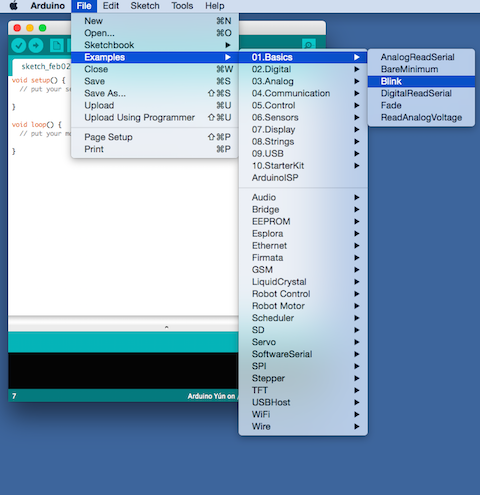
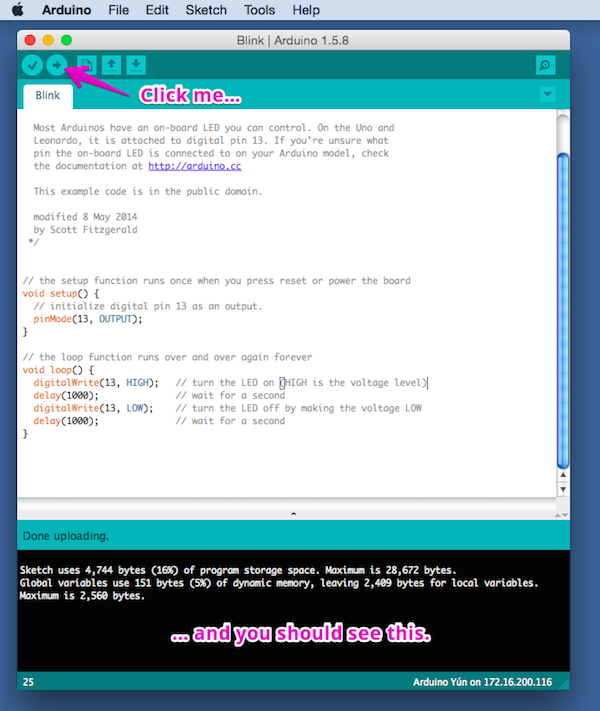
The first thing you may notice is the code structure. Most Arduino programs are composed of two chunks: the setup() which runs once after the program is loaded onto the Arduino, and the loop() and which runs continuously after that.
In the case of Blink, the setup() initiates the Yun’s built in LED as an output. The loop() turns it on and off every second. The comments in the Blink code are pretty self explanatory, so I won’t waste words replicating them here.
Our last step is to get our code onto the Yun. In the top left of the Arduino IDE, click the “Upload” icon. Oddly, that’s not the arrow pointing up, but the one pointing to the right. After a few seconds, your program should load and a red light on your Arduino will start flashing.
Onward!
Alright! So you’ve now successfully got your Arduino Yun running the most recent version of OpenWRT-Yun, you’ve connected it to a WiFi network, you’ve installed the Arduino IDE, and you’ve successfully uploaded and run a sketch. You’re ready to start hacking away on your WiFi enabled Arduino.
Three things that we’ve done with ours are:
I’d love to see what you do with yours. If you’ve got any awesome Arduino hacks, drop them in comments below, hit me up on twitter at @greggyb, or drop me an email at gb@twilio.com.
If you’re looking to learn more, the following resources were incredibly helpful in piecing together this guide:
- Arduino’s Guide to the Arduino Yun
- Arduino’s Some things to keep in mind when using the SD card library
- Arduino’s Upgrading the OpenWrt image on the Yun
- AdaFruit’s How to build a wireless security camera with the Yun
- Twilio’s SMS and MMS quickstarts
Happy Hacking!


Related Resources
Twilio Docs
From APIs to SDKs to sample apps
API reference documentation, SDKs, helper libraries, quickstarts, and tutorials for your language and platform.
Resource Center
The latest ebooks, industry reports, and webinars
Learn from customer engagement experts to improve your own communication.
Ahoy
Twilio's developer community hub
Best practices, code samples, and inspiration to build communications and digital engagement experiences.