Add Chat to a Laravel PHP App Using Twilio Chat
Time to read:
December 14, 2019
Written by

In this tutorial, I’ll be showing you how to add chat functionality to a Laravel application using Twilio Programmable Chat.
Prerequisites
In order to follow this tutorial, you will need the following:
- Composer and Laravel Installer (v2.3.0 and above) installed on your local machine
- Basic knowledge of the Laravel Framework
- Basic knowledge of Vue.js
- A Twilio account
What We’ll Be Building
For the purpose of this tutorial, we’ll be building a one-to-one chat functionality. Users will be able to select another user to begin chat.
Getting Twilio Credentials
Login to your Twilio dashboard and copy both your ACCOUNT SID and AUTH TOKEN.

Before you can start using the Twilio Programmable Chat API, you need to first create a chat service:

Take note of your SERVICE SID.

Lastly, you need to create an API key:
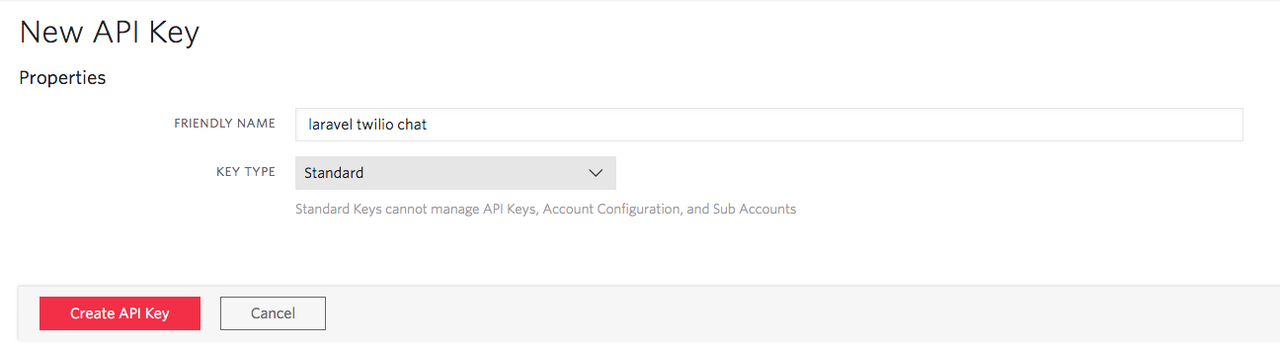
Also, take note of both your API SECRET and API SID.
Creating a New Laravel Application
Let’s get started by creating a new Laravel application. We’ll be using the Laravel installer mentioned in the prerequisites. Run the following command in your console:
Version 2.3 of the Laravel installer was recently released. It allows us to specify that we want authentication scaffolding at the point of creating a new Laravel application.
With the application created, we need to install the NPM dependencies (because https://getbootstrap.com/Bootstrap, Vue.js, and some other dependencies, which we’ll be using comes pre-packed as an NPM dependency):
Next, you will run the default migrations that come with Laravel after a quick set up of the database. We’ll be making use of SQLite for our database. Update the .env file as below:
Create the database.sqlite file:
Now, run the migration:
Next, add your Twilio credentials to the .env file:
Displaying a List of Users to Chat With
We want users to be able to select the user they want to chat with. To accomplish this, the navigation links inside app.blade.php will need to be updated to include a link to the currently authenticated user’s messages. Add the code below before the user drop-down menu:
Next, the named route used inside the link will need to be created in web.php:
Next, let’s create the MessageController and the corresponding method:
Then replace its content with the following code:
First, we are applying the auth middleware to all the methods in the class through the constructor. The index() method then fetches all the users in the database aside from the currently authenticated user.
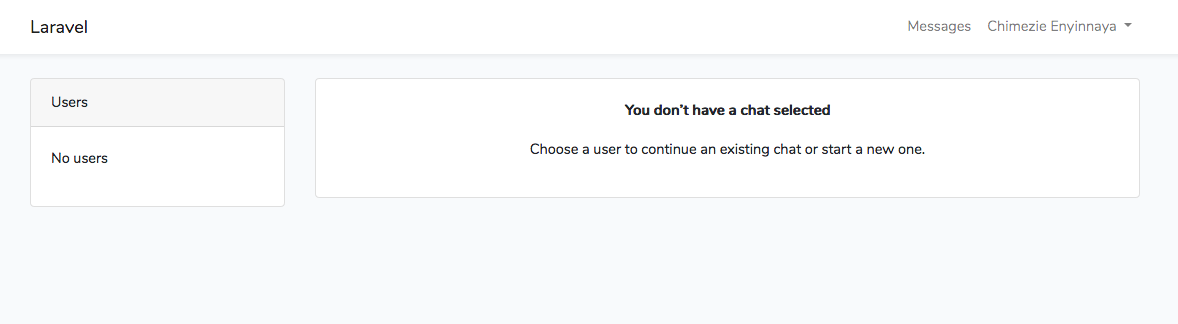
Now, we can create the view to display the list of users. Create a messages directory inside the views directory. Then create an index.blade.php file inside of it and paste the code below:
We’ll be needing the code to render the list of users in another view, hence the need to extract it to a partial that can be reused in multiple views. Create a shared directory inside the messages directory, and within it create a users.blade.php file with the following code:
If there are no users, we display an appropriate message. Otherwise, we display the list of users.
Creating Unique Channels for Users
Channels are the heart of Twilio Programmable Chat, as all interactions revolve around it. We can look at it in terms of a container, as it will contain all chat messages, users, etc. Since we are building a one-to-one chat application, we need to create a private channel and make it unique for each chat conversation. One way to achieve that is to create the channel name of the users' IDs, that way it will be unique to both users in the conversation.
We want this to work such that once a user selects a user from the list of users, the channel will be created automatically if it doesn’t exist yet. Update the anchor tag in the users' list as shown below:
We are joining the authenticated user’s ID to that of the other users with a hyphen.
Next, we need to create the route:
The corresponding method needs to be added in the MessageController:
First, we get the ID of the other user by exploding $ids and getting the second item in the array (which is that of the other user). Then we fetch the user from the database using the given ID. A new instance of the Twilio PHP SDK is created and stored in $twilio. Using the $twilio instance, an attempt is made to fetch a channel with the unique name as the users IDs. If the channel exists, we fetch it, otherwise, we create a new one using the same IDs.
Once the channel is identified, both users need to be added as members using their email addresses as their identity. Also, we check to make sure they are not already added to the channel. Finally, the view is rendered.
Let’s not forget to install the Twilio PHP SDK:
Next, let’s create the chat.blade.php view with the following code:
We’ll be updating this file to display the chat later on.
Generating the Access Token
Before moving to the Vue.js part of our chat application, let’s add the implementation for generating access tokens for authenticated users. This access token will be required on the client-side. Add the code below inside api.php:
Create the TokenController:
Then replace its content with the following:
Since we used the user’s email address to identify the user as a member of a channel, we need to also make use of the email address as the identity to generate an access token. Once the token has been generated, we need to grant the token access to our chat service. Finally, we return the token as a JWT.
Creating the Chat Component
Now, let’s create a ChatComponent that will render the chat messages and an input to send messages. By default, Laravel comes with an ExampleComponent.vue file. Rename it to ChatComponent.vue. We also need to update the reference to the file inside app.js as well:
Next, update the script section of the ChatComponent as below:
This component accept two props: authUser and otherUser for the authenticated user and the other user respectively. Also, it has three data properties: a messages array, a new message to be sent and chat channel.
Initializing the Chat Client
To have access to the Twilio Programmable Chat functionality on the client-side, we need to install the JavaScript SDK. We can choose to either install it through NPM or use it directly from a CDN. For the purpose of this tutorial, we’ll be making use of a CDN. Add the code below inside app.blade.php, just before the close of the body tag:
Now we can make use of the SDK! Add the following code inside the script section of the ChatComponent below the data():
Once the component has been created we call two methods. The fetchToken() makes an HTTP request to our api/token endpoint to fetch an access token for the authenticated use. Once the token is retrieved, we pass it to the initializeClient() to create and initialize the chat client.
Since access tokens have a short lifespan of 24hours, we make sure we are not making use of an expired access token (which will result in an error). To prevent that, we need a way to update the access tokens after they expire. We can easily do that with the JavaScript SDK. Twilio Programmable Chat will fire two events pertaining to access token expiration: tokenAboutToExpire and tokenExpired. All we have to do is listen for any of these events (we are using tokenAboutToExpire in this tutorial) and re-fetch the access token and update the client with it.
Fetching Chat Messages
Though we have not sent any messages, let’s add the functionality for fetching all messages on the channel. Update the template section of the ChatComponent with:
We are displaying the name of the user the authenticated user is chatting with. Then we display the actual messages. If the message is sent by the authenticated user, we align the message to the right to clarify the sender.
To complete this section we need to first get the channel. Add the code below inside the initializeClient():
We are getting the channel by its unique name just as we created it on the backend.
Now, we can get all the messages on the channel. Create a new fetchMessages() method with the following code:
Finally, let’s call the method inside the created hook as shown below:
Sending a Message
Now, let’s create a way to send new messages. Add the following code after the .card-body div:
We now have an input field for sending new messages which calls sendMessage() once the enter key is pressed.
Let’s create the sendMessage() method:
In the code above, we call sendMessage() method on the channel and pass the message a user types into the input field. Then we clear out the input field.
Once a new message is sent, messageAdded event is fired. To display the newly sent message to both users in real time, we need to listen for this event. Add the following code at the end of the initializeClient() method:
Before we head over to testing our application, let’s update chat.blade.php so it renders the ChatComponent. Replace the comment with the code below:
Testing Our Application
Let’s test what we’ve been building so far. First, let’s make sure our app is running:
Then compile the JavaScript:
Now, open two browser windows, login as different users on both and try chatting with each other.
Conclusion
In this tutorial, we learned how to add chat to a Laravel application using Twilio Programmable Chat. We’ve only scratched the surface of the functionality provided by Twilio Programmable Chat. To learn more about Twilio Programmable Chat and what you can do with it, check out the docs.
You can find the complete source for this tutorial on GitHub.
Software developer and Instructor
Website: https://adonismastery.com
Twitter: https://twitter.com/ammezie
Email: meziemichael@gmail.com
GitHub: https://github.com/ammezie


Related Resources
Twilio Docs
From APIs to SDKs to sample apps
API reference documentation, SDKs, helper libraries, quickstarts, and tutorials for your language and platform.
Resource Center
The latest ebooks, industry reports, and webinars
Learn from customer engagement experts to improve your own communication.
Ahoy
Twilio's developer community hub
Best practices, code samples, and inspiration to build communications and digital engagement experiences.