Asynchronous JavaScript: Introducing ReactiveX and RxJS Observables
Time to read:
October 31, 2019
Written by

Reactive Extensions (ReactiveX) are one of the most widely-adopted set of tools in programming today. ReactiveX libraries for JavaScript and other languages provide a way to operate on sequences of data as if they were events. This is a convenient way to handle data from asynchronous sources like web APIs: your programs can react to data as it is emitted from the source without tightly coupling the code that uses the data with the code that gets the data.
In this post you’ll learn about the fundamental concepts of ReactiveX programming and get hands-on experience doing ReactiveX programming with RxJS for JavaScript. You’ll learn how to retrieve data asynchronously, manipulate it as it arrives, and handle errors. You’ll also see how RxJS Observables compare to JavaScript Promises.
Introducing the ReactiveX API and the RxJS library
Reactive Extensions, known as ReactiveX, is an application programming interface (API) enabling programming languages to operate on synchronous or asynchronous sequences of data by propagating changes through a push model to other loosely coupled objects. For example, when a user interface button is clicked, or a REST API returns a JSON object containing a series of data records, an object will notify other objects of the change.
The ReactiveX API is implemented through language-specific libraries. The ReactiveX library for JavaScript is a Node Package Manager (npm) module called RxJS (ReactiveX JavaScript).
ReactiveX libraries are also available for other languages. There is substantial community support for the ReactiveX programming model in the developer community for many languages and for RxJS in the JavaScript community. Because the core elements of ReactiveX are common across languages, learning ReactiveX programming is a portable and widely useful skill.
Note that ReactiveX is not React, a JavaScript library for building user interfaces, and the RxJS library has no direct relationship to React. React is a project of Facebook open source.
Understanding ReactiveX Programming
ReactiveX Programming is a programming paradigm focused on working with static or dynamic data streams and propagating change by combining elements of the observer pattern, the iterator pattern, and functional programming.
In the observer pattern, an object, known as the subject maintains a list of dependents, known as observers, and notifies them automatically of state changes. It’s a way of creating event-based programs using sequences of data. A single subject can update multiple observers asynchronously without subjects having to be tightly coupled to observers.
The iterator pattern is a design pattern from object-oriented programming in which an iterator is used to traverse a container and access the container’s elements. The ECMAScript 6 version of JavaScript supports the iterator pattern with any object that provides a next() method. ReactiveX implements collections in a “push” model that extends the capabilities of the “pull” model of iterables.
ReactiveX libraries include operators that act as functional operators. The value of functional code is the predictability of its results: the output value of the function depends only on its arguments, a key goal of functional programming.
Observables
In ReactiveX, the subject of the observer-subject relationship is called an Observable. Accordingly, the Observable interface is a principal part of the ReactiveX API. An Observable provides a mechanism for retrieving and transforming data.
An observable is often used to retrieve data asynchronously and transform it into a form that is more useful to its subscribers. When there is a change in the state of an observable it emits data items or sends notifications by calling the observers’ methods.
The observable goes into action when an observer has subscribed to it; an observable does not begin retrieving, transforming, and emitting data items, or sending notifications, until there is at least one subscriber. If there is at least one existing subscriber, another subscriber can begin observing the sequence of data after the observable begins emitting.
Operators
ReactiveX Operators are used to manipulate an observable and the data emitted by an observable. ReactiveX has a set of core operators and libraries have additional operators which are language-specific.
Most operators act on an Observable subject and return an Observable. As a result, operators can be chained/piped together; the result of one operation can be passed to the next operator. This makes the order of operations meaningful.
There are a large variety of operators for performing actions on observables:
- creating
- transforming
- filtering
- combing
There are also operators for other types of operations:
- utility
- conditional and Boolean
- mathematical and aggregate
At the most basic level, observers subscribe to observables by calling the .subscribe method. This method enables subscribers to receive data emitted by the observable or to receive notifications, including errors, sent by the observable.
The list of operators for JavaScript is extensive enough that there’s a wizard to help you find the right one. The RxJS Operator Decision Tree will guide you through the process of selecting the right operator for a specific task.
Comparing ReactiveX Observables to JavaScript Promises
The main difference between the Observable and Promise types is repeatability; while a Promise can resolve or reject only once, an Observable can emit multiple values at different times. That makes it a perfect fit for data streams such as WebSockets and repetitive REST API calls, like checking a stock price.
ReactiveX operators are also offer a significant advantage, as they include functionality to perform many commonplace, useful tasks, such as filtering out values that you want to omit.
Observables can include error handling and there are specific operators dedicated to error handling activities. With Promises you are limited to handling rejected promises.
Observables can be used to wrap callback functionality. This is useful in refactoring code that isn’t able to return an Observable or Promise object.
Because ReactiveX libraries exist for a large number of programming languages and Promises are a specific feature of JavaScript, your investment in learning how to use ReactiveX in any language can benefit your programming effectiveness in other languages in a way that knowledge about Promises can’t. Since ReactiveX is a widely adopted paradigm, you’re likely to run across it in 3rd-party code.
Prerequisites
To accomplish the tasks in this post you will need the following:
- Node.js and npm (The Node.js installation will also install npm.)
- Git
You should also have a well-grounded understanding of JavaScript and the JavaScript event loop. Although it’s not required, knowledge of JavaScript Promises and Callbacks will be useful background for understanding the context for ReactiveX.
There is a companion repository for this post available on GitHub.
Setting up the project
To make it easier to set up your project and compare Observables to Promises and Callbacks, the project for this post starts with the existing code from the previous posts in this series. Clone the project by executing the following command-line instructions in the directory where you would like to create the project root directory:
Alternately, if you have been following along with this series and have completed the project from Asynchronous JavaScript: Refactoring Callbacks to Promises in Node.js post you can continue with the code you wrote for that post.
Install RxJS as a project dependency in the asynchronous-javascript project:
Create a new folder inside the asynchronous-javascript project called rxjs.
Programming Observables
When you use observables in your code you’ll typically be working with asynchronous data, so the first part of using an observable is to identify the API call or other work you’re going to be doing to get a data sequence. This becomes part of the observable.
You may want to transform the data retrieved by an observable, or even combine data from observables, before the data is emitted to the subscriber(s). You can do this with operator methods in the observable.
You should also have in mind what you’re going to do with the data when it is emitted by the observable. The code that does this is the observer that subscribes to the observable.
It’s also important to identify how you’ll handle errors. As you’ll see, errors have a much more dramatic impact on programs using observables than programs with native JavaScript structures.
Depending on your program’s requirements, the part of your code that manipulates data emitted by an observable may want to stop listening. If that’s the case, you’ll also want to unsubscribe from the observable.
The following tutorial will walk you through the basics of each of these aspects of observables.
Creating and subscribing to an Observable
Your first programming task in this tutorial is to create and subscribe to an observable. The example below creates an asynchronous timer function that emits a series of “ticks” to the command line once a second for seven seconds.
The generally accepted naming convention is to add the suffix $ to all the constants and variables representing Observables: it helps you differentiate them from “synchronous” variables.
In the rxjs directory, create a file called basics.js.
Insert the following code:
This code creates an observable called clock$ that: 1) announces data is coming from the observable, 2) emits a series of “ticks” once a second, and 3) stops emitting at 7 seconds.
It then creates a subscription to the observable that takes the data it emits and writes it to the console window. This demonstrates one of the key features of observables. The code in subscription, which is console.log will keep executing as new values are emitted by the observable as time passes.
Finally, the code that works with the data emitted by the observable is unsubscribed from it at 10 seconds. Because setTimeout is an asynchronous function it can begin counting at the same time the observable clock$ begins counting.
Because the code you just added to the project includes the import directive from ECMAScript 6 you’ll need to install the esm (ECMAScript 6 module loader) package:
Run the program by executing the following command-line instruction in the rxjs directory:
In your console window you should see the following output:
Since the observable stops emitting at 7 seconds you will only see 6 ticks.
Terminating Observables and clearing the event loop
In the code above, try commenting-out the first setTimeout call. You should see a couple things.
1. The program continues to run until the 10 seconds specified in the following line of code has elapsed:
This means you’ll see 9 ticks rather than 6.
2. It also means you won’t see your command prompt return. You’ll have to end the program manually (with Ctrl+C or whatever your operating system requires).
This is because the code in the observable is still in the event loop and still running. Since you created an asynchronous activity with setInterval() you have to end it with clearInterval(). It’s a good practice to be sure your observables terminate.
Uncomment this line and comment-out the last line in the file, save the file, and re-run the program.
This time you’ll see 6 ticks and your command prompt will return at 7 seconds. While you didn’t need to unsubscribe from the observable clock$ to end this program, ending the asynchronous callback function did so.
Uncomment this line of code and change the 10 to a 4. Save the file and re-run the program.
This time you’ll see 3 ticks and then a pause until 7 seconds before your command prompt returns. You only saw 3 ticks because you unsubscribed from the observable at 4 seconds.
But the program kept running until the clearInterval method fired at 7 seconds, so the return of the command prompt was delayed three seconds.
You’ve just seen the two ways the asynchronous functions in your callbacks can keep running when you don’t intend them to:
- You don’t unsubscribe from them, so they keep running as long as there’s a subscriber somewhere in your code consuming the data they emit.
- You don’t terminate the asynchronous function in the observable, so it stays in the event loop, running but not emitting data.
Keep these two perils in mind as you go forward with programming with RxJS.
Using Operators
Often you need to change the output emitted by an observable. For example, you might only need a particular field from a complete JSON object returned by an API response.
You can make these changes in your observables with Operators. There are a large number of operators in the various implementations of ReactiveX, but those concerned with manipulating data streams are usually considered transformation operators.
The implementation of transformation operators varies between languages. In JavaScript, the RxJS library implements transformation operators through a process called piping. You send an observable into the pipeable operator function(s) using the pipe function. The general syntax looks like this:
Pipeable operators produce a new observable; the original observable is unmodified. The stream of data emitted by the new observable reflects the changes made by the pipeable function.
Pipeable operators can be used in sequence; the observable produced by one operator can be consumed by a subsequent operator. In ReactiveX, this process is known as chaining.
In your current code you have an observable clock$ which emits a value tick every second. What if you’d like your clock to sound “tick-tock”? Which operator should you use?
There is a useful resource for finding the best operator to use for a specific scenario, the RxJS Operator Decision Tree.
Open a new browser tab and use the tool to find the best operator by making the following selections:
- I have one existing Observable, and
- I want to change each emitted value
- To be a value calculated through a formula
You should see the tool has selected the map operator.
Create a new file operators.js and copy the contents of the basics.js file into it.
Add the following line of code to the beginning of the operators.js file:
Replace the existing subscription object with a new one that uses the map operator:
Run the program. You should see the following output:
Note that the setTimeout() call still governs the length of time the clock runs, so you see a total of 6 “ticks” and “tocks”.
It’s also important to realize that the observable being subscribed to is the observable produced by the map operator: the original clock$ observable is unchanged by piping. Transformation operators (and some other types) produce new observables.
In many circumstances you’ll want to leave the original data stream emitted by the observable that performs the asynchronous operation unmodified. In the example code, you could create another subscriber that transforms “tick tick tick” to “beep beep beep”. This is the advantage of applying transformations when subscribing to an observable.
It’s also possible to apply transformations to an observable before the observable emits it. The code in operator.js would look like the following if written that way:
This code will produce the same result, but the observable that produces the “tick tock” sequence in the code above is clock$.
Learning more about Operators
Using operators is not only about changing the content of emitted values. You can also use them to filter or repeat the action triggered by an observable. There are a number of different categories of operators, including a class of operators used to handle errors.
While there are some core ReactiveX operators, the names and implementations differ somewhat between languages. To gain a deeper understanding of how operators work in ReactiveX, and in the RxJS implementation specifically, consult these resources:
ReactiveX – Operators – The ReactiveX documentation provides good background information on the operator concept and a comprehensive list of operators. There are also examples for many language-specific implementations of each operator.
RxJS – Overview – Operators – Start here to get a deeper understanding of using operators in JavaScript, including the .pipe method and categories of operators. It’s also worth getting to know marble diagrams from the information in that section.
If you haven’t been coding along and want to catch up to this step, execute the following commands to clone the project from the companion repository:
Handling errors
Observables sometimes break, or need to fail because of a specific situation like an HTTP call timeout. The only thing you need to implement error handling in observables is to call the .error() method on the subject object, which is the subject in the subject-observer relationship.
Create a new file called errorHandling.js and insert the following JavaScript code:
Run the code with the following command-line instruction:
You should see the following output:
Unhandled errors in observables cause Node.js programs to exit with status 1 (error). Errors thrown from observables must be caught.
To do that, import the of method from rxjs and the catchError function from rxjs/operators by modifying the first two lines of errorHandling.js, as follows:
Replace the existing code for the subscription object with the following code:
Now the subscription object is constructed so that the observable clock$ is piped through both the map and the catchError operators, in that order.
The catchError operator takes two arguments: 1) the error itself and 2) the source observable. Retaining the original observable is useful if you want to retry an operation on the observable or extract information from it for error handling purposes.
The second argument, of('Explosion!') uses the of() static method from the rxjs library to create a new observable that emits the literal `Explosion!”.
After these changes your code should look like:
Run the program again.
Your output should be:
The exception is caught in a nice way, sending the notification “Explosion!” to the console window, and it doesn’t stop the program execution. The program completes and the subscription object is unsubscribed from the terminal observable, which is the observable created in the catchError operator. Since the observable has no subscribers it can be removed from the event loop.
Note that the “Still alive?” output is unrelated to the observables and the error handling. It merely demonstrates that the program is still running.
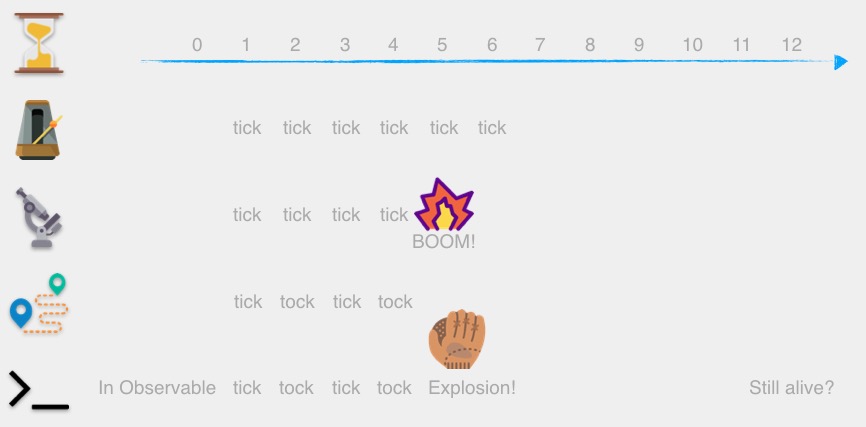
Your application flow is described by the diagram below. Each row shows the following:
Hourglass: indicates the time (in seconds)
Metronome: output of the setInterval function in the source observable
Microscope: values emitted by the observable (what would be delivered to the observer without any changes to the values),
Map: the values emitted by the operators applied in the .pipe method
Prompt: output displayed in the console window
If you haven’t been coding along and want to catch up to this step, execute the following commands to clone the project from the companion repository:
A key difference between RxJS Observables and JavaScript Promises
You probably see some similarities between Observables and Promises. For example, the Observables subscribe method behaves similarly to the then method of Promises, if it’s the last .then in a chain. You might also notice that the pipe function behaves like an n-1 .then when the chain of .then methods is of length n>1.
There is an important difference between the timing of Promise constructor and Observable constructor execution: a Promise constructor is executed as soon as it is encountered in the code during program execution, but an Observable constructor does not execute until an observer subscribes to it. Statements in a Promise constructor will potentially return data as soon as they are reached during code execution, but an Observable won’t execute its code, such as a remote API call, until it has a subscriber. This can have timing implications for your applications.
Create a file called promiseDiff.js in the rxjs directory.
Insert the following code:
The myPromise and myObservable objects look equivalent. If you run the program you will find only one line in the output:
The myPromise constructor has run, but it hasn’t resolved because it hasn’t been invoked with the .then method. The myObservable constructor has not run because it doesn’t have a subscriber. This characteristic of observables is described as “coldness”: they’re “cold” until you fire them up with a subscriber.
Add the following code to the end of the promiseDiff.js file:
Run the program again.
Now the output should contain four lines:
This demonstrates that myPromise has resolved and myObservable has been executed and it has emitted data.
You might also have noticed that the observable emitted before the promise resolved. This is because promises are executed after the call stack is empty, and since the observable is in the call stack it gets executed first. Because both myPromise and myObservable contain synchronous code there are no other timing considerations.
If you haven’t been coding along and want to catch up to this step, execute the following commands to clone the project from the companion repository:
Summary
This post introduced you to ReactiveX Programming and the RxJS library for JavaScript. It showed you how to create and use Observables and Operators with some practical examples. You saw how to perform graceful error handling for Observables. You also saw the important differences between JavaScript Promises and Observables.
Additional resources
ReactiveX introductions and tutorials – The ReactiveX website has an extensive list of resources for learning more about Reactive Programming and the various language implementations. They’re 3rd-party productions, so watch and read at your own discretion.
RxJS – The RxJS website is the place for canonical information about the library for JavaScript.
If you want to learn more about JavaScript Promises, check out the following posts here on the Twilio Blog:
Asynchronous JavaScript: Introduction to JavaScript Promises
Asynchronous JavaScript: Advanced Promises with Node.js
Maciej Treder is a Senior Software Development Engineer at Akamai Technologies. He is also an international conference speaker and the author of @ng-toolkit, an open-source toolkit for building Angular progressive web apps (PWAs), serverless apps, and Angular Universal apps. Check out the repo to learn more about the toolkit, contribute, and support the project. You can learn more about the author at https://www.maciejtreder.com. You can also contact him at: contact@maciejtreder.com or @maciejtreder on GitHub, Twitter, StackOverflow, and LinkedIn.


Related Resources
Twilio Docs
From APIs to SDKs to sample apps
API reference documentation, SDKs, helper libraries, quickstarts, and tutorials for your language and platform.
Resource Center
The latest ebooks, industry reports, and webinars
Learn from customer engagement experts to improve your own communication.
Ahoy
Twilio's developer community hub
Best practices, code samples, and inspiration to build communications and digital engagement experiences.