Build a Secret Santa Bot for WhatsApp Using Python and Twilio
Time to read:
March 02, 2020
Written by
This post is part of Twilio’s archive and may contain outdated information. We’re always building something new, so be sure to check out our latest posts for the most up-to-date insights.

In this tutorial we’re going to use Twilio Whatsapp, Flask and Python to build a simple Secret Santa bot. Also, I’ll show you how to use Dynaconf to manage configuration in a Python Project. You can find the complete code for this project on my GitHub repository.
A user just needs to send a message to the bot to create a Secret Santa contest. The bot will respond by sending a unique code that identifies the event. With this code, the participants can send a message to the bot to join. The creator can then send a text message to carry out the selection of partners. Once the pairings are known, the bot sends a message to each participant with the name of their secret friend.

Tutorial Requirements
To follow this tutorial you need the following components:
- Python 3.7 or newer. If your operating system does not provide a Python interpreter, you can go to python.org and install the latest version.
- Flask. The Framework that we will use to create our web application.
- ngrok. We will use this handy utility to connect the Flask application running on your system to a public URL that Twilio can connect to. This is necessary for the development version of the chatbot because your computer is likely behind a router or firewall, so it isn’t directly reachable on the Internet. If you don’t have ngrok it installed, you can download a copy for Windows, MacOS or Linux.
- A smartphone with an active phone number and WhatsApp installed.
- A Twilio account. If you are new to Twilio create a free account now. If you use this link to open your account you will receive $10 in credit once you upgrade it.
Configuring the Twilio WhatsApp sandbox
We’re going to build a bot that sends and receives messages with WhatsApp using the Twilio API for WhatsApp. To make this possible you need to follow a few steps.
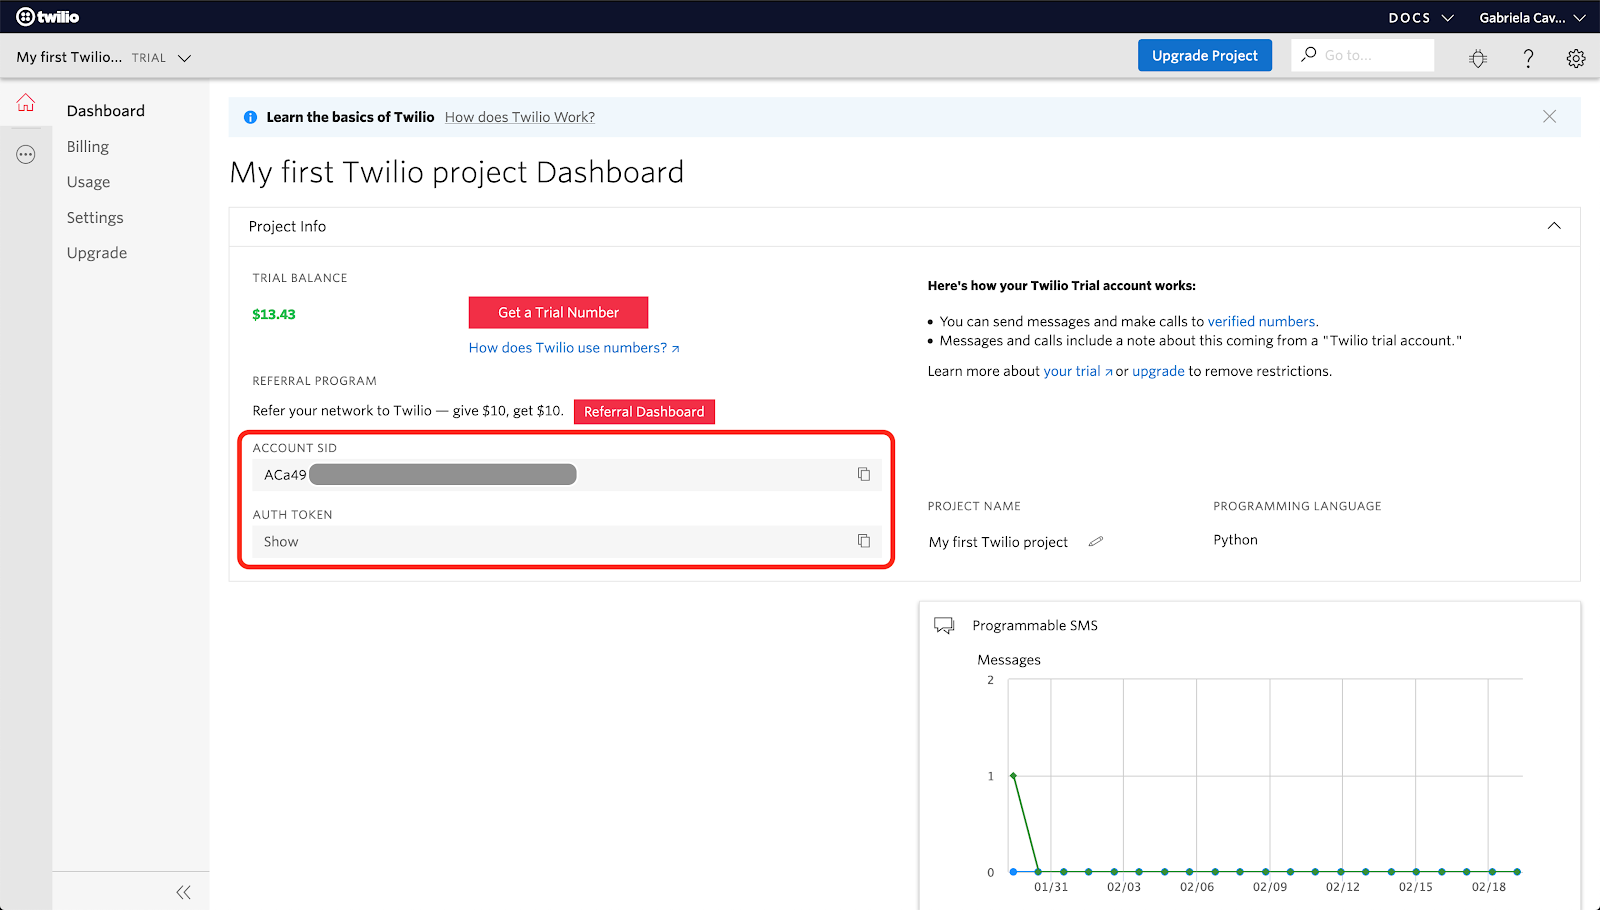
When you log in to your Twilio Console, you’ll see the Account SID and Auth Token. The Account SID is a unique identifier for your account and the Auth Token is a secret key (never share this token!). These are your Twilio credentials, which will allow the Python code to access our Twilio account and use the API. Later you will see how to make them accessible to the Python application through a configuration file.
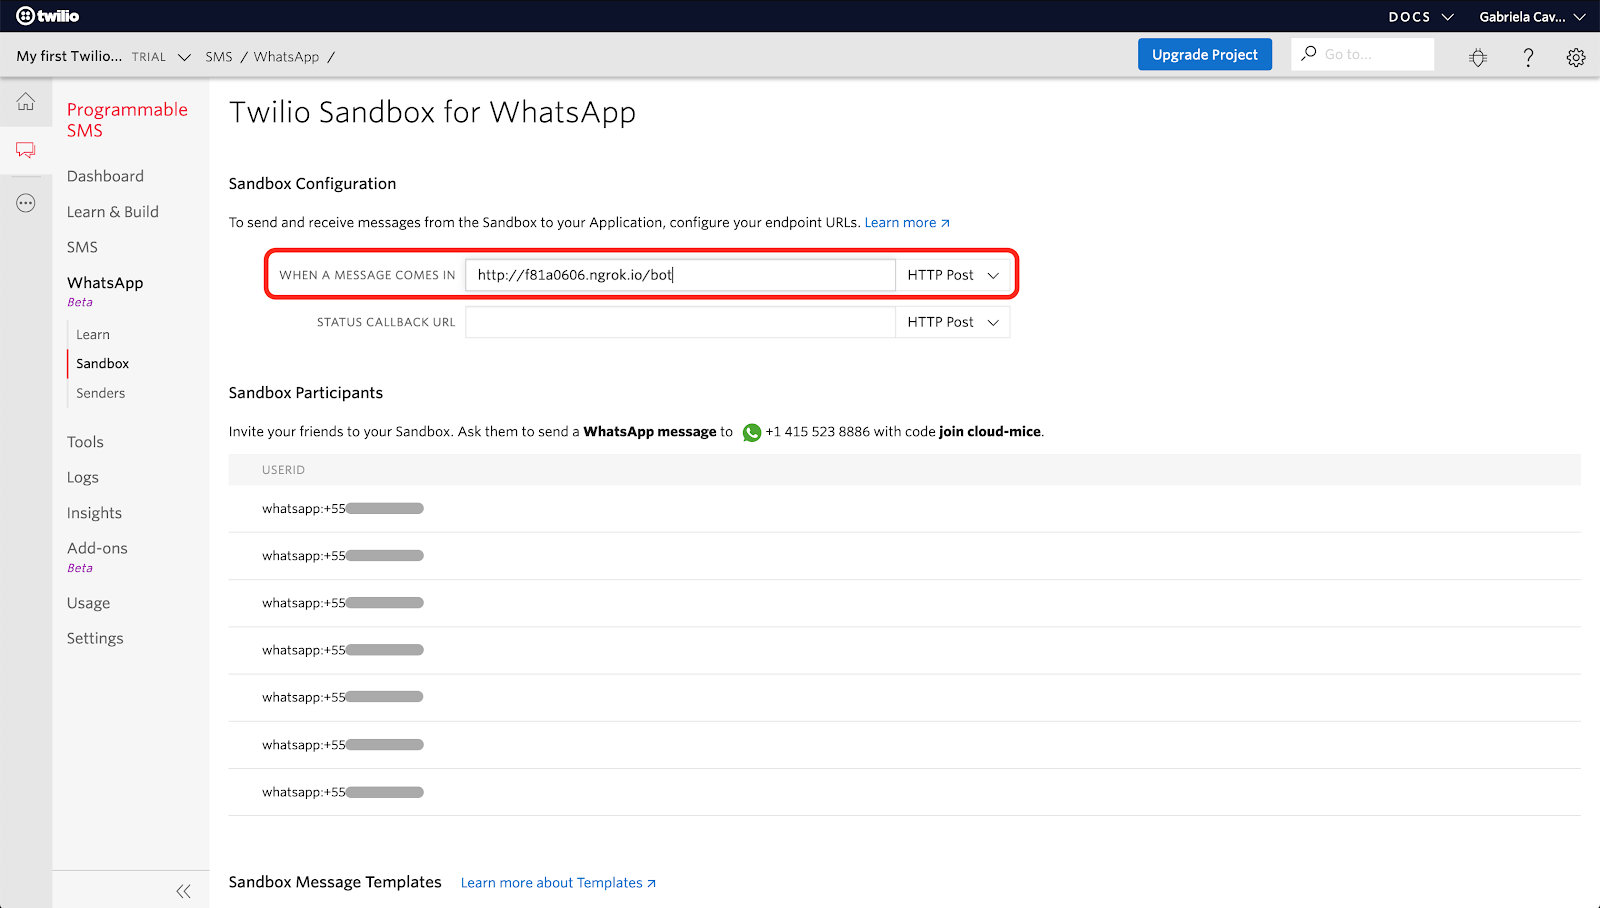
Before you can send WhatsApp messages, you need to activate the Twilio Sandbox for WhatsApp. The Sandbox lets us test our application in a developer environment. Once your application is ready for production use you can request approval to use a Twilio phone number directly.
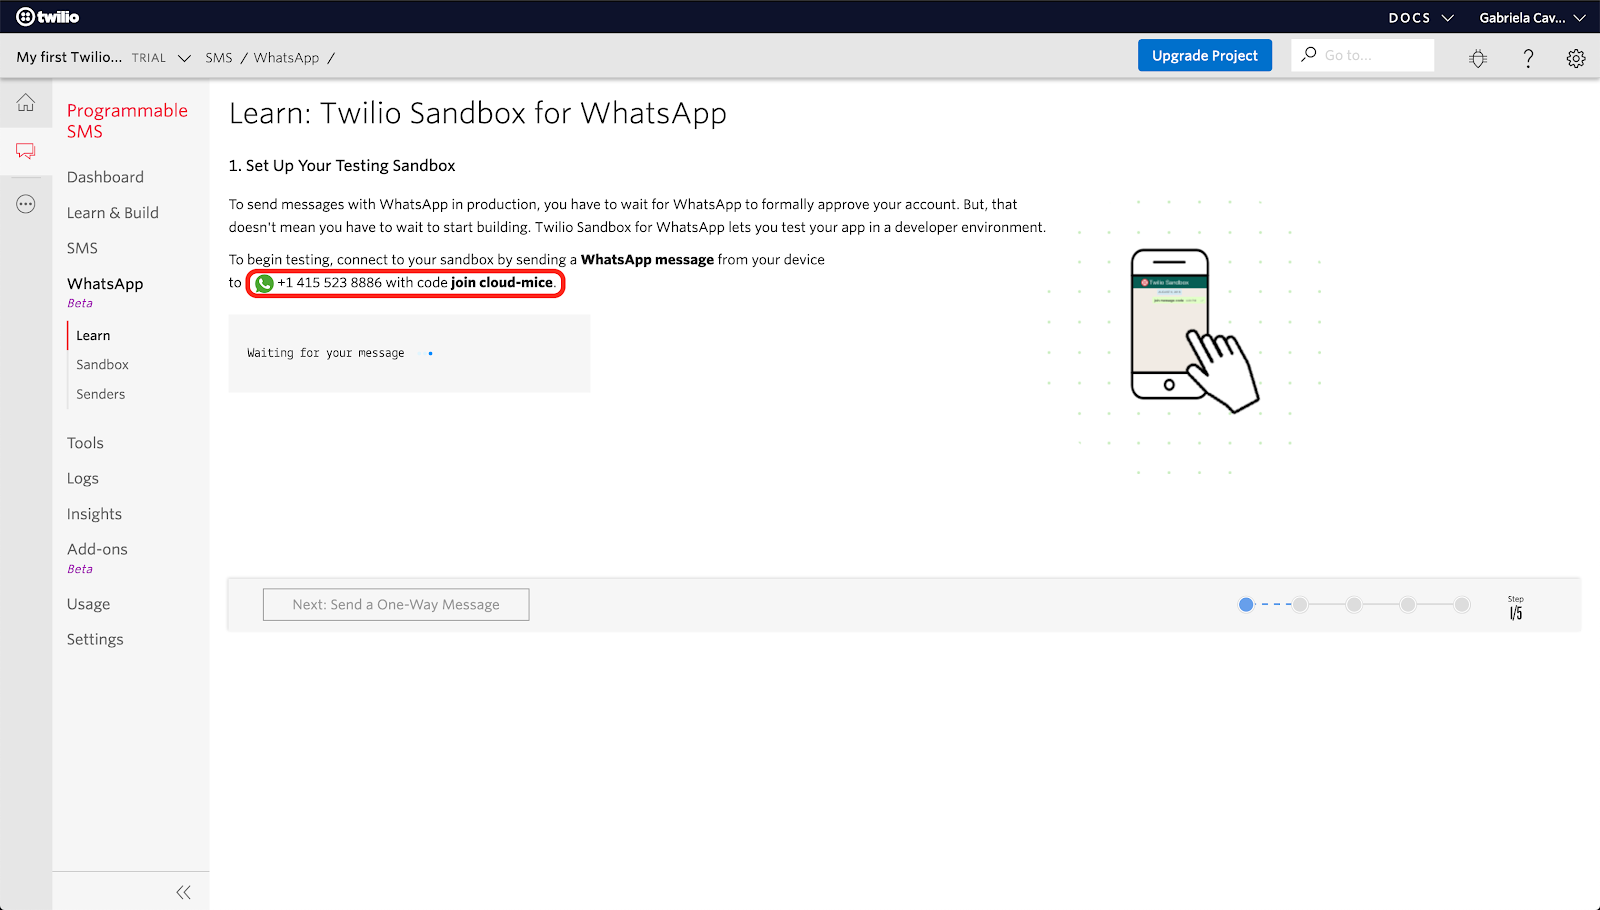
In this WhatsApp page, you will have instructions to connect to your sandbox by sending a specific WhatsApp message to the Sandbox phone number using your device. Since we’re using the Sandbox, we have some limitations. For example, we can only message users who have joined the sandbox. For our Secret Santa bot works we need all the phones that are going to participate connected to the Sandbox. Another limitation is the WhatsApp session, the sessions are valid for 24 hours after the most recently received message, during which time you can communicate with the user using free form messages. In order to send a message outside the 24-hour Session window, you must use a pre-approved template (guide to WhatsApp message templates). So we need to run our Secret Santa in a 24-hour window.
Creating a Python virtual environment
Now that you have the Twilio account and a WhatsApp Sandbox activated, let’s create a separate directory for our Python project and inside it create a virtual environment to install the Python packages that we need. You don’t need to create a virtual environment, but it is recommended to use it while developing Python apps. This allows you to create an isolated environment for each project, and switch between them without worry about breaking another project.
Open the terminal and create a new directory for our project. Inside it we are going to create a virtual environment using the module venv from the Python standard library. To perform these tasks enter the following commands:
This will create the secretsanta-env directory, and install the packages that we going to use in this project, which are:
- The Flask framework, to create the web application
- The Twilio Python Helper library, to work with the Twilio APIs
- The Flask-SQLAlchemy library, to interface with a database
- The Flask-Migrate library, to help us maintain the aforementioned database
- The Dynaconf, to read settings variables from different data stores
- The pytest framework, to help us write test cases for our code
Here’s a guide on general Python and Flask development environment setup if you need help.
Using Dynaconf
Hey, we are all set up, now let’s talk about Dynaconf and why we’re going to use it. Sometimes you have a simple and small application, and probably, to configure this app, you don’t need a complex structure. But if your application starts to grow, or if you are working on a big project, you should think about how to manage the settings of your project. How do you organize the configuration for each environment? Where do you save your secrets? Which file format do you use? There are many choices that you need to make just to configure your application. Thanks to dynaconf, this is not a big issue any more.
Dynaconf handles your settings and environment variables, so you don’t need to care about opening and reading any files. Dynaconf can load configuration from .py, .toml, .ini, .yaml, .json, .env files, Redis server, Vault server and environment variables.
Now, how can we use dynaconf in our Secret Santa bot? We need to define how our code will work in each environment: development, testing and production. For example, in development we need Flask’s DEBUG option enabled and we need to set the Database URI to the path where our SQLite database is, while in production we need to disable DEBUG and set the Database URI to a Postgres host (or your preferred database server). Here is a settings.toml file for our project:
Here we separate the environments using [environment] sections. By default Dynaconf will work on [development], so the variables that will be loaded are declared in [development], while also looking in [default] for any variables not defined in [development].
If we set the ENV_FOR_DYNACONF environment variable to a different environment name, dynaconf will use the configuration values from the environment that you choose before going to [default].
In our configuration file, we define TWILIO_NUMBER using the prefix “whatsapp:” before the phone number. Twilio represents the remote number that comes from a WhatsApp channel using the prefix whatsapp:, for example whatsapp:+558433333333. For SMS messages, Twilio only uses the phone number, without the prefix. This bot will work for SMS and Whatsapp, and to switch between them we just need to update the settings file.
Dynaconf will allow template substitutions for string values by using @format or @jinja. The SQLALCHEMY_DATABASE_URI variable, which defines the connection address with the database, needs to use an absolute path to the database file. In Python, we could do it like this:
With Dynaconf and @jinja we can use template substitutions and filters. Jinja supports its built-in filters and Dynaconf includes additional filters for the abspath, realpath, relpath and dirname functions.
Put the settings.toml file in the secretsanta-bot folder. In this file we define only non sensitive data, like general project settings. This file can be added to a git repository or shared with someone else. We also have some sensitive variables that we need to define, like the Twilio Account SID and Auth Token. For the sensitive configuration variables we can create a .secrets.toml file and add your secrets:
The .secrets.toml file should never be added to your git repository!
Find more information about Dynaconf on this Dev article and on the git repository.
The Secret Santa bot
Let’s talk about our bot. It will be a Secret Santa bot, where you can create a Secret Santa event, add participants to it, and finally run the event so that each participant receives the name of their secret friend. We have four main actions:
- Create a Secret Santa: the user sends
create, and the bot responds with a unique code that represents this event. Identifying each event allows the bot to run multiple concurrent events for different groups of people. - Add a new participant: Each participant sends
add {name} to {code}. The bot will confirm the new participant sending a message with{name} was added!to the participant and the event’s creator. - Run the event: When all the participants have added themselves, the event’s creator can run the draw by sending the message
run {code}. - Cancel the event: to cancel an event, the user can send
cancel {code}.
Before we start to write the Python code, let’s create a new subdirectory folder called app in our secretsanta-bot folder. Inside the app folder, create four blank Python files: app.py, models.py, routes.py and bot.py. Now, we’re going to talk about each of these files.
app/app.py: The application factory
We are going to start with the app.py file, so we can see the basic structure of our application.
If you are not familiar with the Flask framework, take a look at this quickstart and follow the Flask Mega-Tutorial.
In our app.py file, the idea is to set up the application in the create_app function. This allows us to create multiple instances of the same application with different settings. For example, we can test our application creating instances to run using a SQLite database and Postgres DB (read more about application factories in the Flask documentation).
In this create_app function, we initialize FlaskDynaconf, Flask-SQLAlchemy, Flask-Migrate and Flask-Admin, and then we register the blueprint bot.
app/models.py: Database support
We have two database models:
SecretSanta: in this model we are going to save each draw. We store if the draw is in process, so participants are still entering, and the phone number of the person that created the draw.Participant: stores the names and the phone numbers of participants.
Our models.py file looks like:
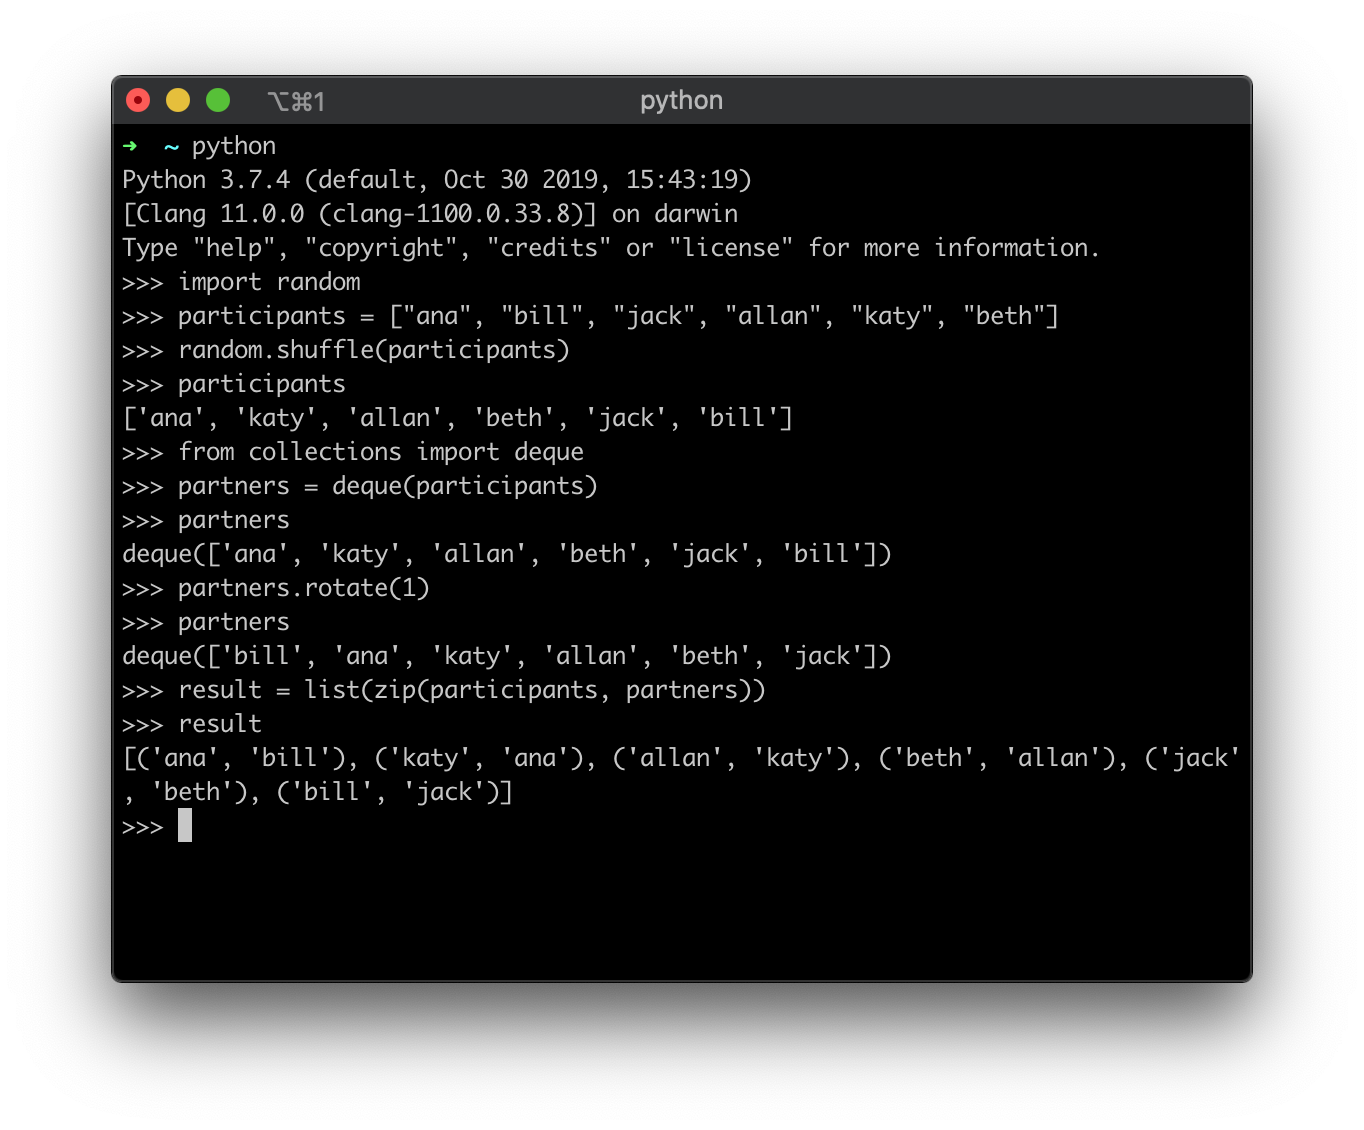
We have two methods in the SecretSanta model: create, which is a static method, and run. These methods are helpers to create a new Secret Santa event and then to run it once all the participants have registered. The run method follows these steps:
- Stores the participants list in the
participantslocal variable. Note how this list is built as a copy of the list returned by the database model. - Randomize the order of the participants list.
- Create a second list based on the participants list called
partners. - Shift the elements in the partners list by one.
- Pair each element of
participantswith the corresponding element inpartners. - Return the pairs.
Below you can see an example Python session demonstrating the logic of the run method with an example list of participants:
app/routes.py: The bot interface
Now let’s understand how our bot will communicate with the Twilio API for WhatsApp. The bot needs to be notified when there is an incoming message. To do that, we use a webhook and we define an endpoint in our bot that the webhook will use to deliver data and communicate with us.
Take a look at the routes.py file:
Here we create the bot Blueprint. A Blueprint object works like a Flask application, but it is not a complete application. You should see a blueprint as a collection of views, templates, static files, that you can use as an extension of your Flask application. It’s a “section” of your app. You can use blueprints to organize your project, for example by having blueprints for an admin panel, for a dashboard, for profile pages, etc. Read more about blueprints in A Better Application Structure.
In our bot code, we have a blueprint to encapsulate the code related to our bot actions. In the routes.py file, we define an endpoint /bot, that will be invoked by Twilio every time that a user sends a message to our bot.
app/bot.py: The bot logic
We are going to write the process_message function called from the /bot route in a separate file called bot.py. In this file we are going to put all functions that are directly associated with the action of our bot, like checking received messages, or deciding what answer to provide. Let’s start by processing a “help” command for our bot:
If the user sends help, the process_message function replies with the four available commands. You can see that we call the _bot_reply(response) auxiliary function defined near the top of the module. This function replies to incoming WhatsApp messages by sending the content of the response variable.
Next, we check if the user wants to create a new Secret Santa event.
Now that we have a new Secret Santa, the participants are going to enter the event by sending their name and event code. We need to check if the user has sent us a wrong event code. If everything is ok, we add the participant to the event in the database.
There is a little trick here. The message that we expected is in the form “add name to code", for example, “add Gabi to 1”. So first we have the string “add” at the beginning, next we have the participant name (we don’t know how many words this can be), the “to” and the event identifier. To find all information in the incoming message, we split the message in a list of words, for example: [“add”, “Gabi”, “to”, ”1”], then we get the participant_name doing the join of words[1:-2], which means “all words starting from position 1 exclusing the last 2”. Slicing the list like that, the user can say “add Gabi to 1” or “add Gabi Cavalcante to 1” and it always works, our bot will not break no matter how many words the user uses to give their name.
To get the event code we do code = int(words[-1].strip()), which gets the last word, strips the spaces and finally converts it to an integer, matching the type of the database primary keys.
Note that in this case, we call the _send_message and _bot_reply auxiliary functions, because we need to reply to the whatsapp message that the participant sent to us, while also send a message to the event’s creator telling them that a new participant has registered.
The _send_message function doesn’t reply to an incoming message, it sends a message to any number that we give. Since we are using the WhatsApp sandbox, we can only send messages to numbers that are connected to it. You can see that we use the Twilio Account SID and Auth Token that we defined in our .secrets.toml file.
Now we check if the incoming message is to run the event.
Note that if you run the event once, you cannot run it again. For the last case, we check if the message is to cancel the event.
Let’s see the complete routes.py:
Initializing the Database
For this example, we’re going to use the SQLite database, so make sure the filename to your database file is in the settings.toml. Also ensure that the SECRET_KEY variable is set in the .secrets.toml.
We can initialize our database using the Flask-Migrate commands. Since this will be the first time setting up the database, we need to run flask db init. This command will set up our migration repository. Next, run flask db migrate to generate a migration script for the changes we made that define our two database models. Finally, use flask db upgrade to apply the changes in the migration script generated before to the SQLite database.
After running these commands you will see a new migrations subdirectory and the SQLite database file. If you check the migrations/versions folder, you can see the script used to create the database using the structure that we defined in the models.py file. Any time you make changes to the models you just need to run the flask db migratie to create a new script with these changes, and flask db upgrade to apply them to the database.
Running our Secret Santa bot
Before we run our bot, let’s create the .env file. This file defines some environment variables that help the flask command to know how to run our application. The FLASK_APP environment variable is necessary to define how to load the app. In our case, we should define it to point to the create_app application factory function:
The environment in which the Flask app runs is set by FLASK_ENV. The default is production, but we can also use development or test. This variable is also used by Dynaconf to switch the working environment.
Start the bot by running flask run. Now your bot is running on port 5000, but inside your computer and as a private service that is only available for you.
We will now use ngrok to make our bot reachable from the Internet. Open a second terminal window and run ./ngronk http 5000. The lines beginning with “Forwarding” have the public URL that ngrok uses to redirect requests into our service.
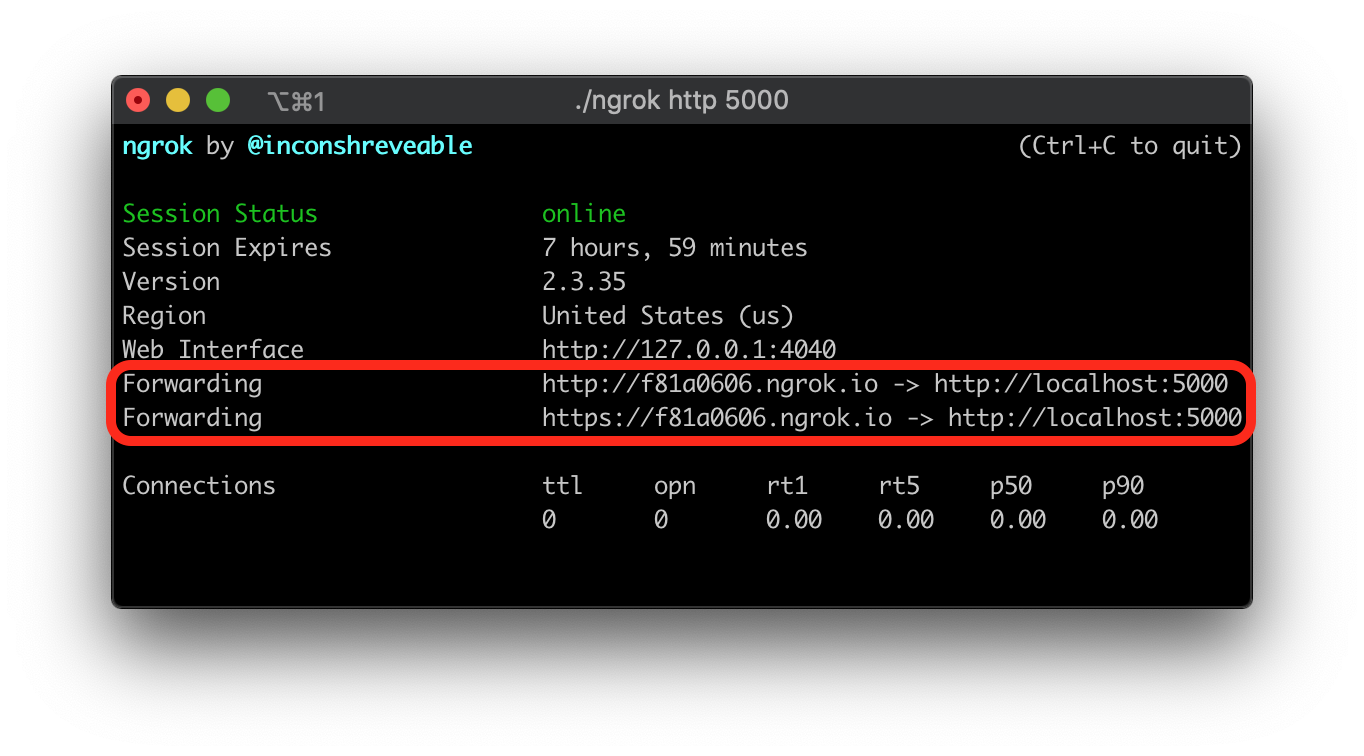
Go to the WhatsApp Sandbox, and copy the https:// URL from ngrok and then paste it on the “When a message comes in” field, appending the /bot URL at the end. Click the red “Save” button to store this change.
Now you can send a message to the Secret Santa bot, create an event and ask your friends to participate.

Keep in mind that as we are using ngrok for free, we can’t keep the session for more than 8 hours. When you restart ngrok, the URL assigned to you will be different, so you will need to update it in the sandbox.
Tests with pytest
Now that you have the bot running. How do you test it? You can run the application and see if your bot replies to the users and sends messages, but after every change that you make you will need to restart your app, open WhatsApp, create a Secret Santa event, join it from a few other phones, and so on. You will spend a lot of time testing, and also money sending all these test messages.
Twilio provides test credentials and magic phone numbers, which allow us to test the application without actually sending SMS messages, so you are not charged while running tests. You can find your test credentials in account settings of your Console.
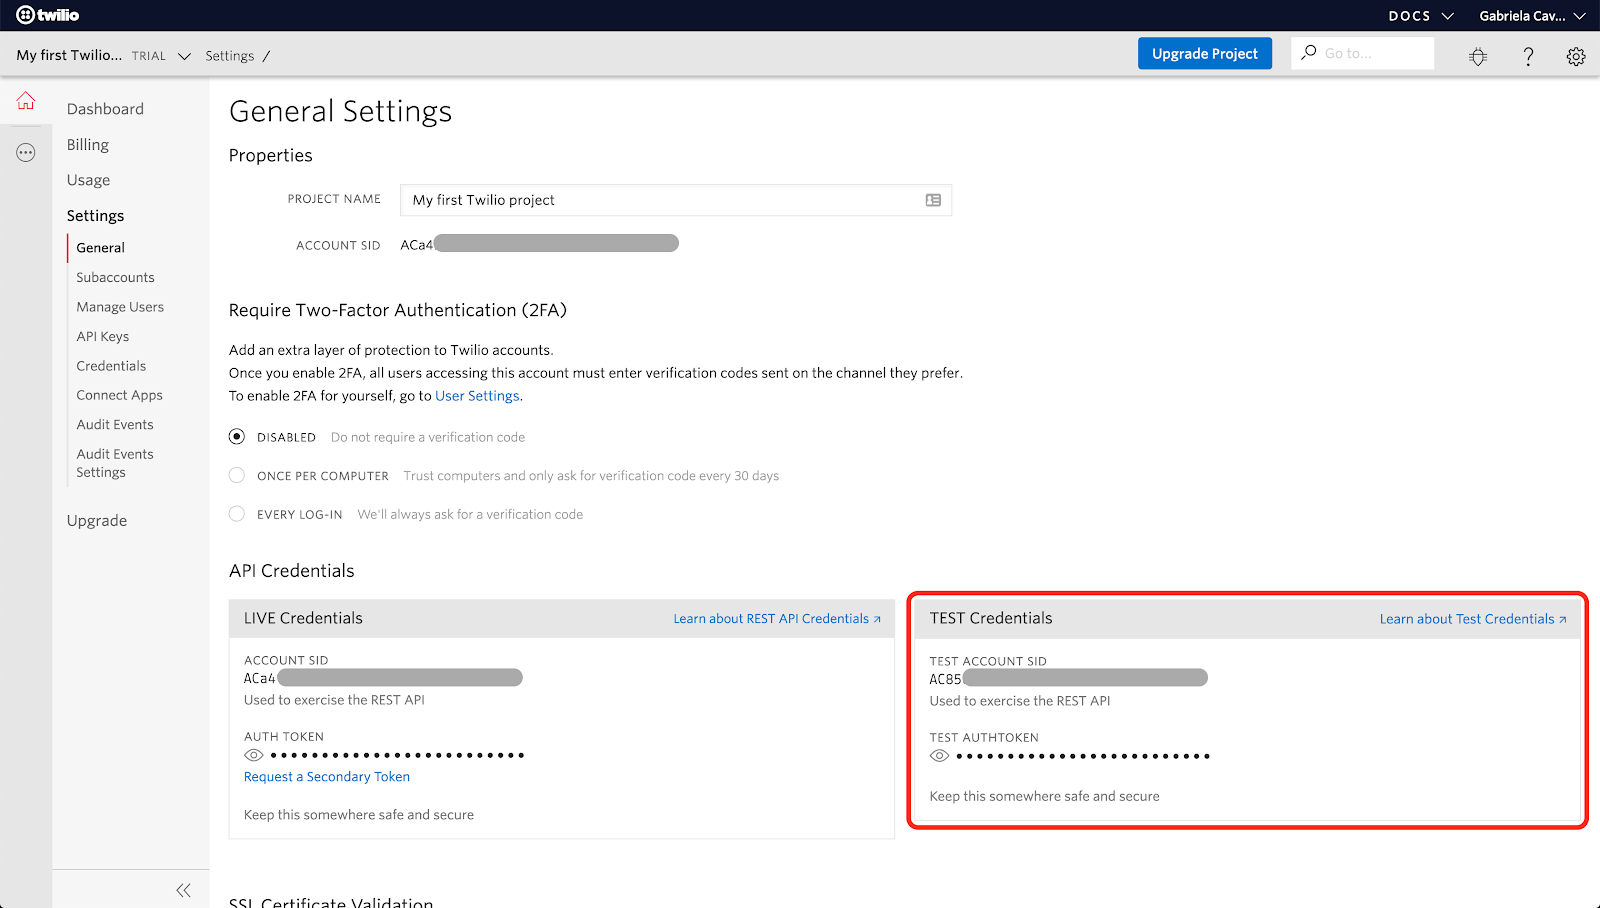
When you make a request with the test credentials, Twilio will check all the inputs as they do with real credentials, but no actual messages will be sent.
To help us to write test cases there are a few magic phone numbers. If you send a message to +15005550001 your test will receive the error code 21212, which is “This phone number is invalid.”. If, on the other side, you message the number +15005550006, then Twilio will return a successful response.
The pytest framework allows us to write unit tests. A unit test checks if a small part of our code is working as expected. Pytest can also scale to support complex functional testing for our application.
Let’s begin by creating a tests directory under the application root. We will store our unit tests in files named with the format test_*.py, as these files are auto-discoverable by pytest.
Before we start to write our test cases, we need to define a specific testing environment. You remember that we have a testing environment in our settings.toml, so now we can create an app using these variables and test it. Creating this fixed baseline we can have our tests producing consistent and repeatable results. We implement this fixed baseline using fixtures, that we’re going to write in a file called conftest.py, inside the tests directory. We don’t need to import the fixture in our test, fixtures are automatically discovered by pytest. Let’s check our conftest.py:
We define a fixture called app(), that creates a Flask application instance using the testing environment and returns it. The db(app) fixture is responsible for initializing the testing database. The code before the yield statement runs before each test function, while the code after the yield executes after the test function has finished execution. This fixture returns the database instance before the tests and after testing is done it closes the database session and cleans everything up.
You can see that we also define a scope to our tests. Scopes define how our fixtures are going to be shared across the tests. For us, the app can be the same to all tests, so we can define the scope as session, but we want a different database for each test because we don’t want a test leaving a database in a bad state to affect other tests, so the db fixture uses a scope of function.
Now let’s create the test cases. To test our bot we create a file inside /tests called test_bot.py. Let’s write a small test to check if sending a help message causes the bot to return a correct answer.
In this test case we define an expected response, using an xml structure. Going back to the process_message function, you will see that we call _bot_reply(response) to actually reply to the incoming message. This function uses the MessagingResponse() class from the Twilio library to help us build the response in TwiML format. TwiML is an XML based language with tags defined by Twilio to allow us to build our WhatsApp and/or SMS responses. At the end of the test, we use assert to confirm that the process_message function returns the expected XML response.
Now we can create a more complex test. We’re going to create a Secret Santa, and see if our bot actually creates it, next we add participants, and run the event. In the same file we add a few more imports, and a new test function.
Note that we don’t use the phone number in the format whatsapp:{number} like we do when we use the bot for real. When we just set a phone number without the whatsapp: prefix, the Twilio Client will send the message as SMS instead of WhatsApp. At the moment, there is no way to use magic numbers to test the WhatApp message, but since the Twilio Client response has the same format for SMS and WhatsApp we can check the bot functions simulating SMS messages.
Conclusion
I hope you enjoyed this tutorial. We’ve built a simple, but funny Secret Santa bot. Our bot receives messages, processes them and replies to the users. We modeled a database and tested our bot code. I hope you will use a few tools and techniques from this tutorial in your future projects.
If you want to improve the chatbot project, you can think about building a web interface to create web-based Secret Santas. Take a look at the Flask-Admin extension, it can be helpful to build an interface on top of an existing data model.
Maybe you want your bot to use more sophisticated message processing techniques. For that, I recommend that you read about natural language processing. I suggest NLTK, scikit-learn and spacy, all of which can be used from Python.
Good luck!
Gabriela Cavalcante is a Python enthusiast and a Flask fan. You can find some of her projects on GitHub.


Related Resources
Twilio Docs
From APIs to SDKs to sample apps
API reference documentation, SDKs, helper libraries, quickstarts, and tutorials for your language and platform.
Resource Center
The latest ebooks, industry reports, and webinars
Learn from customer engagement experts to improve your own communication.
Ahoy
Twilio's developer community hub
Best practices, code samples, and inspiration to build communications and digital engagement experiences.