How to Control Home Assistant on Your Raspberry Pi with Twilio SMS
Time to read:
October 28, 2022
Written by
Reviewed by

The tutorial How to Control Your Raspberry Pi with Twilio SMS shows that it is possible to remotely control your Raspberry Pi with SMS.
This is done by using an SMS message as a set of commands defined by a protocol.
Everything we want to control on the Raspberry Pi is a controlled object, and it is associated with a GPIO pin.
What if we can do better?
What if we can control more than a simple device connected to a GPIO?
What if we can control a home automation system with SMS?
In this tutorial, you will learn how you can control your Home Assistant on your Raspberry Pi with Twilio Programmable SMS. But first, let’s explore what Home Assistant is.
What is Home Assistant?
Home Assistant is an open-source home automation tool that allows you to control many electronic devices with a single web interface.
It was created by Paulus Schoutsen in September 2013.
It’s a free software written with Python as its programming language.
Home Assistant can run on different hardware and platforms. You can install and run it on operating systems like Linux, macOS, and Windows with WSL.
You can also run it on a single-board computer like a Raspberry Pi.
Take a look at the official web site for more information. Sometimes we refer to Home Assistant as HASS.
Why choose Home Assistant?
There are many advantages that can drive someone to choose Home Assistant, but for the purpose of this tutorial there are mainly three reasons:
- Home Assistant can be integrated with many controllable devices: It integrates with over a thousand devices and services. This will allow you to control thousands of objects with SMS.
- Home Assistant can run on Raspberry Pi: It is recommended to run Home Assistant on a Raspberry Pi, and the Home Assistant OS can be run directly on the board.
- You can control a device or an object on Home Assistant via REST API: This is one of the keys to this tutorial. The Home Assistant REST API allows you to manipulate entities represented generally by a device from an external program.
How to associate a controlled object with the Home Assistant system
In Home Assistant, any controllable data point in a device is represented by an entity.
In other words, an entity is a controllable object in Home Assistant.
An entity can be controlled by calling an action on it. In Home Assistant terminology, the action is called a "service", and a service belongs to a domain. See the glossary on the official website for more information about each definition.
If we compare the similarities to the system described in the tutorial How to Control Your Raspberry Pi with Twilio SMS we have:
- Entity is a Controlled object
- Service is an action
This allows us to control entities with the same protocol in Home Assistant by SMS.

But how can we send the command to Home Assistant?
HASS has a rest API that allows external tools to interact with it. It accepts JSON data format and allows you to control an entity by calling a service.
The service can be called by using a URL like the following:
http://<your_raspberry_pi_ip_address>:8123/api/services/<domain>/<service>
For example, to switch on a light, you can make a POST request to the following URL by sending an entity_id as data:
http://<your_raspberry_pi_ip_address>:8123/api/services/switch/turn_on
The idea here is that in order to control an object in Home Assistant with SMS, you need to translate the SMS message to a command, then the command to a REST API call.
Here is a schema showing the interaction between every part of the system:
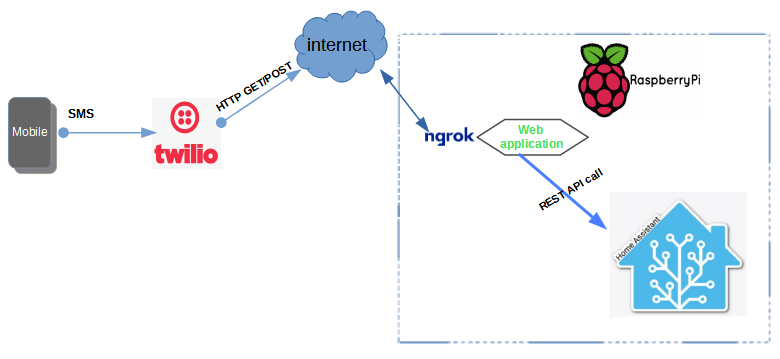
This is how the system works:
- An SMS is received on your Twilio number.
- Twilio calls a webhook that is pointing to the web application hosted on your Raspberry Pi.
- The web application then extracts the command from the SMS content, and translates it to a controlled object according to the protocol.
- The web application calls the corresponding URL to the REST API.
That is how the whole system works. Now let’s put it into practice.
Implementation of controlled object with LED
In this section, you will learn how to define a light object in your Home Assistant and how you can control it with Twilio SMS. An LED will be used as a light.
Requirements
- Read the article How to Control Your Raspberry Pi with Twilio SMS
- One Raspberry Pi with Home Assistant installed on it. Check out this link to install Home Assistant. You can install it with Docker or a Python virtualenv. The virtualenv installation is used in this article. A Raspberry Pi 3 Model B is used in this tutorial, but you can use any model of the board.
- Two LEDs
- Two 330 Ohm resistors
- One breadboard
- Some jumper wires
- A Twilio phone number: Here is a link to create an account if you don’t have one already: Twilio | Try Twilio Free.
- Ngrok. You can learn more about using Ngrok in 2022 here.
Build the circuit
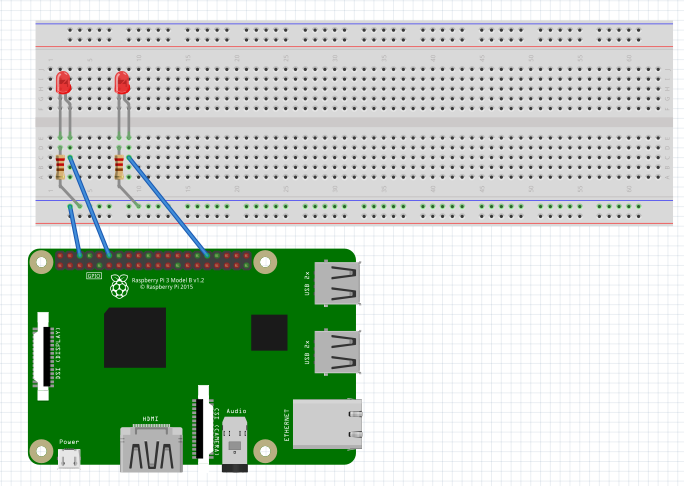
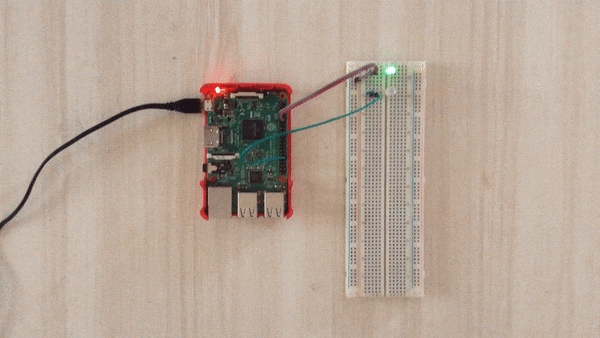
To realize the circuit, you need to connect your two LEDs to your Raspberry Pi.
Follow the schematic below to connect each part. Note that GPIO 18 and 12 are each connected to an LED.
Add LEDs as light switches to Home Assistant
In Home Assistant, you need to add the corresponding integration before being able to interact with any kind of device.
For the LED switches connected to the GPIO, we will use the remote_rpi_gpio integration.
This integration needs the pigpio daemon to perform any action on the GPIO pins, so let’s install it first.
Install pigpiod
Run this command to install pigpiod:
Then, you can run it with the following command:
To make it run at boot time, so you don’t have to run it manually every time your Raspberry Pi restarts, you can run this command:
Note that you need to enable remote GPIO on your Raspberry Pi config.
Here are the steps to enable remote GPIO access:
- Execute the command:
sudo raspi-config. - Go to "Interfacing Options".
- Go to "Remote GPIO".
- Choose "Yes".
Now remote GPIO access is enabled.
Add LED as light switch to the configuration
Next, add the integration remote_rpi_gpio to your Home Assistant.
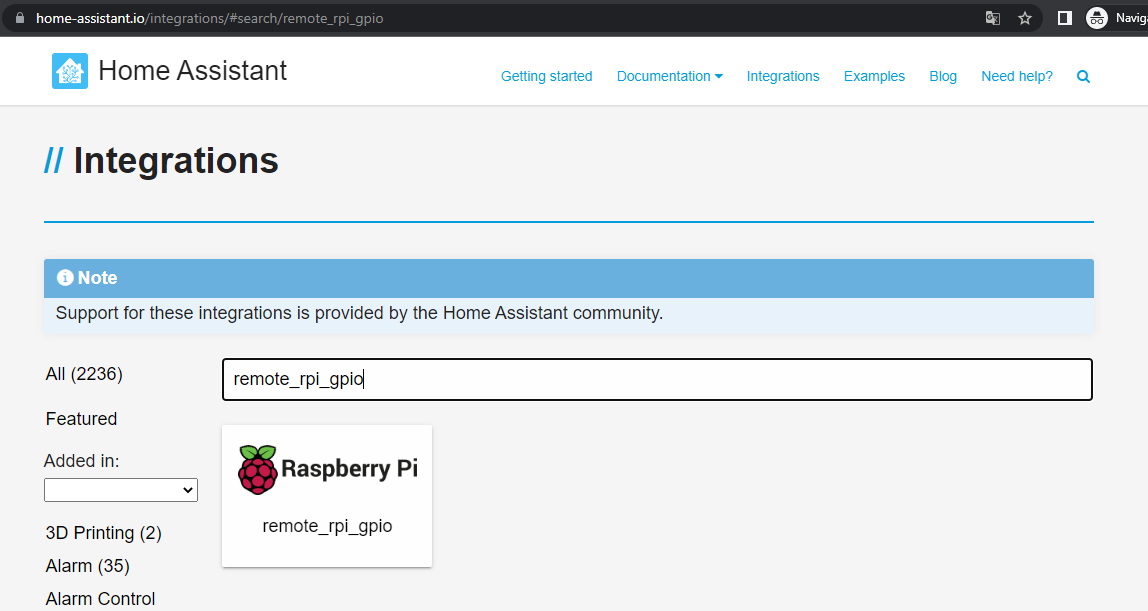
To do this, go to the Home Assistant integrations page, and search for "remote_rpi_gpio" as shown in the image below.
Click on the first result, and you should be redirected to a page that guides you to install the integration. This page tells you to add some lines to your configuration.yaml file. If you chose to install Home Assistant using the virtualenv installation, you can find this file at /home/homeassistant/.homeassistant/configuration.yaml.
Add the following lines at the end of your configuration.yaml:
These lines tell Home Assistant that there are two light switches connected to the Raspberry Pi GPIO pins 18 and 12. One is named Garage Light and the second one is Desk Light.
Run Home Assistant
After the configuration is done, you can now run or restart your Home Assistant to see the change. For virtualenv installation you have to switch to the user homeassistant, activate the virtualenv, and then run hass on the command line.
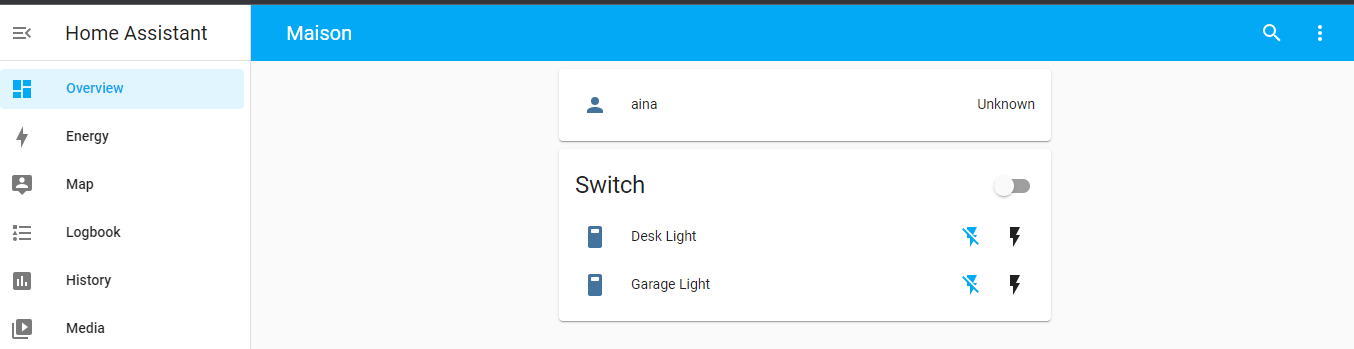
If you navigate to http://<your_raspberry_pi_ip_address>:8123 in your browser (replacing <your_raspberry_pi_ip_address> with your Raspberry Pi's actual IP address), you should have the Home Assistant web interface available on port 8123 of your Raspberry Pi, and see the two light switches on the overview page as shown below.
Using the REST API to control the light
You probably played a little bit with the interface by switching on and off the two LEDs. That is cool, but it’s not the goal in this tutorial.
We need to be able to control them programmatically. And to do that, we need to interact with the REST API.
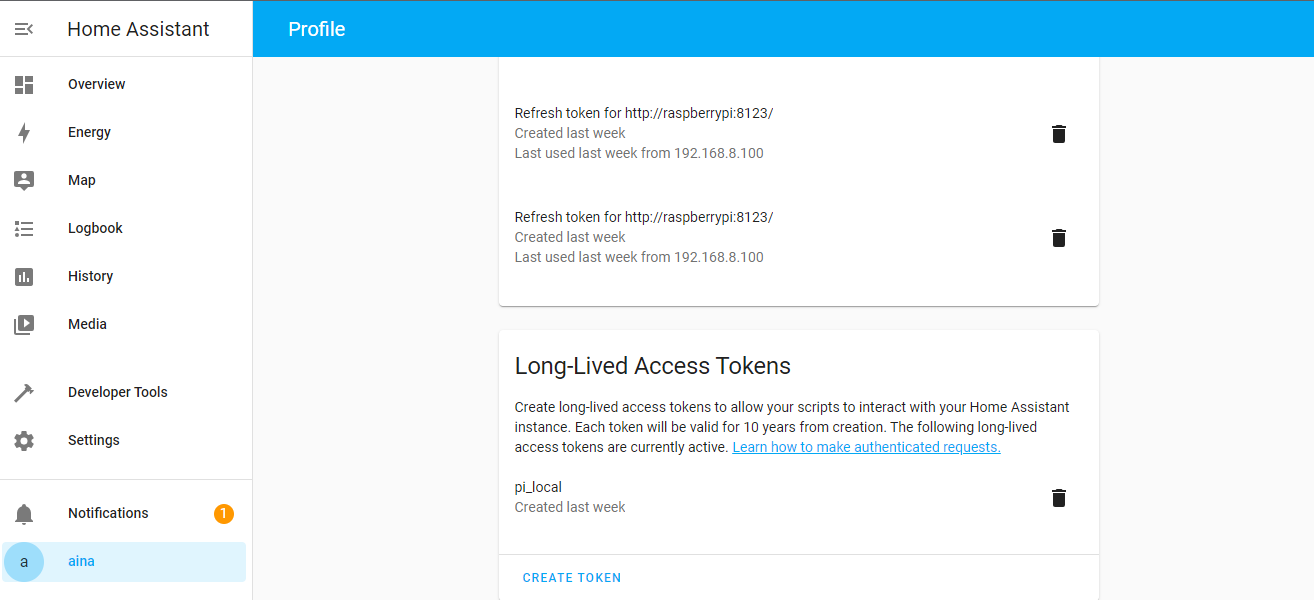
Getting the access token
The REST API is a door for external applications to contact Home Assistant, so you need a key to be able to enter the door. That is the access token.
You can find it on the web interface if you click into your profile. Clicking your username in the bottom left corner should take you to this URL: http://<your_raspberry_pi_ip_address>:8123/profile.
In the section Long-Lived Access Tokens, you can create a new token if there is none. Just click the button CREATE TOKEN to get one. Note that you should copy your access token and keep it in a safe place, as you cannot see it anymore from the interface once you close the modal.
Testing with command line tool
Once you get the access token, you can start playing with the REST API using the command line.
This request is for turning on your LED on GPIO 18 — it’s the garage light:
eyJhb should be replaced with your access token, and <your_raspberry_pi_ip_address> with your Raspberry Pi IP address.
Writing code for the controlled object
The LED is controllable via REST API. We are almost done. Now we need to combine the REST API call with our web application that Twilio SMS uses as a webhook.
Let’s dive into the code.
First, clone the repository from GitHub and change into the directory:
Then create a new file in the rpi_control/controlled_object directory with the name hass_light.py.
Add Home Assistant as a controlled object with the following code:
Go to the config.py file at the root of the project and make some changes, replacing the code in the file with the following lines and the placeholder text with your access token and your Home Assistant URL:
Run the web app
Time to run the web application. Do not forget to set up a virtual environment for the web application, since you'll need to install some requirements in it before running.
Here is how you can create a virtualenv. Inside the root directory of the project rpi_twilio_sms_control run the following commands:
Then install the Twilio Helper Library package and RPi.GPIO:
Now run the web application with the Python command:
Expose your web application with ngrok
Ngrok is a free tool that allows you to make your web application accessible from the internet while running it locally.
Download it from the official website then install it with this command:
If you are running ngrok for the first time, you should create an account and get your auth token. Once you get your auth token, run the following command to add it to your configuration, replacing <token> with your auth token:
Expose your web application with ngrok with this command:
In your console, you will get a public URL that is accessible from the internet.
Configure the webhook URL in the Twilio Console
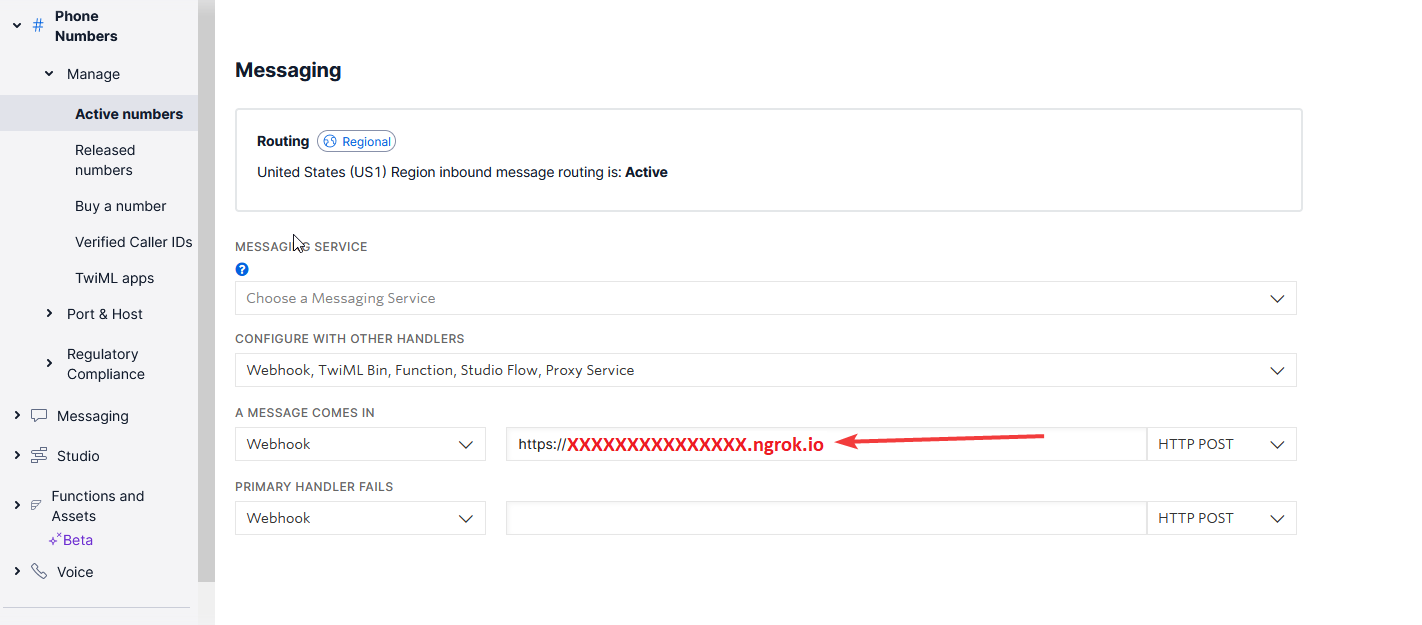
Log into the Twilio Console and in the left-hand menu, go to Phone Numbers > Manage > Active numbers.
Select the number you wish to receive the SMS and scroll down to the Messaging section.
Paste your ngrok forwarding URL into the webhook field in the section A MESSAGE COMES IN.
The URL to paste is the one ending with ngrok.io in your ngrok terminal.
Test the entire system
To test the system, send an SMS to your Twilio number with the content below:
The LED at GPIO 18 should switch off and the LED on GPIO 12 should switch on.
You can continue testing it by switching the lights on and off via text message.
Conclusion
Now you know how to control your Home Assistant on Raspberry Pi with Twilio Programmable SMS. You are not limited to GPIO-connected devices with Home Assistant. You can control every single entity provided by adding a corresponding controllable object.
An alternative with Twilio and Home Assistant is to use the Twilio integration for Home Assistant, but this is based on events, not the content of your SMS.
About me: I’m a lead Python developer with 8 years of experience, passionate about electronics, IoT, and vintage mechanics. You can find me on Twitter or read my blog here: http://www.curiousmanjournal.ml/.


Related Resources
Twilio Docs
From APIs to SDKs to sample apps
API reference documentation, SDKs, helper libraries, quickstarts, and tutorials for your language and platform.
Resource Center
The latest ebooks, industry reports, and webinars
Learn from customer engagement experts to improve your own communication.
Ahoy
Twilio's developer community hub
Best practices, code samples, and inspiration to build communications and digital engagement experiences.