How to Create a Group Video Chat App with Symfony, PHP, Twilio, and React.js
Time to read:
October 12, 2020
Written by
Reviewed by

If the news and current statistics about remote work are any indicator of the future, it’s obvious that working from home is gradually becoming the new normal for employees all over the world, including numerous tech companies. While effective communication may be defined differently for various companies, one of the most promising ways to improve productivity and keep your team together involves using video conferencing or chat.
This tutorial will guide you on how to create a video conferencing chat application using Symfony, React.js, and Twilio Programmable Video. The video chat application will allow users to connect and participate in a predefined chat room.
Prerequisites
To participate in this tutorial, you will need the following:
- A Twilio Account
- Composer globally installed on your computer to manage dependencies
- Preferred basic knowledge of building applications with React and Symfony
- Node.js and Yarn package manager installed on your computer
- Symfony CLI installed on your computer. Follow the instructions here to set it up for your operating system.
Create a New Symfony Application
Considered as one of the leading PHP frameworks used for building web applications and RESTful APIs, Symfony is built with an elegant structure and is robust enough for building any kind of applications irrespective of the size.
To get started with creating a new Symfony application, you will use Composer. Run the following command from the terminal:
This will scaffold a new Symfony application within the symfony-react-video-chat folder in your development folder. Alternatively, you can use Symfony Installer to set up your project using the following instructions.
Install Twilio PHP SDK for the Project
Move into the project’s folder and issue the following command to install other required dependencies:
Here, we installed:
twilio/sdk: A Twilio PHP SDK that will facilitate interaction between the Twilio API and our application
Obtain Credentials and Update the Environment File
As mentioned earlier, a Twilio account is required for this tutorial and by now, you should have created one. Navigate to your Twilio console to access your Twilio credentials. Copy the TWILIO_ACCOUNT_SID from your dashboard and keep it safe:

Proceed to the API keys list and see the following page:
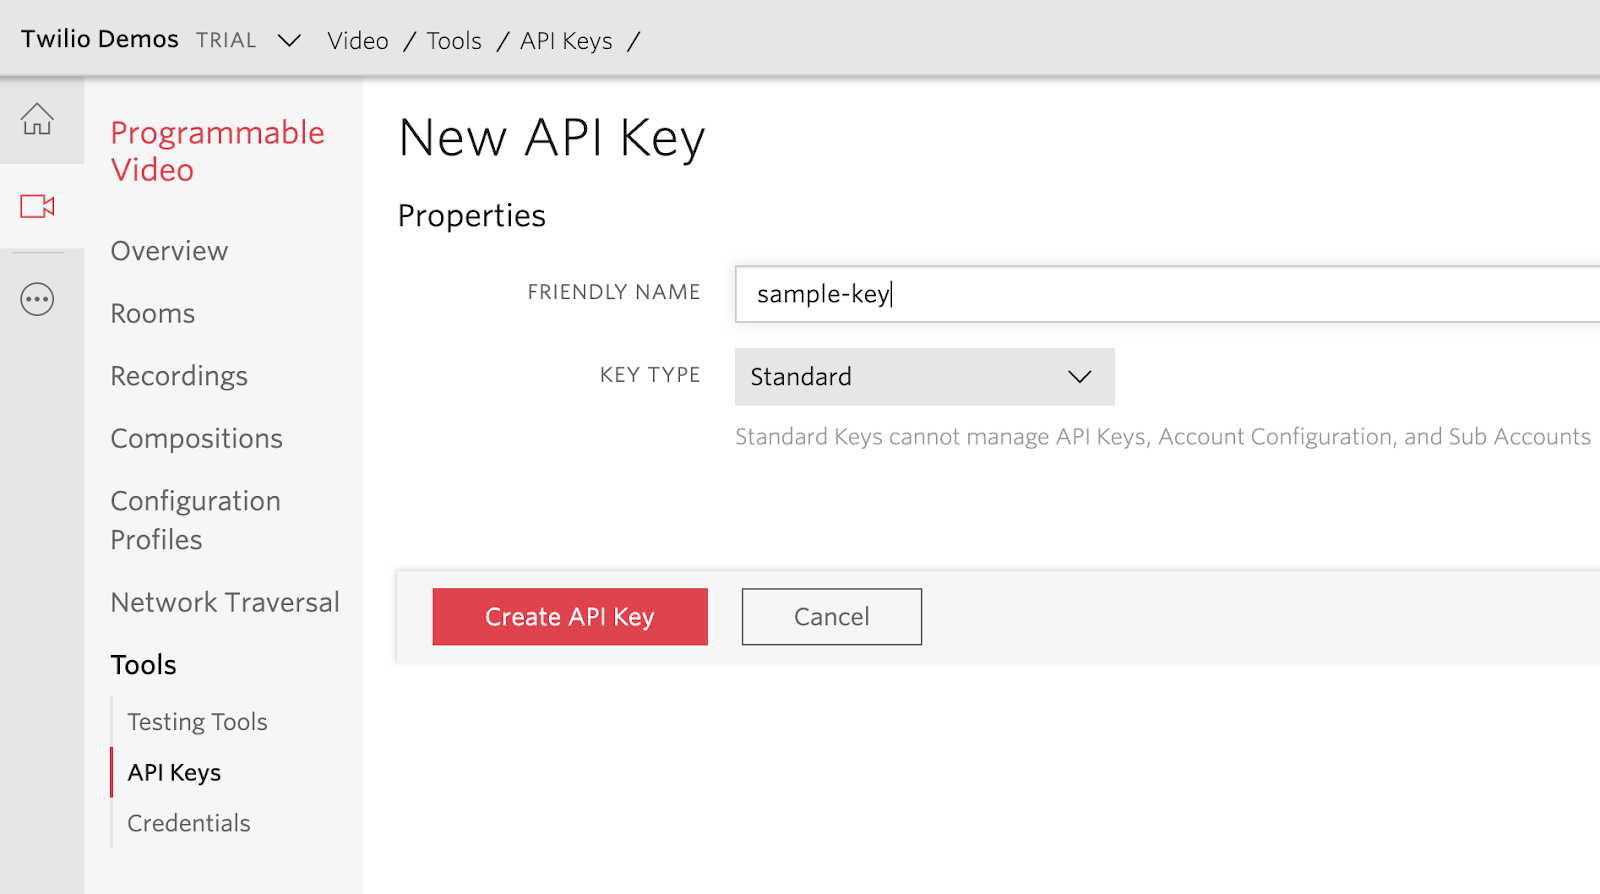
Give your API key a friendly name such as "sample-key" and click on the Create API Key button to complete the process. This will generate a random unique API Key SID and API Key Secret for you.
Navigate to the .env file for your project and include the values of the TWILIO_ACCOUNT_SID, API_KEY_SID, and API_KEY_SECRET as obtained from the Twilio console. The .env file should have the content displayed below:
These credentials are crucial to generating an access token and room permissions for a user. A participant in a chat room which will be generated in the next section.
Generate Access Tokens
In a programmable video application, the access token controls the identity and room permissions of a participant in a chat through the Twilio SDK. It usually contains information about the details of your Twilio Account SID and API key.
Next you will create an endpoint that will use these credentials to generate an access token for users.
Similar to what is obtainable in other MVC structured web applications, endpoints are often mapped to a particular Controller action for proper handling of HTTP requests, business logic, and returning the appropriate responses. For this purpose, we will use the maker bundle that comes installed with Symfony to generate a controller and its corresponding view. Run the following command to create a new controller:
This will create two new files for you:
- A controller located in src/Controller/TokenController.php
- A view page in templates/token/index.html.twig
Open the newly created controller and replace its content with the following:
Here, we modified the default code generated by the maker bundle by configuring the index() method to render the content of the token/index.html.twig on the homepage route. The video chat will be visible on this page at the completion of this tutorial.
A method named generate_token() is created. In this method, we accessed the environment variables defined in the .env file earlier and passed them as a part of the required parameters for a new instance of the AccessToken() method from theTwilio SDK.
The preferred room name, which will be posted from the frontend, was retrieved via the HTTP Request method and set as the room in which the holder of the generated access token can only connect to.
Navigate to the templates/token/index.html.twig and replace the content with the following HTML:
This is a basic twig template file for a Symfony application which will remain empty until the React.js frontend is appended to the <div> with an id of root.
Start the Application
Start the application by issuing the following command in the terminal:
Enter localhost:8000 in your preferred web browser. You’ll notice an empty page. Leave the server running for now. We will revisit it later.
Build the Frontend Logic
Now that the backend functionality has been implemented and running, set up the React application to connect it to the created backend API, making our video chat application functional. Open another terminal within the root directory of the project and use Composer to install Symfony Webpack Encore by running the command below:
In addition to:
Webpack Encore is a JavaScript library that uses Webpack under the hood. It is popularly known for working with CSS and JavaScript files within a Symfony application. The preceding command will create a webpack.config.js file, an assets folder, and add the node_modules folder to the .gitignore file.
After the installation is complete, use Yarn to install React, Axios, and Twilio Programmable Video JavaScript SDK by running the following commands:
Configure Webpack Encore and Enable React
Here, we will enable React and set up an entry point within the webpack.config.js file at the root of our project as shown here:
From the code above, we instructed Encore to load ./assets/js/app.js as the entry point of the application and uncommented the .enableReactPreset() method.
Create a Chat Component
Encore has already created an existing structure for us to build on. Create a new component named Chat.js file within the assets/js folder and paste the following code in it:
This component will be responsible for connecting with the created API endpoint, retrieving the generated access token from the API, and rendering the chat window. To achieve these steps, we created a form with an input field so that the users can enter their preferred name for the chat room and post it to the API endpoint once the Join Room button is clicked.
Once the form is submitted, the joinChat() method will be called and a POST HTTP request will be sent to the access_token endpoint. Upon a successful response, the retrieved token will be used to connect to a live video chat session.
To join the video chat, add the following method named connectToRoom() immediately after the joinChat() function:
Here, we passed the generated token obtained from the backend API and used it to set up a connection to the chat room. We also created a local video track and appended it to a chat window where it will be displayed.
Once a new participant is connected to the chat room, the room.on() method displays their name within the chat window.
Update the AppComponent
Here, we will initialize React and bind it to an HTML element with an id of root. Open the assets/app.js file and replace its content with:
Modify the Base Template
Thanks to the Webpack Encore, React code will be compiled down to JavaScript. To include the generated script in the project, navigate to the base template located in templates/base.html.twig and replace its content with the following:
Include Bootstrap CDN
To introduce some default styles for this project, we will include a Bootstrap CDN file. Bootstrap is a CSS framework for creating page layouts. It offers a lot of helper classes that can be included in the HTML element of web pages. To include the Bootstrap CDN within this project, open assets/styles/app.css file and add the following link:
Test the Symfony App
Ensure that the Symfony application is still running from a separate terminal within your project directory. If it's not running, use the command below to resume the Symfony application:
In a second terminal session, run the following command to compile the React application and watch the JavaScript files for any changes:
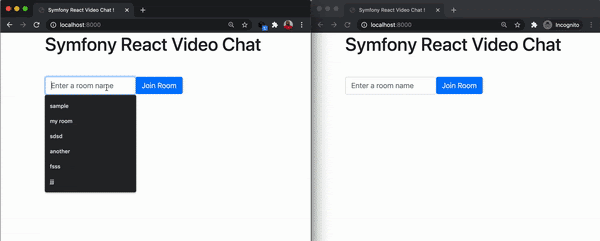
Navigate to http://localhost:8000 to view the application. Open two different windows and join a room:
Conclusion
The video chat application built here can use some improvement by extending its business logic to accommodate more features, such as screen sharing and displaying the number of participants in a chat room. Check the official documentation of Twilio’s Programmable Video to learn more about building virtual experiences with video.
I do hope that you found this helpful. The complete source code for this project can be found here on GitHub. Happy coding!
Olususi Oluyemi is a tech enthusiast, programming freak, and web development junkie who loves to embrace new technology.
- Twitter: https://twitter.com/yemiwebby
- GitHub: https://github.com/yemiwebby
- Website: https://yemiwebby.com.ng/
Related Posts

Related Resources
Twilio Docs
From APIs to SDKs to sample apps
API reference documentation, SDKs, helper libraries, quickstarts, and tutorials for your language and platform.
Resource Center
The latest ebooks, industry reports, and webinars
Learn from customer engagement experts to improve your own communication.
Ahoy
Twilio's developer community hub
Best practices, code samples, and inspiration to build communications and digital engagement experiences.