Build a Curbside Notification System with Twilio Studio and Functions
Time to read:
April 29, 2020
Written by
Reviewed by

Some businesses have found a need to send an SMS once an order is created in their system. They would like this notification to be responded to in order to carry out a set of actions such as to notify someone to deliver the order.
In this blog post we’ll show you how to create a notification workflow that can achieve this goal. We will enable an example business to notify a runner to deliver orders to customers in the business parking lot when they arrive on-site.
Prerequisites
To get started with the project you will need the following:
- A Twilio account (Sign up for a free trial account and get a $10 credit)
- Postman, a free tool for making API calls
Purchase a Twilio Phone Number
If you haven’t already done so, go to twilio.com and sign up for a free account or log in to your existing account.
In order to send and receive messages to our Twilio account we will need to buy a phone number.
In this example we’re interested in receiving and sending messages from a California number which needs SMS capabilities.
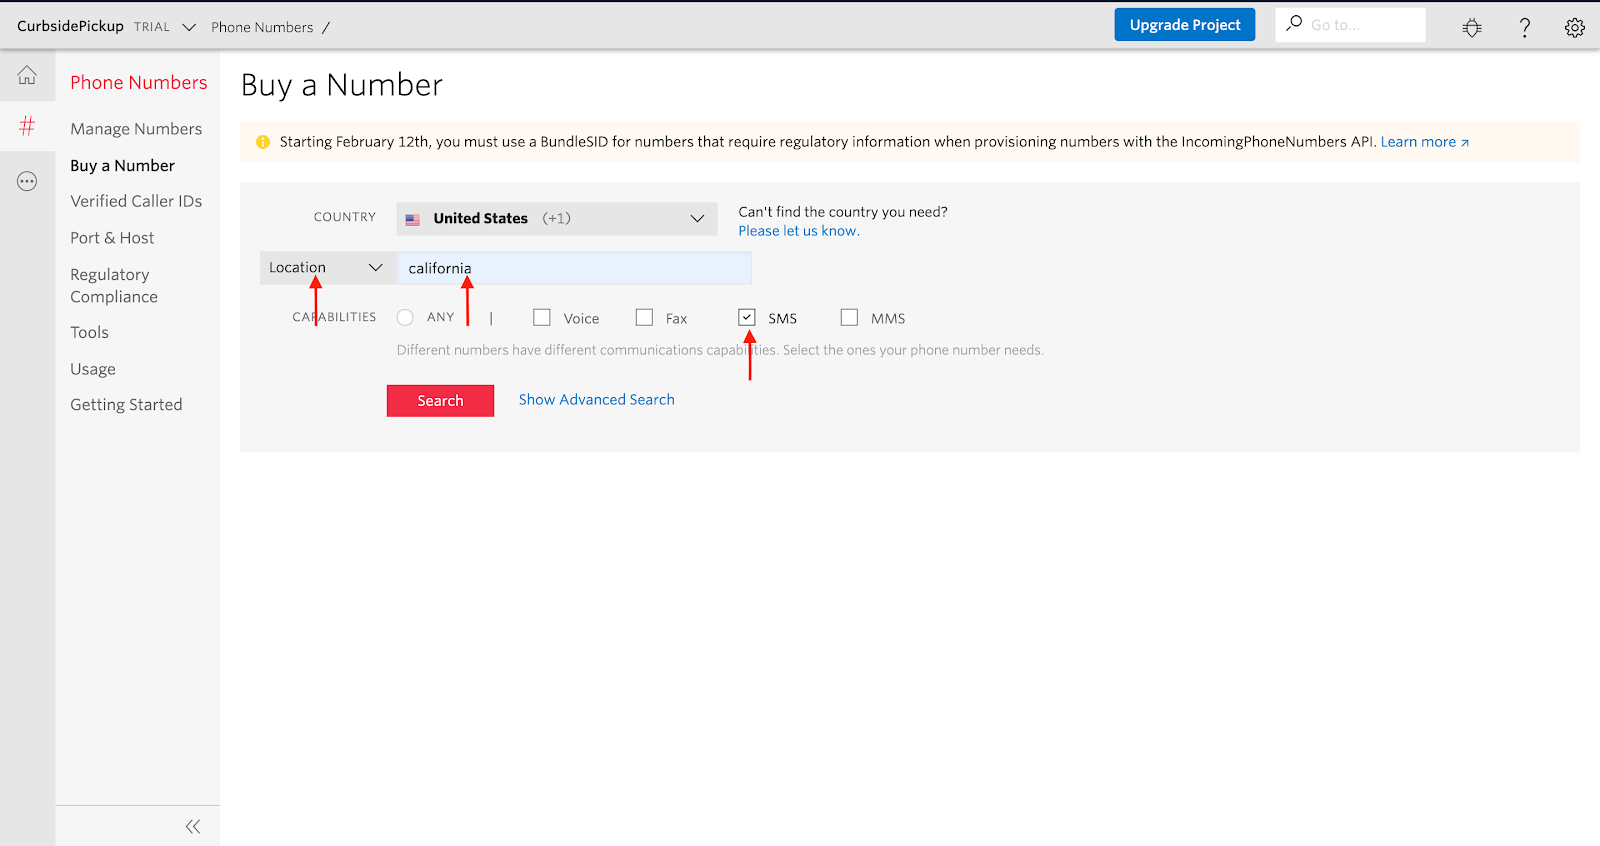
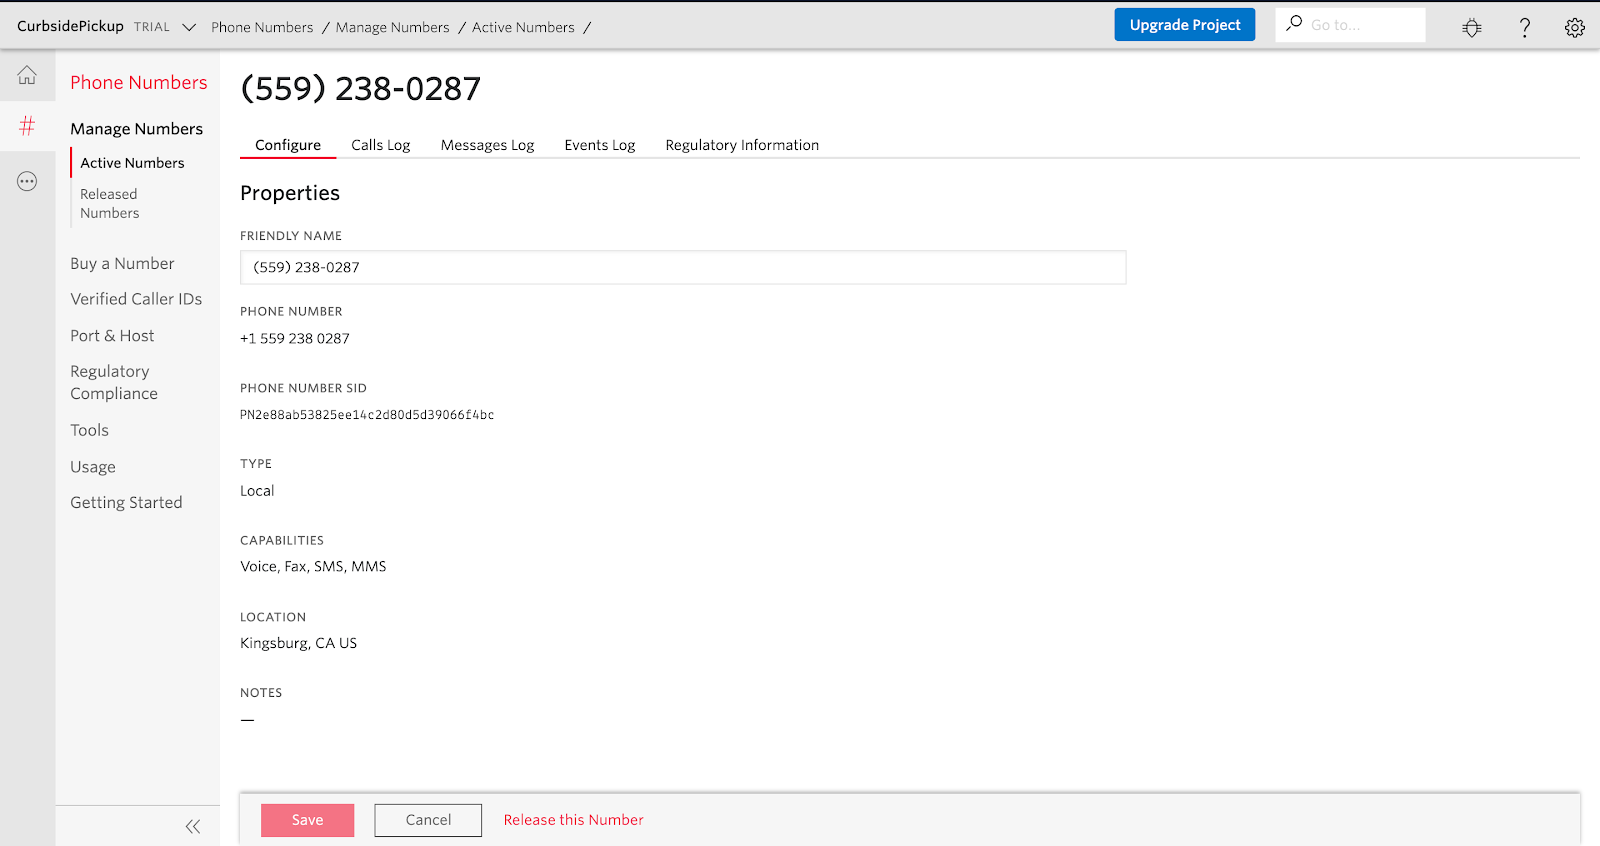
After viewing the phone number selection, select “Buy” and follow the steps to purchase the number. This will take you to the phone number’s page which we will reference later.
Set up a Studio Flow
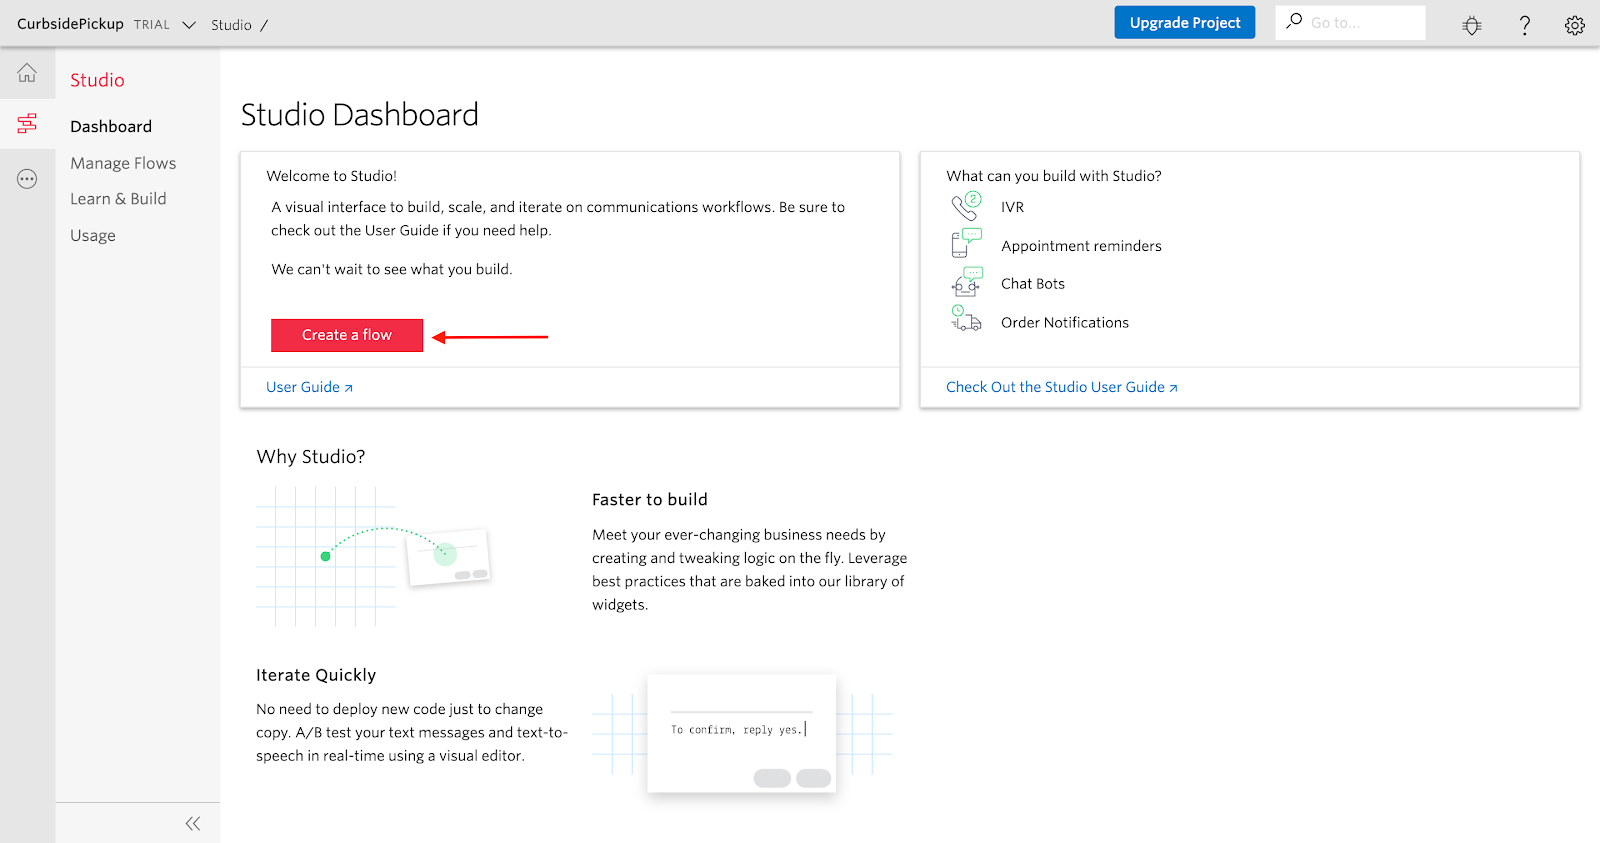
Twilio Studio is a low code tool we can use to create communication workflows that can be triggered from an API Call, Incoming Voice Call, or Incoming Message. Pairing Studio with Twilio serverless Functions allows us to expand on this workflow as needed.
To get started we need to open Studio and create a new flow.
First head to the Studio dashboard. Once you get to the Studio Dashboard, click “Create a flow”:
Name your flow. Here we named it “Curbside Studio.”
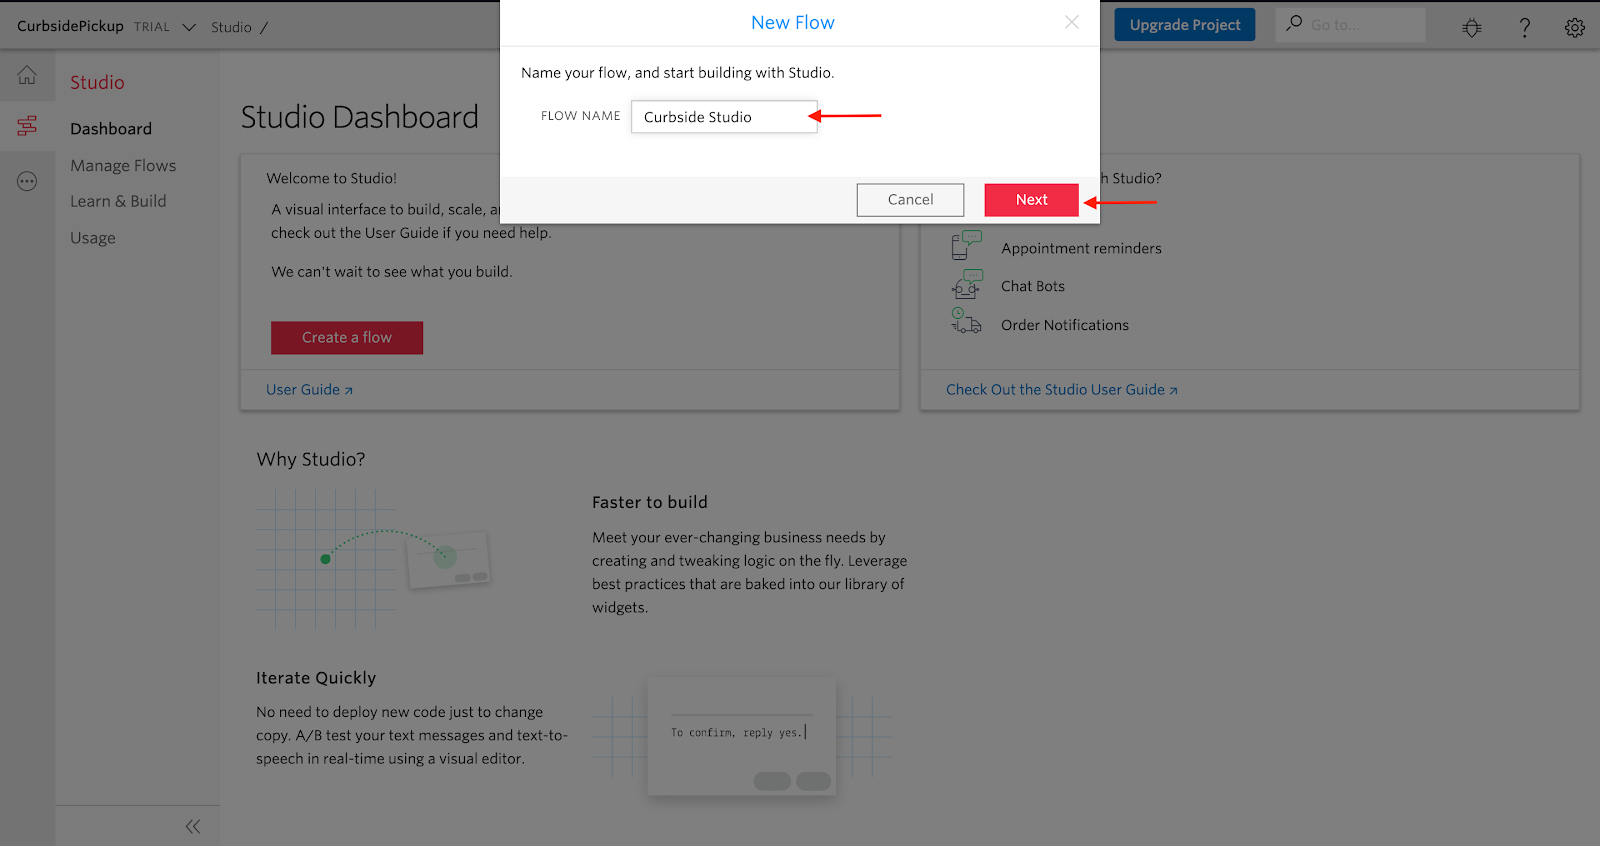
For this example we will be starting a flow from Scratch. However there are many template flows one can start a project from.

- On the left we can see options for Editor, Logs, and Revision History.
- In the center we see the start of the Studio flow called the “Trigger”.
- On the right is the Widget Library which contains all the available channels and options to implement in our flow. Today we are focusing on Messaging (and will end using a Function. )

Create an API Studio Flow
Now that we have set the studio flow up we will start with the first step of our flow.
For this example, we want to kick the order notification off when an order is created. From there, we can fire off via an API call.
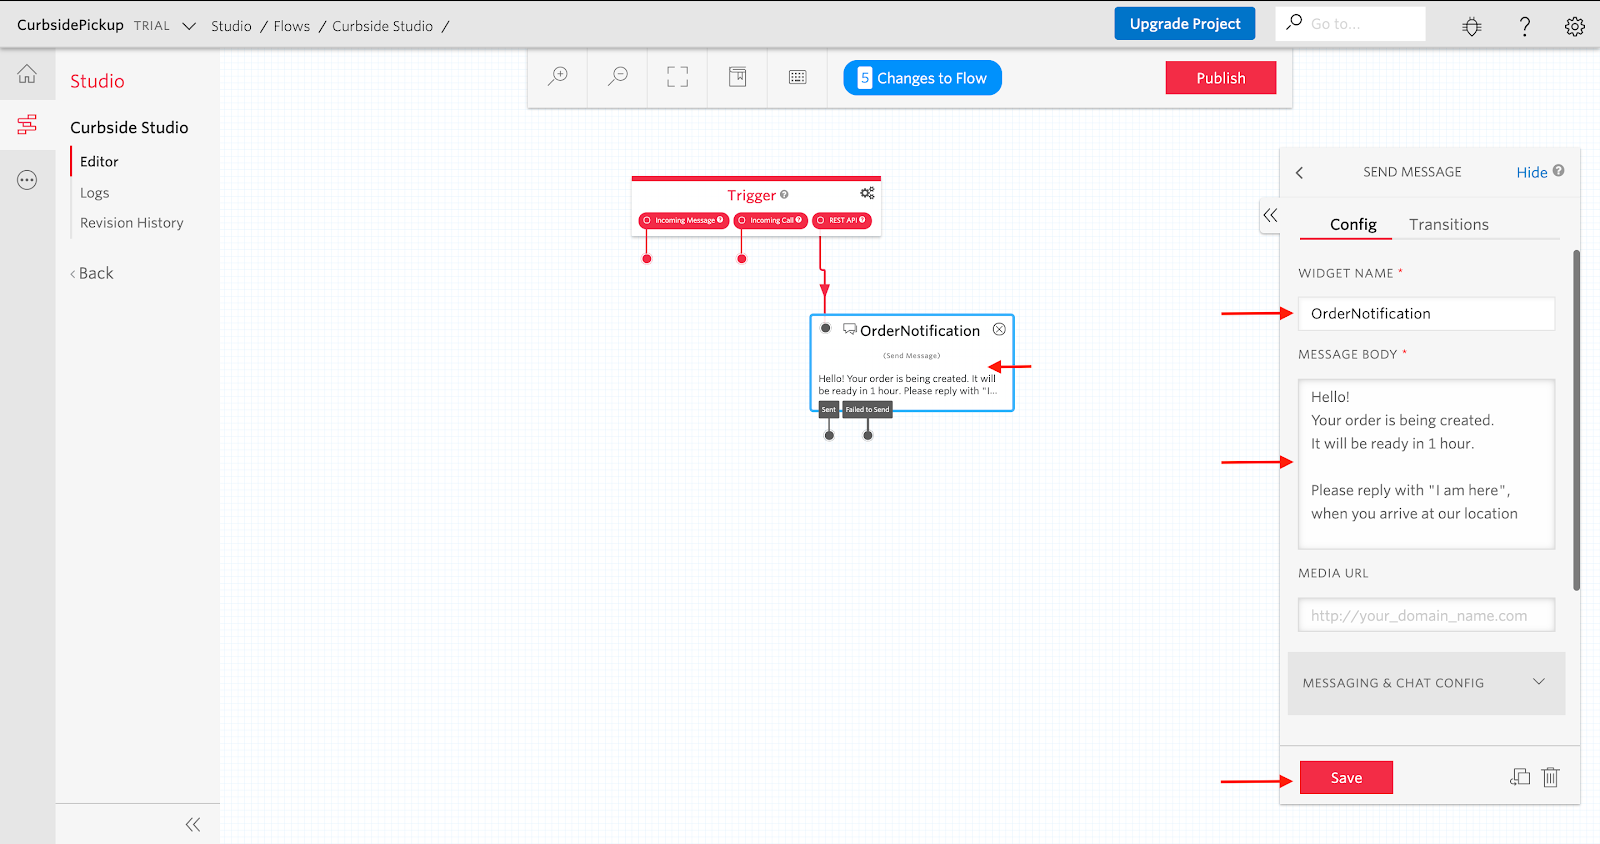
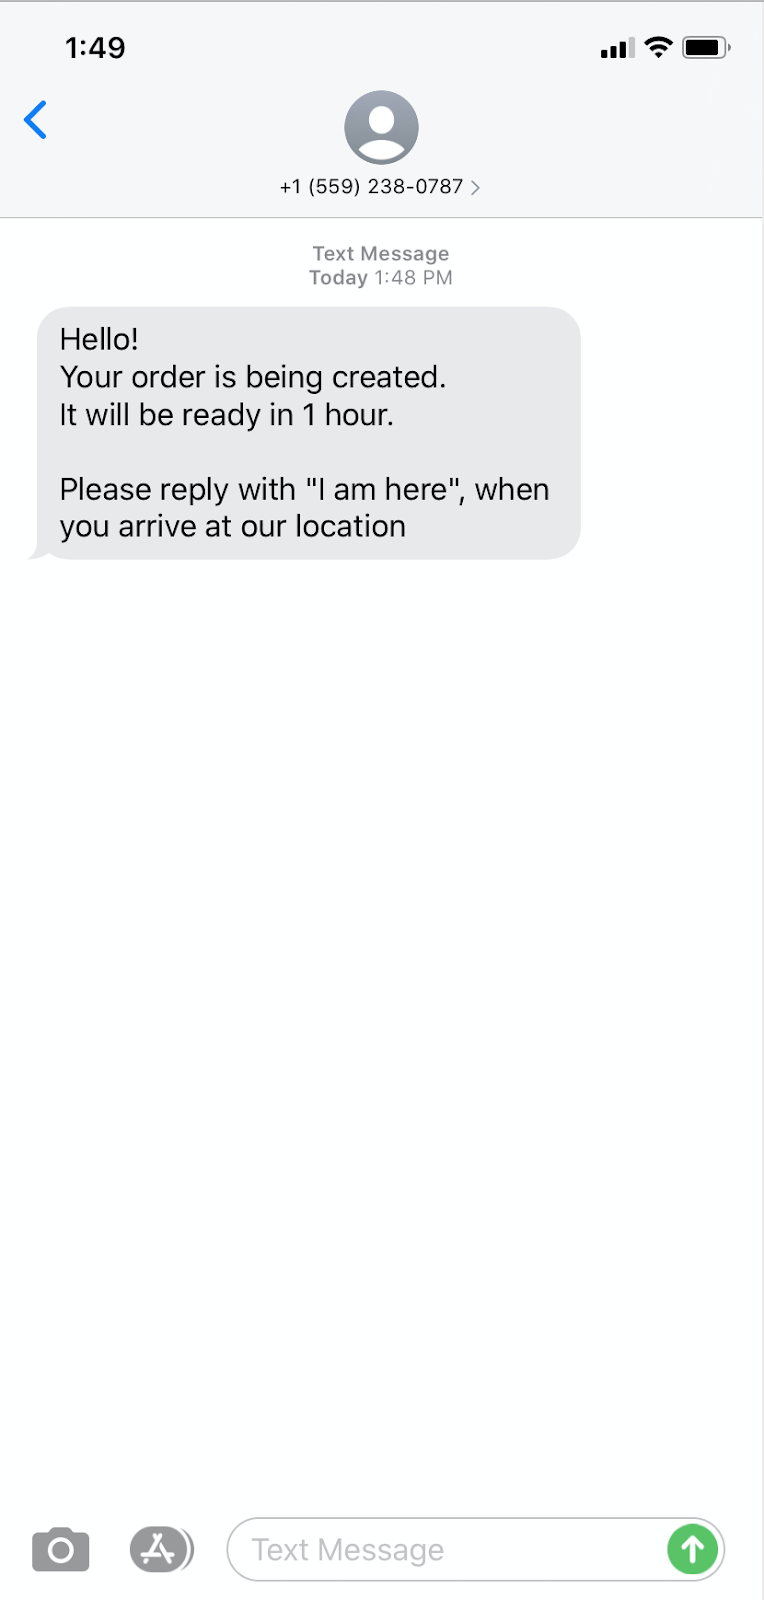
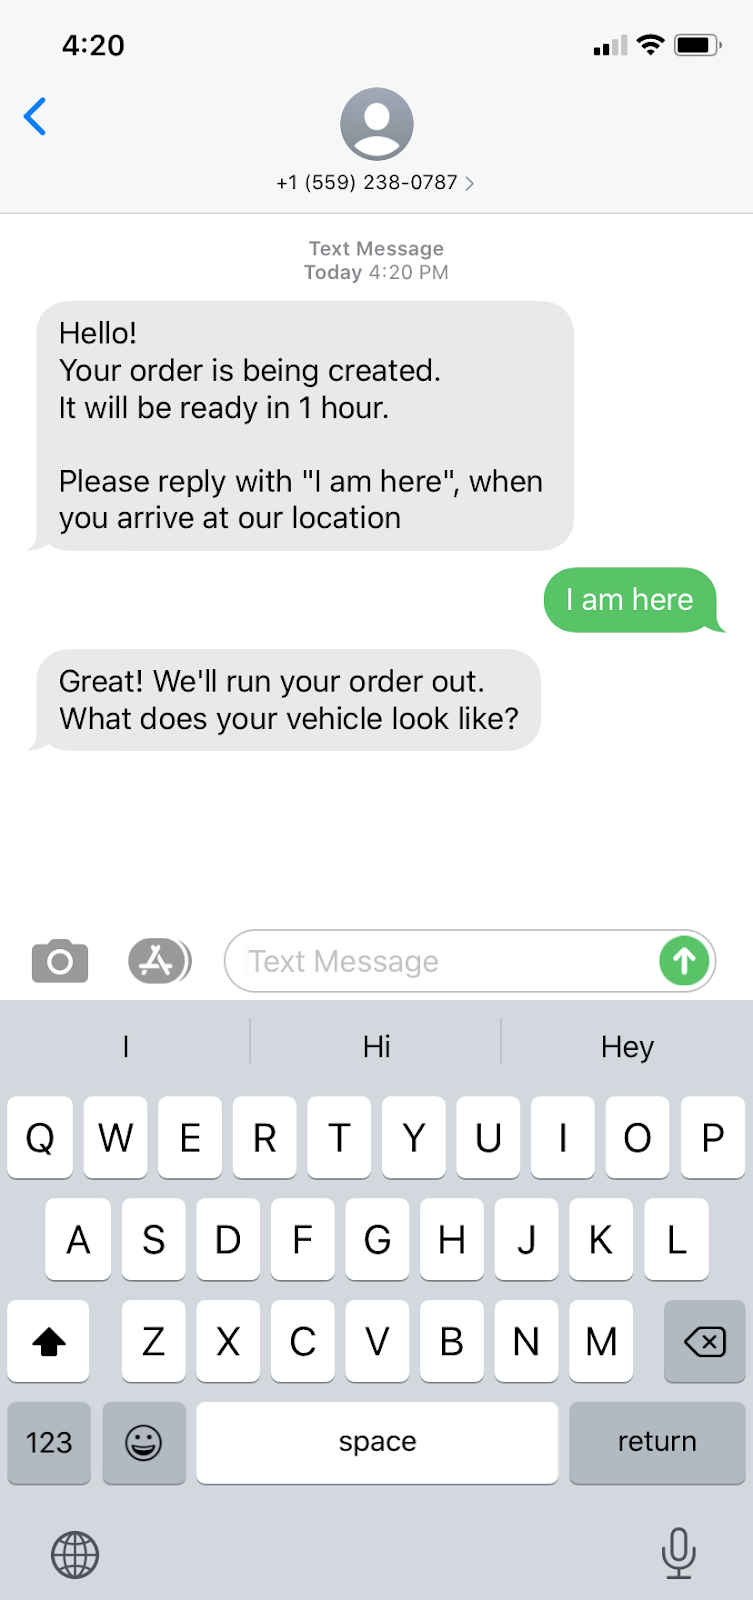
To create this notification, we need to start by using the “Send Message” widget under Messaging. Click and Drag the widget to the studio flow. We then want to Click and Drag from the REST API trigger to our new widget. Click on the “Send Message” widget to rename it and add the message body you would like sent. For example, you could use “Hello! Your order is being created and will be ready in one hour. Please reply with ‘I am here’ when you’re outside.”.
After you are done setting the body, click “Save” to save the widget.
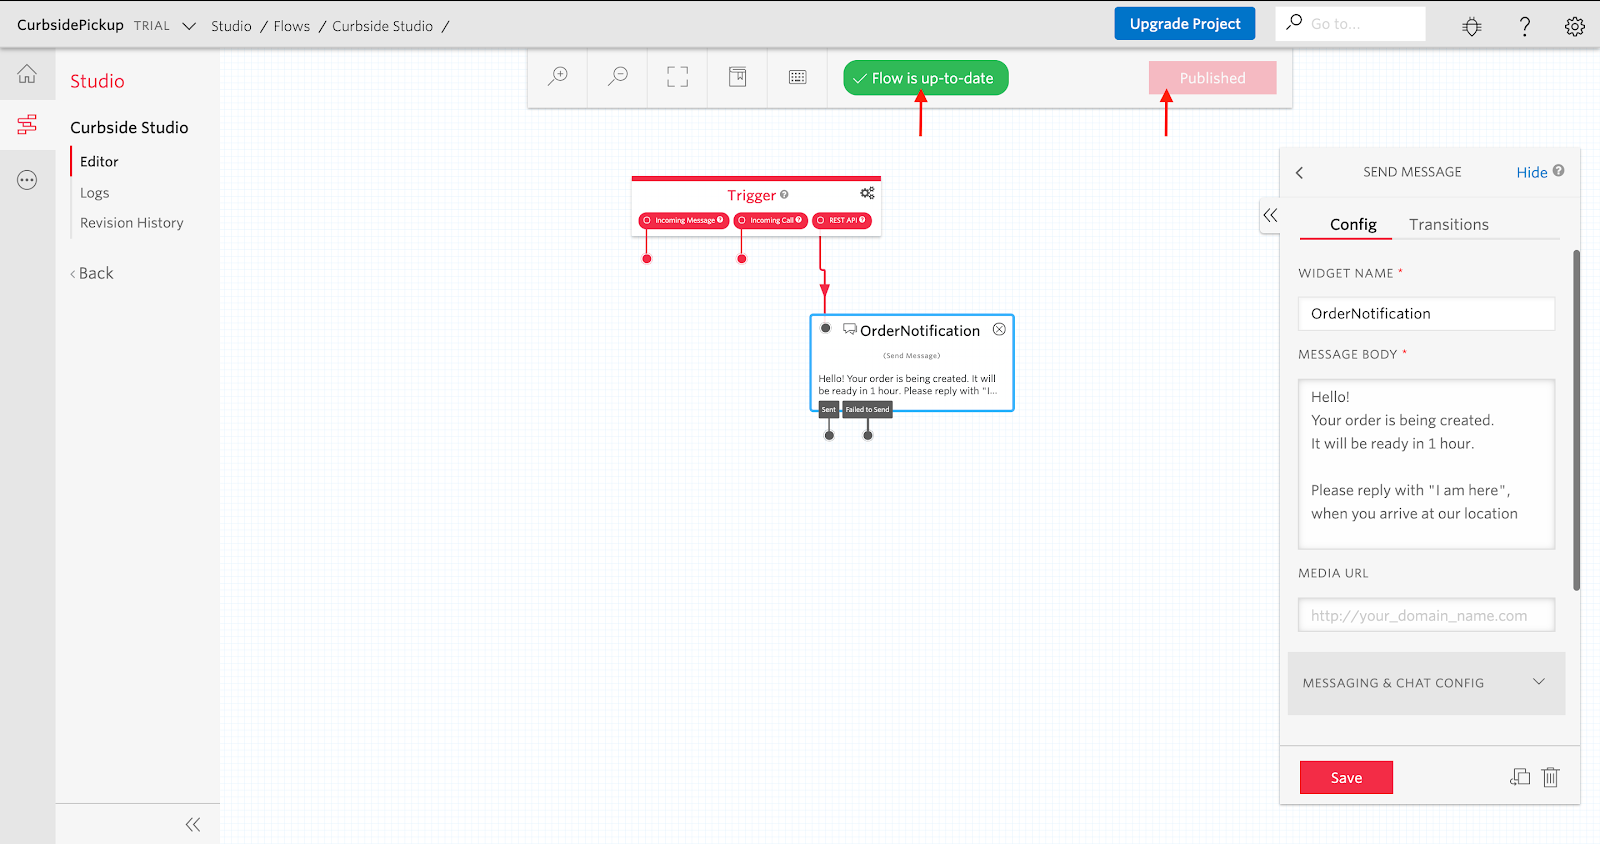
After you save the widget click “Publish” to publish the Studio flow. You will notice a green notification saying “Flow is up-to-date” after the flow has been published.
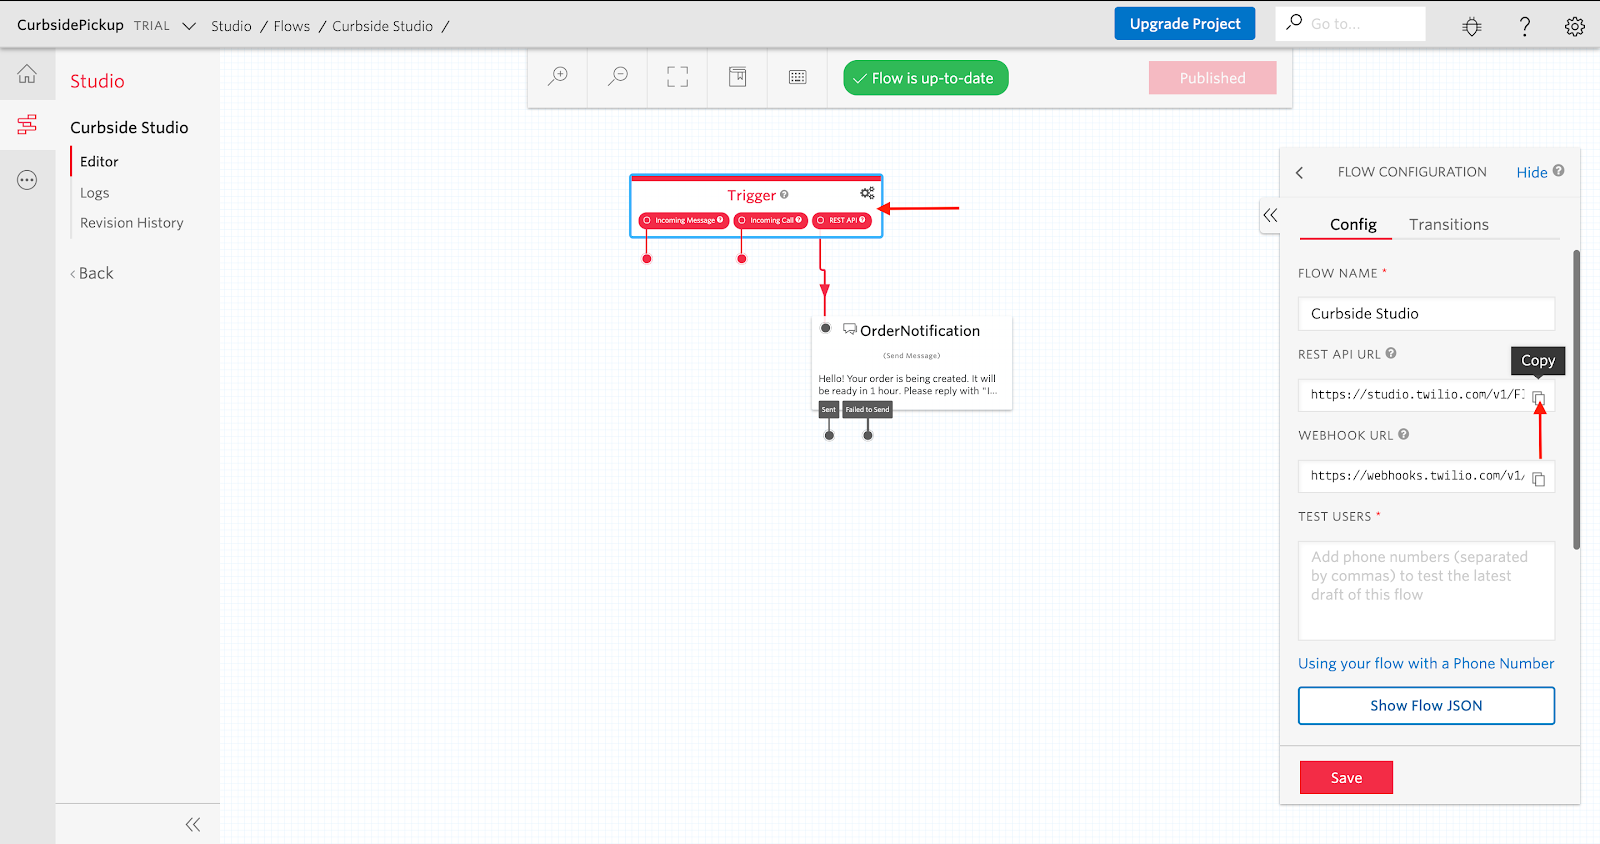
Once the studio flow is published click on the “Trigger” widget and on the right copy the string called “REST API URL”.
Test Twilio Studio with Postman
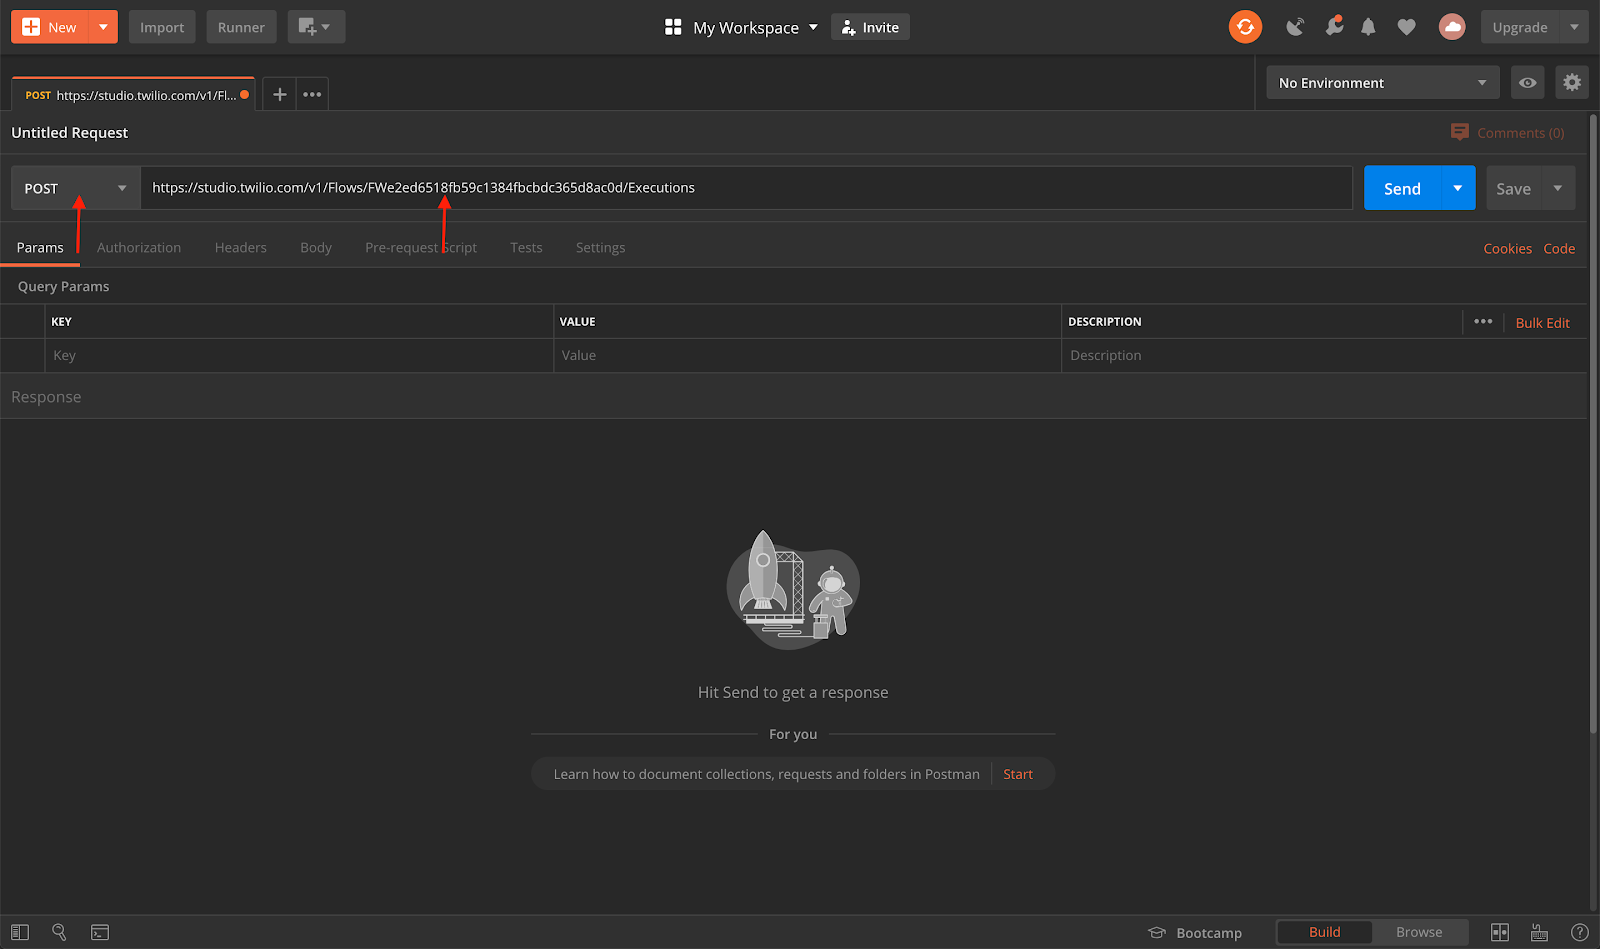
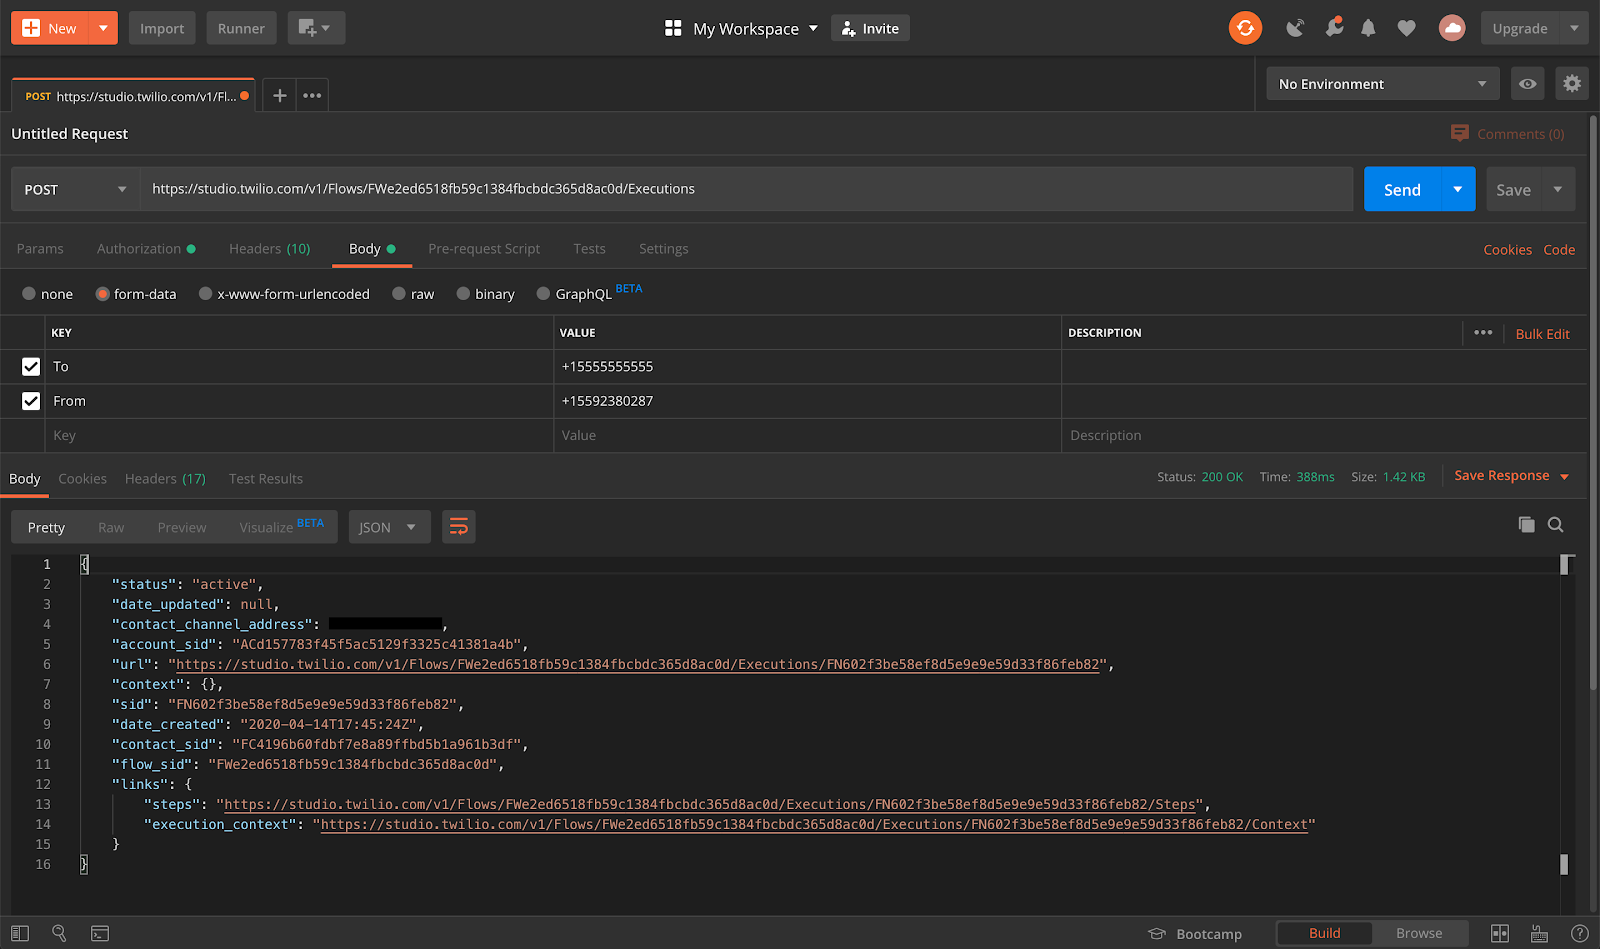
To test our current studio flow we need to trigger our flow via an API call. In order to simulate this call we will be using Postman.
To start we need to click the “+” tab on the top left of the Postman window

We then need to change our request type to POST and paste the REST API URL copied from our studio flow.
Then we need to click the “Authorization” tab and then choose the “Basic Auth” option
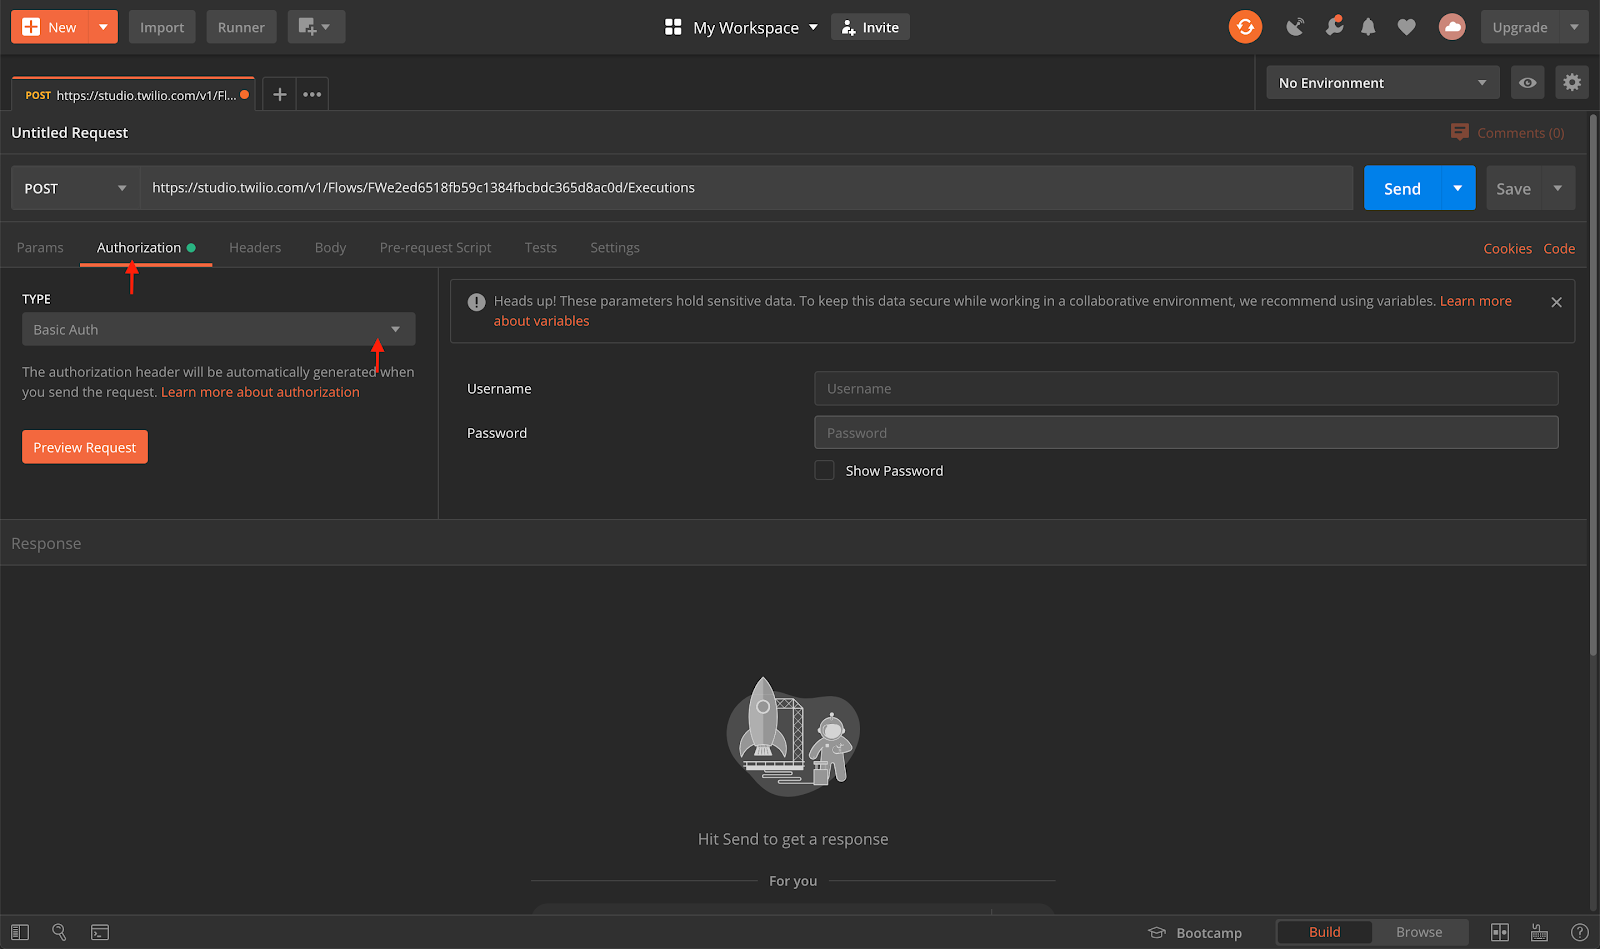
We then need to head back to the Twilio Console to grab our username and password, which map to our Account SID and Auth Token.
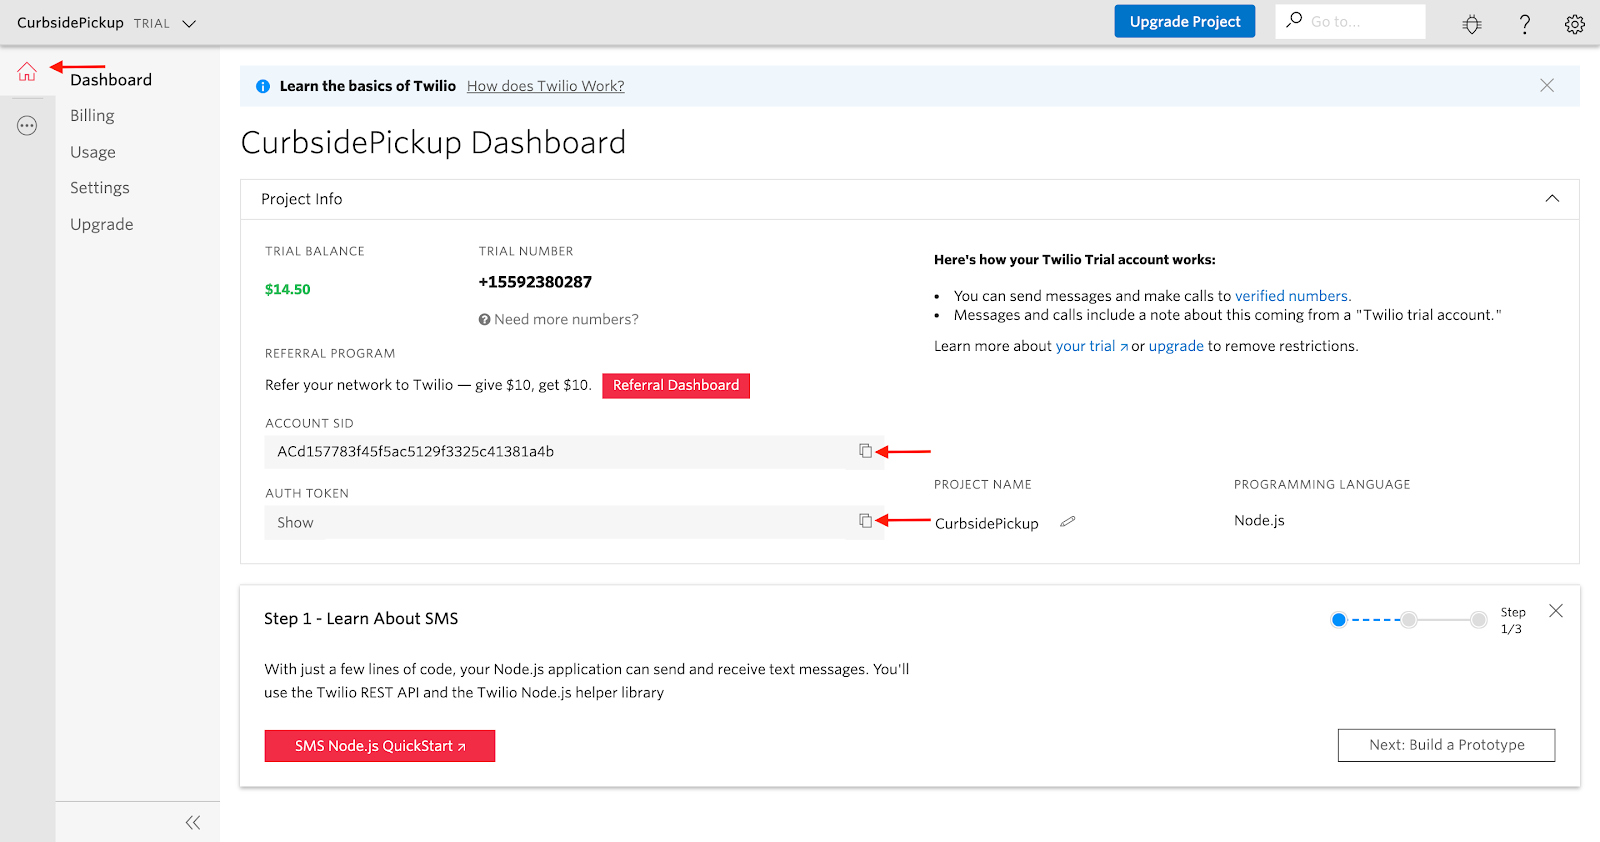
In the Twilio console window, click the home button on the left of the screen. Then copy Account SID, and paste it in the username input in Postman. Then, copy the Auth Token and paste it as our password in the Postman window.

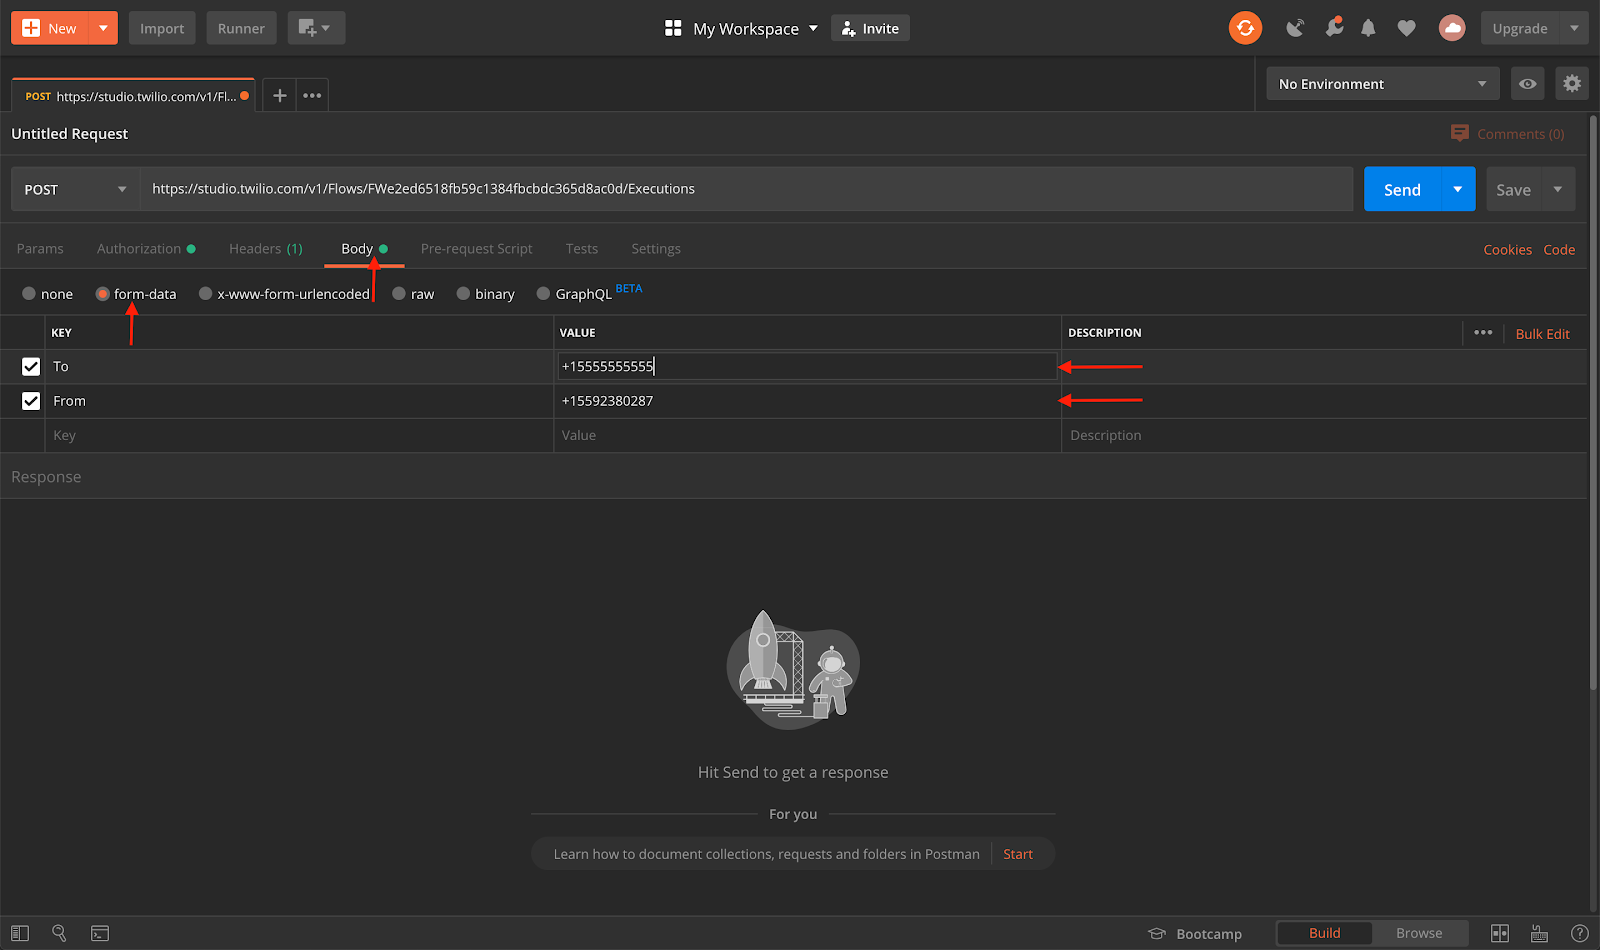
Our last Postman configuration step is to enter the correct phone numbers. We need one to send “To” and one to send “From”.
In your Postman window, click the “Body” tab. First, set the body to use the “form-data” format.
In the first line we will add “To” as our key and in value we will add a test number to send the text to, here we used a personal phone number. (Be sure to enter it in E.164 format). Next, add the “From” number – this is the Twilio phone number we purchased earlier in the tutorial.
Once all this is configured press “Send” to fire off the API request and see our “Send Message” widget deliver a message to the number we specified.

Now we have created the first leg of our Studio flow!
Create an incoming message Studio flow
Now we are able to send a notification using an API request. Next, we want the end user to be able to respond to that message and provide the business with some information.
Let’s move back into our Studio flow now.
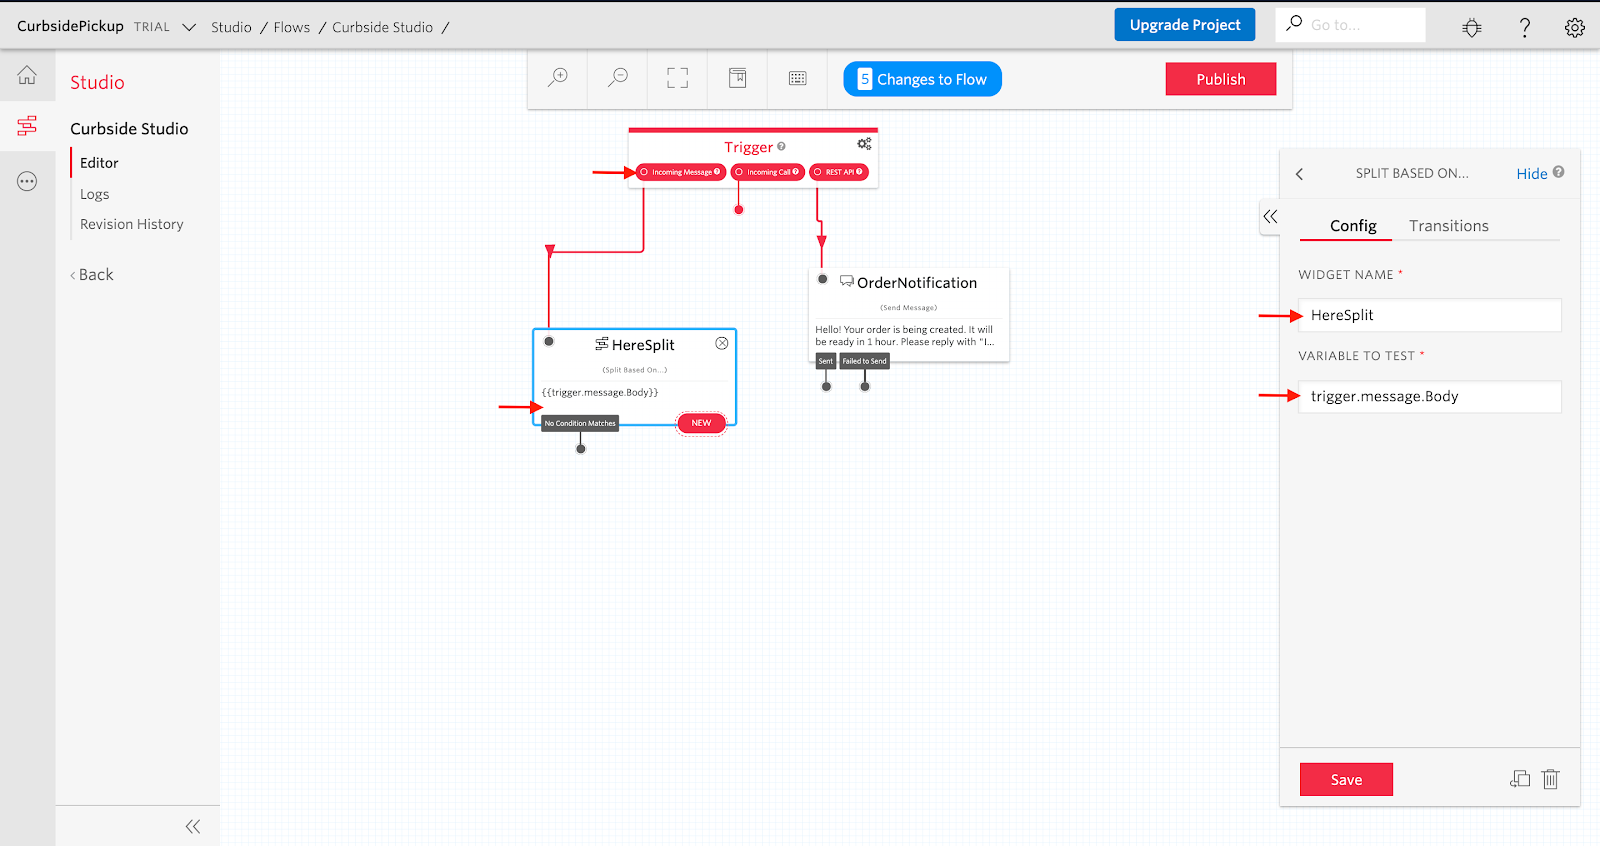
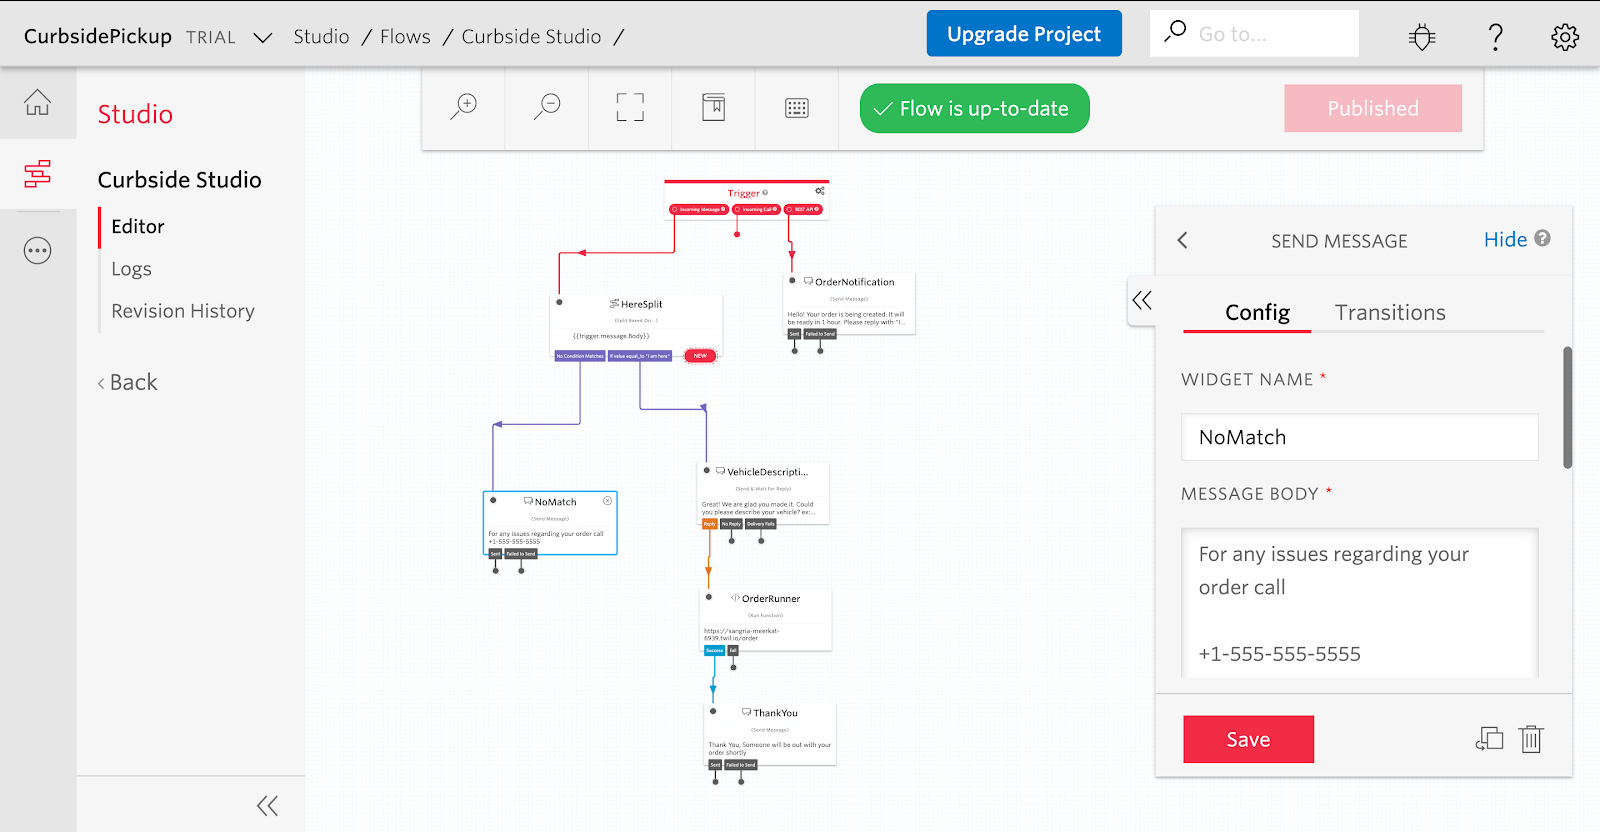
First, we will want to add the “Split Based On” widget by dragging it to the studio flow under the “Incoming Message” trigger of our studio flow. We will then connect the Incoming message trigger to the Split Based On widget by dragging and connecting. We will use this widget to control our SMS Studio Flow based on certain criteria – in this case to respond to a message that says “I am here”.
To set this up, next click on the new “Split Based On” widget. Then we can rename the widget (I called mine “HereSplit”) and specify the variable to use to split. In our case we want to read the variable corresponding to the Body of the incoming message trigger, trigger.message.Body.
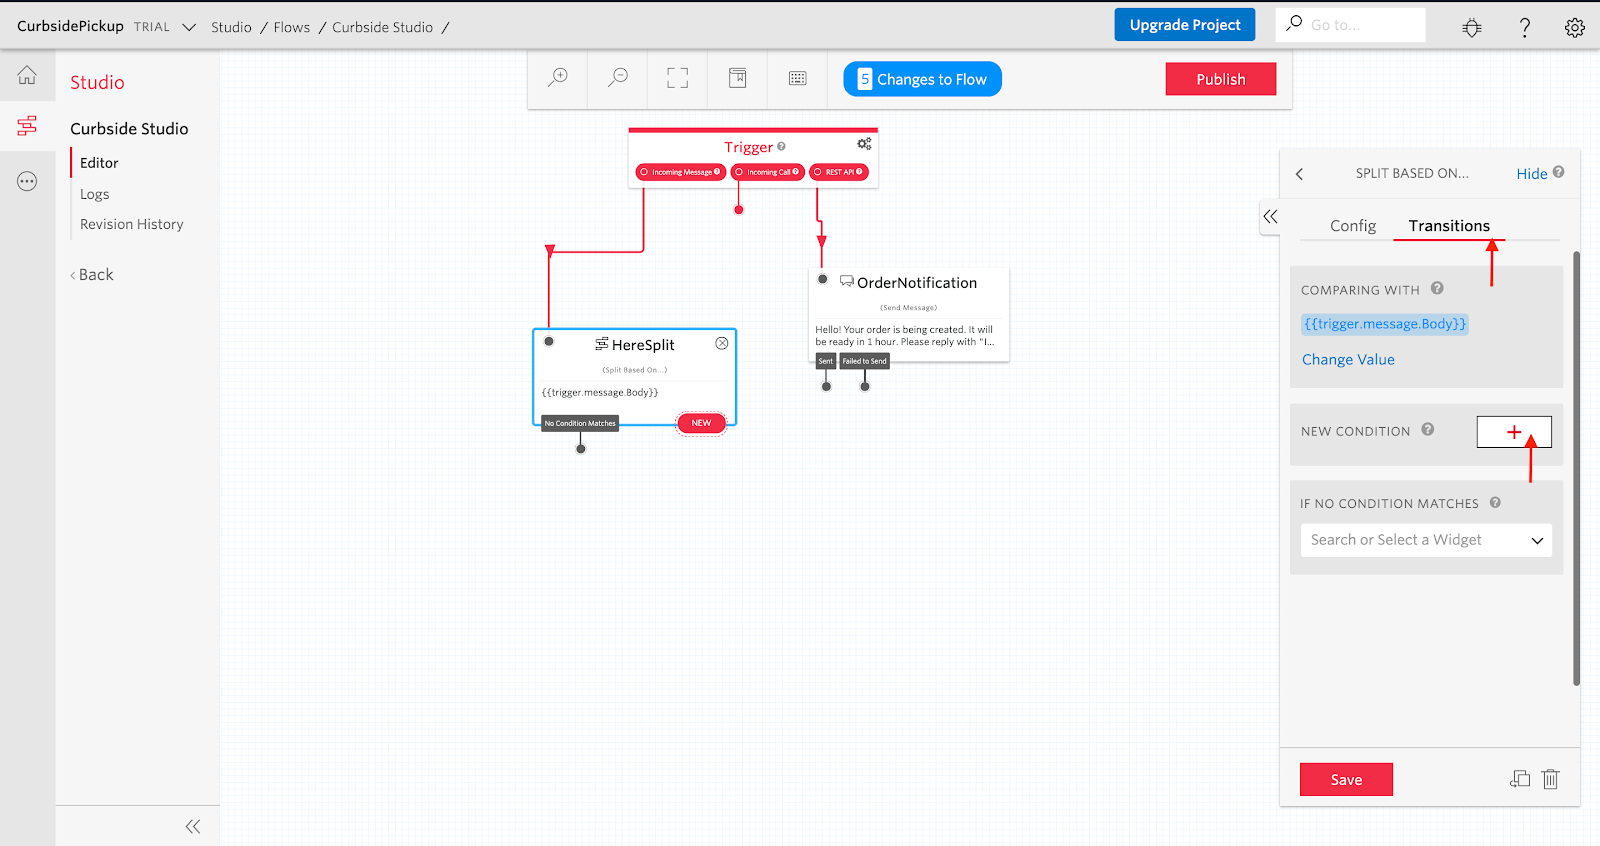
After this is set up, we want to specify the transition to split our studio flow. On the top right of the “Split Based On” widget, click “Transitions”.
On the “Transitions” tab we need to add a new condition to split on, click the red “+” sign. For our simple example, we want to read when someone messages back “I am here”. So we will select the “Contains” operator and type our string of “am here”.
If we do see that message, we will then want to select the next widget in our Studio flow.
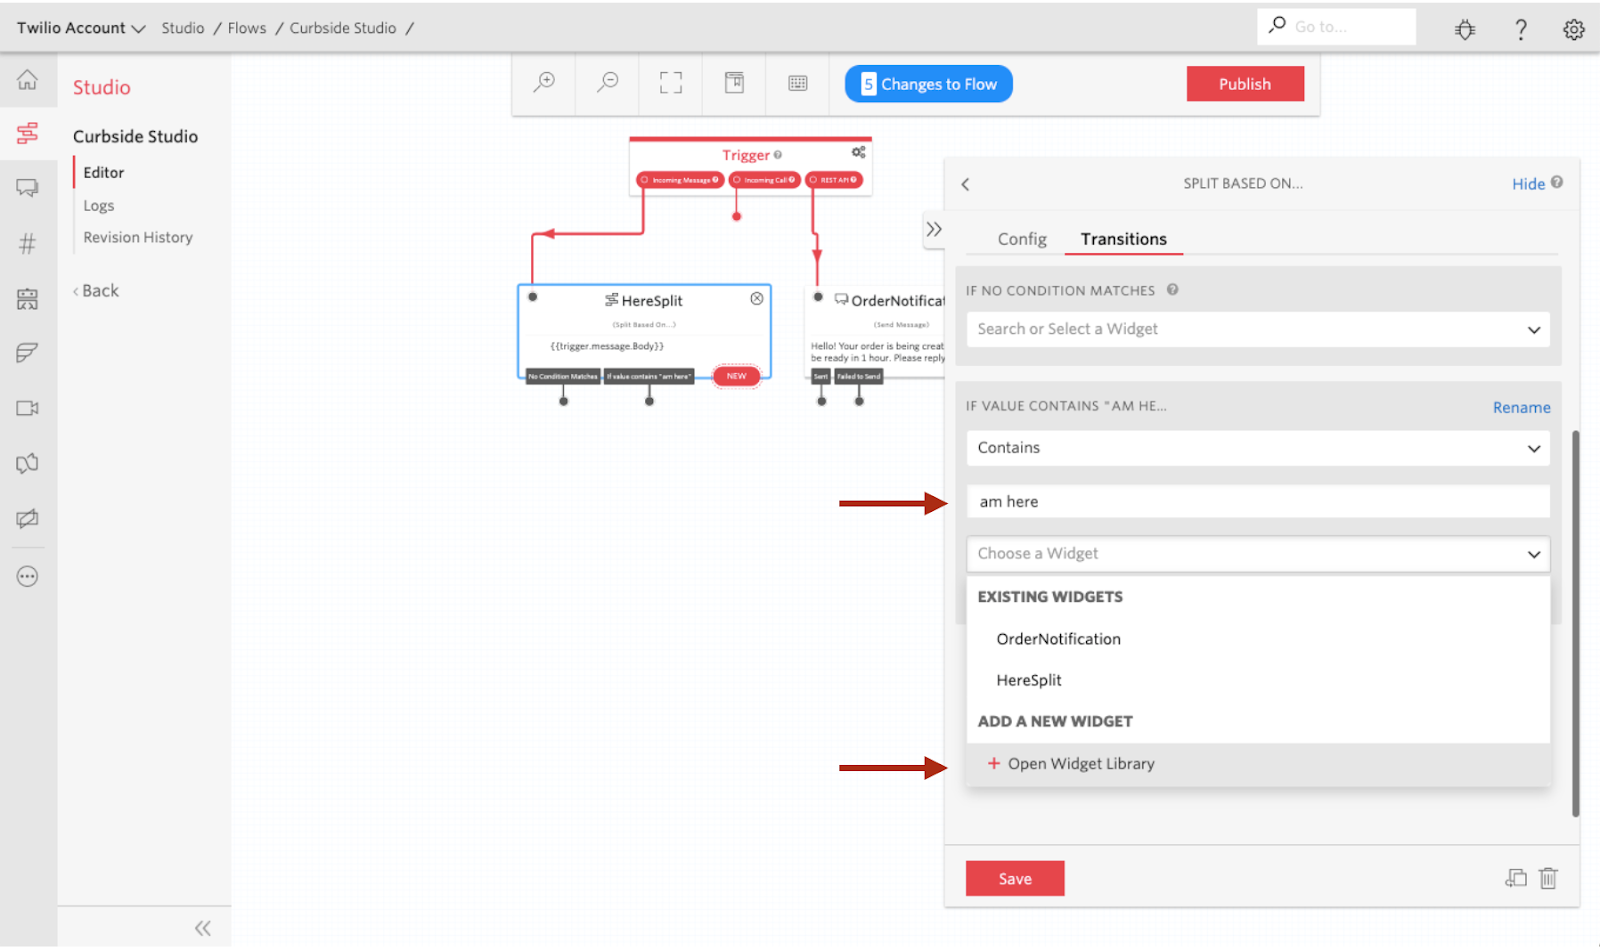
For our example, we want to acknowledge that the customer is on location and ask about their vehicle so our order runner can look out for it (another alternative method is to have parking lot markings with numbers and ask the customer to just text that number). To do this we will use the “Send & Wait for Reply” widget to send our acknowledgement SMS and wait for our customer to reply with their vehicle description.
Drag a “Send and Reply” widget to the canvas, and hook up a transition from the “Split Based On” widget. I named mine “VehicleDescription”. Add a suitable message too, such as “Great! We'll run your order out. What does your vehicle look like?”.
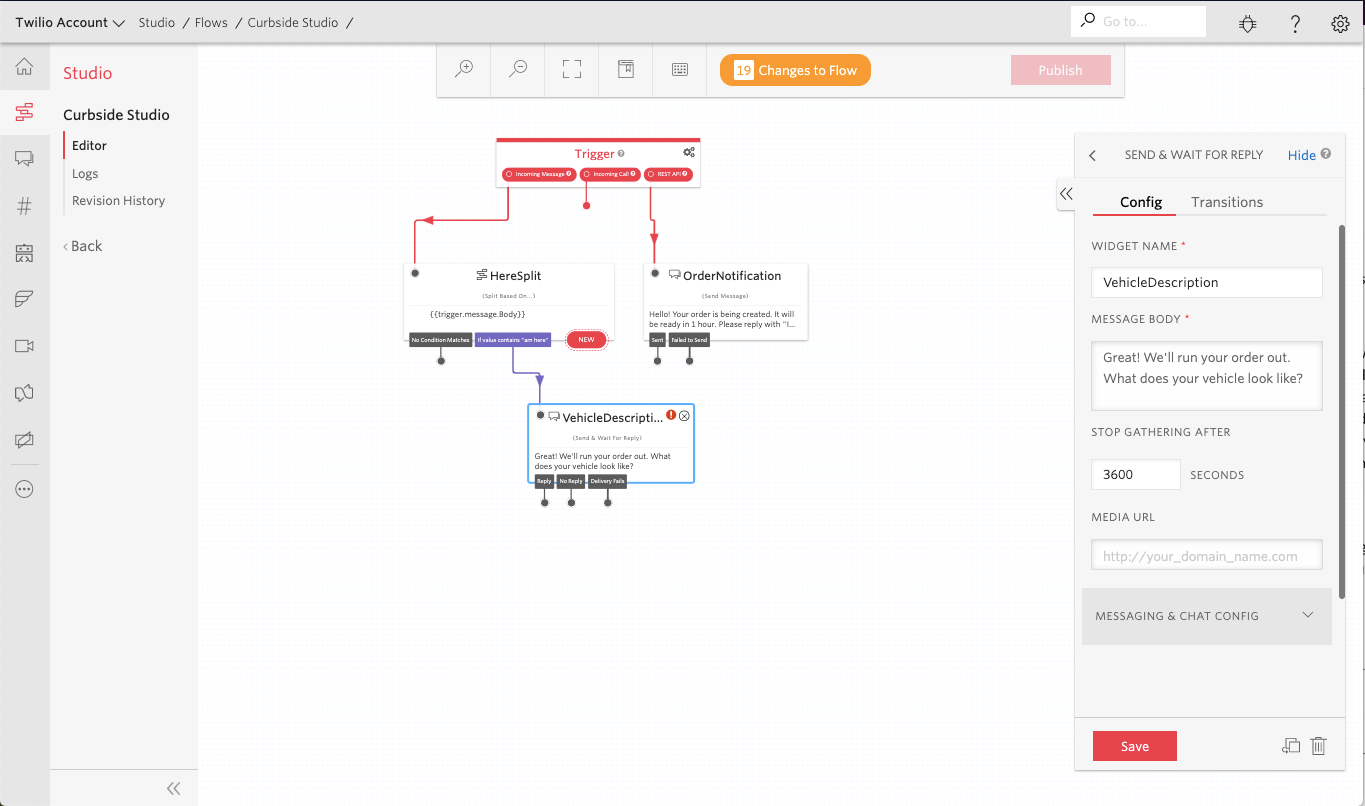
After we set up our “Send & Wait for Reply” widget, we will use a Function to inform the Store and then send one last SMS to let our customer know that someone will be out with their order shortly.
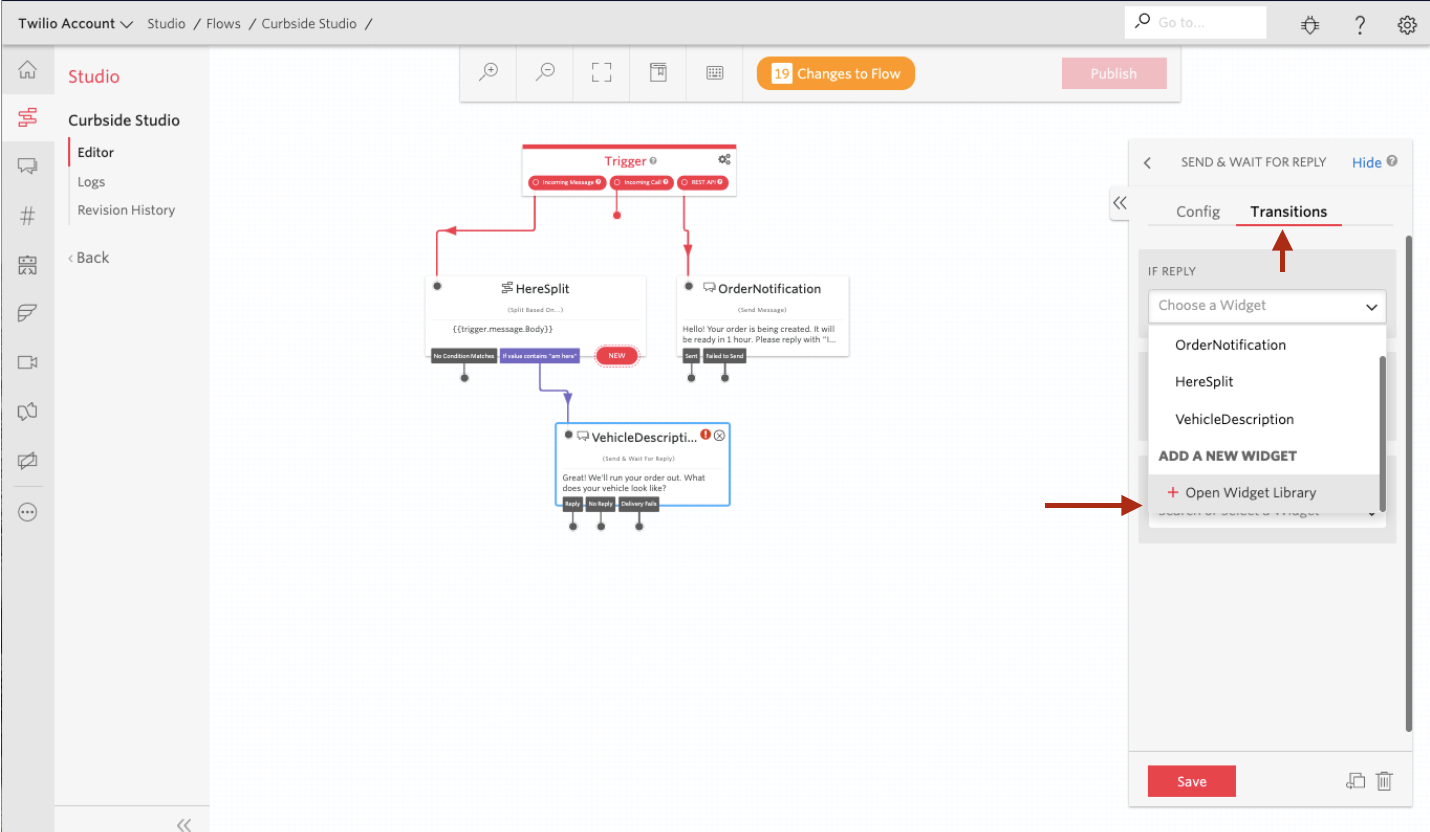
Click the Transitions tab, under “IF REPLY”, select “Open Widget Library” and drag a new “Run Function” widget
Send data from Twilio Studio to Functions
Based on our example, we have collected a vehicle description from our customer, but we have not yet sent a message to someone in the store letting them know our customer is here and what vehicle they are driving.
In order to send the message to the store, we are going to use the “Run Function” widget to run our Twilio Function. Using a function also allows us a certain level of freedom outside of our Studio flow for any future development.
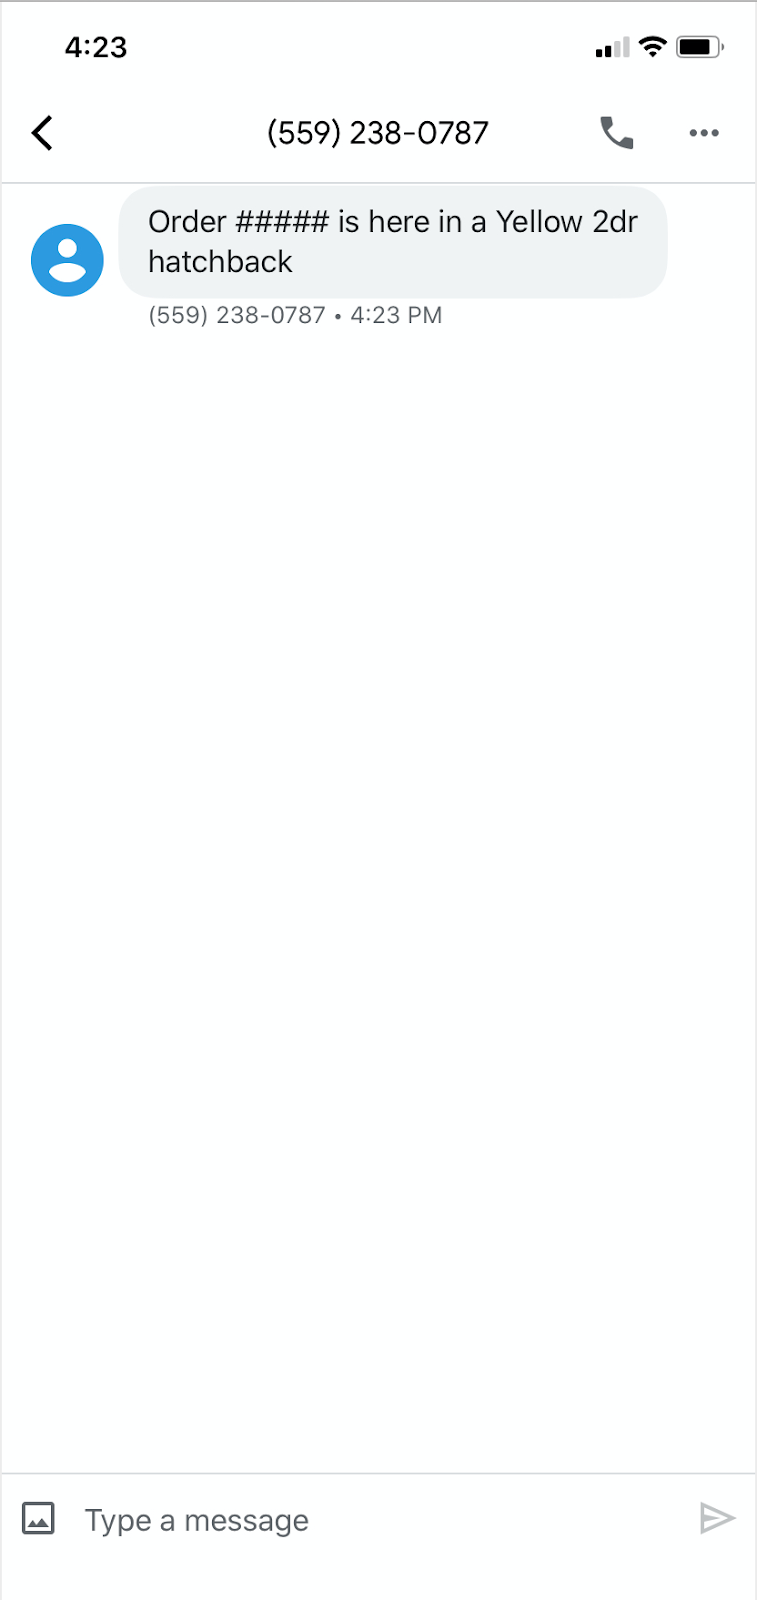
For now, our Function will grab the customer’s phone number and their vehicle description and we will send that information to our order runner’s phone.
Continuing our work, connect the “Run Function” widget to the “Reply” from the “Vehicle Description” widget.
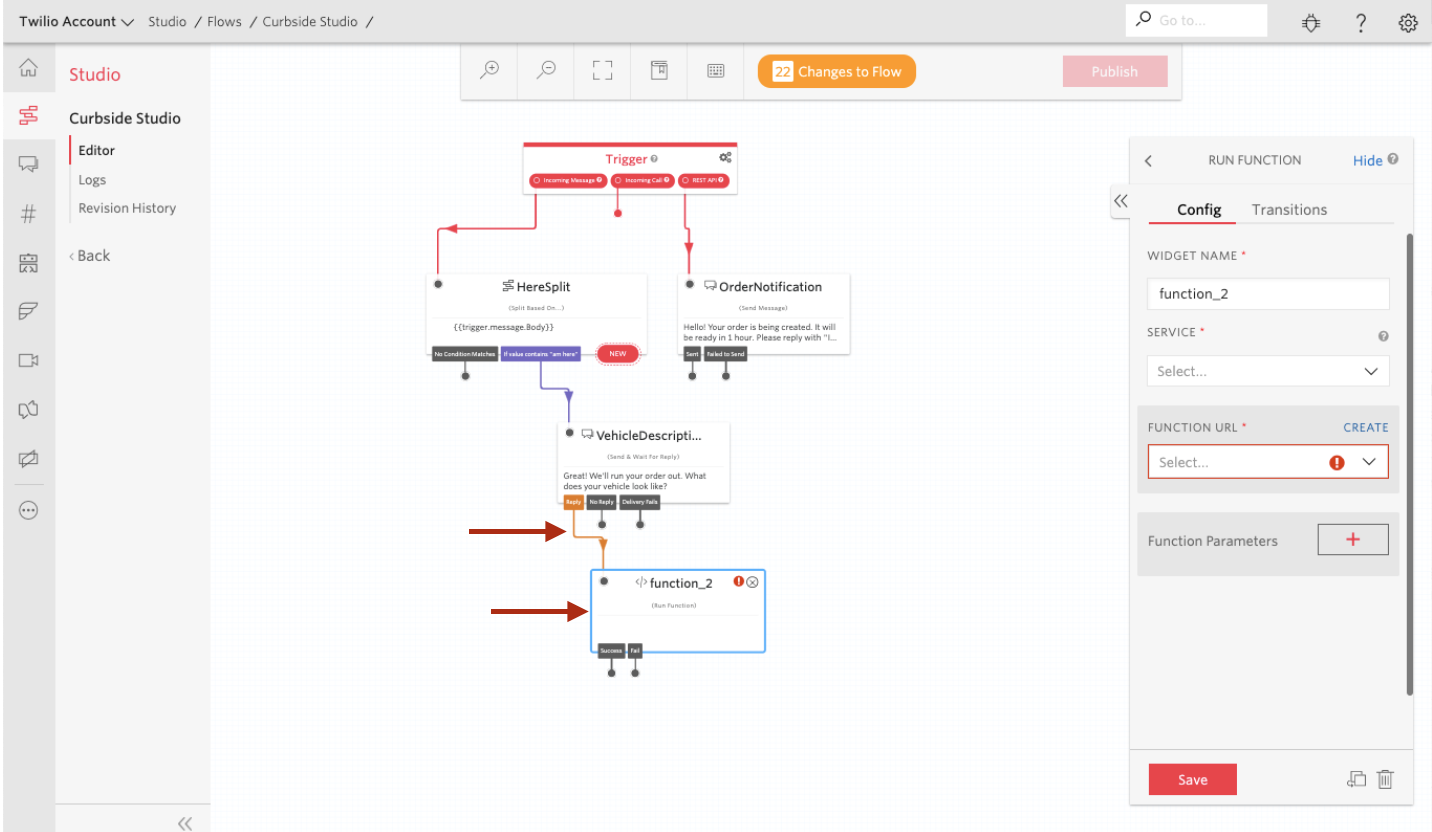
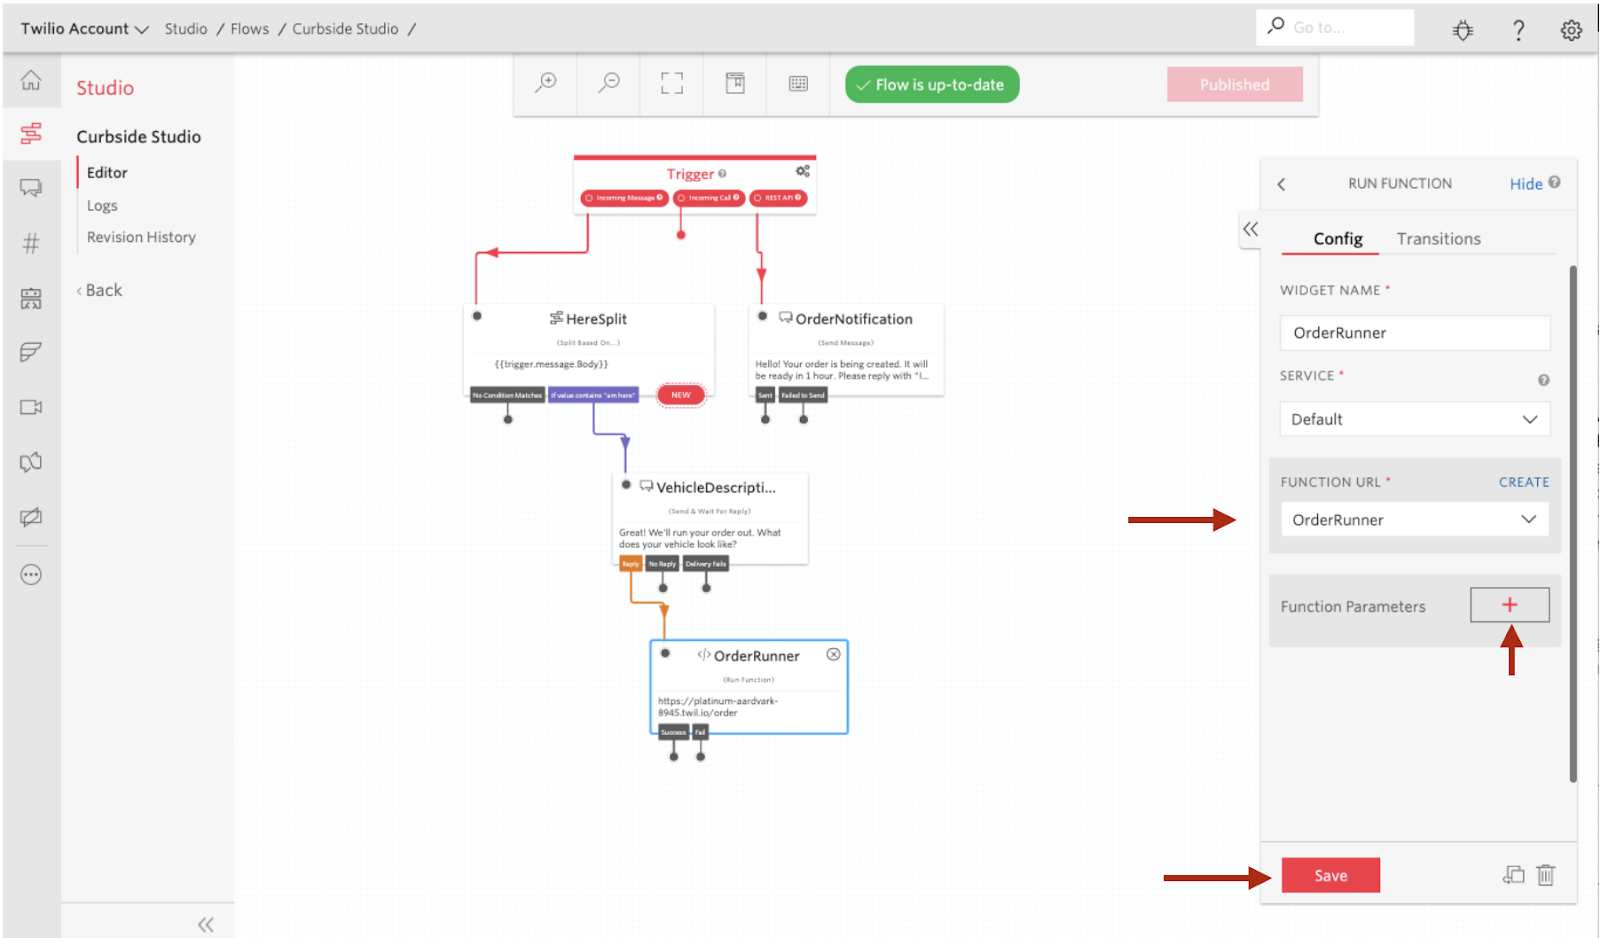
Rename your “Run Function” widget tp “OrderRunner”, and press “Save”. Then click “Create” in the FUNCTION URL box.
This will open another tab to the Twilio Functions dashboard.
When you get to the Twilio Functions Dashboard, click the “Create a Function” button. If instead you already have other Functions, click the red plus (“+”) button.
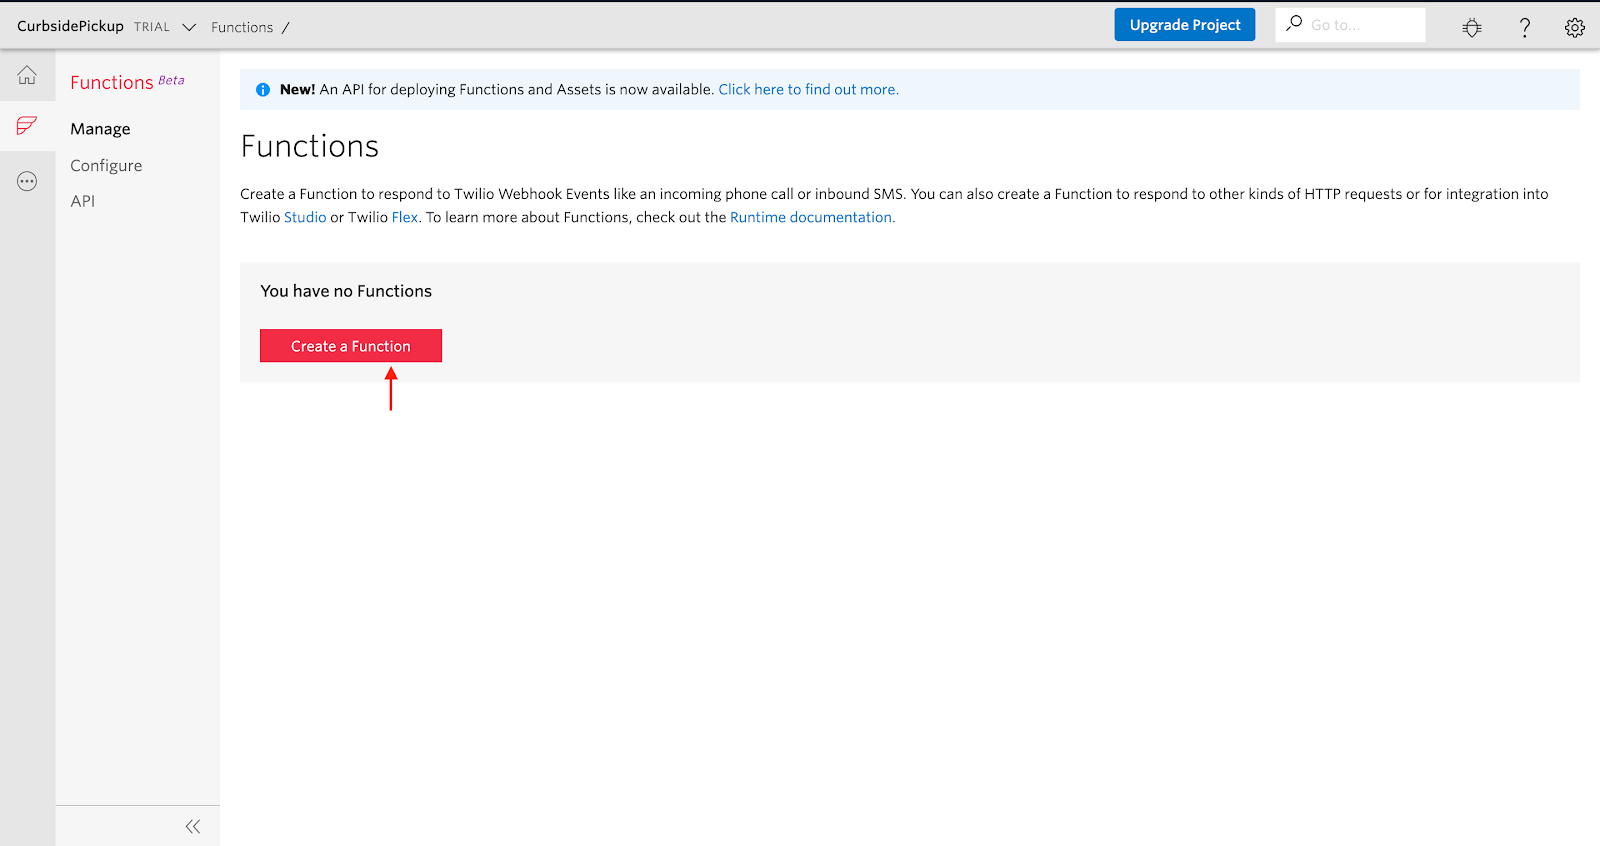
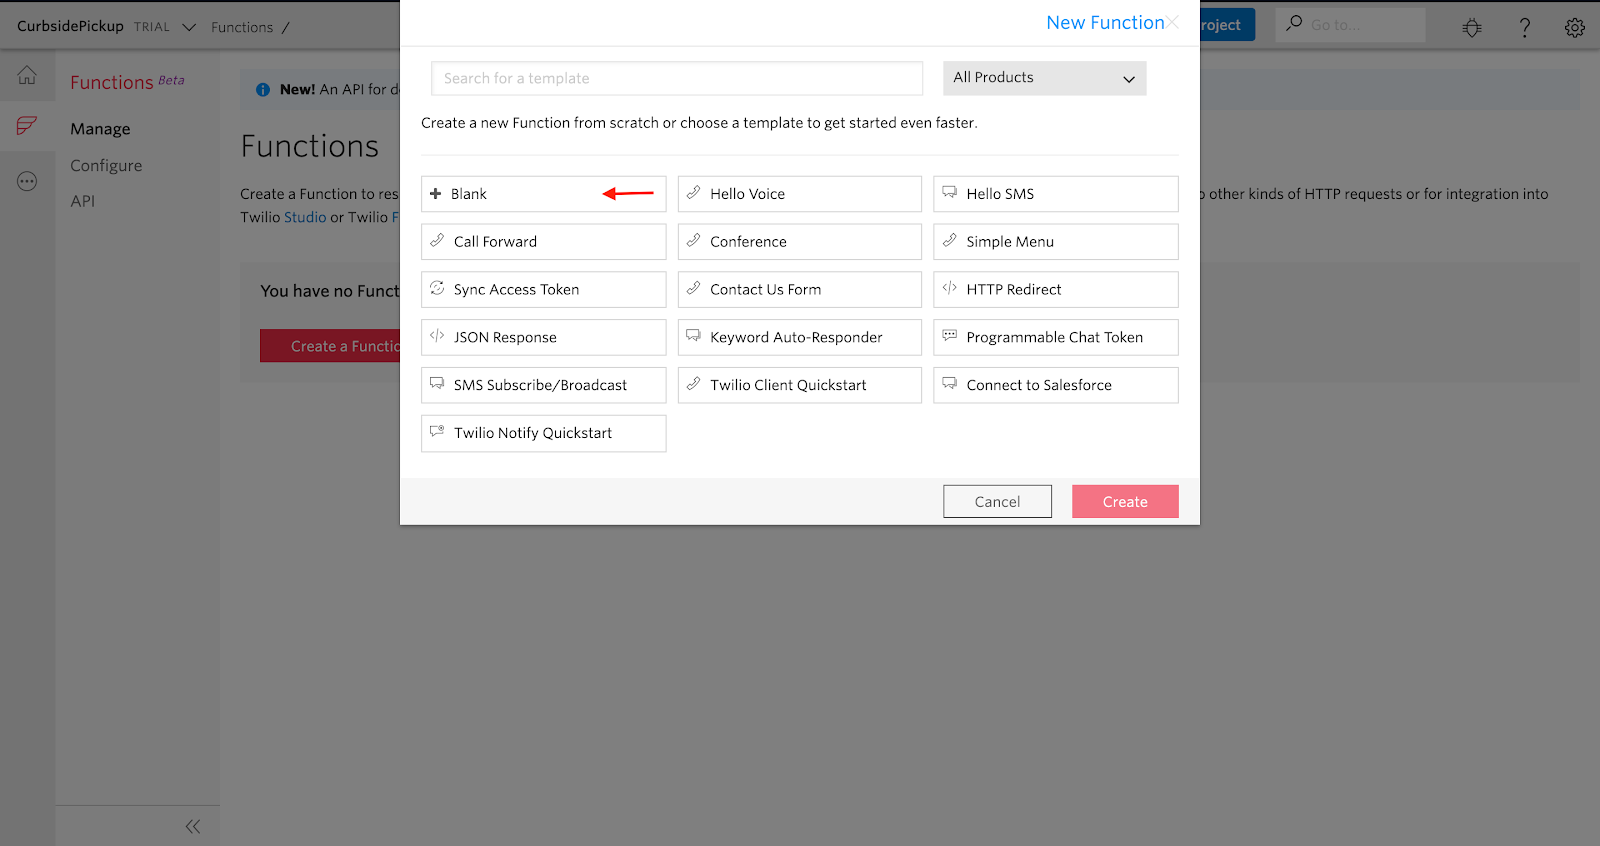
This will open up a window with many quickstart template functions. For this tutorial we will be using the “Blank” template. Select “Blank” and then click “Create”.
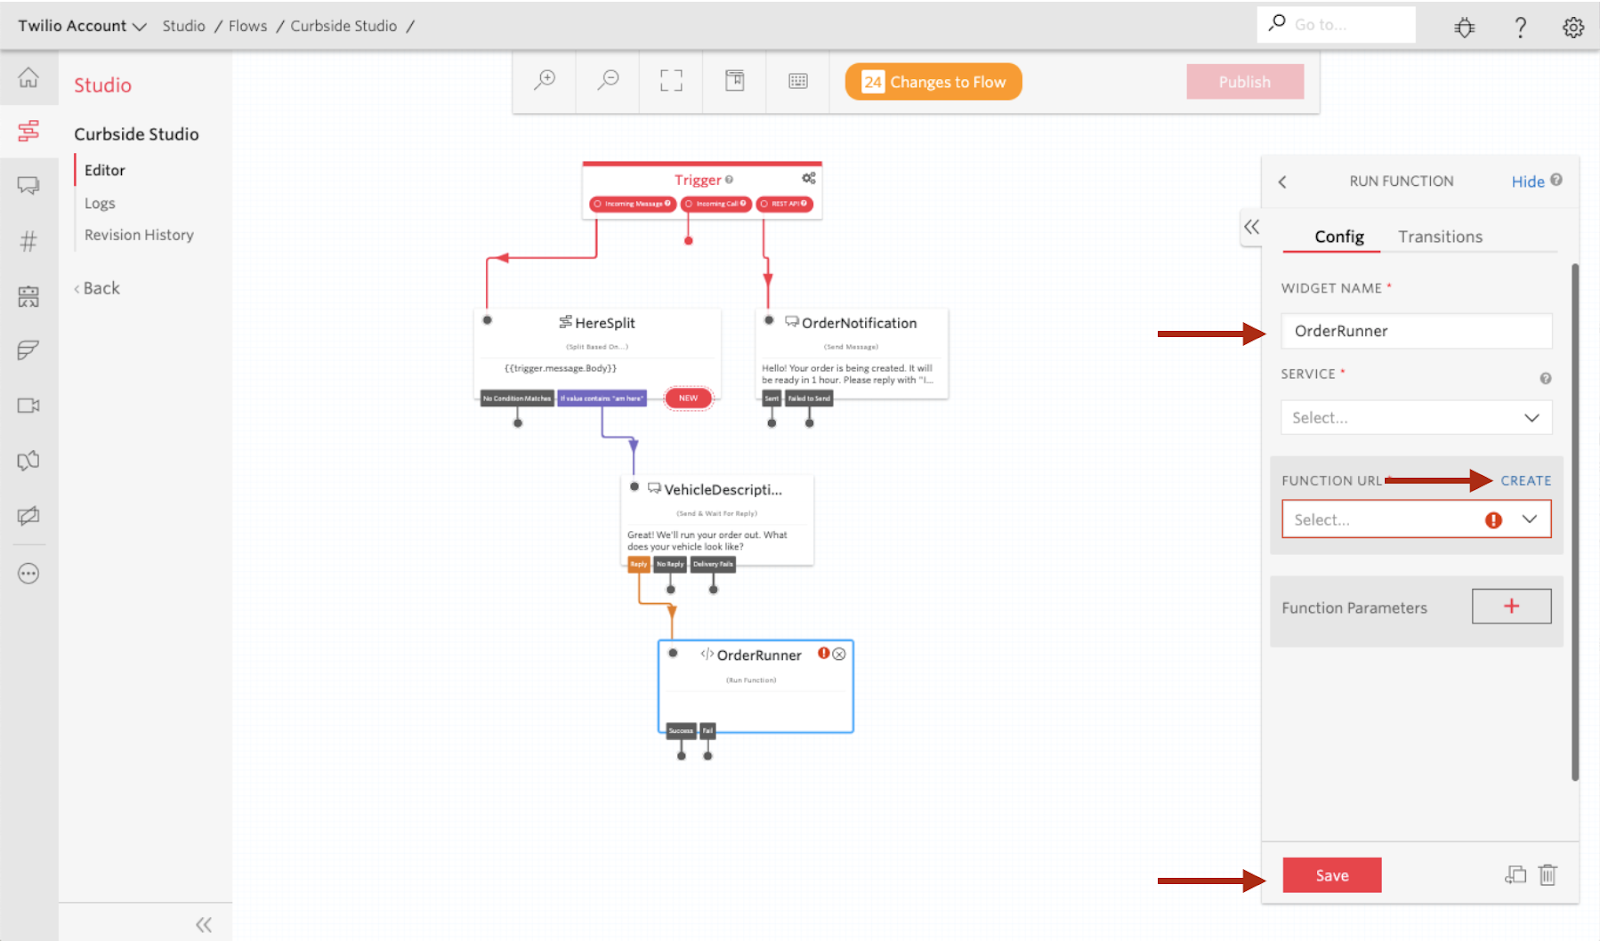
Once you click create you’ll be taken to the function page where we can name our function as well as name the path for calling the function. I used “OrderRunner” as the function name, with a path of /order.
After this is done click “Save” and return to the Studio flow page.

On the Studio flow page, click the function widget. Here we can select the function we just saved under “Function URL” (
OrderRunner if you followed my lead). After that, we will create the parameters from our Studio flow that we would like to pass on to the function. Three key pieces of information we will need to pass are:
- the Vehicle Description that was gathered in the previous widget
- the Customer’s Phone Number which messaged in
- the Twilio Number that we are sending messages from
To create our first parameter we will need to click the “+” sign next to Function Parameters.
Then we can name this parameter “vehicleDescription” and set it to the value we grab from the “VehicleDescription” widget. We set it to {{widgets.VehicleDescription.inbound.Body}} and then press “Save”. Note we want the “inbound.Body” not “outbound.Body”. This will also be different based on what you named your widget.
To add the second parameter, click “Save”, then click Function Parameters “Add”
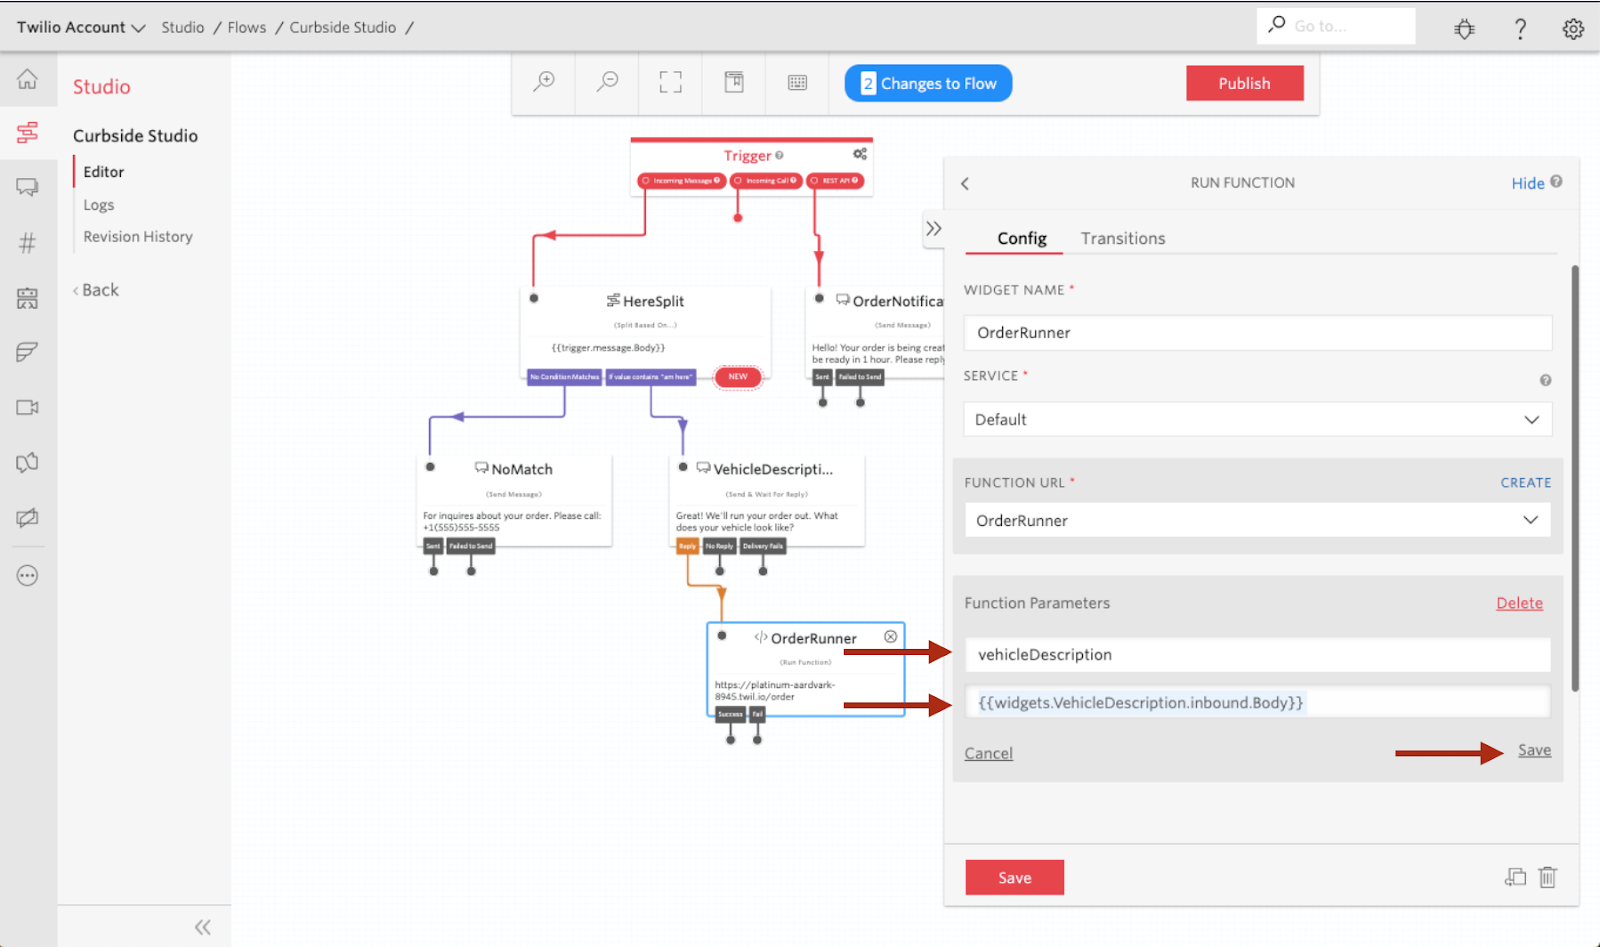
We next need to grab the customer’s number. We can get this value from the trigger widget by setting the key to customerNumber and the parameter to {{trigger.message.From}}.
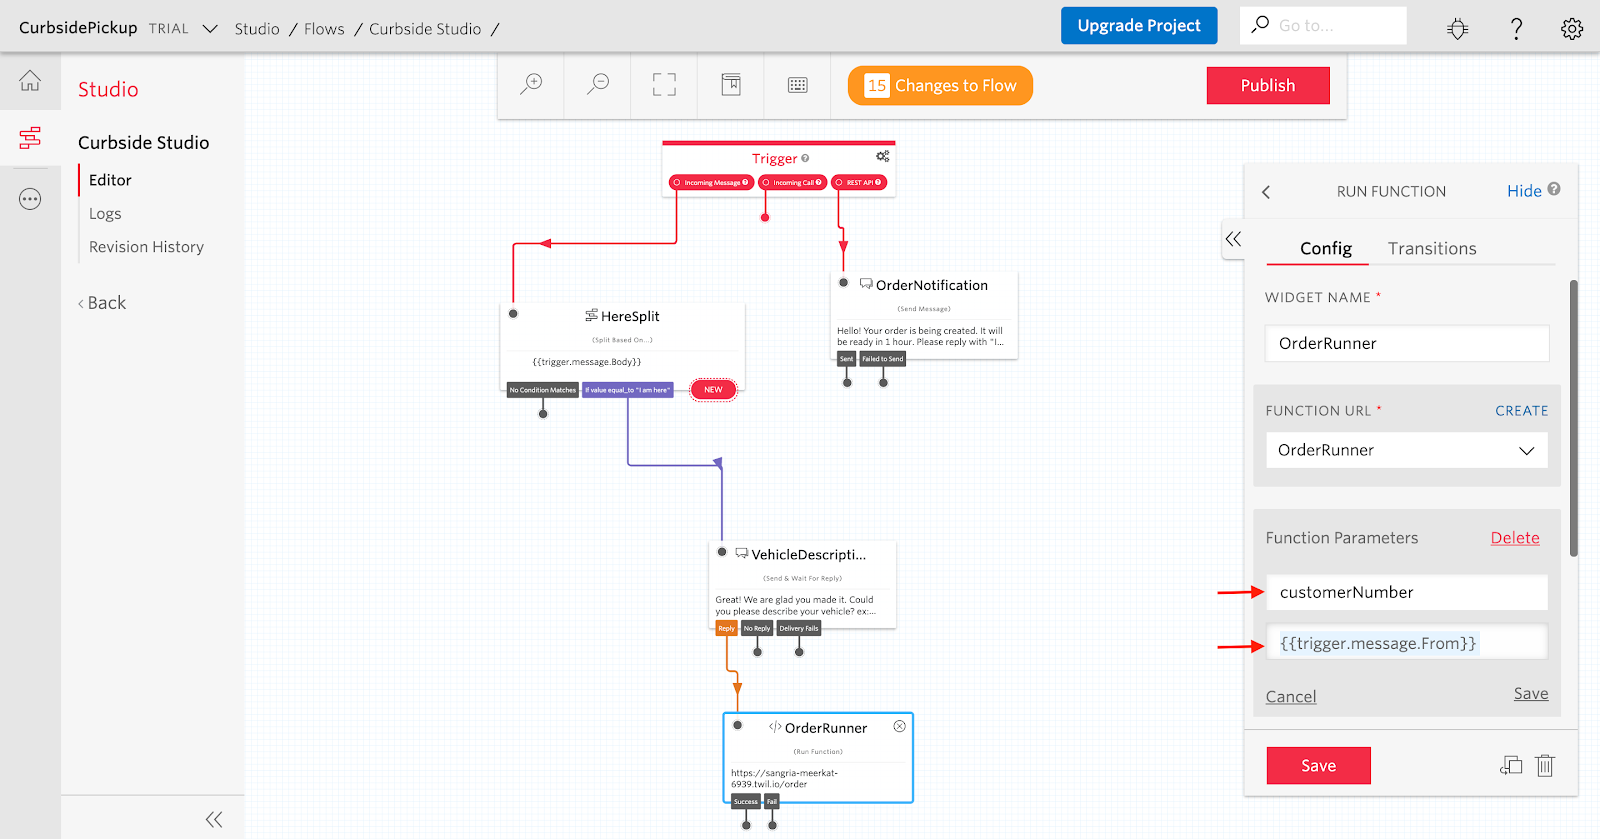
Very similar to the customer number, we need to grab the Twilio number which receives the message. Set the key to twilioNumber and the parameter to {{trigger.message.To}}.

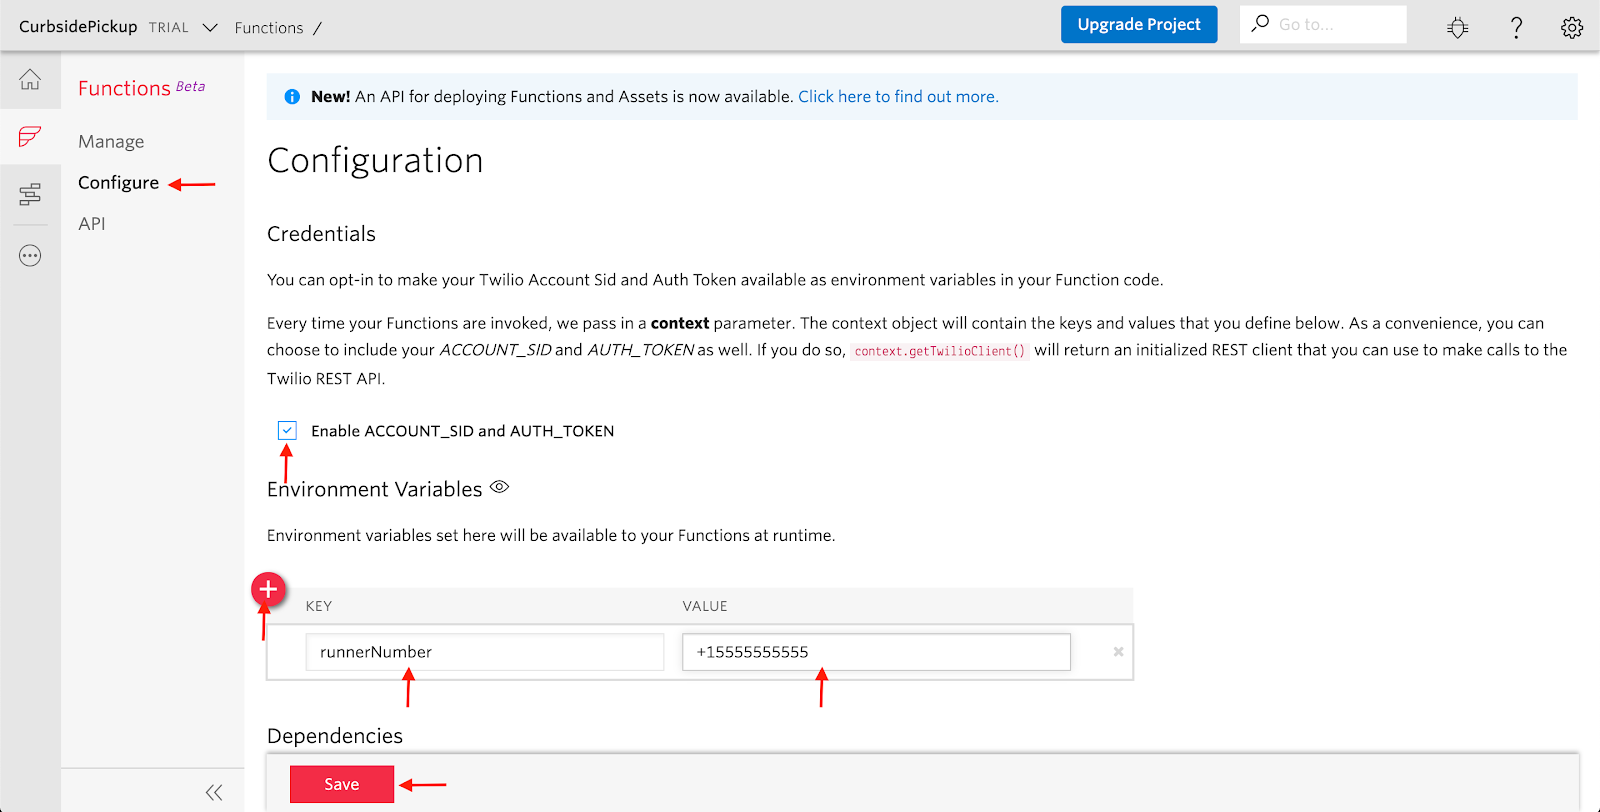
After this is saved, we will have the three key pieces we need to pass to our function. We can now head back to the Functions tab and on the left click “Configure”.
On the “Configure” page we want to click the checkbox
“Enable ACCOUNT_SID and AUTH_TOKEN” so that our account information is usable for the Twilio Function.
Next, we want to set an environmental variable that will always be accessible to our function. Based on our order example, this will be the number of the person who will run the order out to our customer. Click the “+” sign under “Environment Variables” to add a new variable runnerNumber with the value of the personal number we used earlier to test in Postman.
Once this is done, click “Save” on the bottom of the page.
Now back on our functions page, we will use the following code to grab the variables from our Studio flow and message our runner.
Once this code is in we can click save and head back to the studio flow.
Add the curbside pickup notification
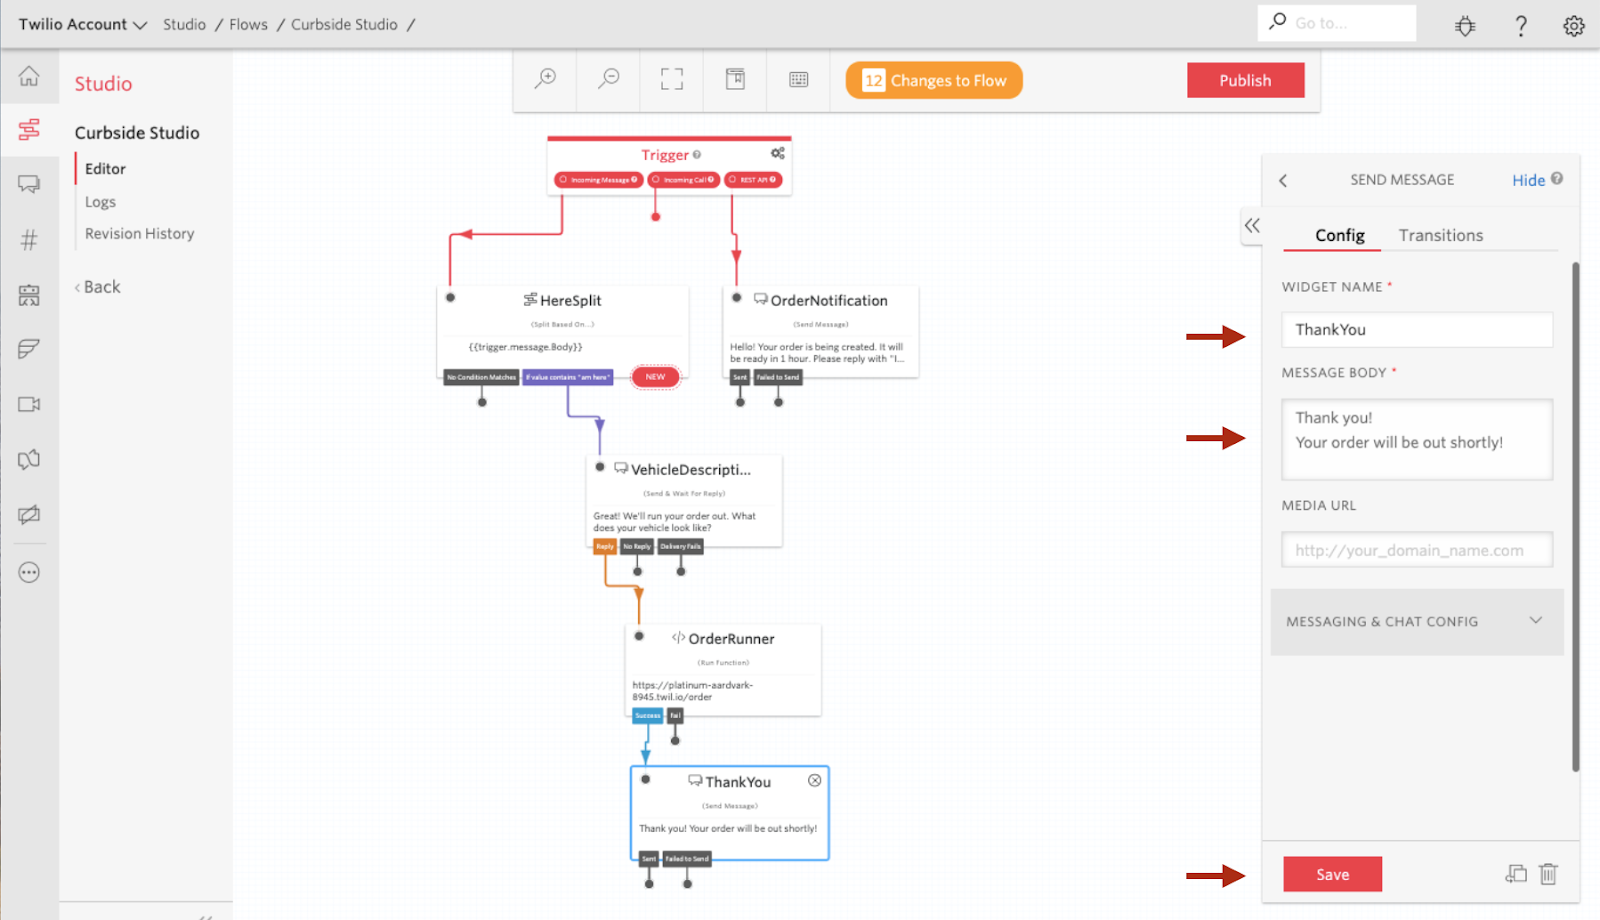
If our function sends a message to the order runner successfully, we want to send a message to the customer stating that someone will be out shortly.
To do this we need to add a “Send Message” widget under our function widget and connect it to the “Success” transition. We can add a Widget Name and Message body then click “Save”.
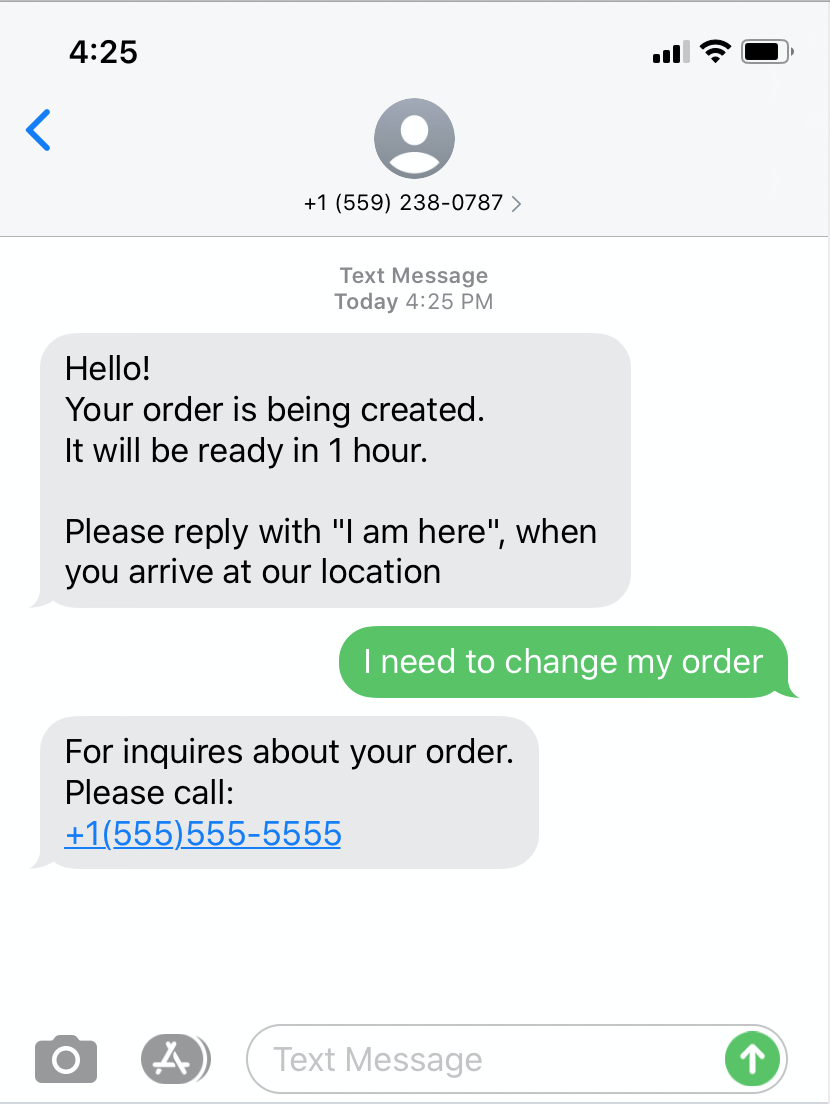
There is one last widget we should add – a catch-all message if we don’t understand a response. To do this, we can add a “Send Message” widget under our Split Widget and connect it to the “No Condition” transition. We can then name the widget and add a message body. I called mine “NoMatch” and provided a number to call. You could also say you “don’t understand” and provide valid responses.
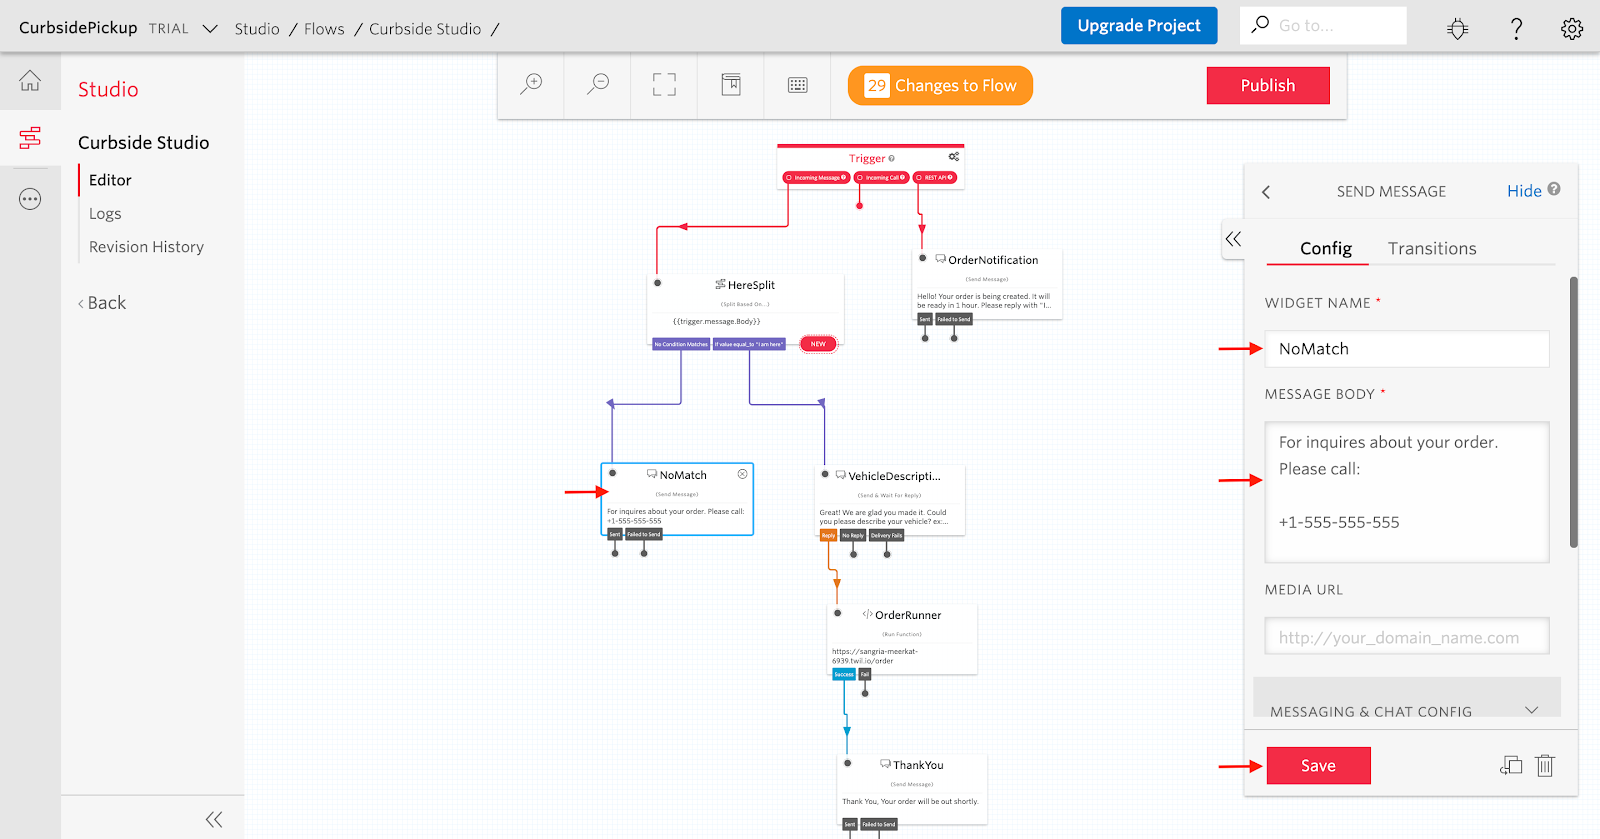
After we add the last widget we can click “Publish” to publish the studio flow.
Once we publish the Studio flow, we need to trigger the flow upon messages our Twilio phone number.
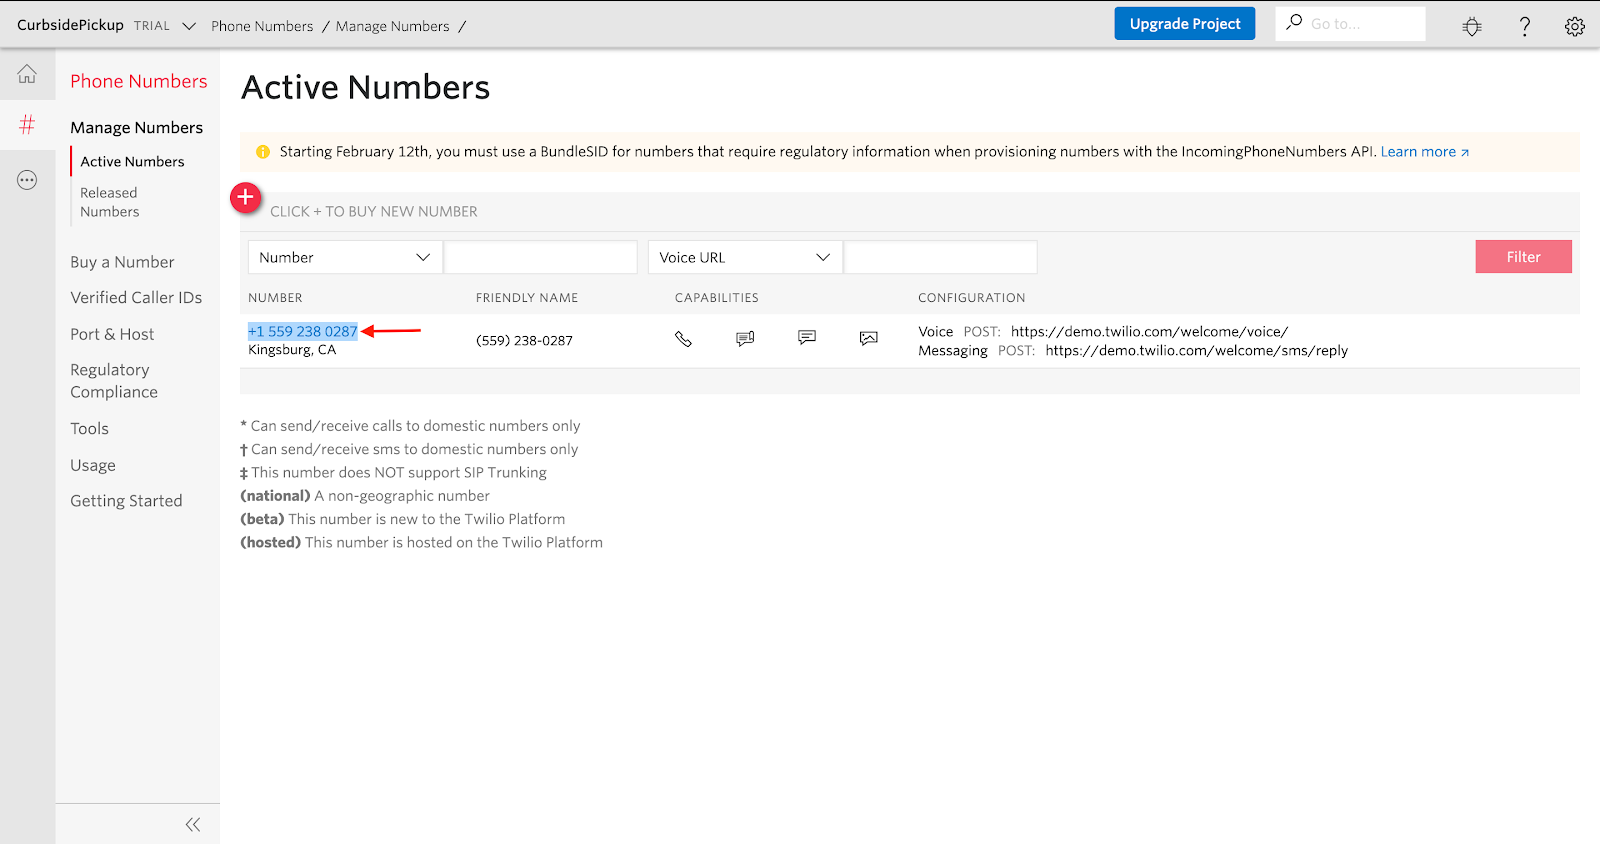
To do this navigate back to the numbers page. Then, click the number you purchased for this studio flow.
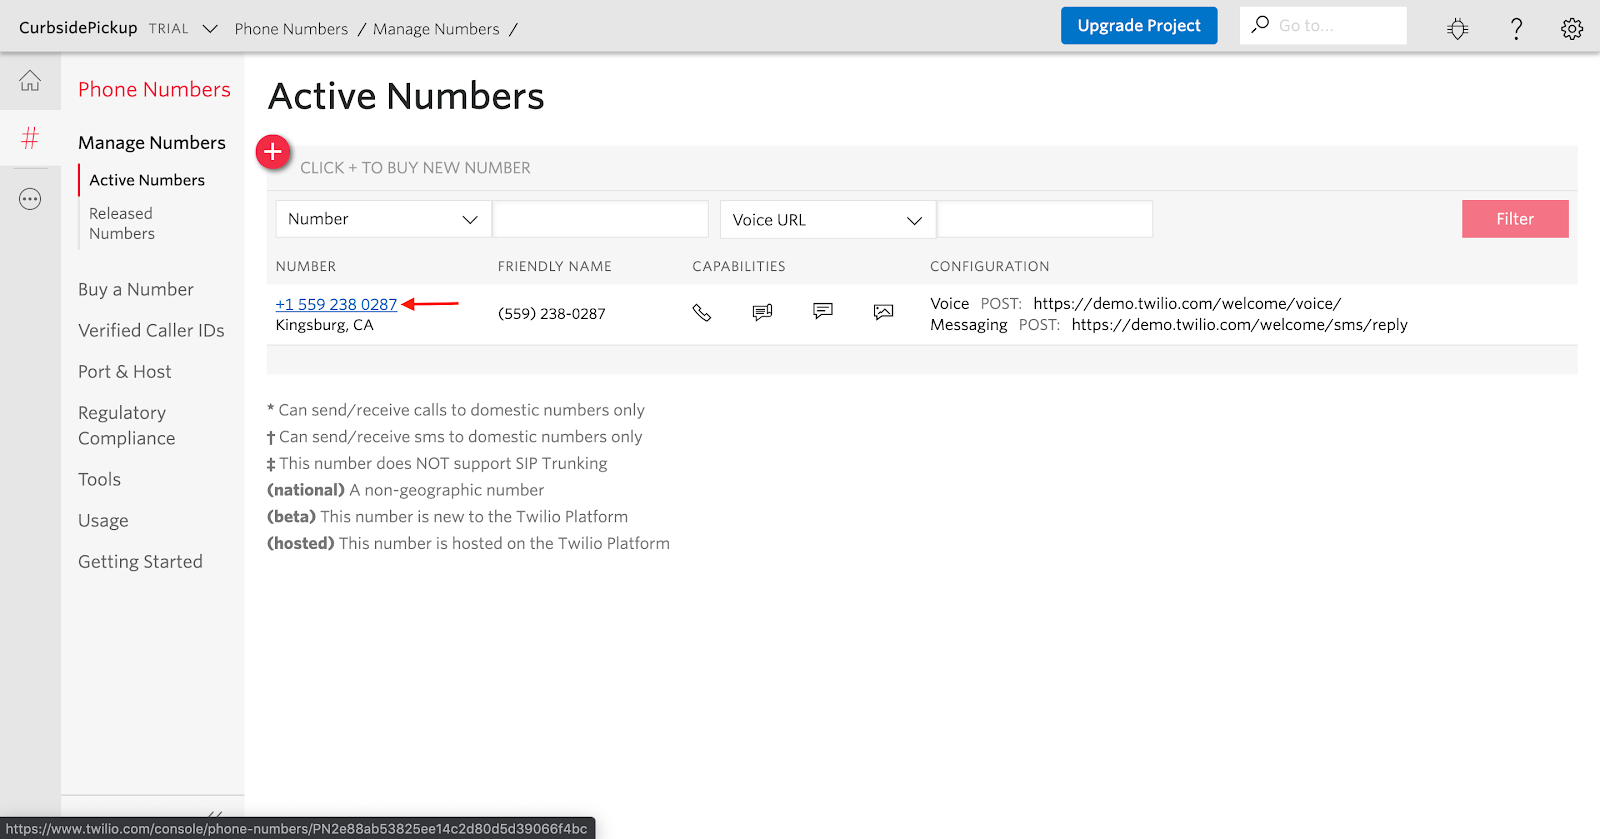
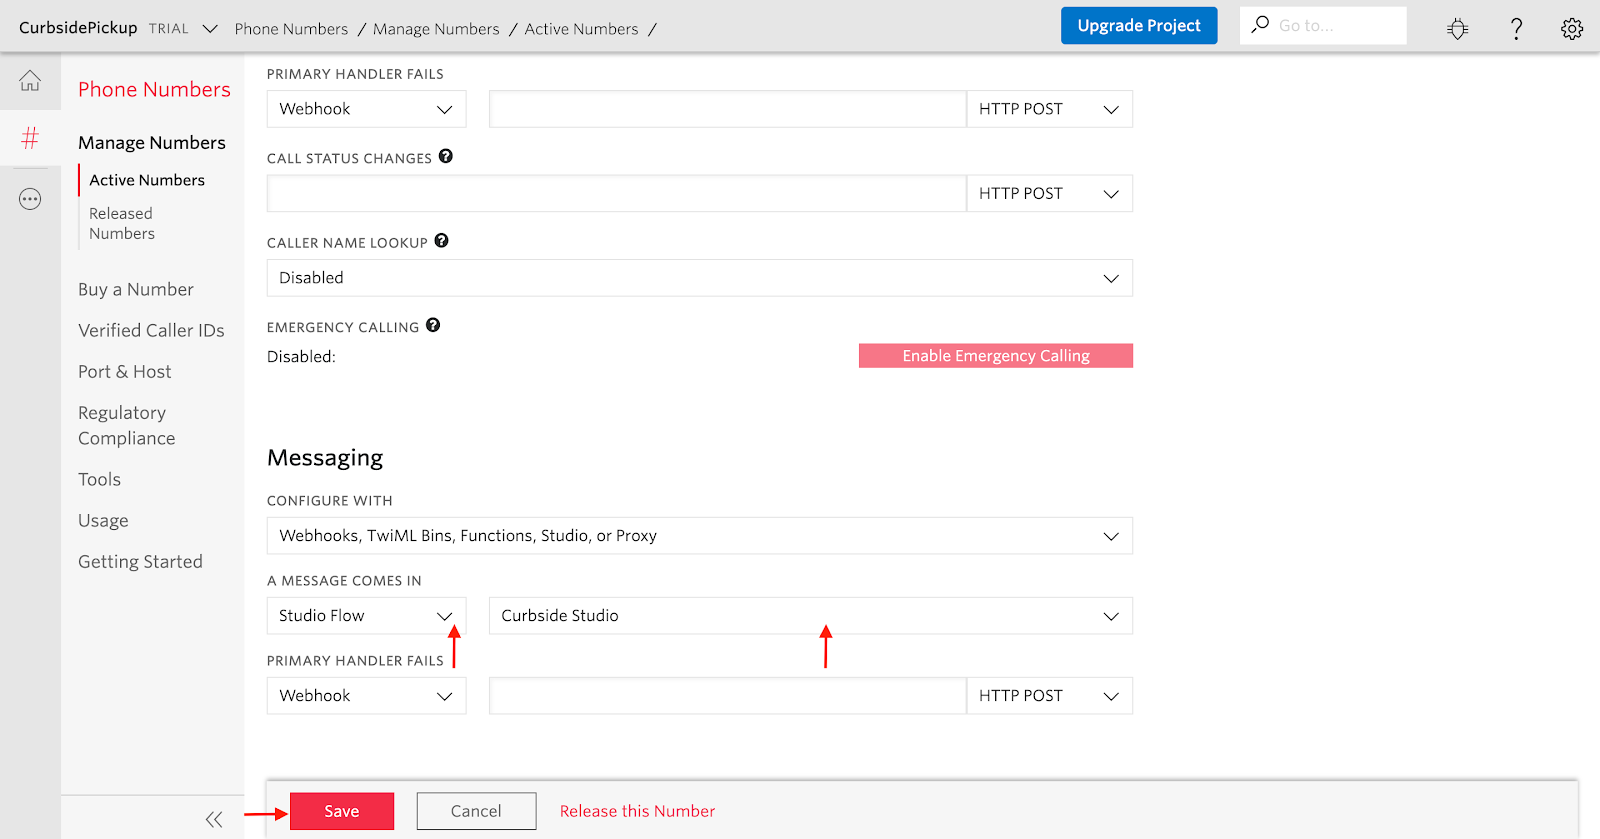
Once in the number page, scroll down to the “Messaging” Section. We want to change the action when a message is incoming to our number, which is to send it to our Studio flow.
Once this is set we can click “Save”.
Now our Studio flow is ready to test.
Test the workflow
We open our API call from earlier in Postman, hit “Send” on the top right.
We will then see the message come into our personal phone number. We can then reply with “I am here” and see the immediate response asking for our vehicle description.
Now, respond with a Vehicle Description:
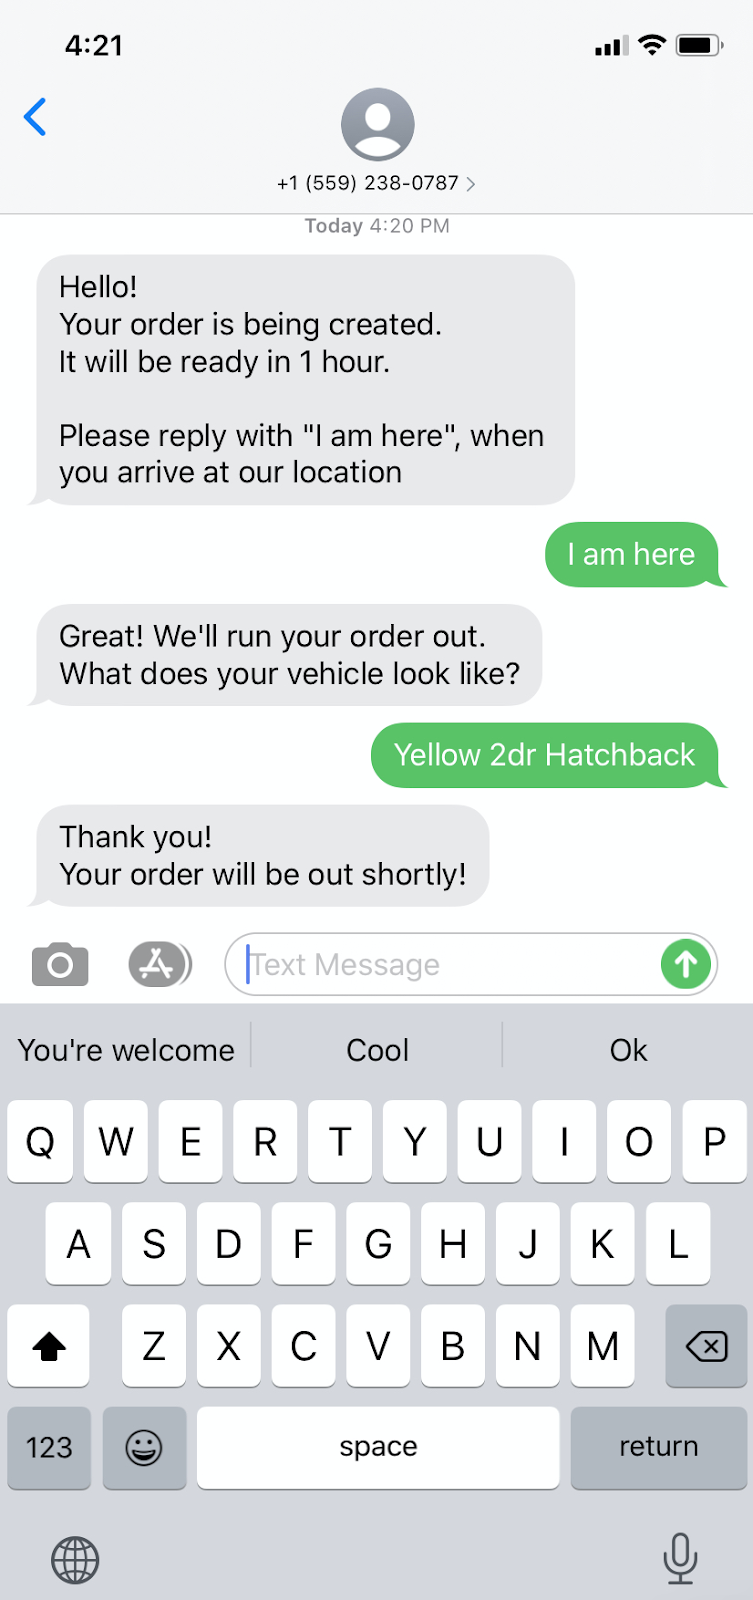
Once we send the vehicle description we will see the message sent to the order runner.
That completes the Studio Workflow!
Test the error path
- Send an API request from Postman.
- Receive the message on the phone.
- Reply with something other than “I am here”
You should see the No Condition Match message come into play. We can expand on this use case by trying to find recurring matches, such as “is my order ready?” and creating new flows from it.
Here are a few suggestions on how to extend what we have just built:
- Create more flows based on the Split Widget to improve the customer experience.
- “Where is my order”
- “I need to change order”
- “Cancel Order”
- Pull an order number into the Twilio Function from a database via an API request
- Use Twilio Autopilot to intelligently read the message and route to the correct flow
Conclusion: Building a Curbside Notification System with Twilio Studio and Functions
In this blog post, you have learned how to use Twilio Studio, Twilio Functions, and Twilio Messaging in order to create a simple workflow to send a notification and have the end user respond to the notification. That message then can get passed to an order runner with context included.
If your organization would like more guidance on how to build solutions or would like to partner together on your work addressing the COVID-19 outbreak, we’re here to help. Get in touch through this link.
Sabeel Siddiqi is a Solutions Engineer at Twilio. He lives in Atlanta, GA. Aside from being an amatuer chef in his kitchen, he enjoys breaking down challenges and building up solutions with customers. He can be reached at sasiddiqi [at] twilio.com
Additional resources
The following reference resources will provide you with in-depth information on some of the topics mentioned in this post


Related Resources
Twilio Docs
From APIs to SDKs to sample apps
API reference documentation, SDKs, helper libraries, quickstarts, and tutorials for your language and platform.
Resource Center
The latest ebooks, industry reports, and webinars
Learn from customer engagement experts to improve your own communication.
Ahoy
Twilio's developer community hub
Best practices, code samples, and inspiration to build communications and digital engagement experiences.