Detect Sales Leads using Twilio Conversations and Segment
Time to read: 14 minutes
July 07, 2022
Written by
Reviewed by

Wondering how to increase sales and gain market share? One key success factor is agility, how fast can your sales team respond to a customer decision. We are all humans, and if we say we are ready to buy – wouldn't it be best if we received the right offer or support immediately? We humans always get busy or change our minds, or we might overanalyze and back away from a purchase. For you, as a business, that means the opportunity can quickly disappear.
But, with Twilio, you can set up the right keyword detection and triggers to engage with customers exactly at the right time, on the right channel, and with the right context. In this post, you will learn how to use Twilio Conversations API to detect key words on customer conversations and track them using Segment Personas. Once a certain trait is detected, Segment can trigger an alert to your CRM, and the right person can be notified to act right away.
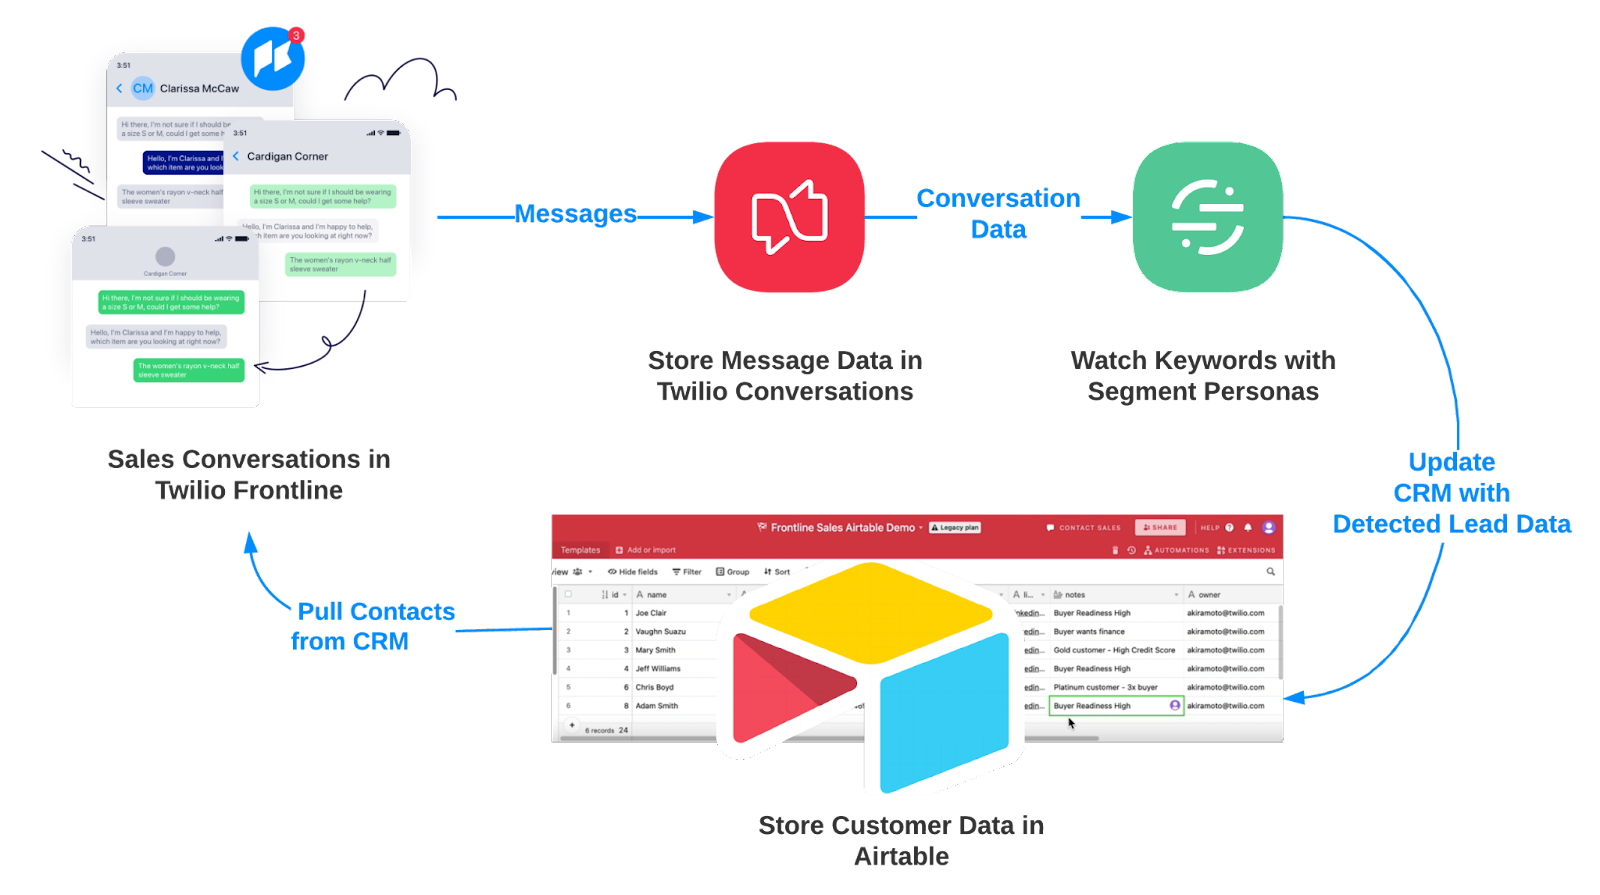
To build out the keyword detection solution, you will set up Twilio’s Frontline. Frontline is a mobile and web application interface built on top of the Conversations API. Although, if you already have an application already, you could use Conversations instead. We will capture keywords related to readiness to buy (e.g., “interested”, “ready”, “close”, “buy”, ”deal”, “purchase”, ...). Each keyword has assigned values (for example, “close” gives a much stronger signal than “interested”).
Next, you will send keywords to Segment and use Segment Personas to compute user traits. We will use these values to compute a sum for each customer, and once a certain threshold is crossed, we will update the CRM and send a notification. In addition, we will also send Segment all messages exchanged, and use a Segment Audience to detect a certain keyword (e.g., “finance”), update the CRM and send a notification (for example, to your Financing department).
Prerequisites
To get started you will need:
- A Segment account – sign up for a trial here, but note the warning below.
- A Twilio account - sign up for a free developer account here.
- An Airtable account - sign up for a free developer account here.
- An Okta account - sign up for a free developer account here.
This blog post uses material from the following posts:
- Frontline quickstart
- Frontline integration with Airtable quickstart
- Build Frontline Video Tutorial
- Personalize Communication Channel Outreach using Segment and Twilio
For brevity, sections of the resources above will be referenced in the build below.
Putting it together
This project is broken into two sections: one for setting up Twilio, and one for Segment.
Set up your Twilio account
Go to twilio.com and sign up for a free account (or log in to your existing account).
In this blog post, we will use Twilio Frontline to demonstrate the power of Conversations. There are several blog posts describing how to deploy Frontline:
- Build a Smart Clienteling Mobile App Using a Bot and Twilio Frontline
- Integrating Salesforce with Twilio Frontline for Insight-driven Donor Engagement
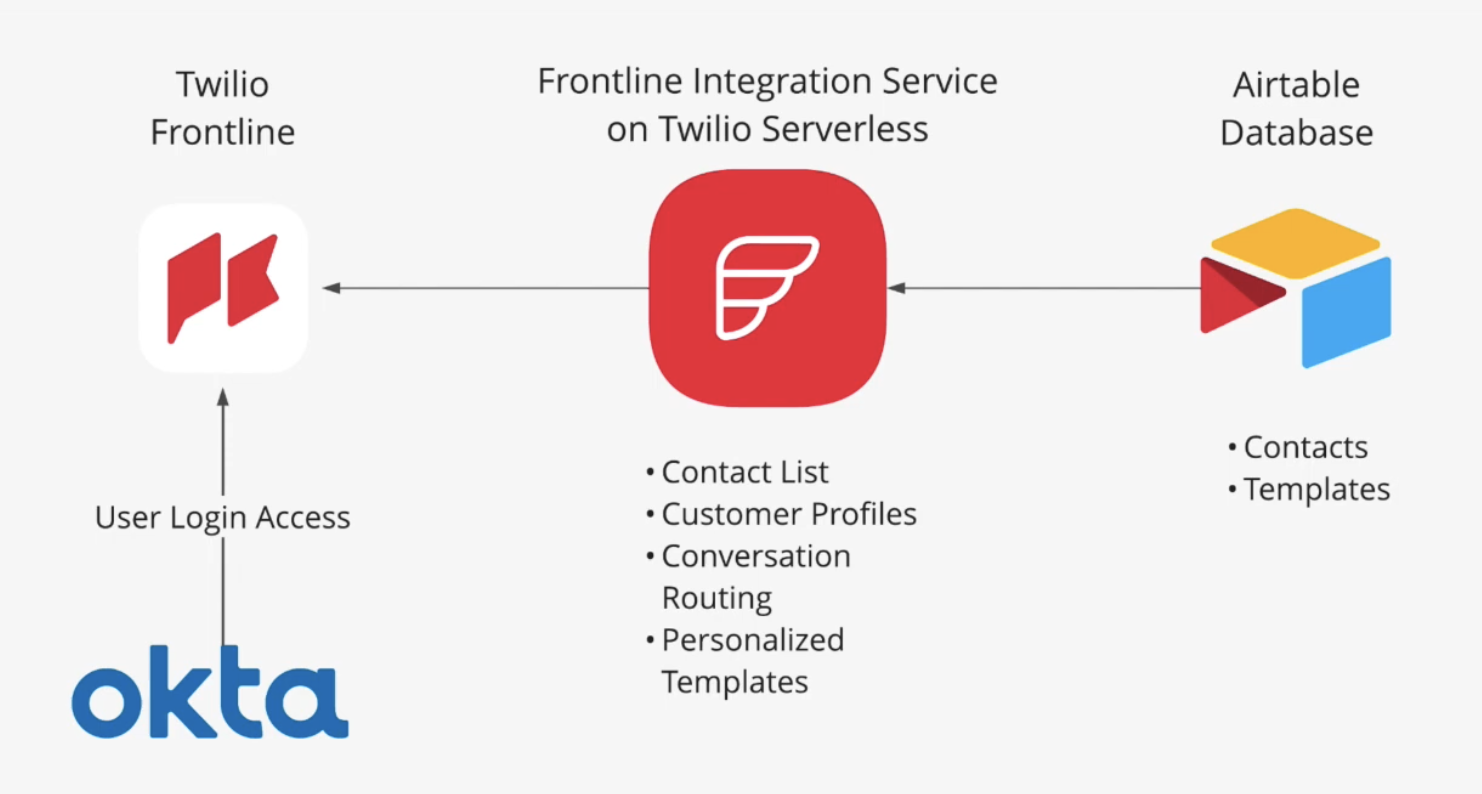
We will use the Frontline integration with Airtable quickstart and build our sales keyword detection use case on top of it.
Watch this implementation video to get your Frontline instance up and running in less than 10 minutes.
Sign up for a Twilio account and get a phone number
Follow this procedure.
Create a new Twilio Frontline instance
Follow this procedure.
Configure Twilio Conversations
Follow this procedure.
Project Setup
Clone this git repo.
Follow these steps to clone the repository and configure SSO with Okta:
SSO
The script will ask you for the following:
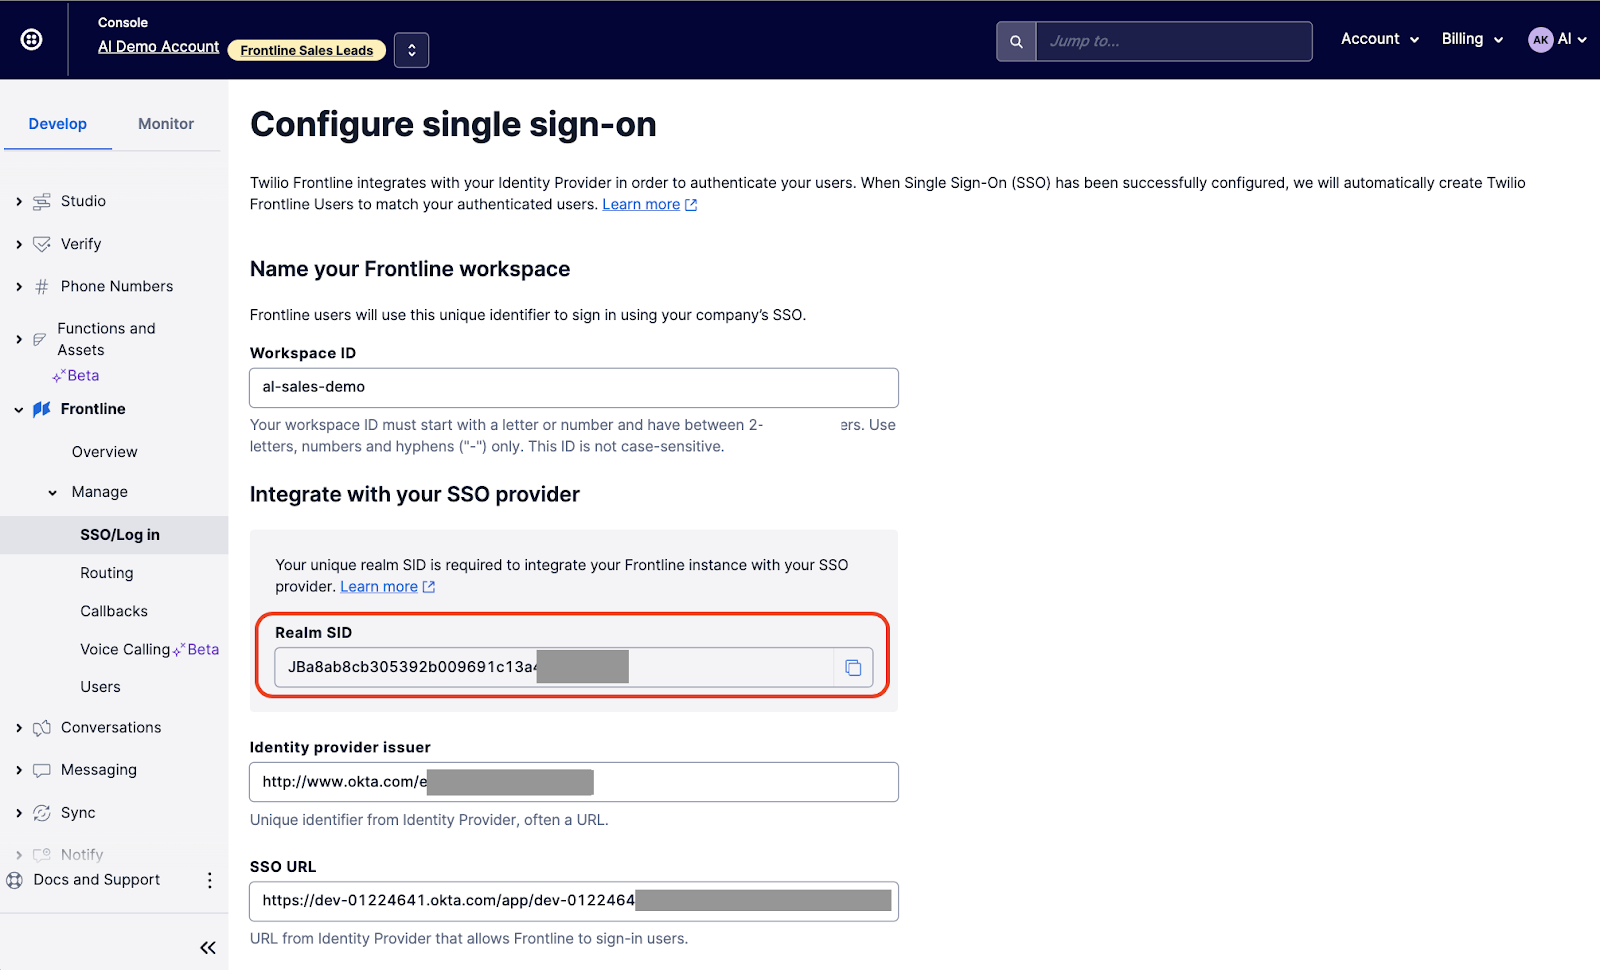
- Frontline Realm SID on your Console: Frontline > Manage > SSO/Log in:
- Okta Organization URL - copy the link for your okta instance (e.g.,
https://dev-012211111-admin.okta.com):
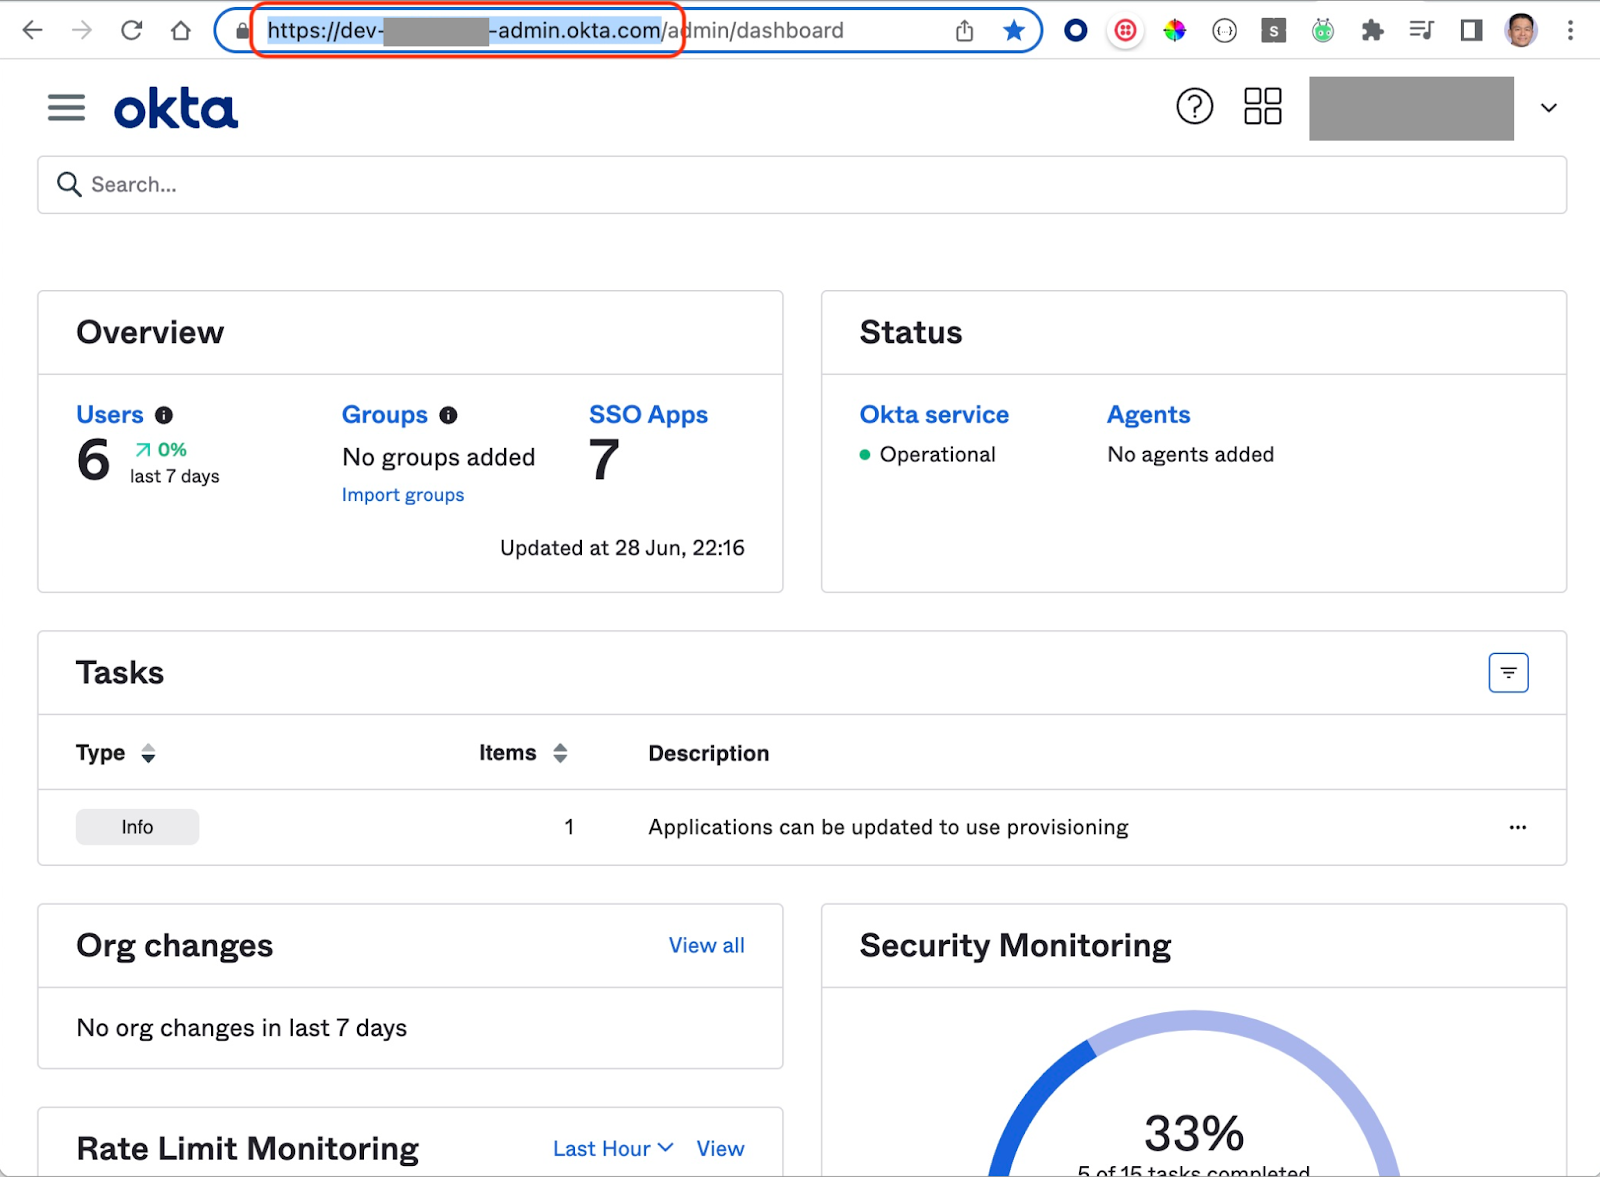
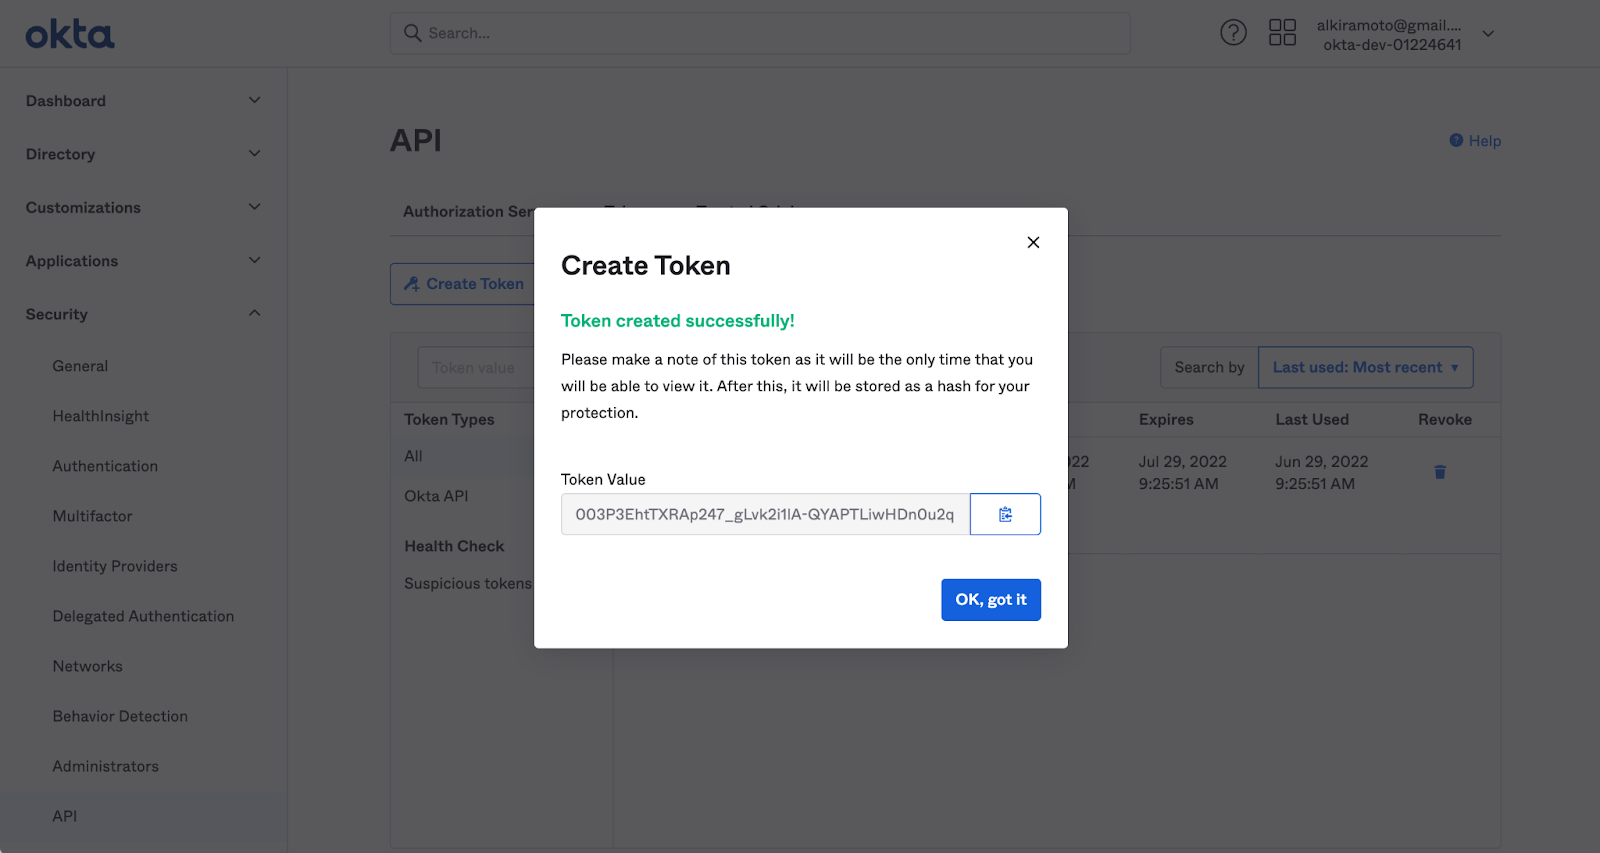
- Okta API Token: Go to Okta, Security > API > Tokens > Create Token then provide a name:
- Name for the Frontline instance in Okta – choose your own (e.g.,
Frontline Quickstart)
The script will create an App on Okta. Copy and paste the values from Okta to your Twilio Frontline (Frontline > Manage > SSO/Log In):
- Identity provider issuer
- SSO URL
- X.509 Certificate
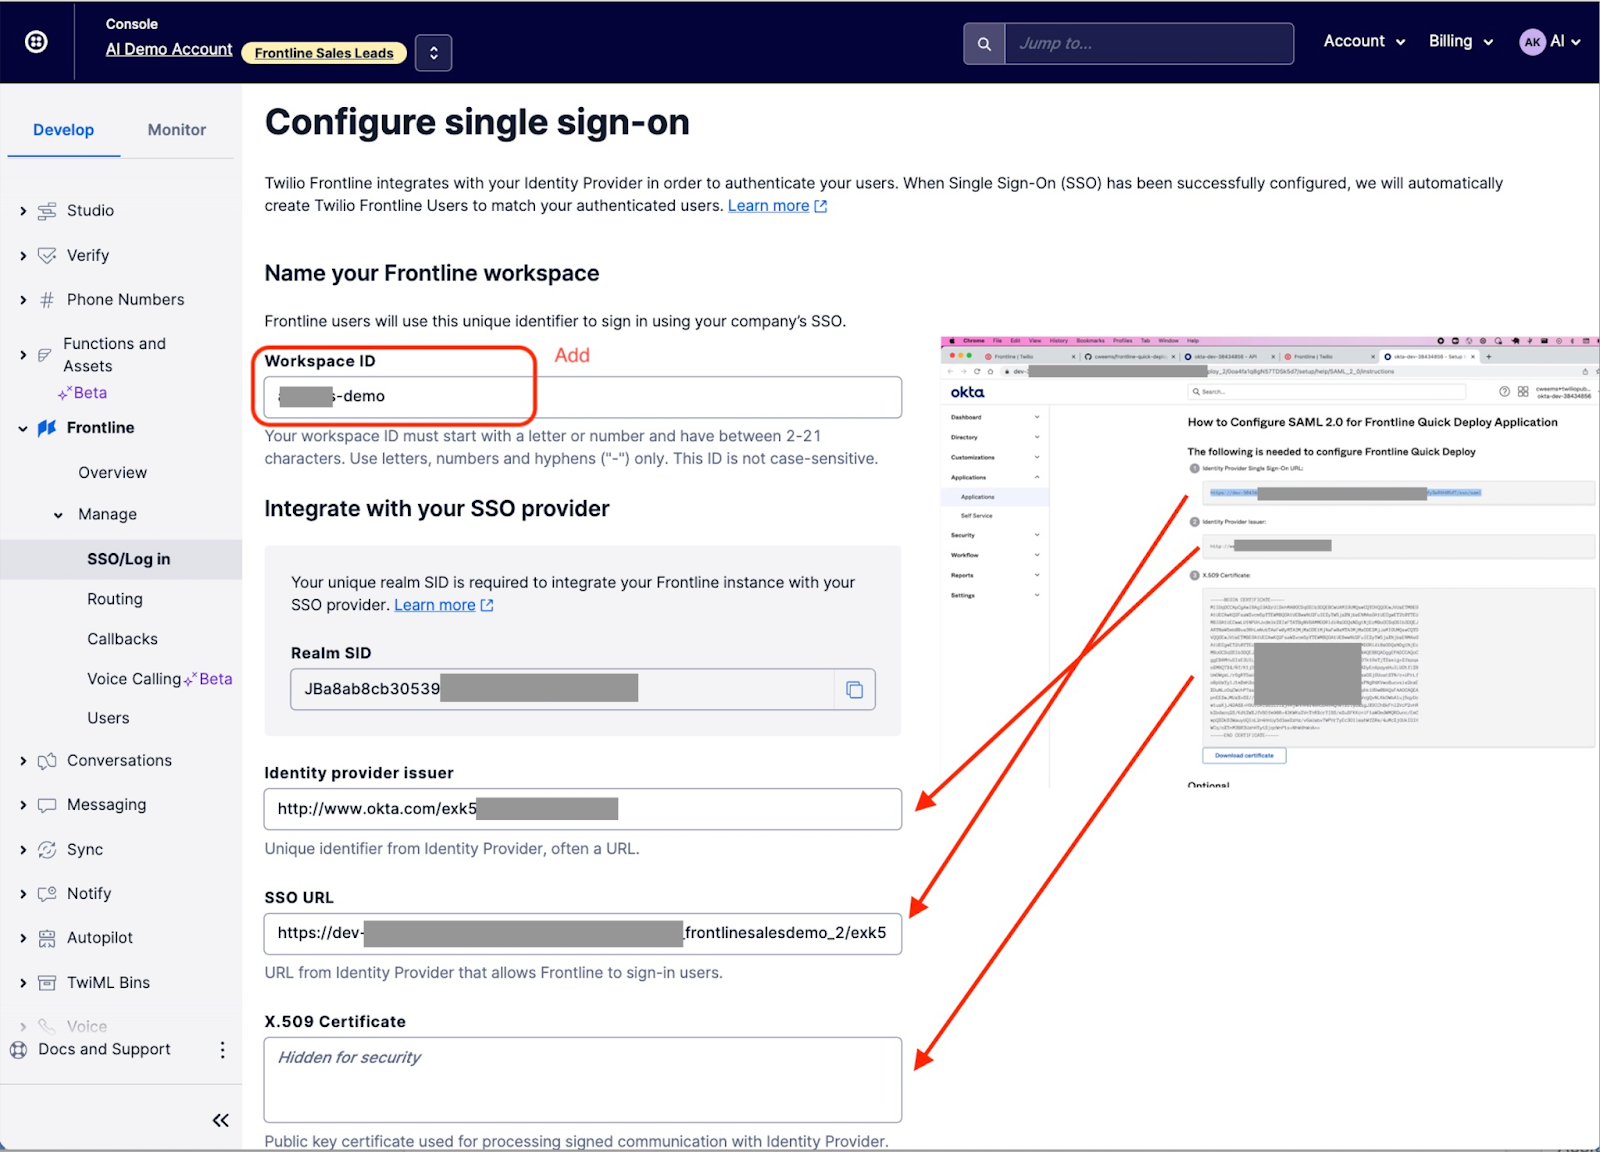
Add a Workspace ID (e.g., john-sales-demo) – what users will type on the app to tell what SSO space they want to log into.
Go to Okta - Directory > People then select your user and assign it to the new application. Create a user if you do not have a user already configured.
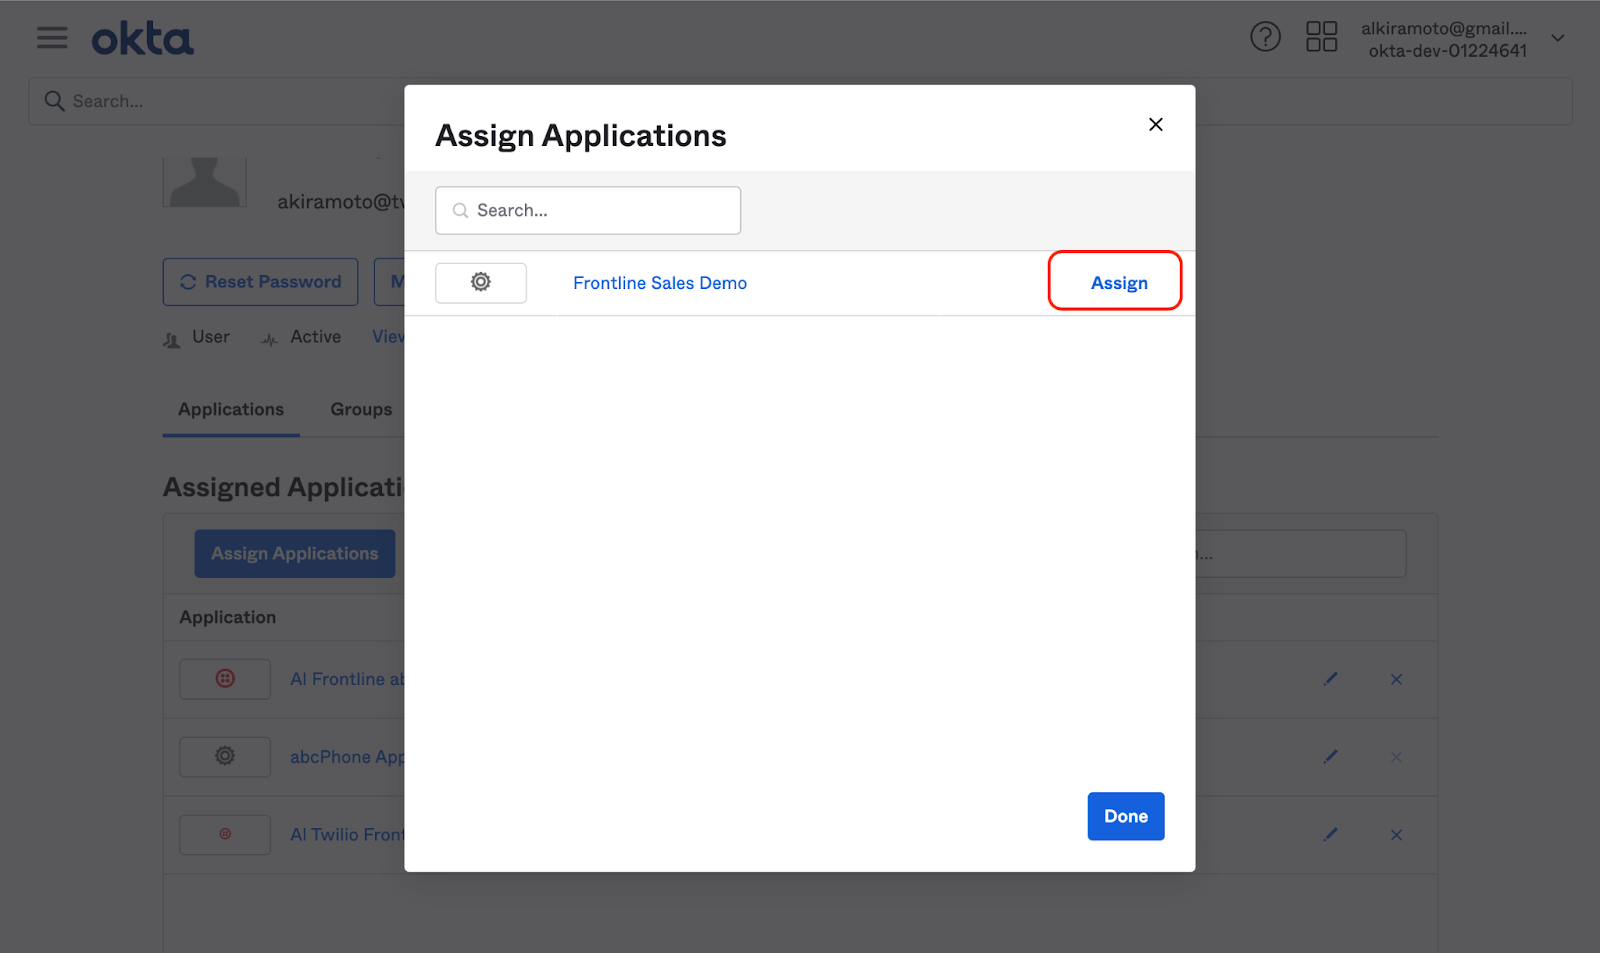
Click Assign, then Save and Go Back.
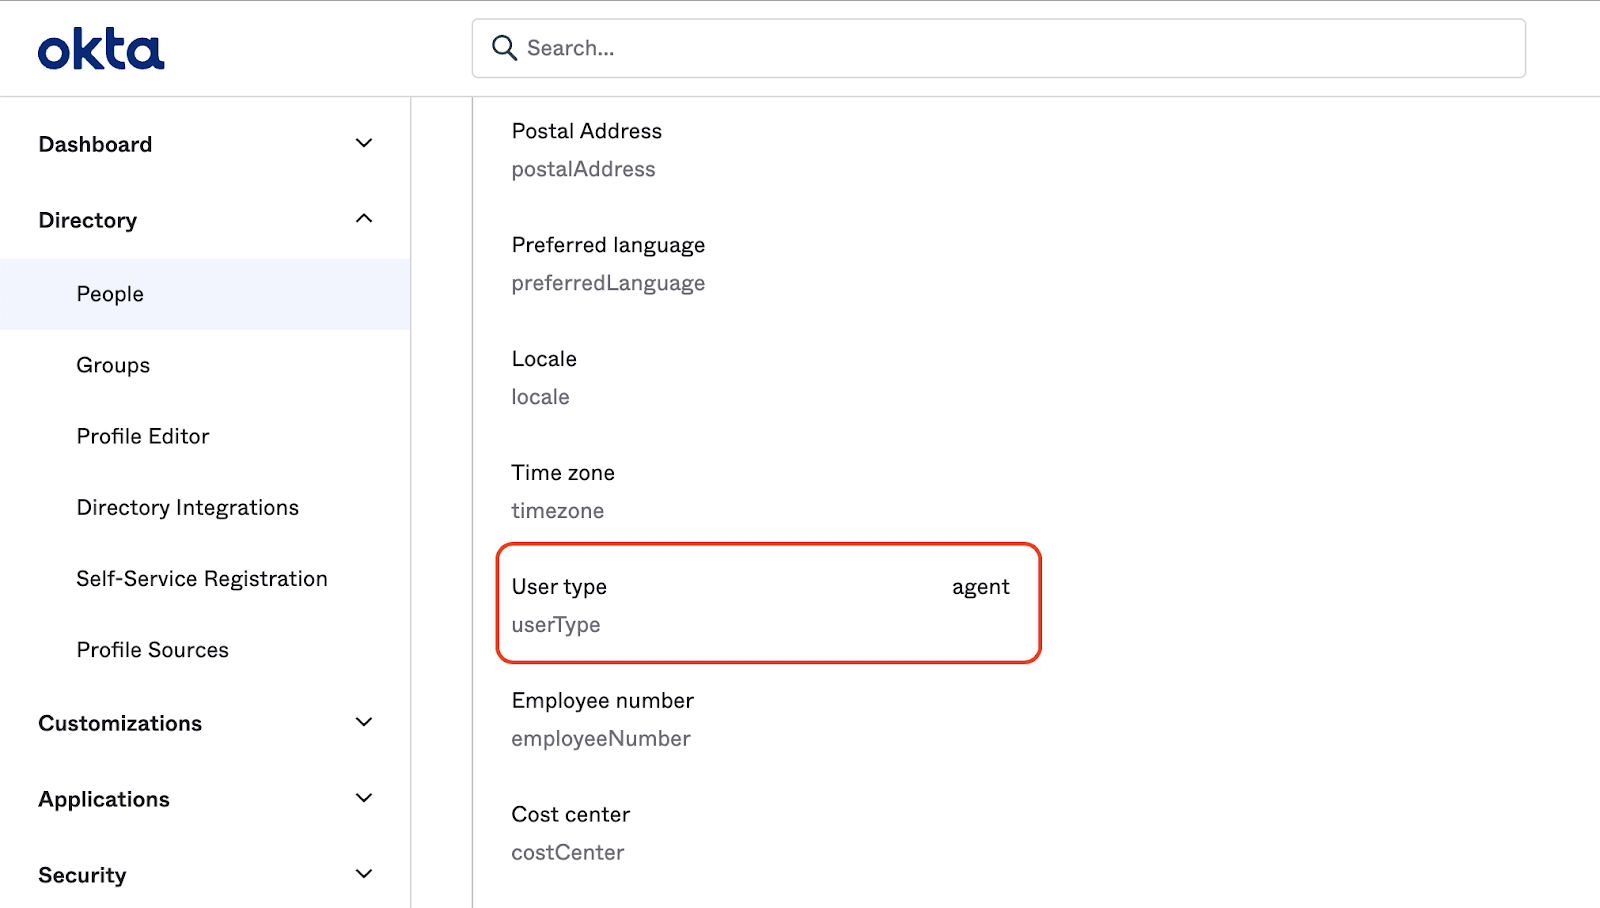
Then, edit your profile. Go to Directory > People, select your user and add the “agent” for your User type profile:
For more information about this Okta step, visit this link.
Download the Frontline App from Google Play or Apple Store.
You can test your SSO setup by Sign in into your workspace (e.g., john-sales-demo), you will be prompted to login with your user credentials.
Setting up your Twilio Functions
Back in your terminal, make sure you are on the right project directory:
Setup the Environment Variables
Here are the environment variables that must be configured first:
These environment variables will need to be configured later on the Segment Section:
Setting up Airtable (our simulated CRM)
Log in to your Airtable account.
A sample Airtable template can be found here. Click on Copy base on the top right. This will add a clone to your own workspace.
Open the table and add your users. Note that addresses in the sms and whatsapp columns must be in E.164 format, for example +1234567890. If numbers are formatted differently, the integration may fail to find customers in Airtable when a conversation is initiated from an inbound message.
The owner should be the Okta username you created.
Now, you need to find your Airtable Base ID. Go to your Airtable, Help > API Documentation, then copy the information for “The ID of this base is” (it starts with “app”). Copy to AIRTABLE_BASE_ID= in the .env file.
You also need to copy your Airtable API key. Go to your Airtable, Help > API Documentation, then look for the section AUTHENTICATION. Select the “show API key” checkmark, then copy the information on the right of "Authorization: Bearer”. Copy it and paste it after AIRTABLE_API_KEY= in the .env file.
Twilio CLI
Install or update your Twilio CLI:
Login to your Twilio Account:
Twilio Serverless Deploy
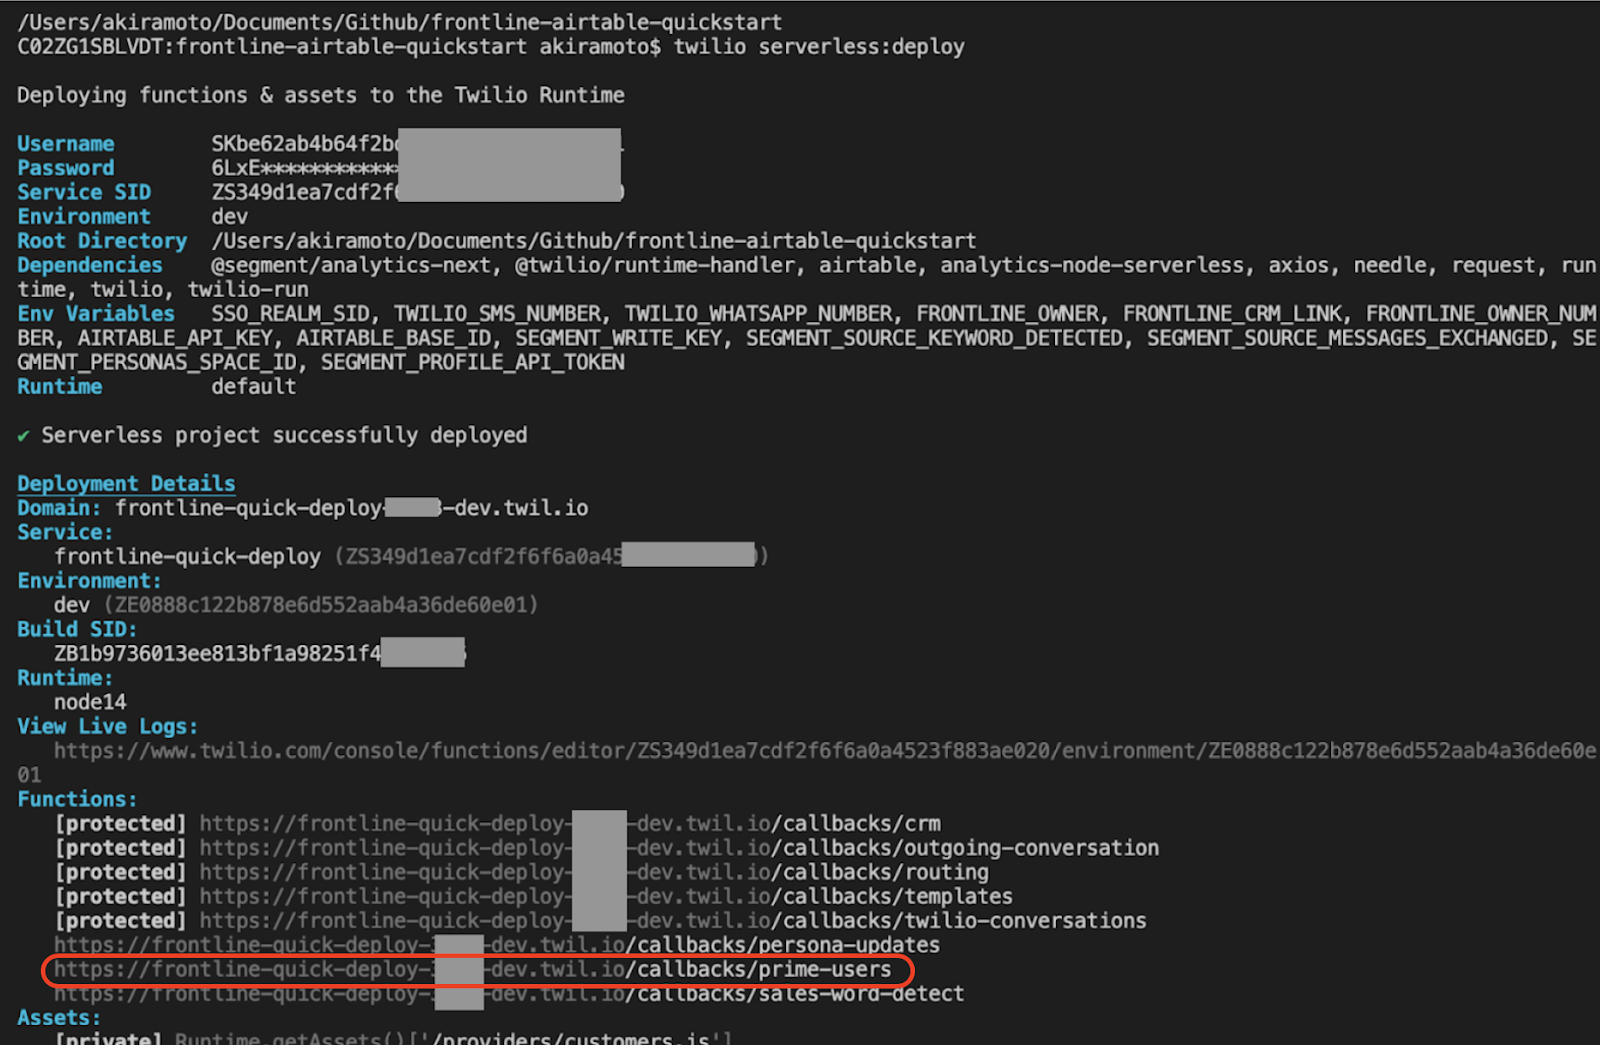
Deploy this Serverless app with this command:
If your deploy is successful, you should see an output that looks like this:

The app provides eight callback URLs:
/callbacks/crm: called when Frontline loads the contact list or a user detail page./callbacks/outgoing-conversation: called when a user initiates an outbound conversation./callbacks/routing: called when a message is sent inbound that does not match an open conversation./callbacks/templates: called when a user opens the templates menu./callbacks/twilio-conversations: called after a conversation is created or a participant is added to the conversation. Detects keywords, and sends data to Segment./callbacks/persona-updates: called when there is a new identity created by the Segment Audience, and it updates the Airtable record for that specific user and alerts the number set inFRONTLINE_OWNER_NUMBER=/callbacks/prime-users: called manually to import all users from Airtable and update Segment with the customers name, user ID, phone, and email./callbacks/sales-word-detect: called manually to send events to Segment from a made up user called John Smith. It primes the Segment Personas with Events.
Once you run this, grab the link for /callbacks/crm and update FRONTLINE_CRM_LINK in your .env file.
For example:
FRONTLINE_CRM_LINK=https://frontline-quick-deploy-1111-dev.twil.io/callbacks/crm
Configure Callbacks
Copy and paste the callback URLs (including your unique subdomain) into your Frontline configuration in the Twilio console.
Routing configuration
In the Twilio Console, go to Frontline > Manage > Routing and add [your_app_url]/callbacks/routing under Custom routing:

General callbacks
In the Twilio Console, go to Frontline > Manage > Callbacks and copy and paste the following callback URLs from your Frontline integration service:
- CRM Callback URL:
[your_app_url]/callbacks/crm - Outgoing Conversations Callback URL:
[your_app_url]/callbacks/outgoing-conversation - Templates Callback URL:
[your_app_url]/callbacks/templates

Conversations Setup Callbacks
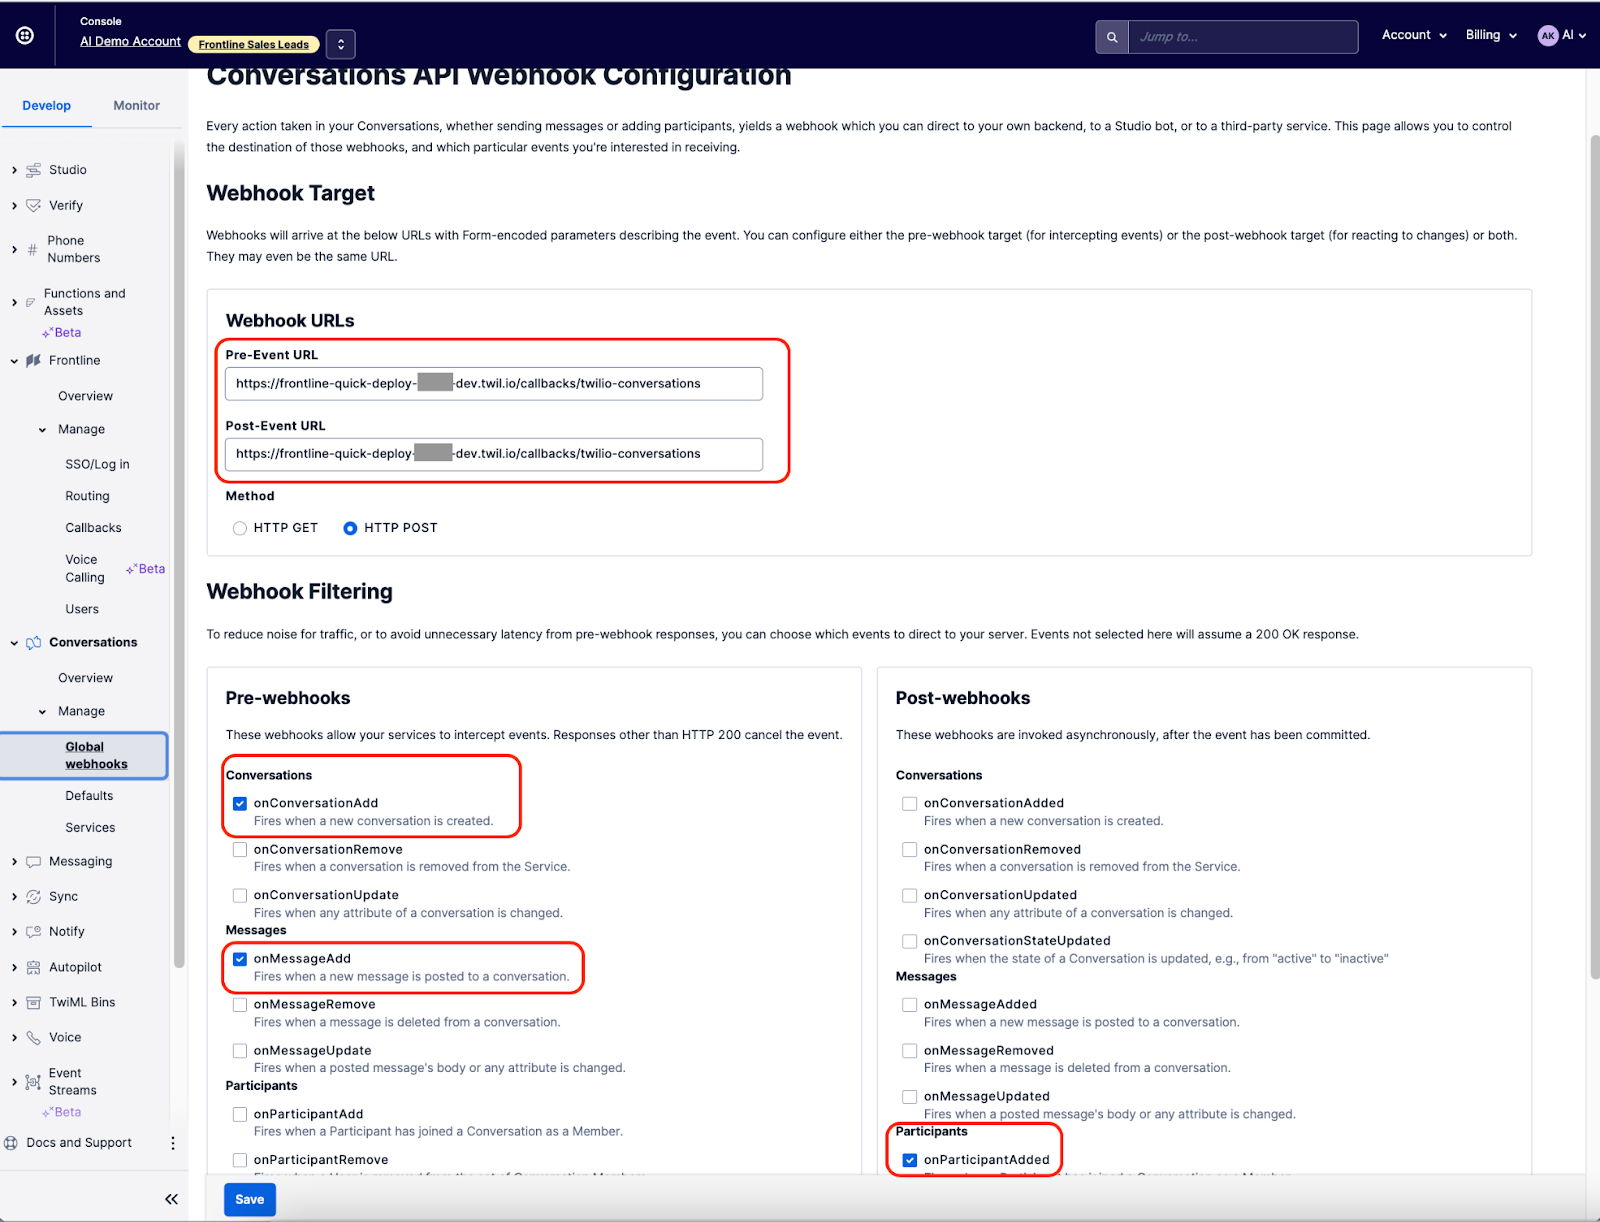
This callback receives the onConversationAdded, onParticipantAdded, and onMessageAdd events from the Conversations service, and sets the name of the conversation as well as the participant and participant avatar that is joining the conversation.
To set them up, go to Conversations > Services > Default Frontline Service > Webhooks. Add the link for [your_app_url]/callbacks/twilio-conversations in the Pre-Event URL and Post-Event URL fields.
Then select the onConversationAdded, onParticipantAdded, and onMessageAdded events.
Now you can see the customer list in your Frontline app, and you can initiate a conversation with them.
Note: Integration Limits
Due to limitations with Airtable's API, this implementation probably isn't suitable for large-scale projects. Read the details here.
Set up Segment
Segment is a Customer Data Platform (CDP) that can ingest events from almost everywhere. As data comes into Segment, a customer’s identity traits (phone number, email, userId, etc.) can and should be included in the incoming event payloads. When this happens, Segment will automatically associate that event data to a profile within Segment Personas using its identity graph. From there, Segment can go a step further and configure additional automatically computed Traits based on those incoming user attributes.
As this happens, Segment is creating comprehensive profiles within Personas on incoming users using deterministic, first party data. Directly within Personas, we can create Audiences of users based on their event behavior and the traits Segment has collected through the event stream. This will help us automatically group users who have taken certain actions, and make it easier to communicate to them directly, or let a third party system like a CRM know something interesting has happened with this user.
Segment architecture for keyword detection
For this tutorial, you will create three Sources within Segment. The first source, ‘keywordDetected’, will capture all keywords and associated values from messages received via Twilio Conversations. The second source, ‘messageExchanged’, will capture the messages exchanged between a user and an agent that utilizes Twilio Frontline. The third source, ‘TwilioKeyword’, will be used to take the phone number we have already received from the previous event ingests, and use that as a lookup key with the data that sits within Twilio Frontline. Frontline will then provide Segment back additional data around that user, and push that via an “identify” call. We will also create one Destination to take all this ingested data and update our CRM with information about our users.
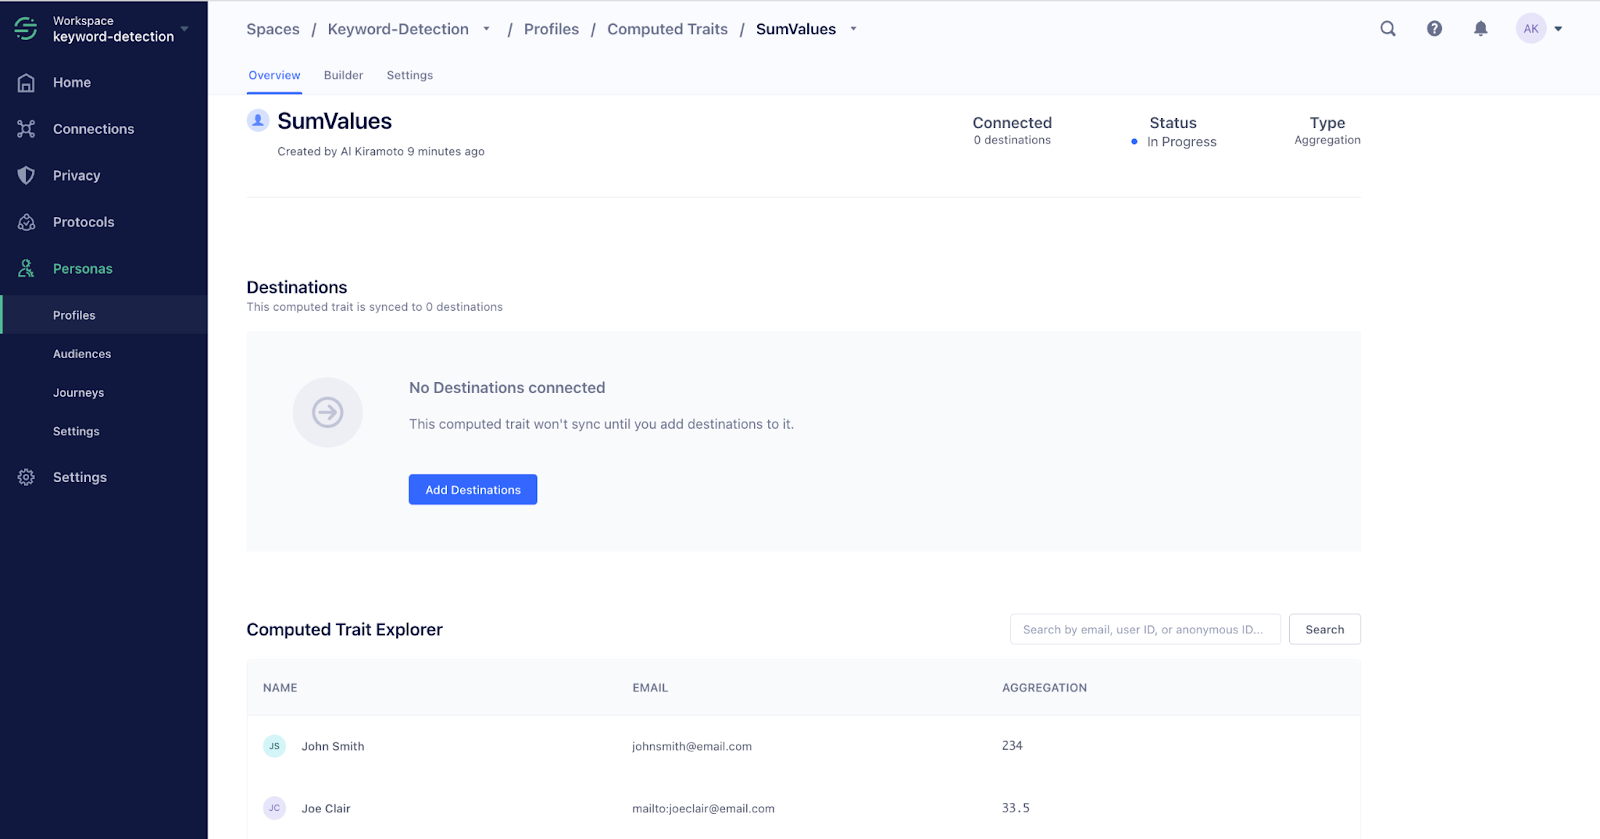
Segment Personas will create a Computed Trait called ‘SumValues’ that will aggregate the sum of all keywords values for a certain user.
Finally, we will also create two Audiences within Segment. The first audience will be called ‘BuyerReadinessHigh’ and it will utilize the Computed Trait ‘SumValues’ as the logic to alert our CRM when a user crosses a certain threshold – 20 in our example here. The second audience will be called ‘customerWantsFinance’ and will monitor the messages exchanged and detect a certain keyword (e.g. ‘finance’).
Create Segment Source Functions
(1) keywordDetected function
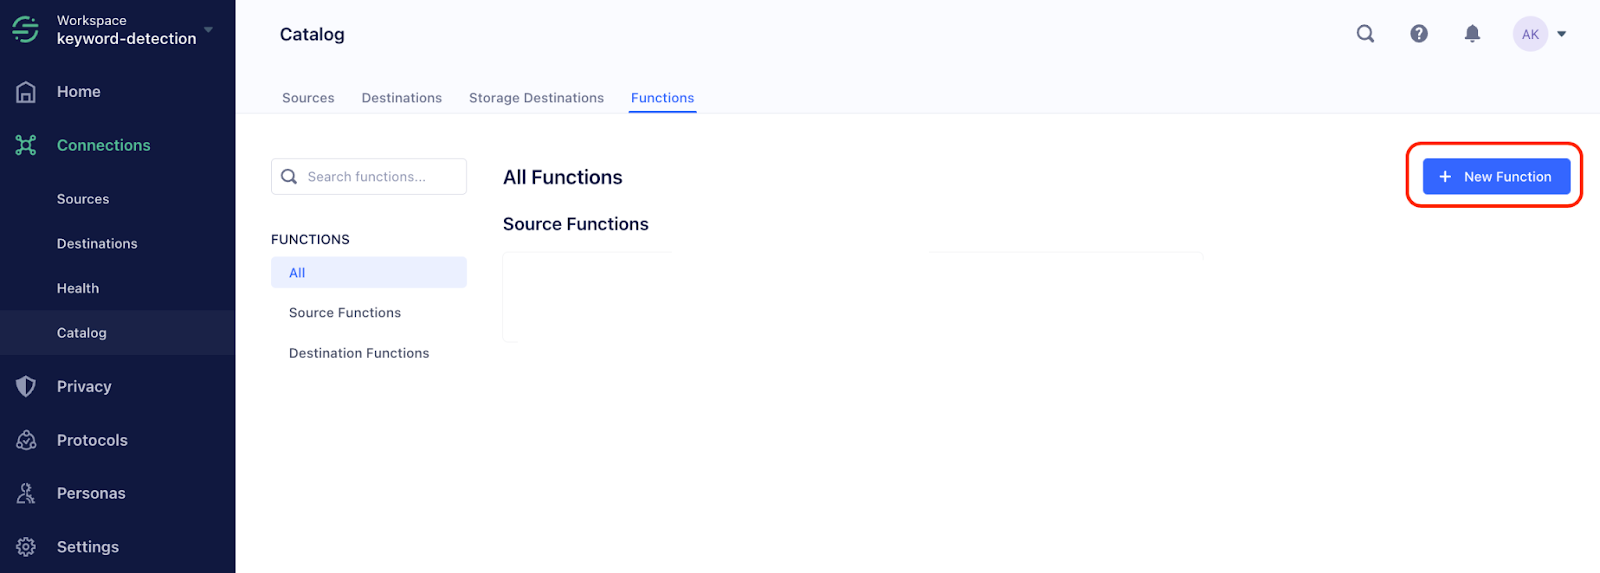
In your Segment console, select your Workspace, navigate to Connections > Sources and click Add Source. Then click Functions at the top of the page, and then click the blue button on the right side of the page called + New Function:
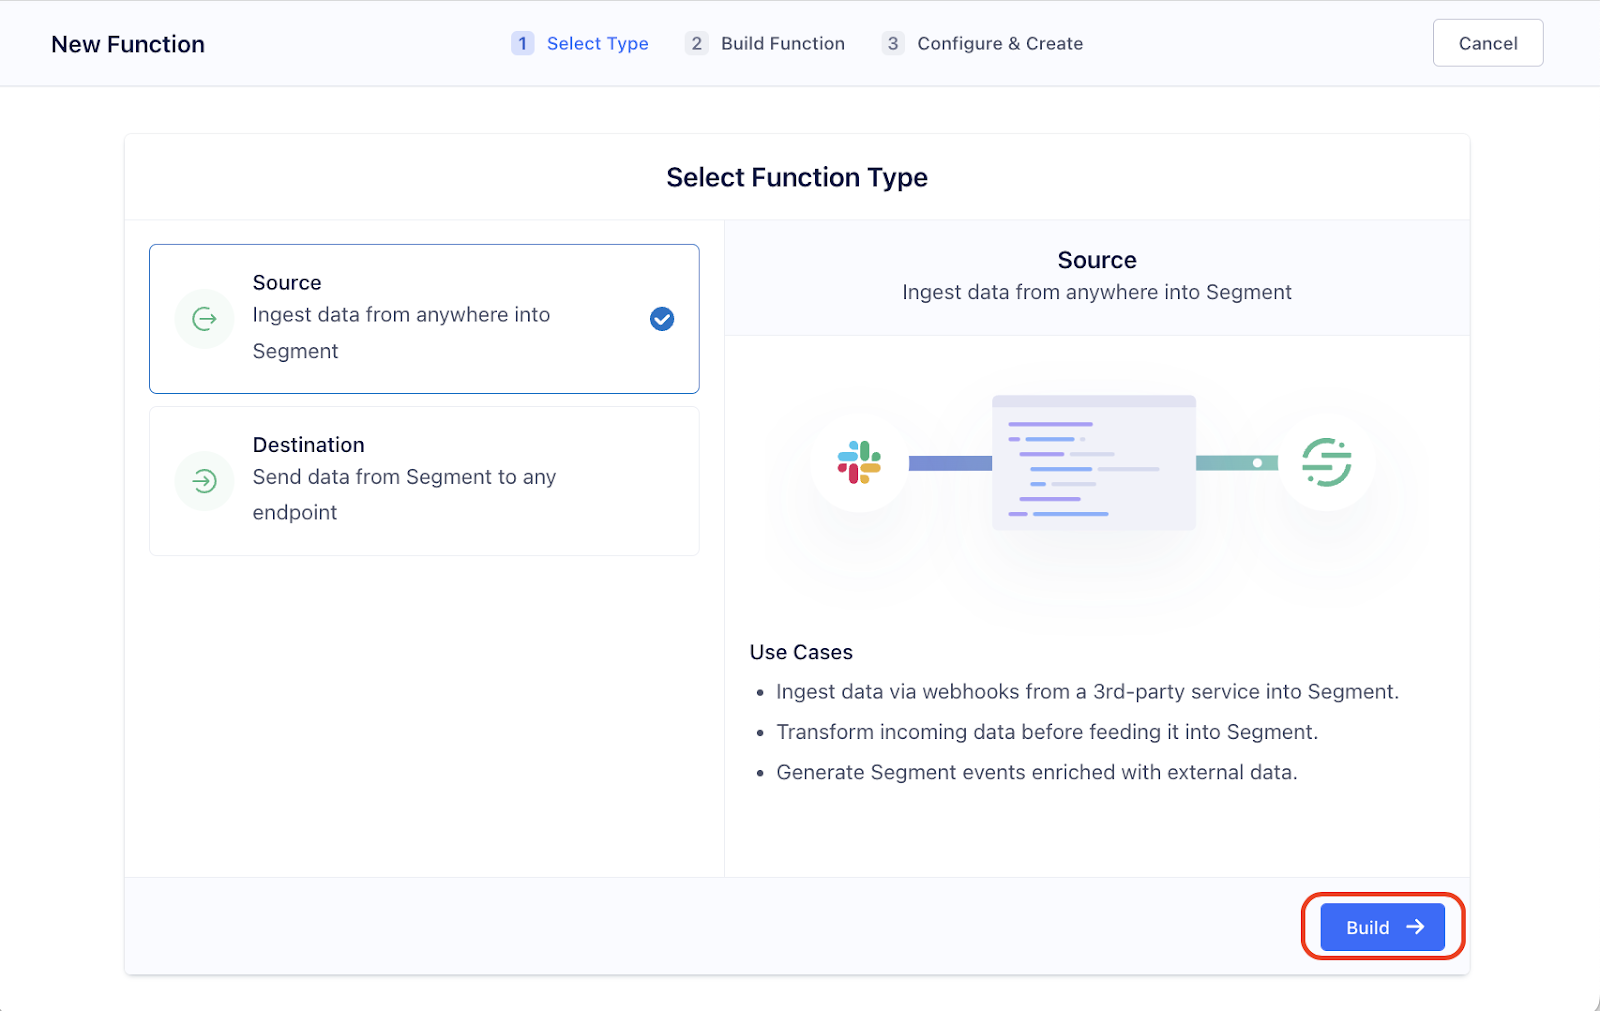
Make sure Source is the Function type selected. Then, click Build:
Copy and paste the following code into your newly created Source Function code editor:
Click Configure. Name the function keywordDetected. Click Create Function.
Next, click on the blue button, + Connect Source:
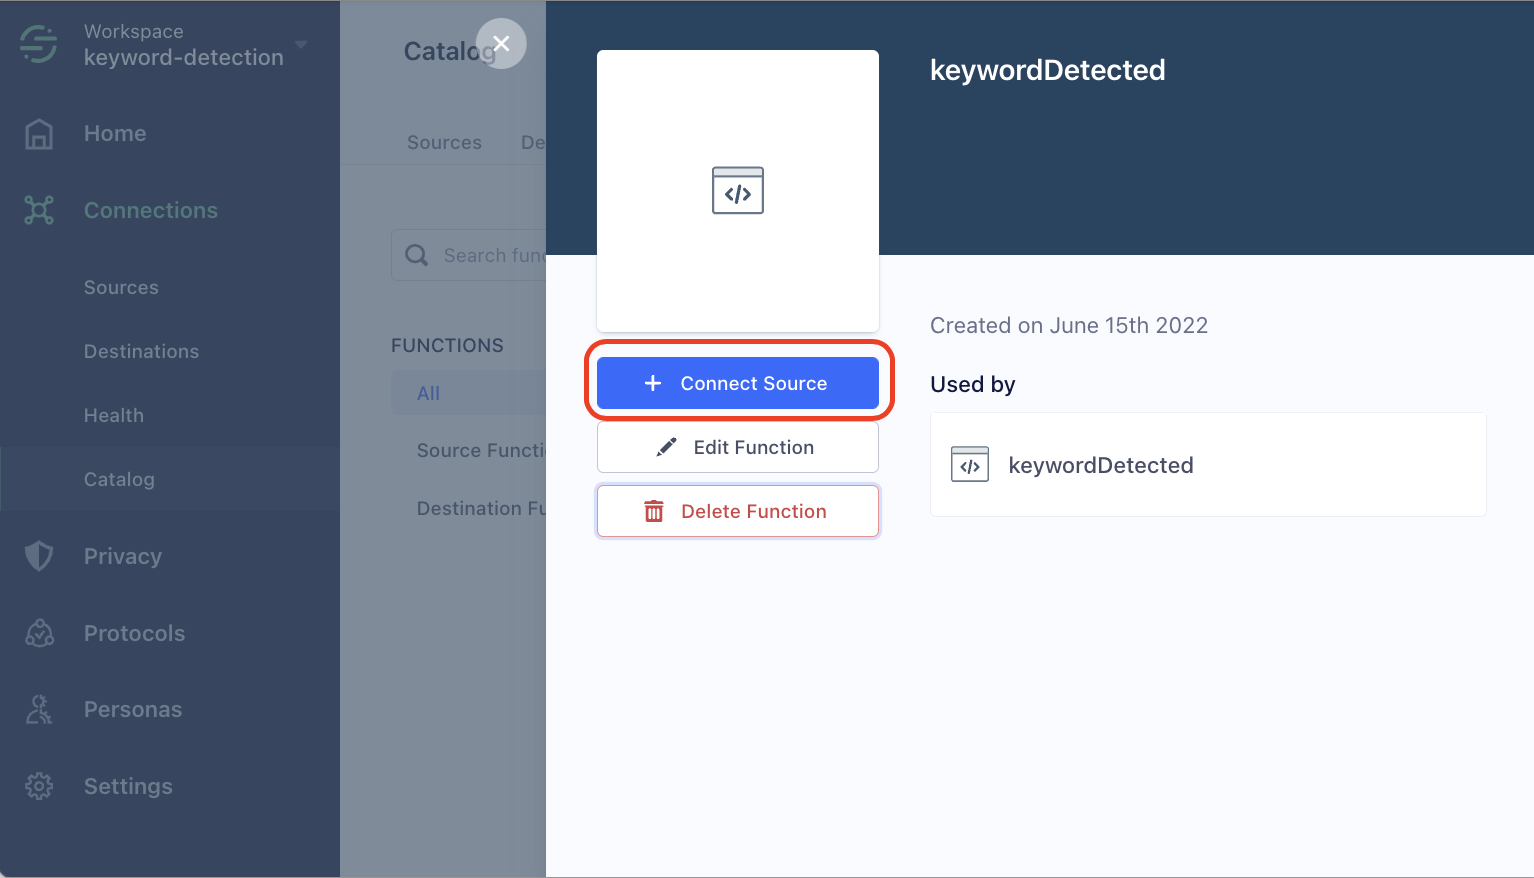
On the Source setup, leave the name as keywordDetected and the Webhook URL as is, then select Continue, then Finish. Your first source is created!
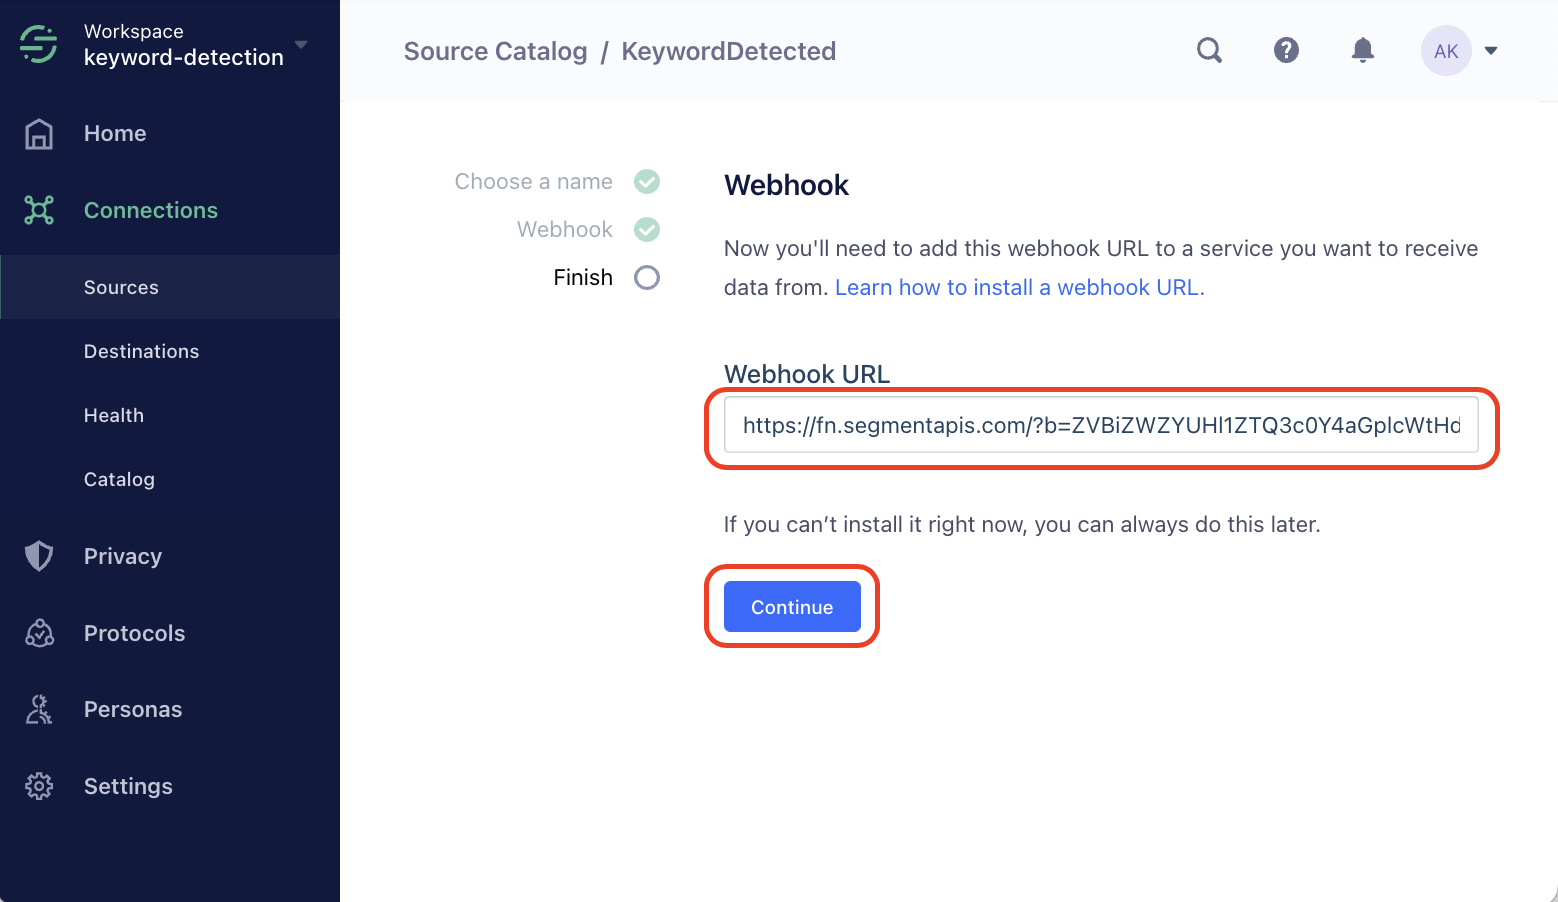
Copy the Webhook URL and save it. We suggest you paste it in your .env file for the SEGMENT_SOURCE_KEYWORD_DETECTED .env variable. It will look something like this:
SEGMENT_SOURCE_KEYWORD_DETECTED=https://fn.segmentapis.com/?b=xxxxx=
(2) messageExchanged function
Navigate to Connections > Sources and click Add Source. Then click Functions at the top of the page, and then click + New Function.
Make sure Source is the Function type selected. Then click Build.
Copy and paste the following code into your newly created Source Function code editor:
Click Configure. Name the source, messageExchanged. Click Create Function.
Next, click on + Connect Source.
On the Source setup, leave the name as messageExchanged and the Webhook URL as is. Then, select Continue, then Finish. Your second source is created!
Copy the Webhook URL and save it. Paste it in your.env file for the SEGMENT_SOURCE_MESSAGES_EXCHANGED .env variable. It will look something like this:
SEGMENT_SOURCE_MESSAGES_EXCHANGED=https://fn.segmentapis.com/?b=yyyyyyy=
(3) TwilioKeyword Node.js Source
We will also need to update Segment with the user’s information that already resides in Twilio Frontline. To do that, we need to leverage what is called a ‘write key’ in our Node JS Source.
Navigate to Connections > Sources and click Add Source. Select Node.js (under Server) and select Add Source. Under the Source setup, name it TwilioKeyword, and once the channel is created Segment will show you the write key:
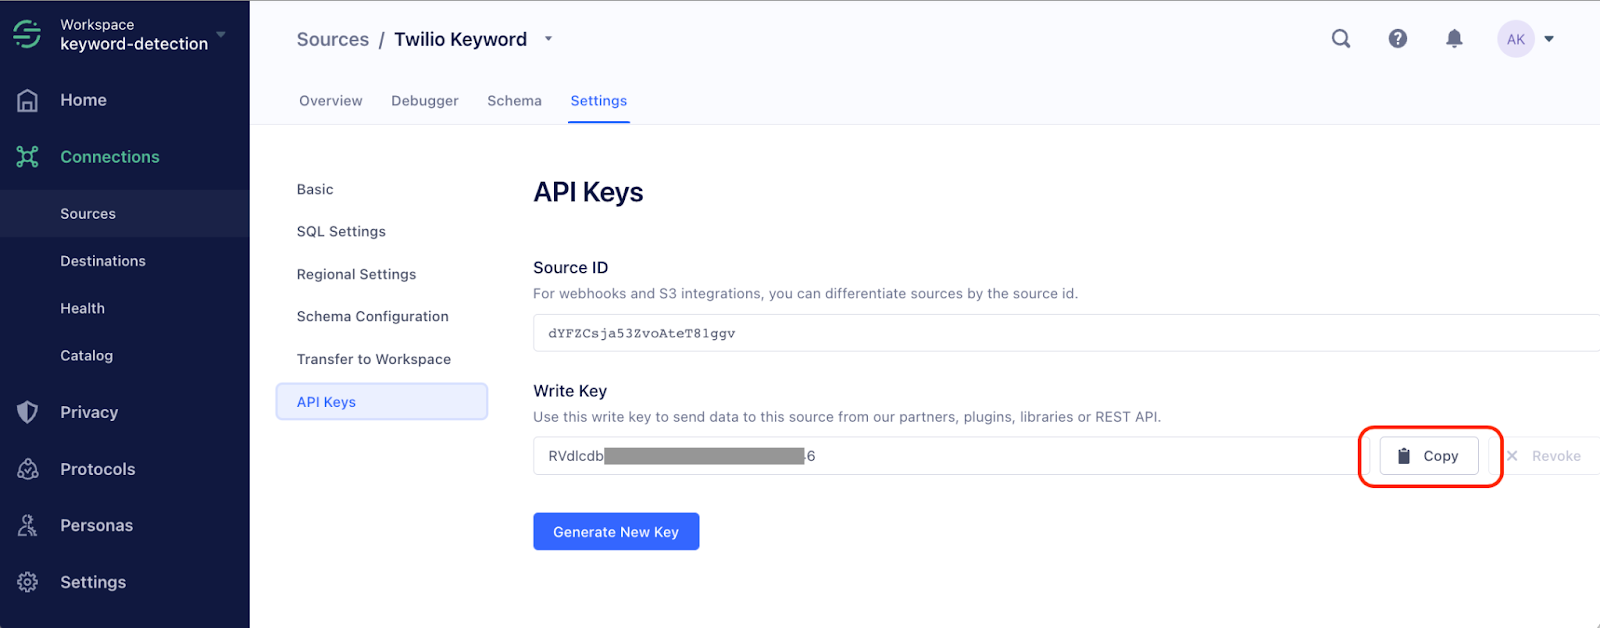
See Segment’s documentation for more details.
Copy the Write Key and save it, paste in your .env file for the SEGMENT_WRITE_KEY= .env variable.
Twilio Serverless Re-deploy
We are ready to re-run our Twilio Functions deployment with the remaining .env variables needed:
Make sure you have the following added to your .env file:
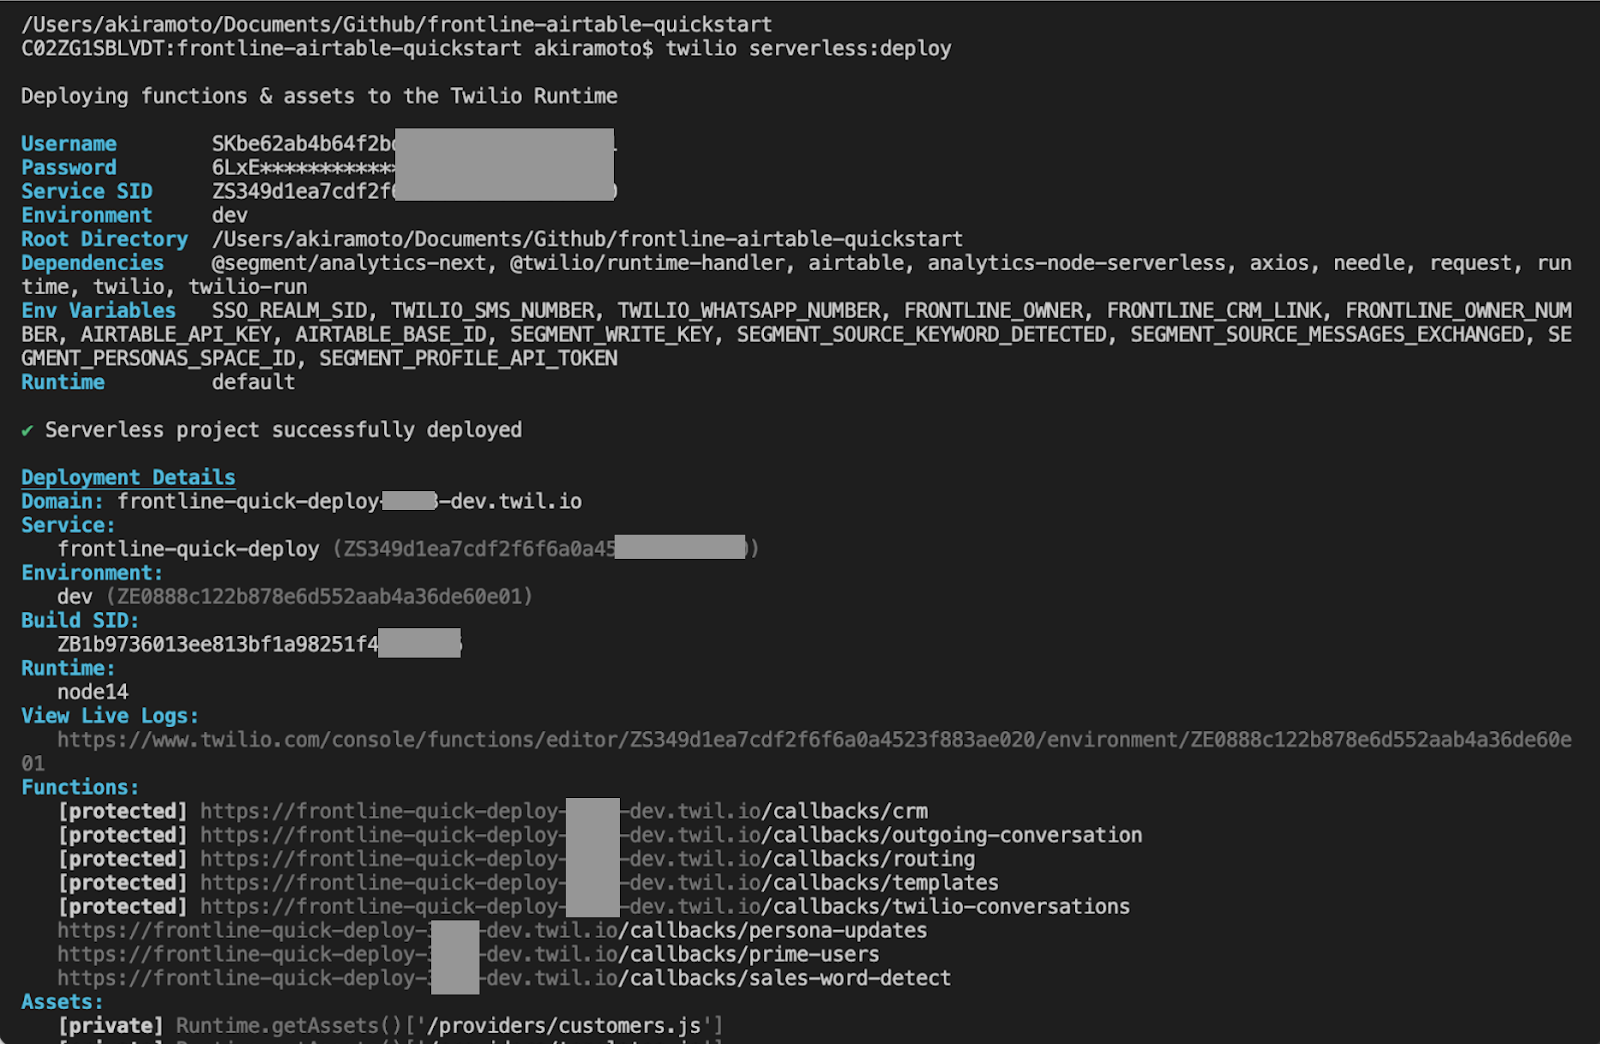
Re-deploy Twilio Functions:
If your deploy is successful, you should see an output that looks like this:
Create Segment Personas Computed Traits
When keywords are detected in your Twilio Conversations, they will be sent to Segment by the /callbacks/twilio-conversations Twilio Serverless Function. These events will be used as the data source that allows us to create Personas Computed Traits in Segment. Computed Traits are how we will dynamically set the ‘Buyer Readiness Stage: High’ status for the users in this tutorial.
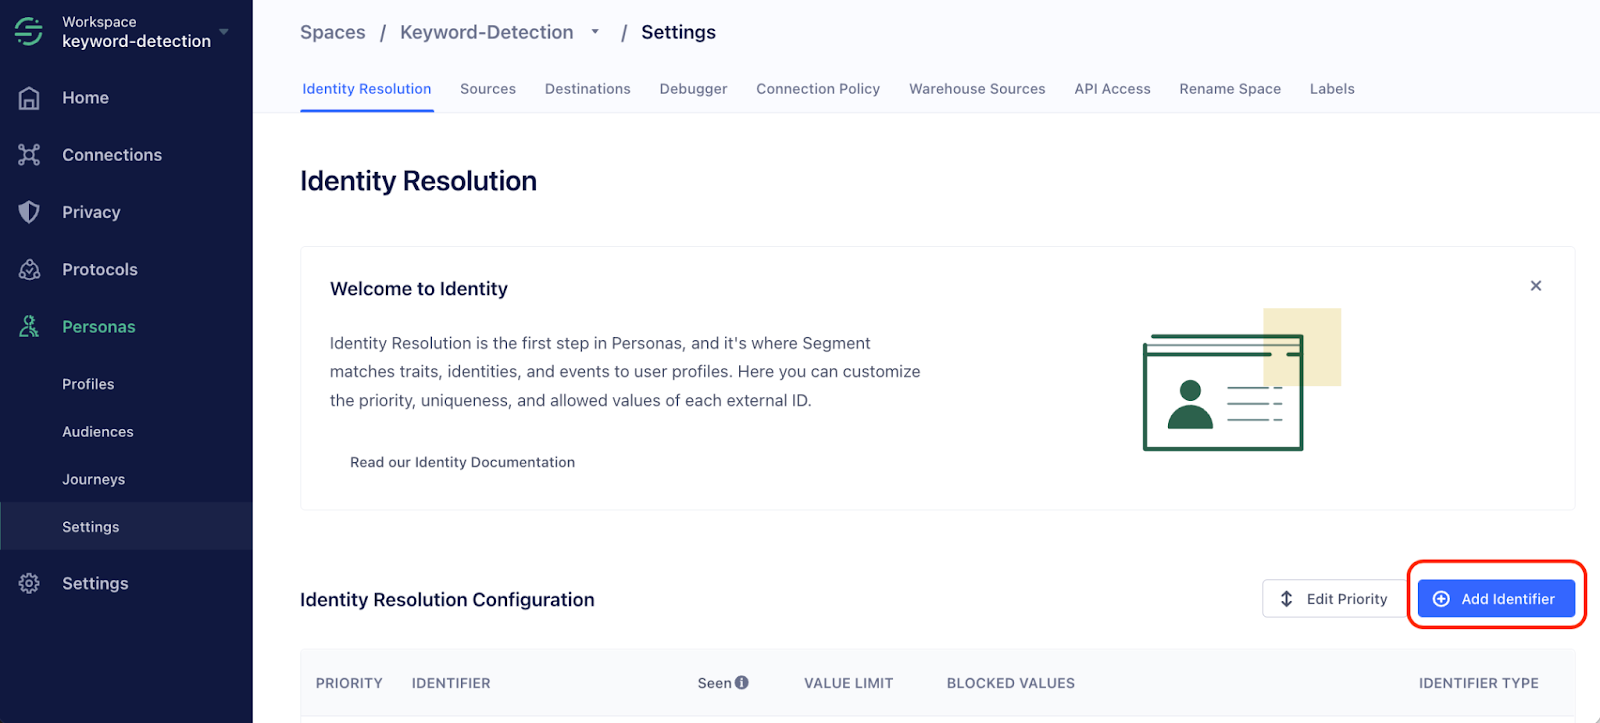
Before generating events and computing traits, let's visit the Segment Personas identity graph configuration and see which sources are feeding our Personas Space.
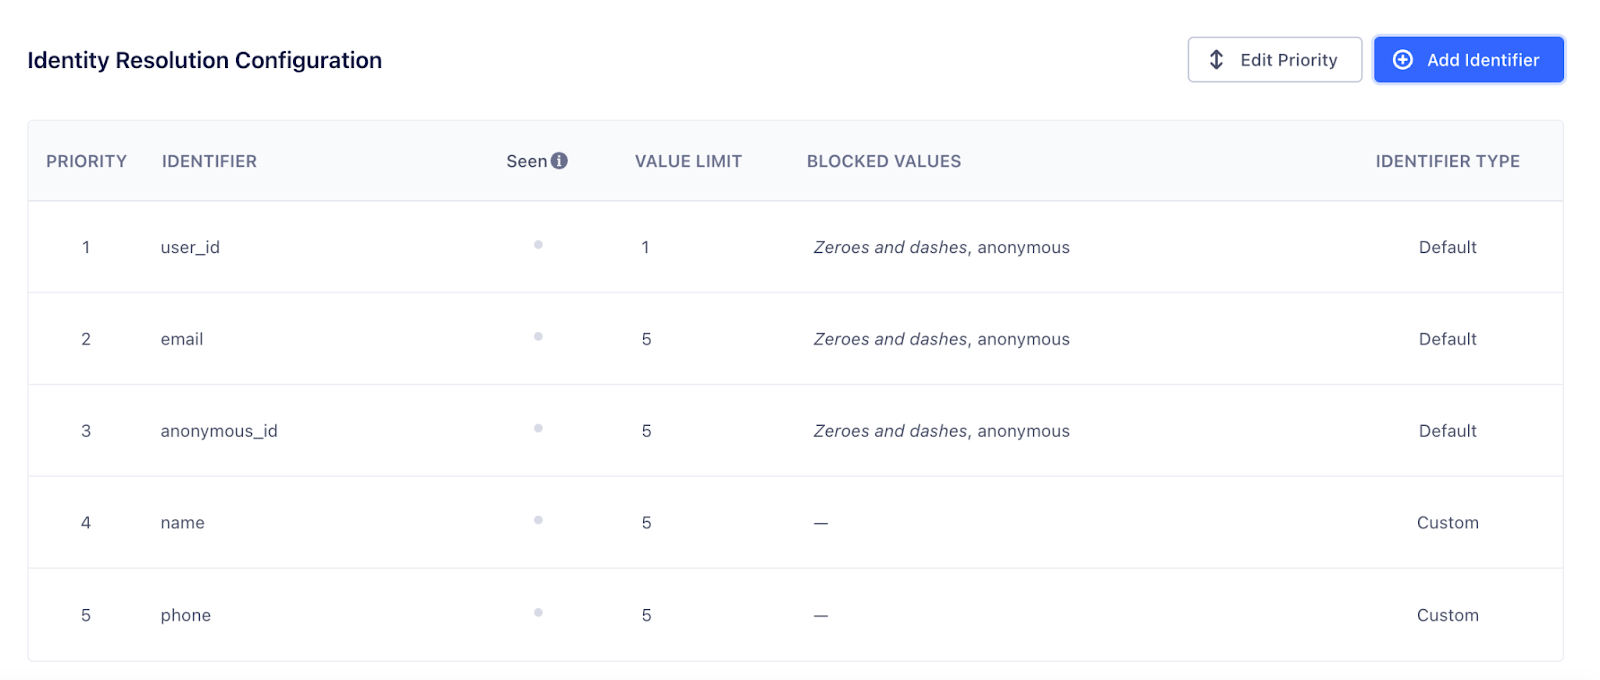
Navigate to Personas. Select Settings from the side menu bar, and then Add Identifier:
Click on Default Identifiers and select user_id, email, and anonymous_id:
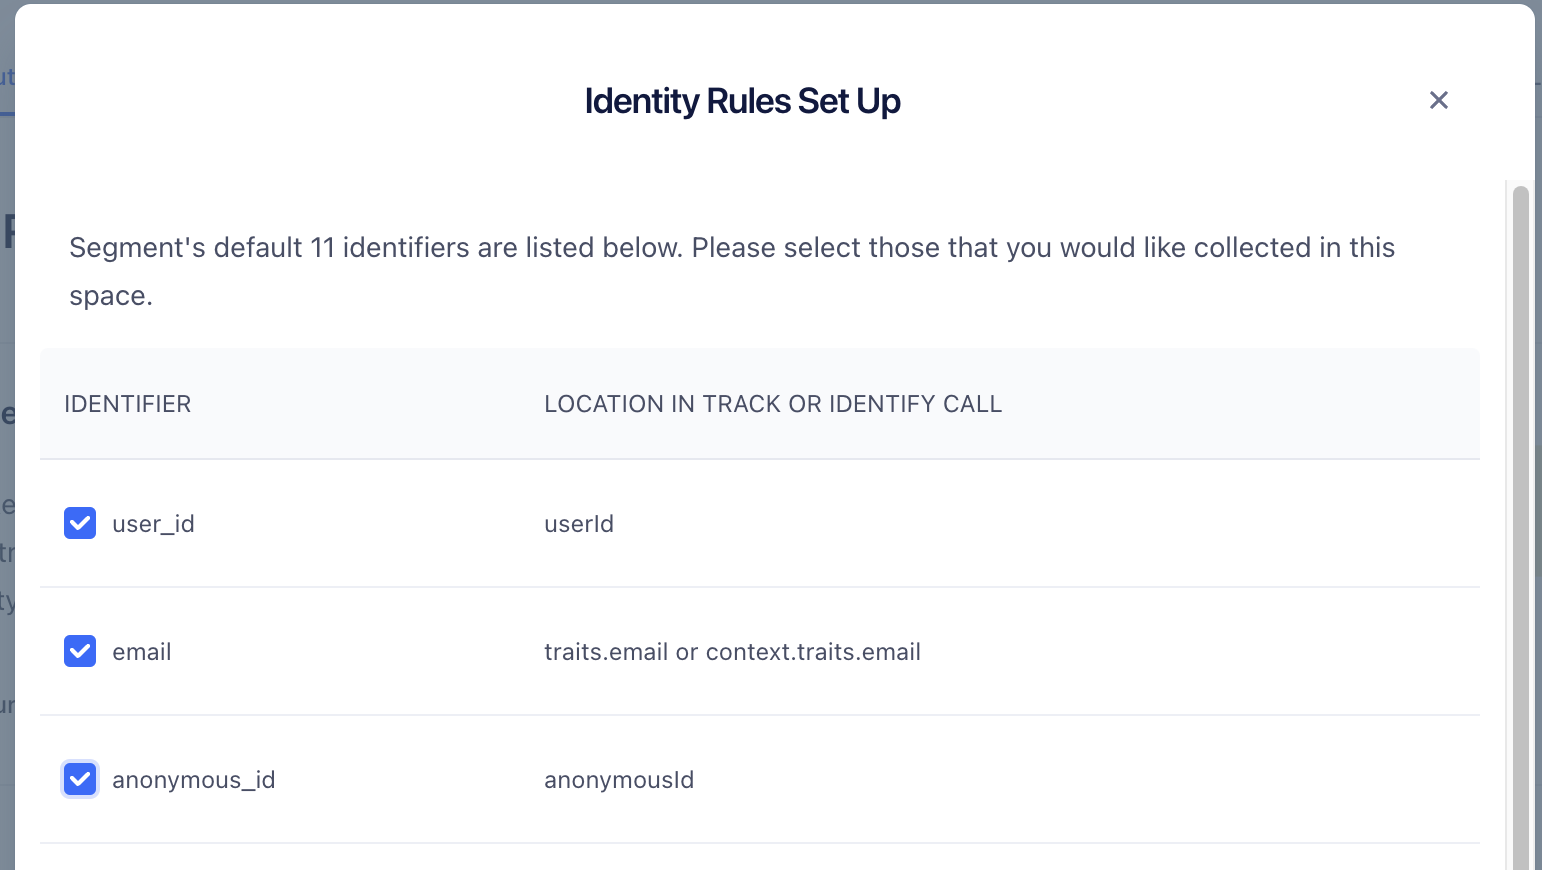
Click Continue, then Add Identifiers.
Click on Add Identifier again and select Custom Identifiers:
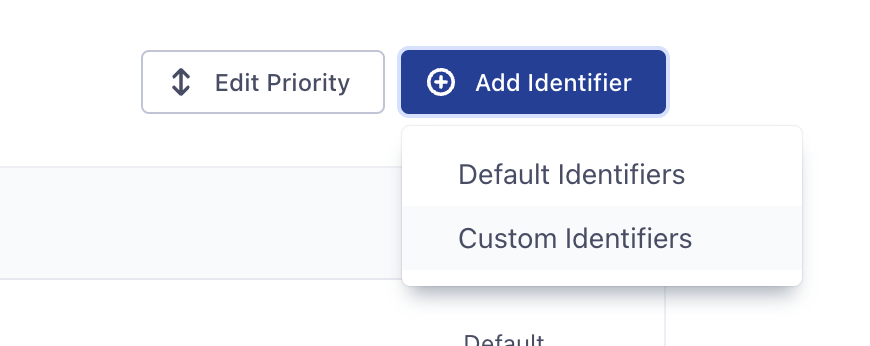
Add ‘name’ and ‘phone’:
Once you’ve done that, navigate to Personas, and select Sources from the top menu bar. Click Connect Sources:
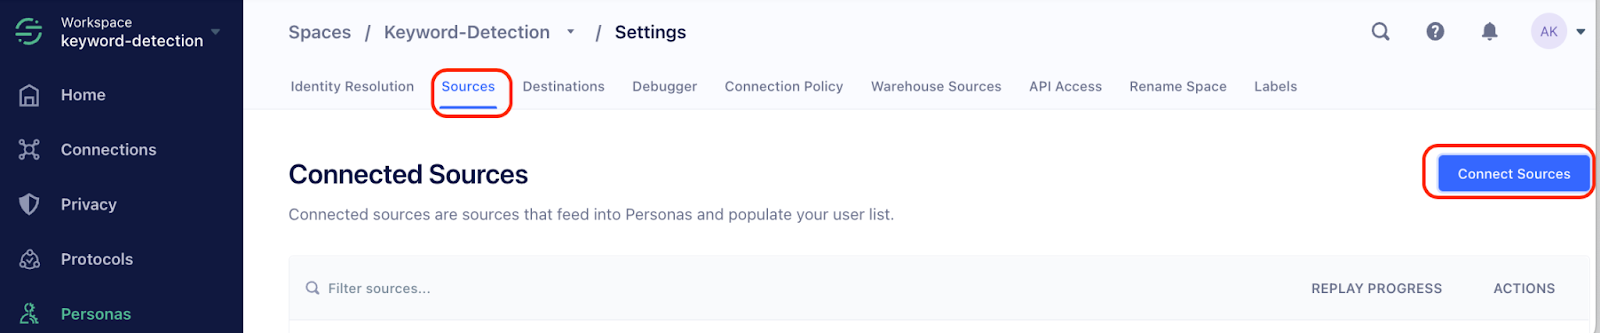
Connect the ‘Message Exchanged’ and ‘Keyword Detected’ sources we made earlier, along with the ‘Twilio Keyword’ Node app source we created earlier:
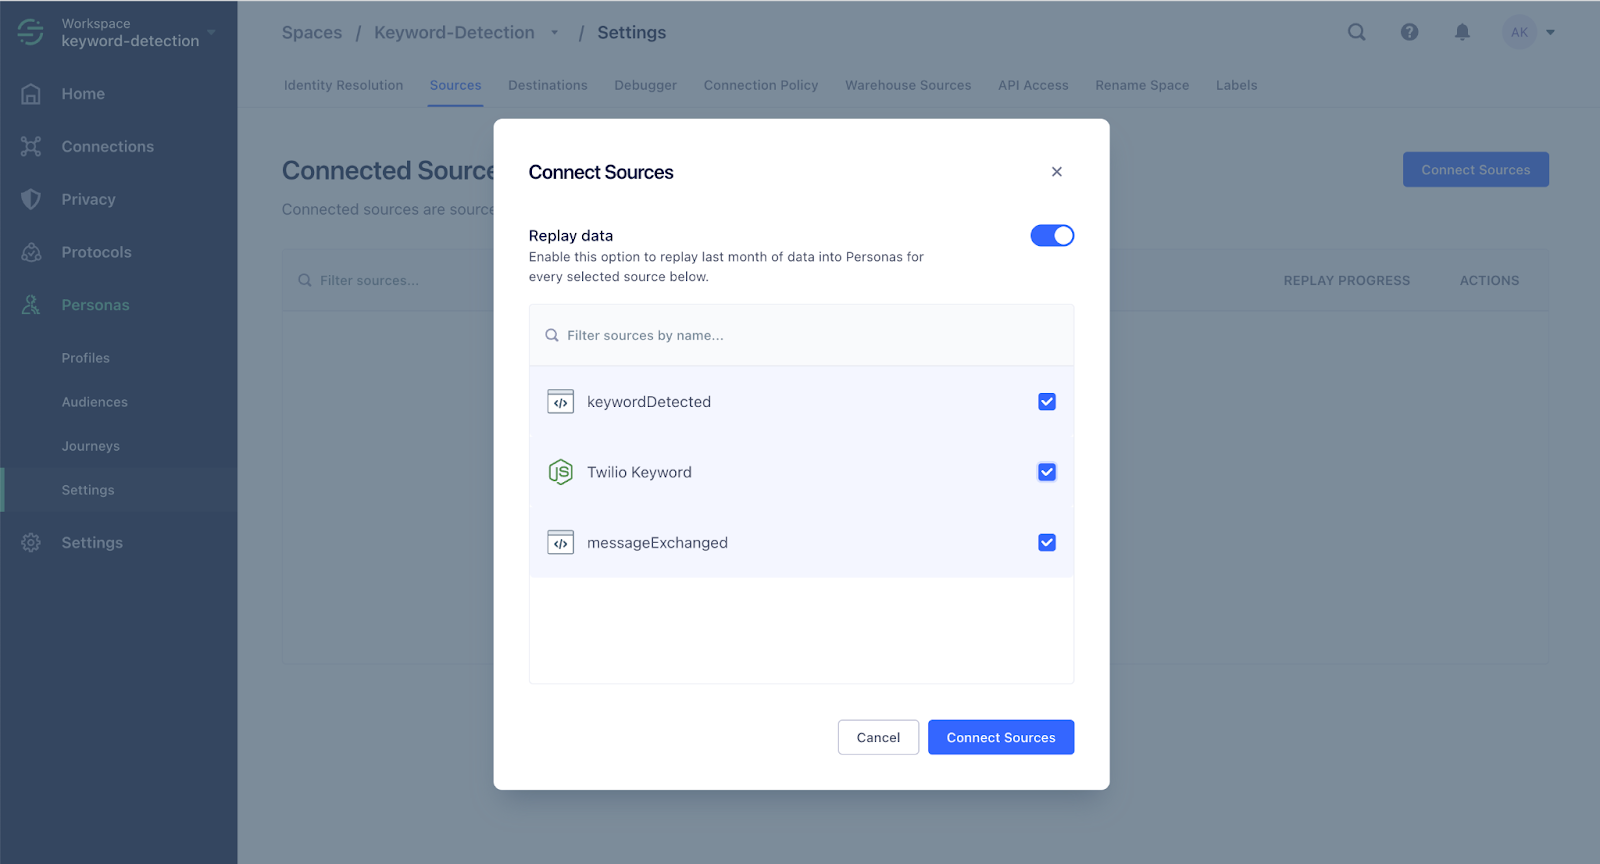
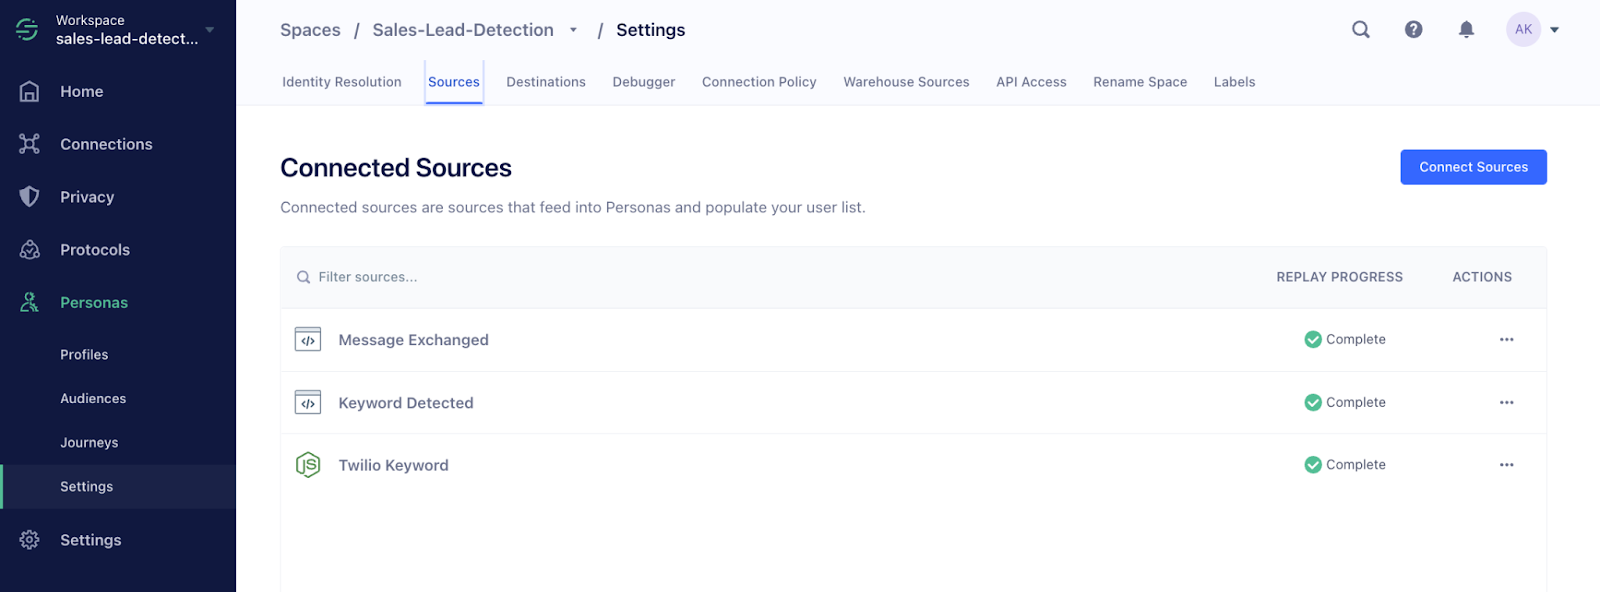
You should see the three connected sources now in the settings:
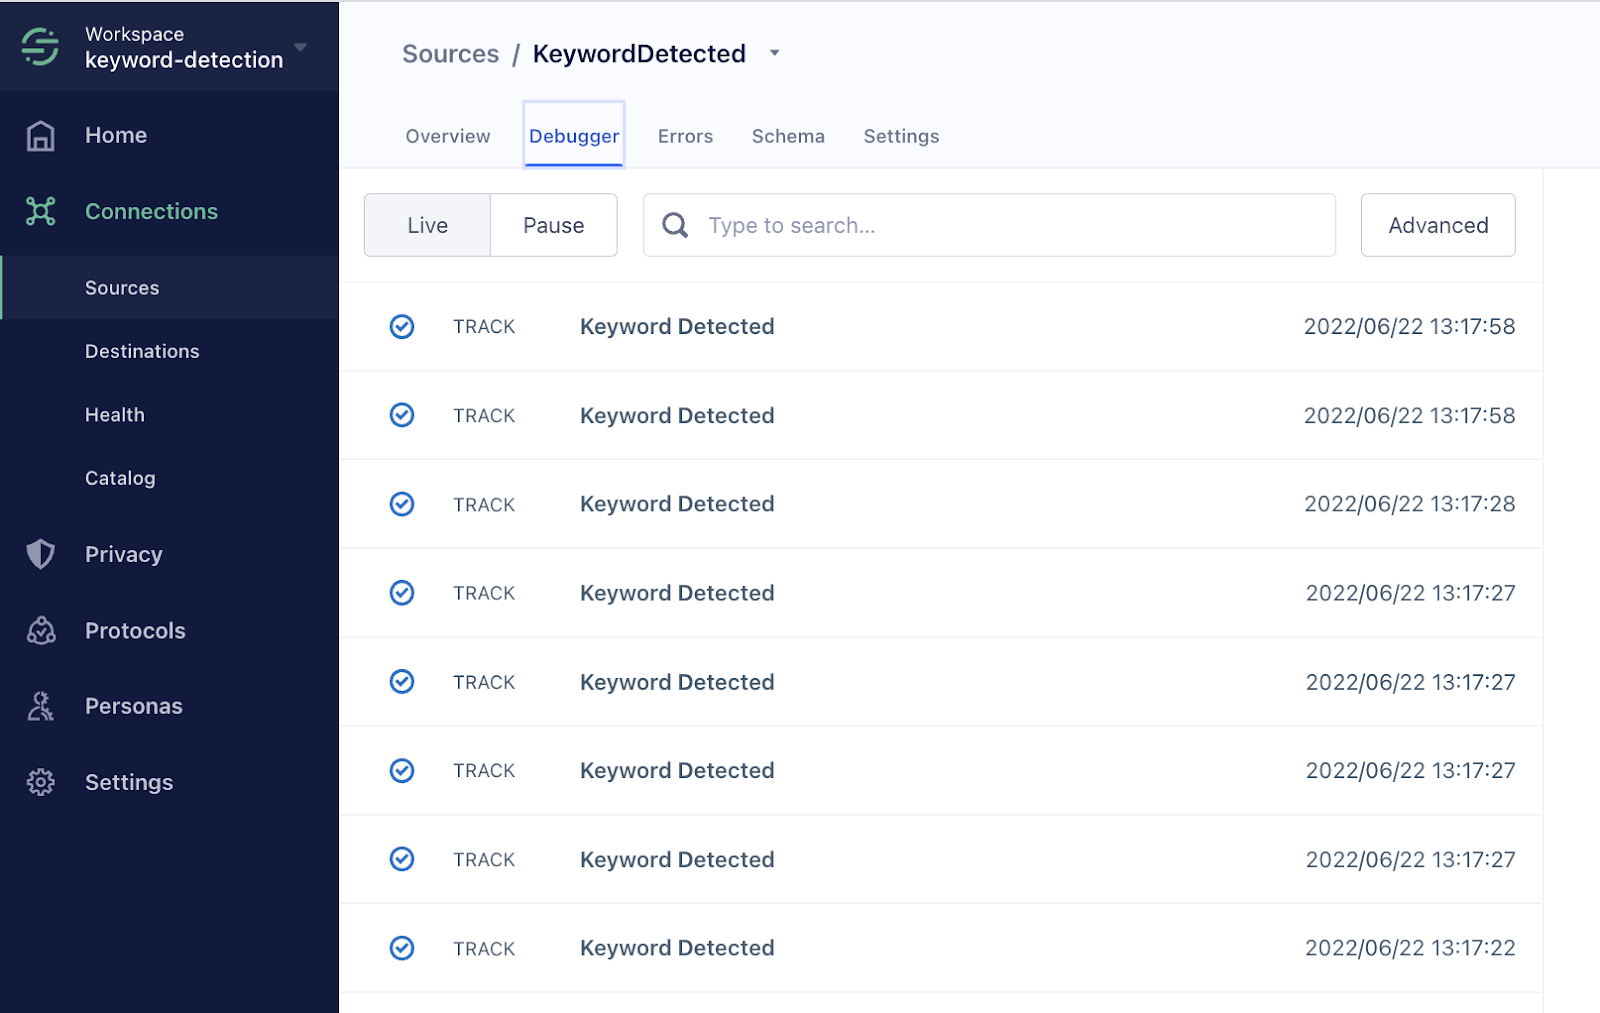
Now we are ready to generate some data, so we can create Computed Traits in Segment. Get started by running the /callbacks/sales-word-detect Twilio Serverless Function. Click the link on your terminal (e.g., https://frontline-quick-deploy-1111-dev.twil.io/callbacks/sales-word-detect)

Run this code a few times to send more events to Segment. Do this at least five times.
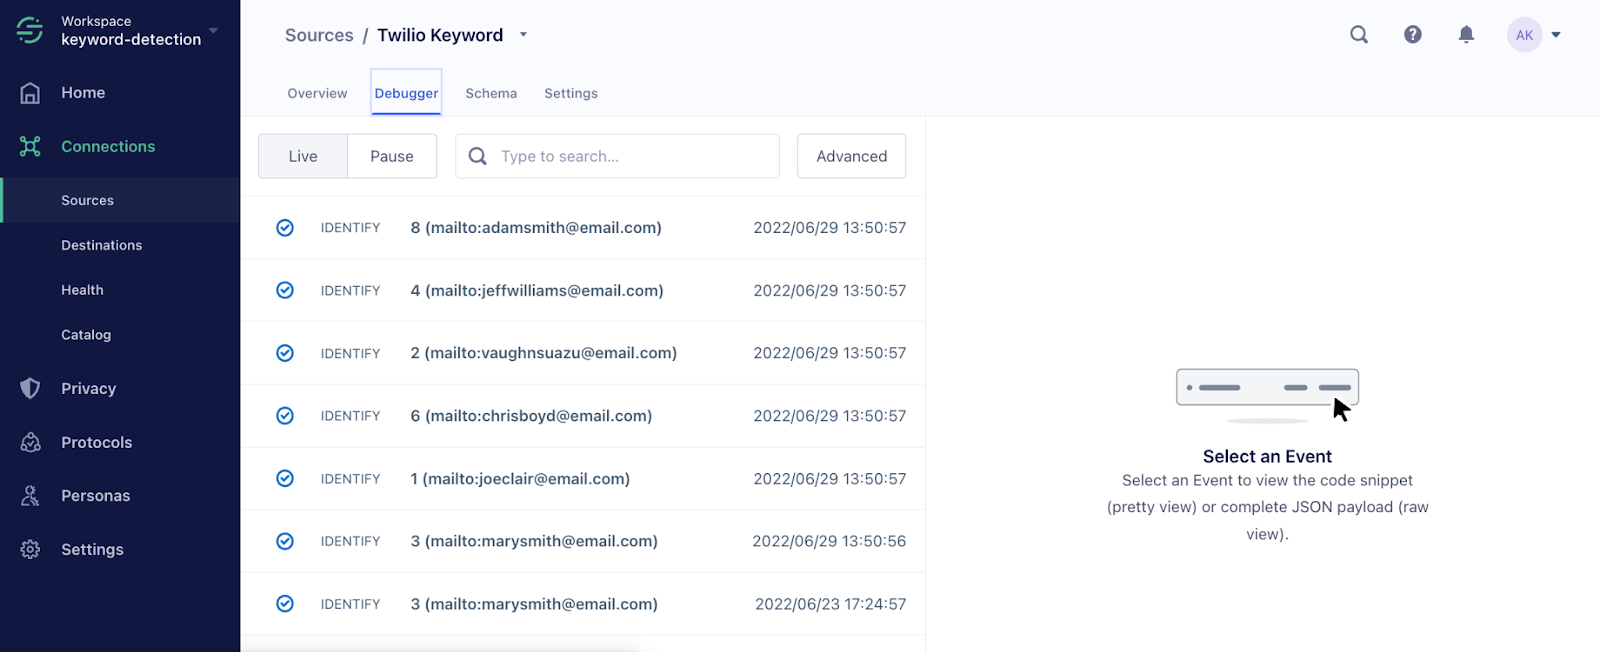
You can see the events coming in by navigating to the debugger. Click Connections > Sources, then click Keyword Detected, then Debugger:
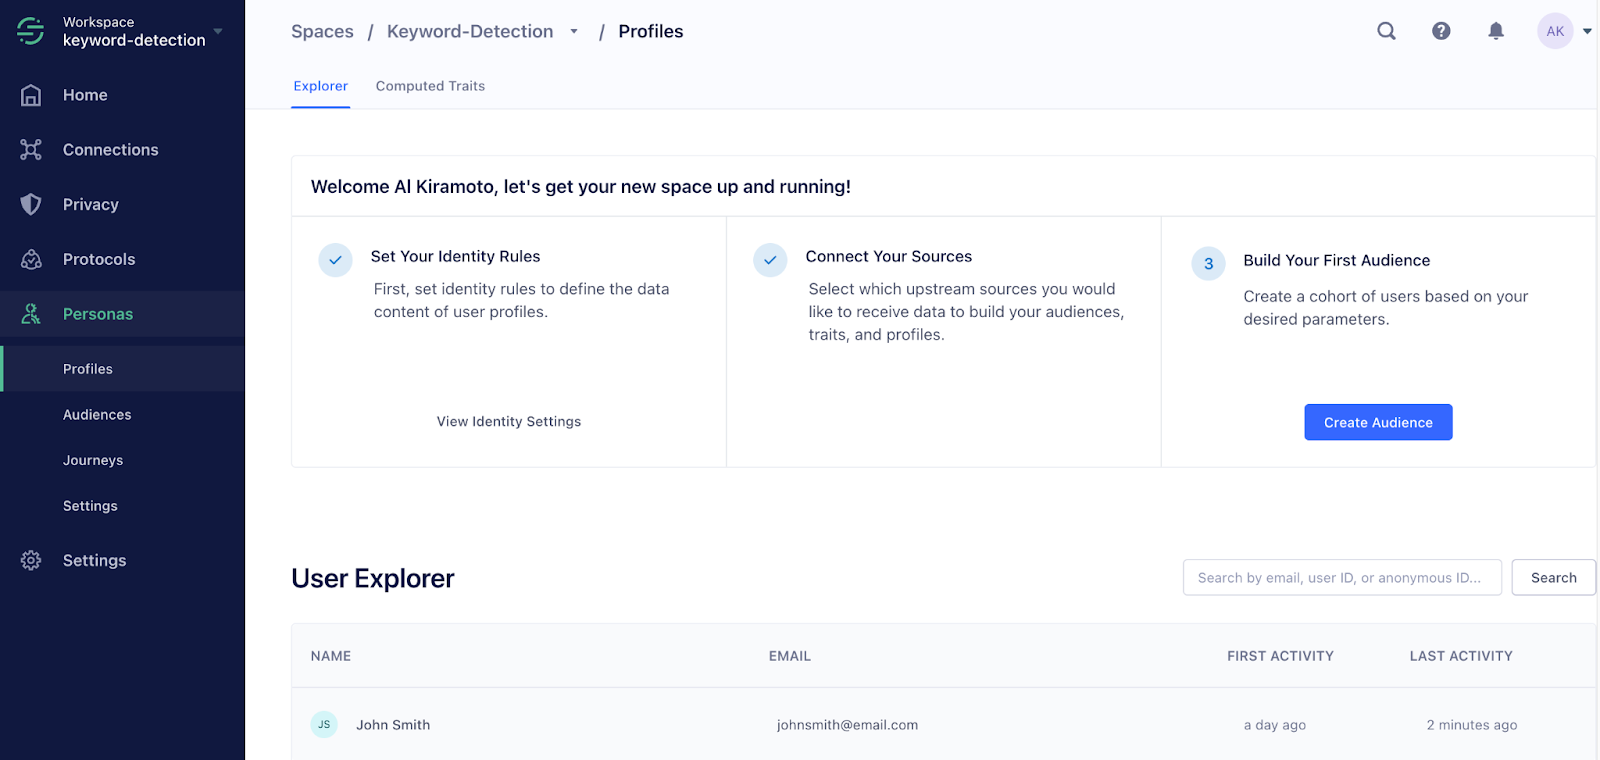
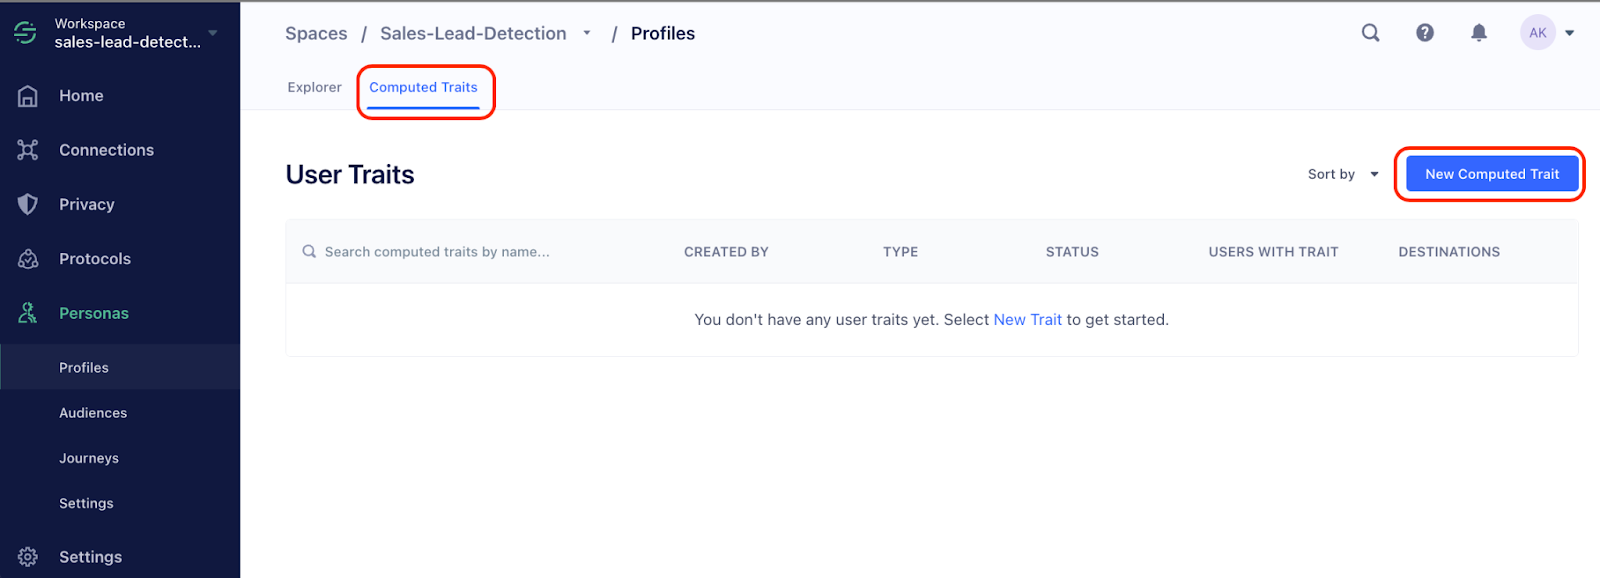
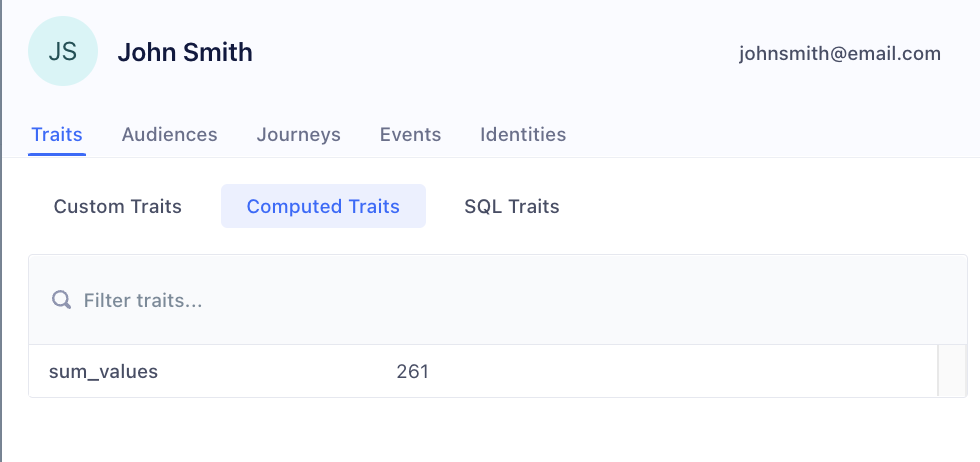
Next, we will set up Traits. Click on Personas in the left sidebar. It will take you to the Profiles page. Under User Explorer, you will see the user ‘John Smith’ and the events we generated:
Select Computed Traits, then New Computed Trait:
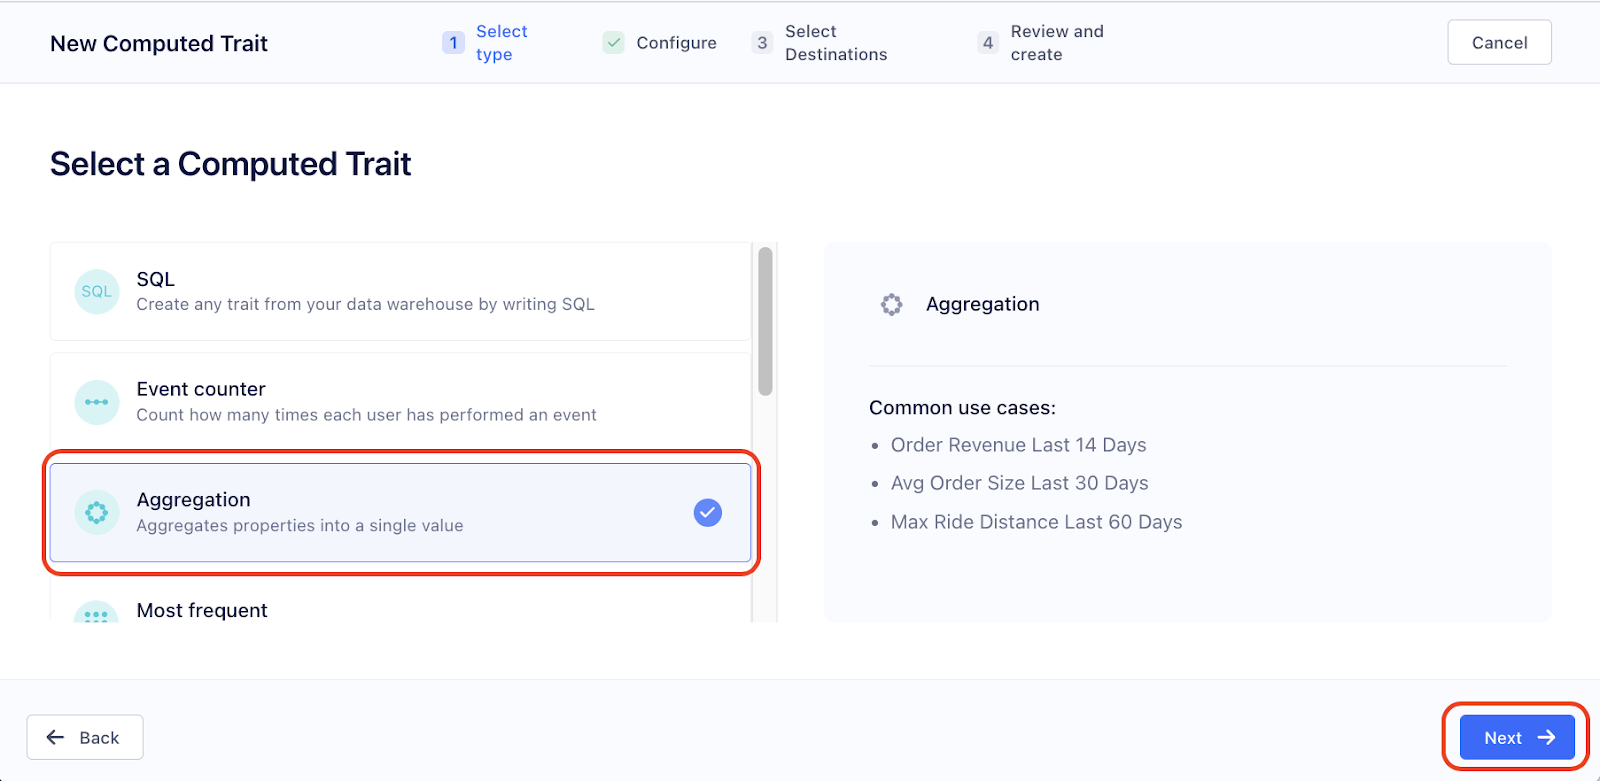
There are many options here, feel free to explore them for a minute or two. For this use case, select Aggregation then Next:
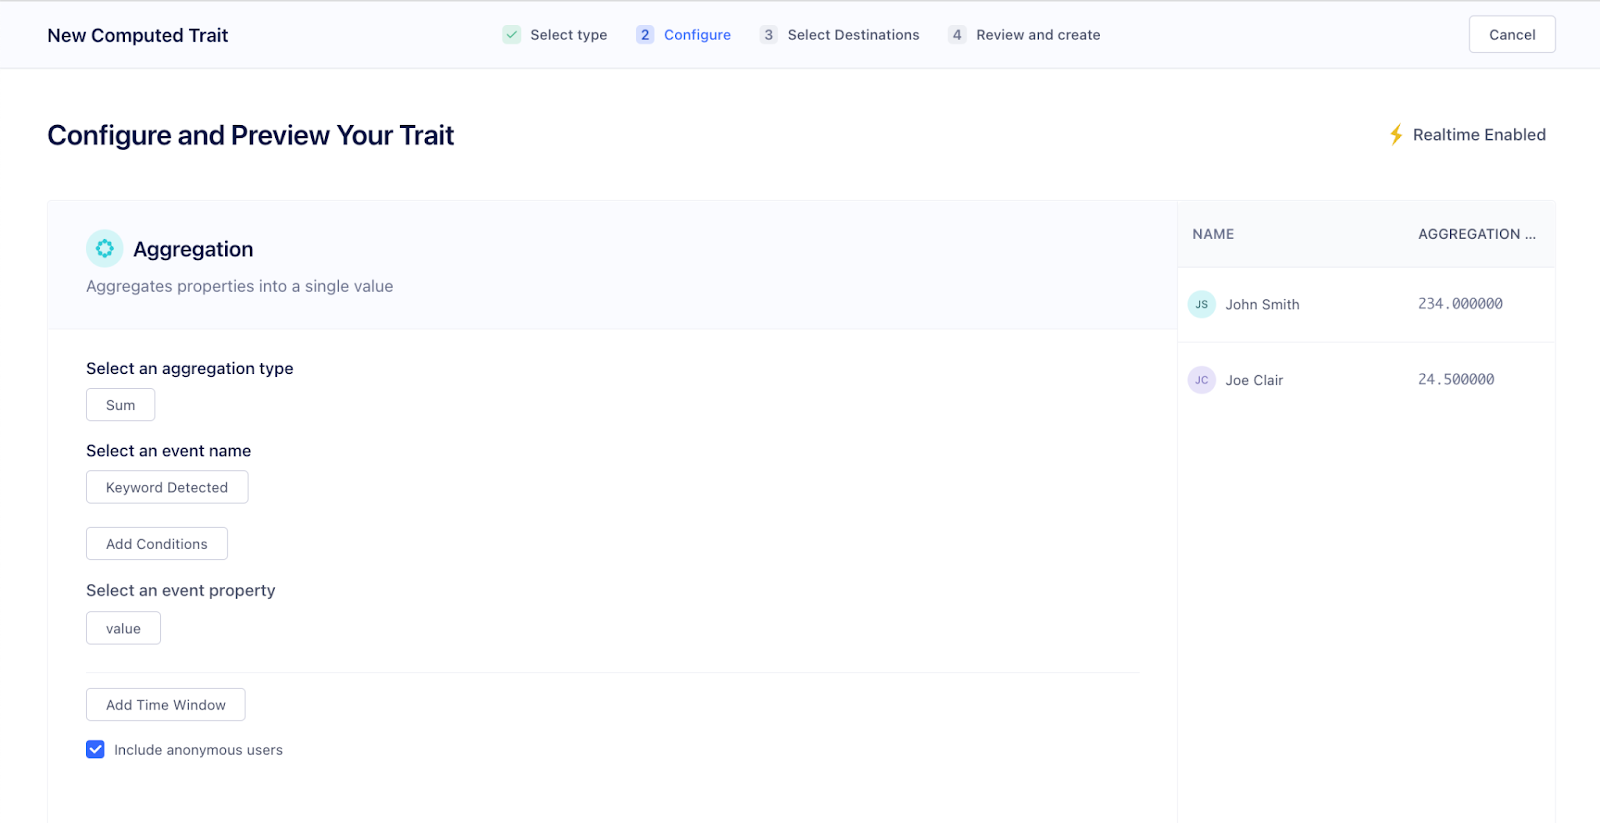
Select Configure. In the Select an aggregation type prompt, leave it as ‘Sum’. For Select an event name, click Select Event, then click on Keyword Detected. Then, for Select an event property, choose ‘value’.
Select Preview and let this trait be computed. You will see a preview which looks similar to this:
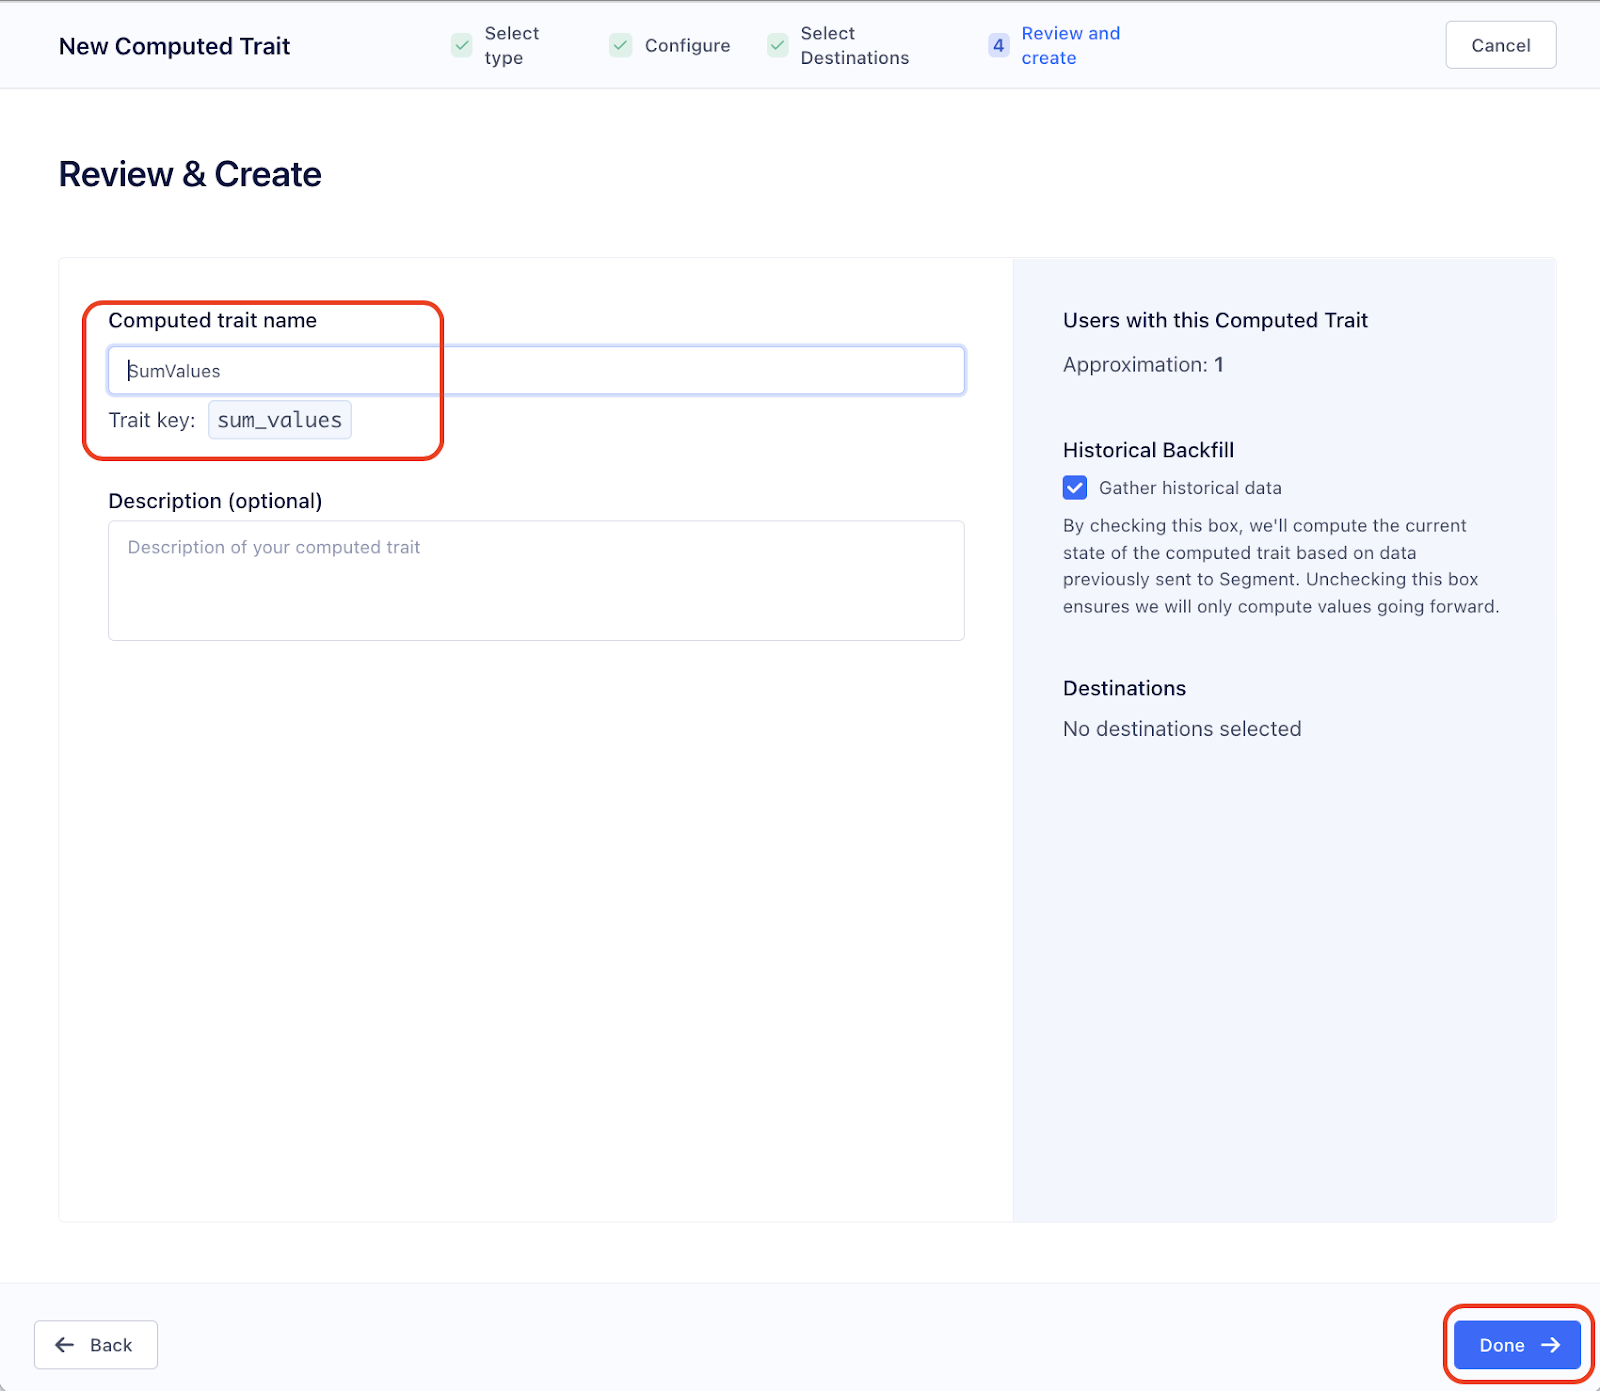
Click on Next, you will be on the Select Destinations page. Click on Next (do not select a Destination here). You will be on the Review & Create page. In the Computed trait name prompt, type SumValues (this needs to be exact for our app to work).
Then, click on Done:
We will need to wait a few minutes while this new Trait is computed by Segment.
Once the User Trait is computed, you will be able to see something similar to this:
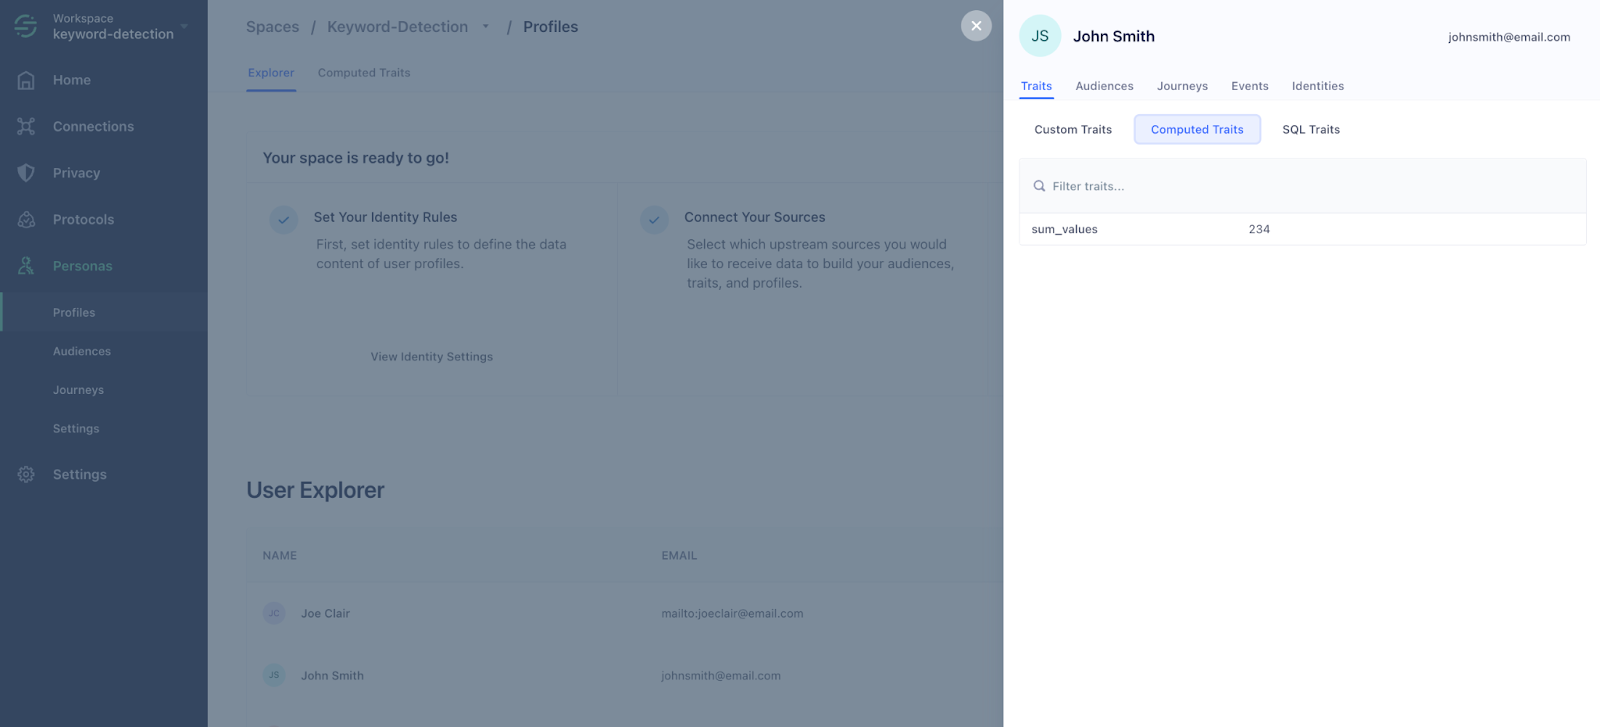
Also, you can go the User, then select Traits, then Computed Traits
Create Segment Audiences
Now, let’s configure our Audiences.
(1) BuyerReadinessHigh Audience
Go to Personas on the left sidebar, then Audiences. Click + New, then Audience:

You will see ‘This audience contains all users where…’ then ‘All Users who’ – click on the + Add Condition button. Choose the Have a Computed Trait option. For the ‘...have a Computed Trait’ prompt, select the trait ‘sum_values’. Click on equals and change it to greater than, and choose a value (for example, 20). Click on the Preview Results button.
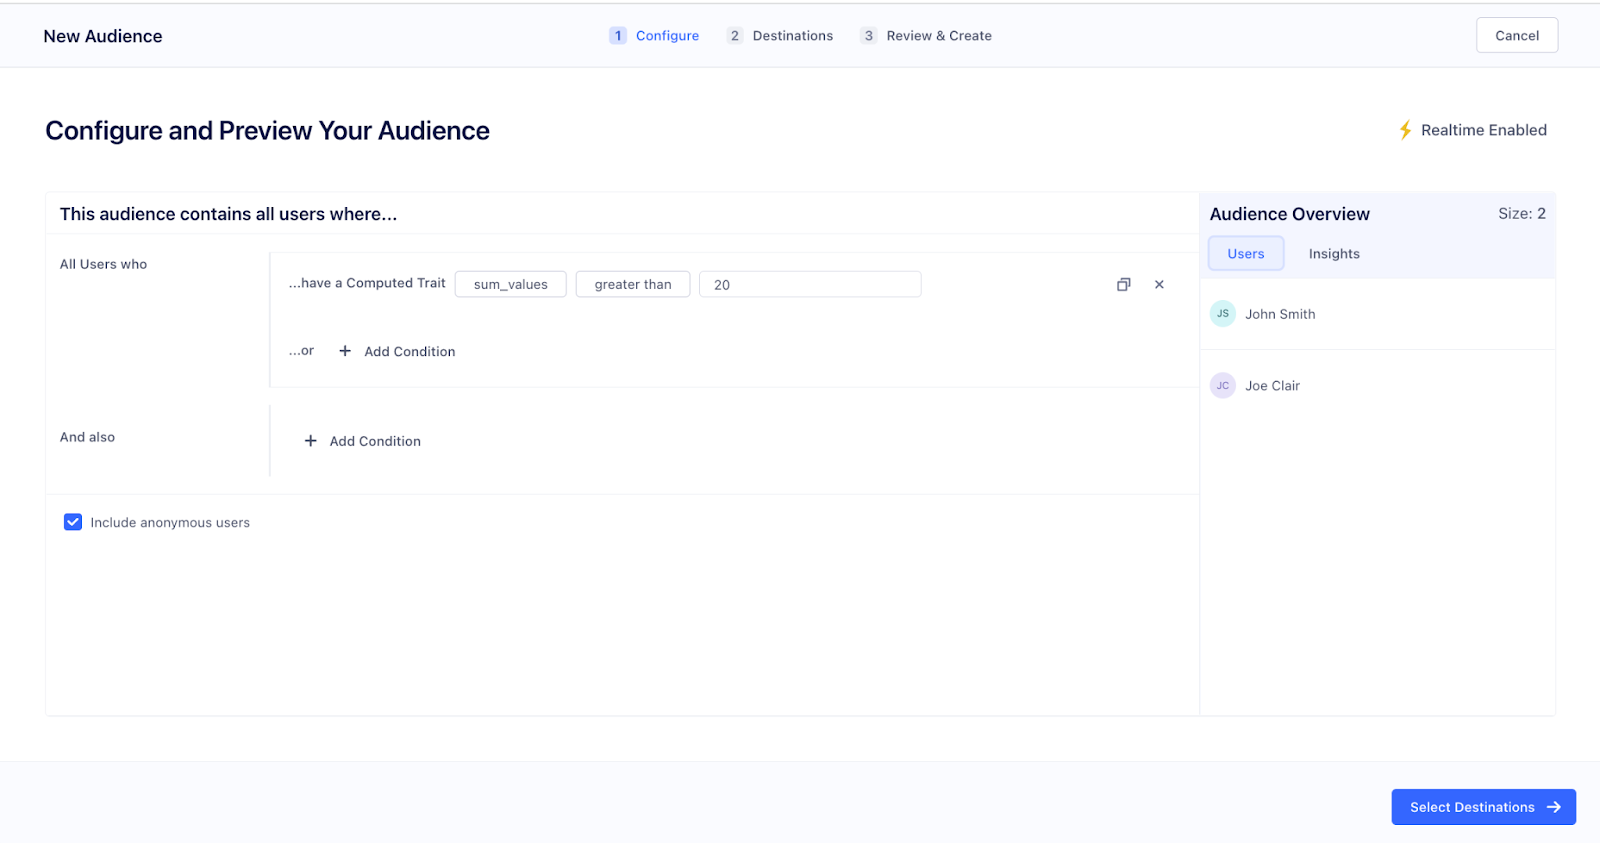
Click on Select Destinations. Do not select a Destination here.
Click Review & Create.
For Audience Name, use BuyerReadinessHigh (this needs to be exact for our app to work).
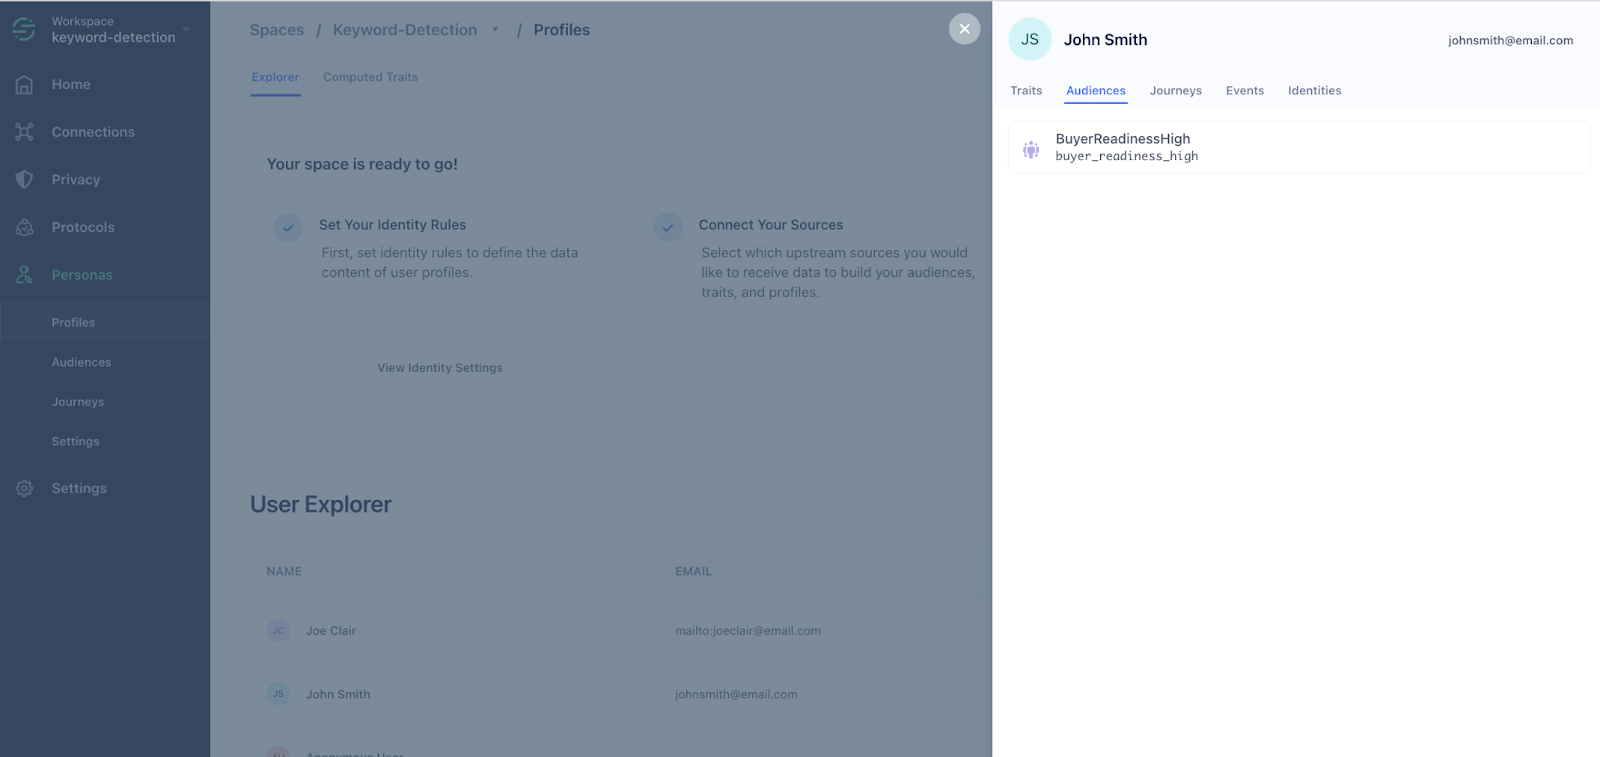
You can see if our Audience was computed correctly by going to Personas > Profiles. Select the user John Smith and Audiences to see the Audiences:
You can see that for our test user, we have a Computed Trait with a counter in ‘sum_values’:
And John Smith is added to the ‘BuyerReadinessHigh’ Audience as well:

(2) customerWantsFinance Audience
Using Frontline, go ahead and send and receive a few messages. You will see that your Source messageExchanged logs everything.
Go to Personas on the left panel, then Audiences. Click + New then Audience.
You will see ‘This audience contains all users where…’ then ‘All Users who’. Click on the + Add Condition button. Choose Performed an Event:
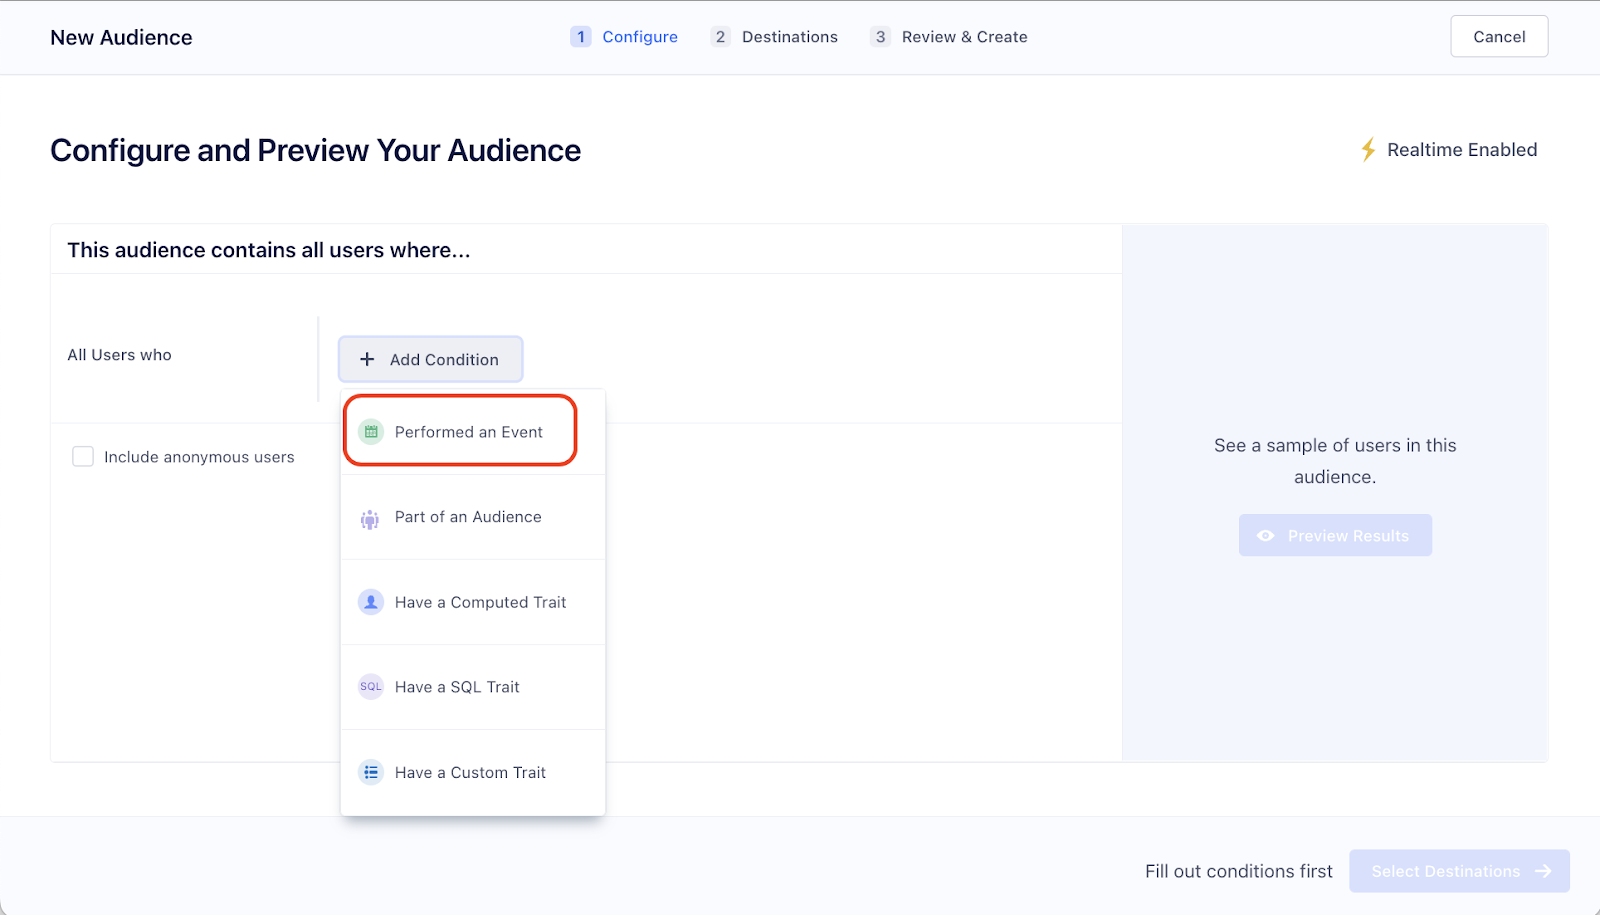
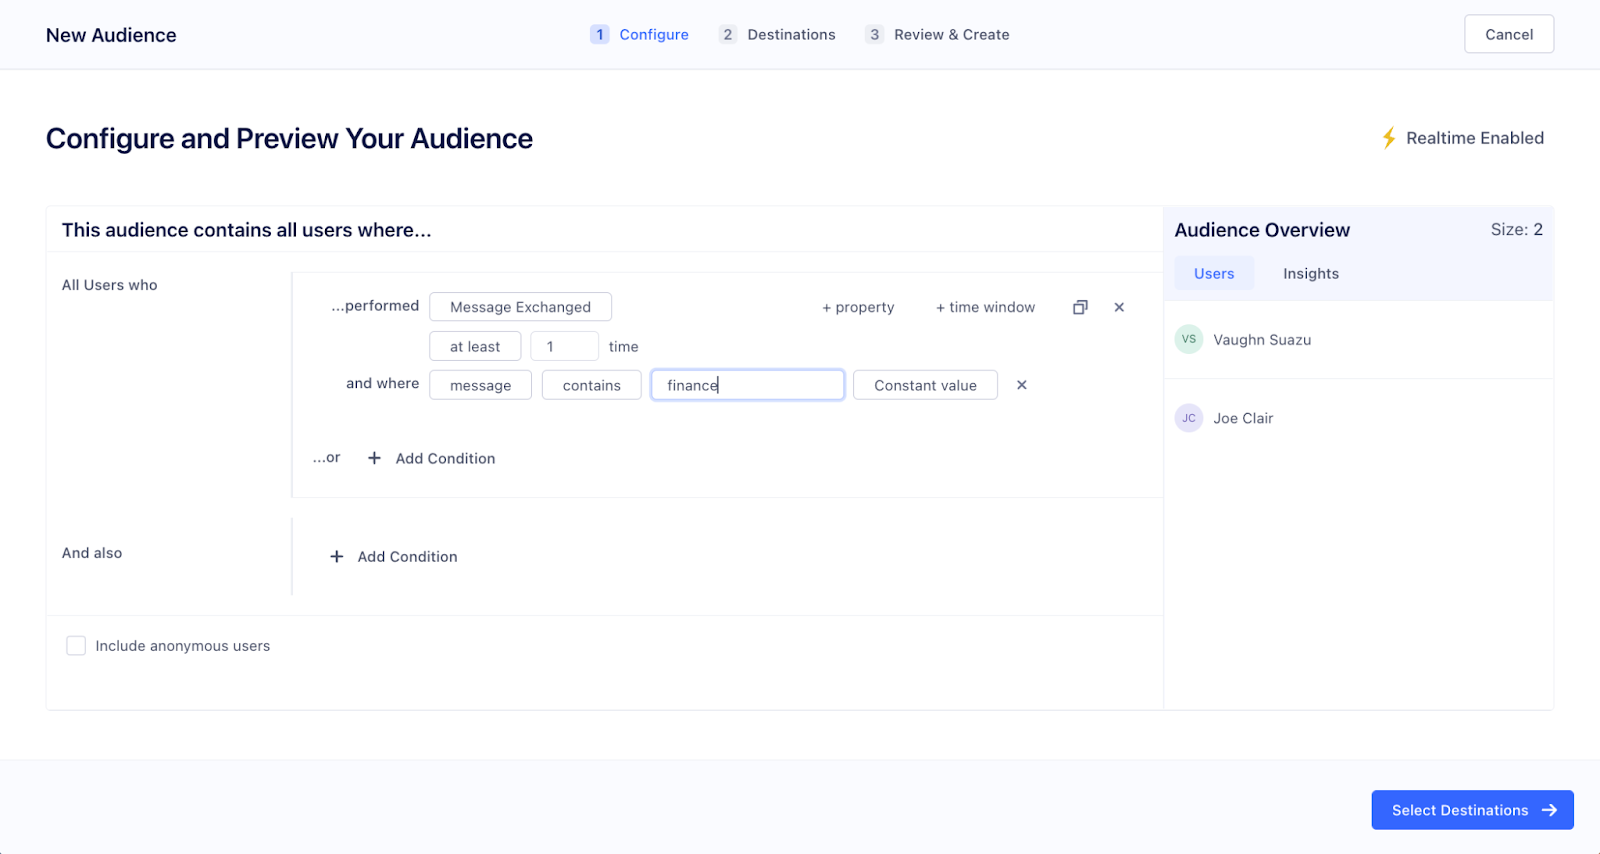
For the ‘...performed’ prompt, select the name Message Exchanged. Click on +property and change Select Property to message. Change the equals to contains and the field type finance. Click on the Preview Results button to preview your Audience.
Click on Select Destinations. Do not select a Destination here. Click Review & Create.
For Audience Name, use customerWantsFinance (this needs to be exact for our app to work).
You can see if our Audience was computed correctly by exchanging some messages, followed by a message including the phrase “I want to finance”. Then, wait a couple minutes, then go to Personas > Profiles. Select the user that said the phrase, and check under Audiences for ‘customerWantsFinance’.
Create a Segment Destination
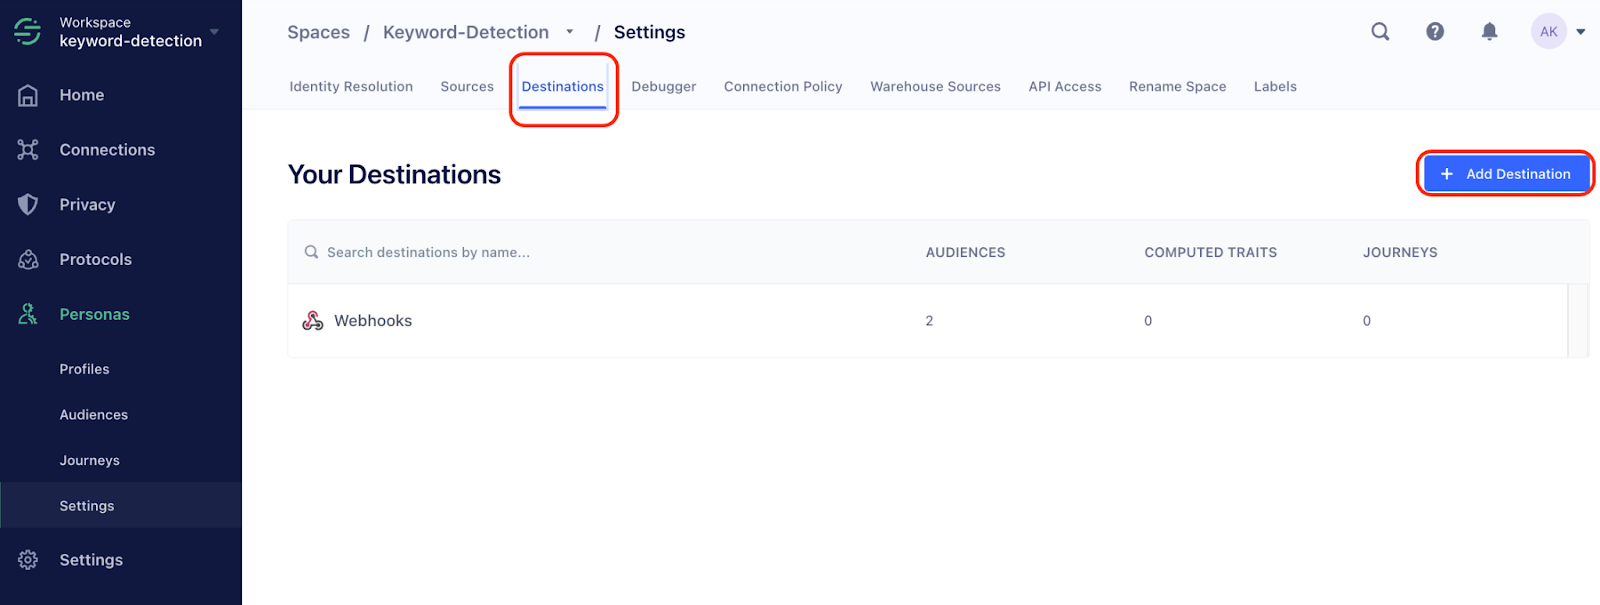
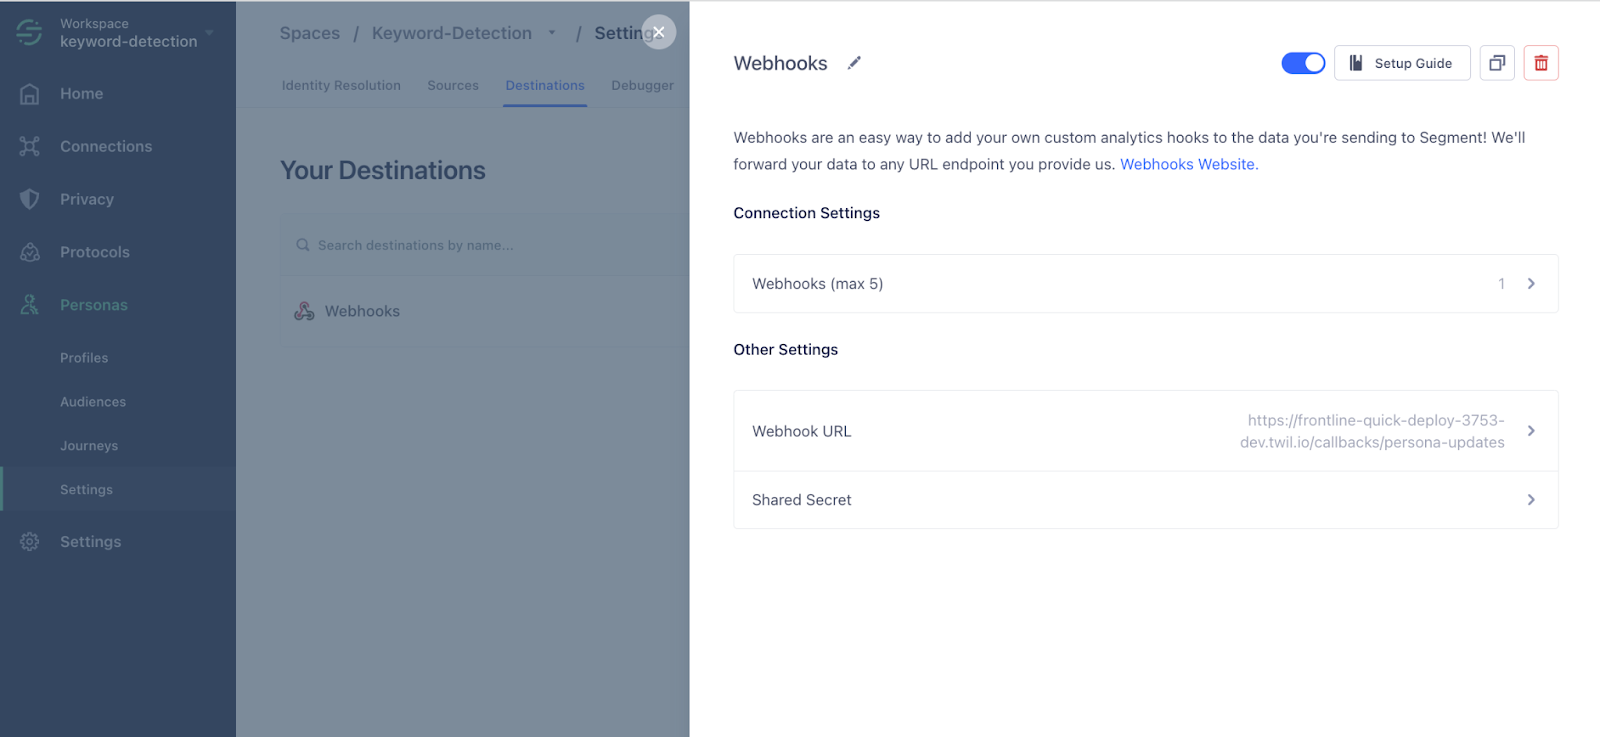
Finally, we will need to create a Destination for our Audience, so we can send the information back to Twilio (to the Function /callbacks/persona-updates). In production, this might be a webhook directly to your CRM to update the customer record.
Click on Personas, Settings, then Destinations. Select Add Destination:
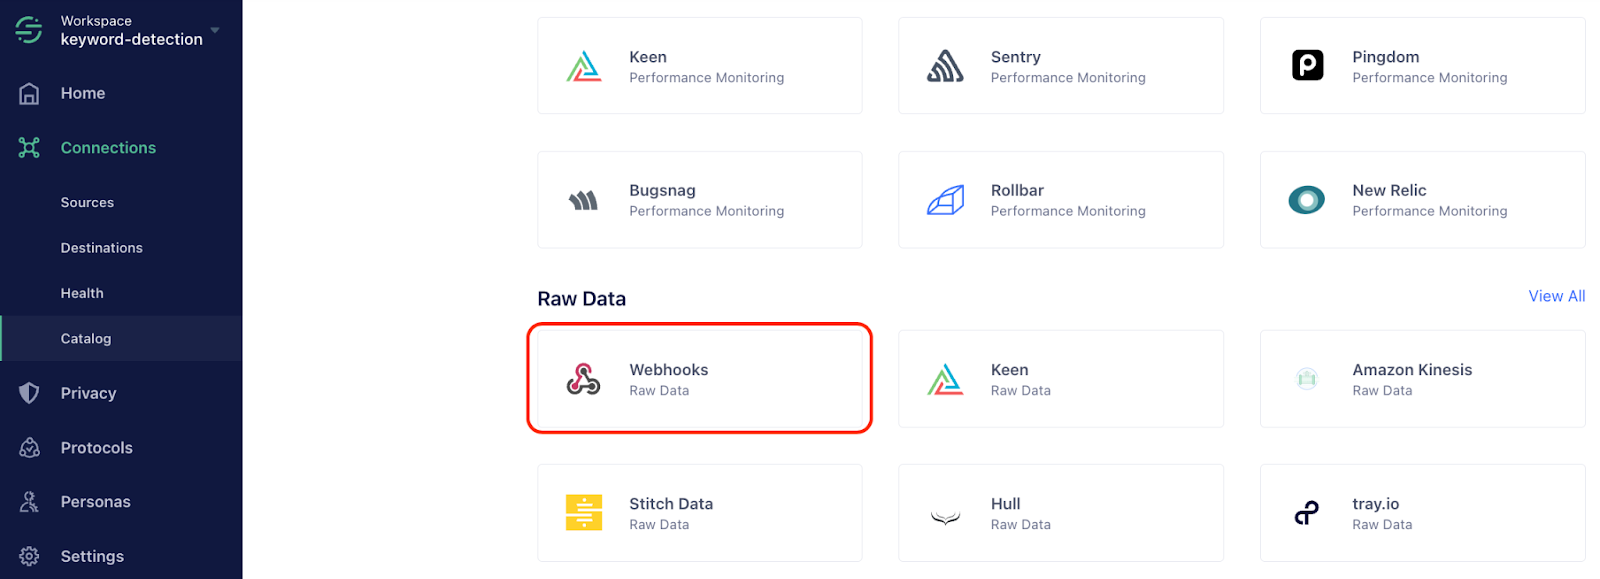
On the bottom of the new page, you will select Webhooks under Raw Data.
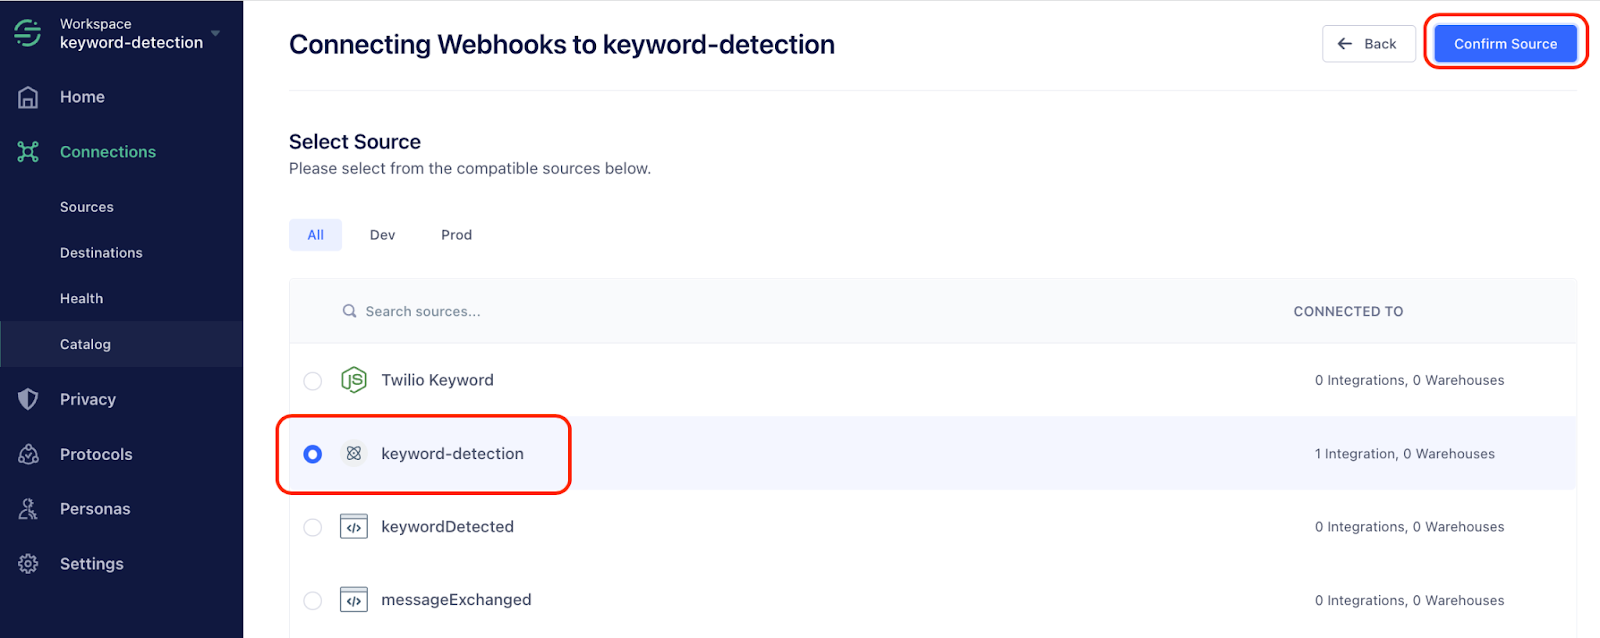
Click Configure Webhooks. For Select Source, leave the keyword-detection field alone, then click Confirm Source.
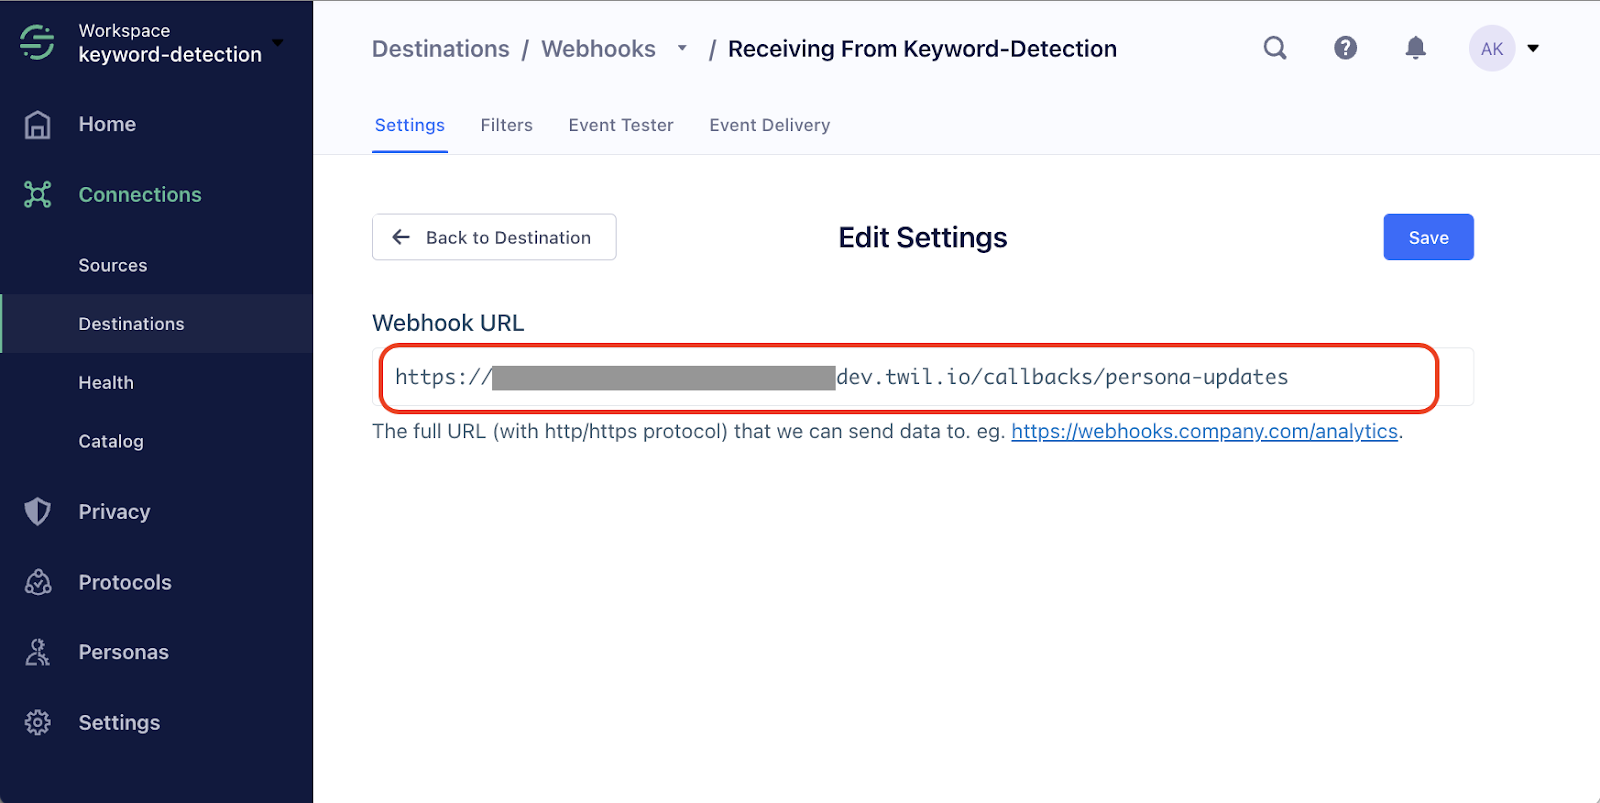
Paste the link for the callbacks/persona-updates function, then select ‘Save’:
Go to Personas, then Audiences, then click on Add Destinations. Select Webhooks, then enable them (using the small blue toggle button):
Go to Personas, then Audience. Select ‘BuyerReadinessHigh’, then hit Add Destinations. Select Webhooks, then leave Send Identify ON (only Send Identity, do not check Send Track):
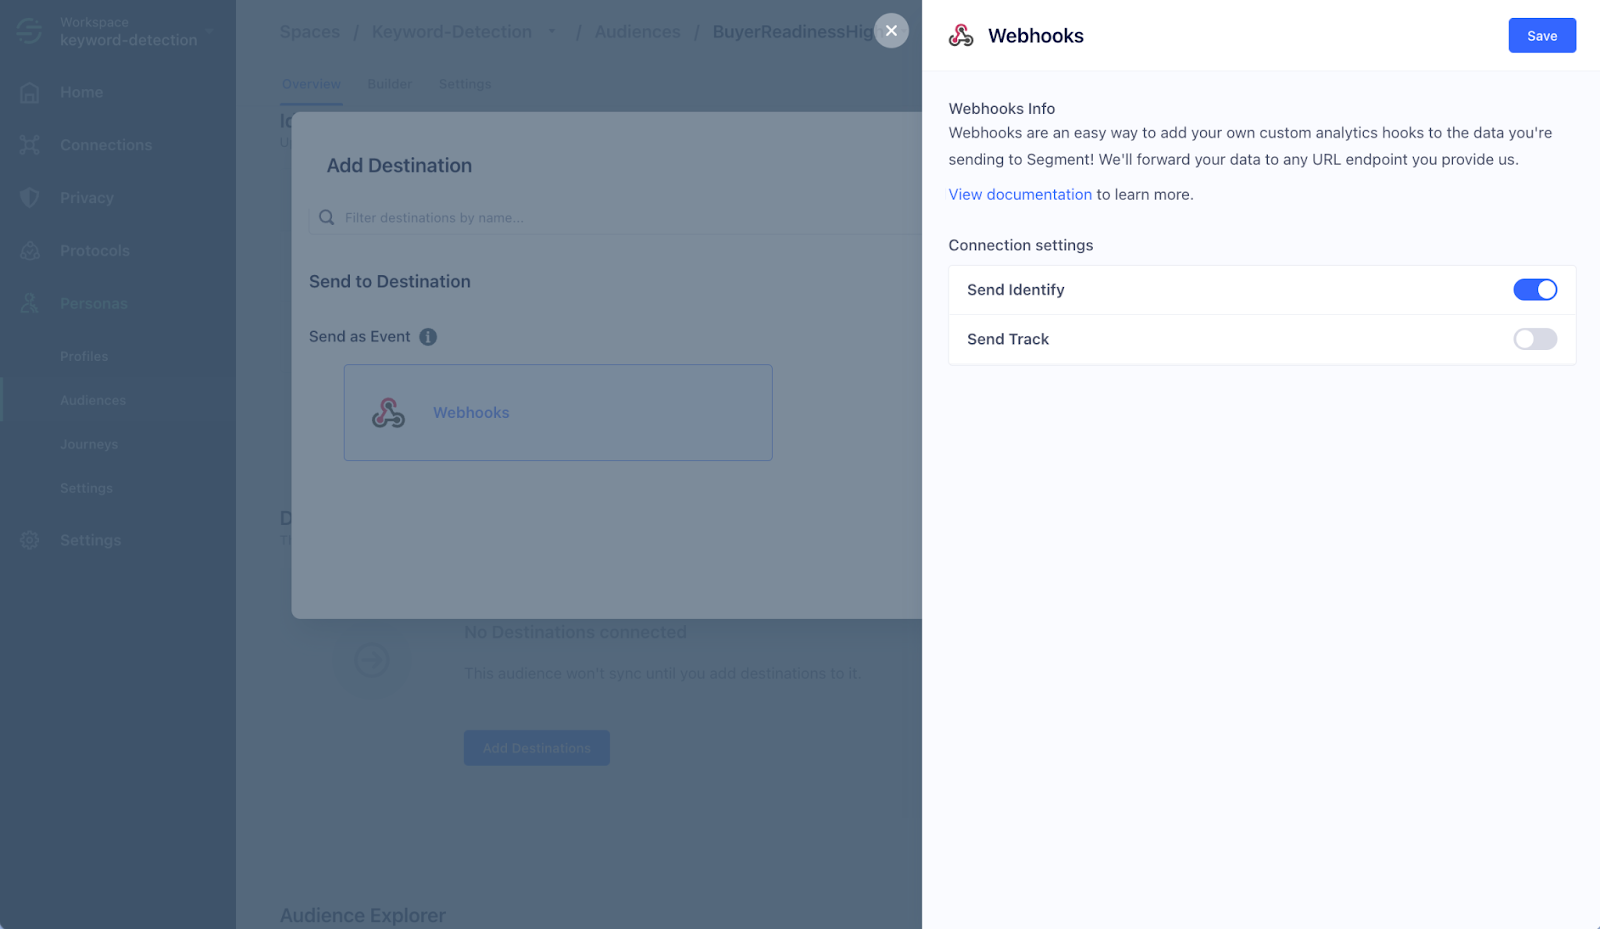
Click Save then Add 1 Destination.
Test it out
Log into Airtable (our mock CRM) and configure your customers:
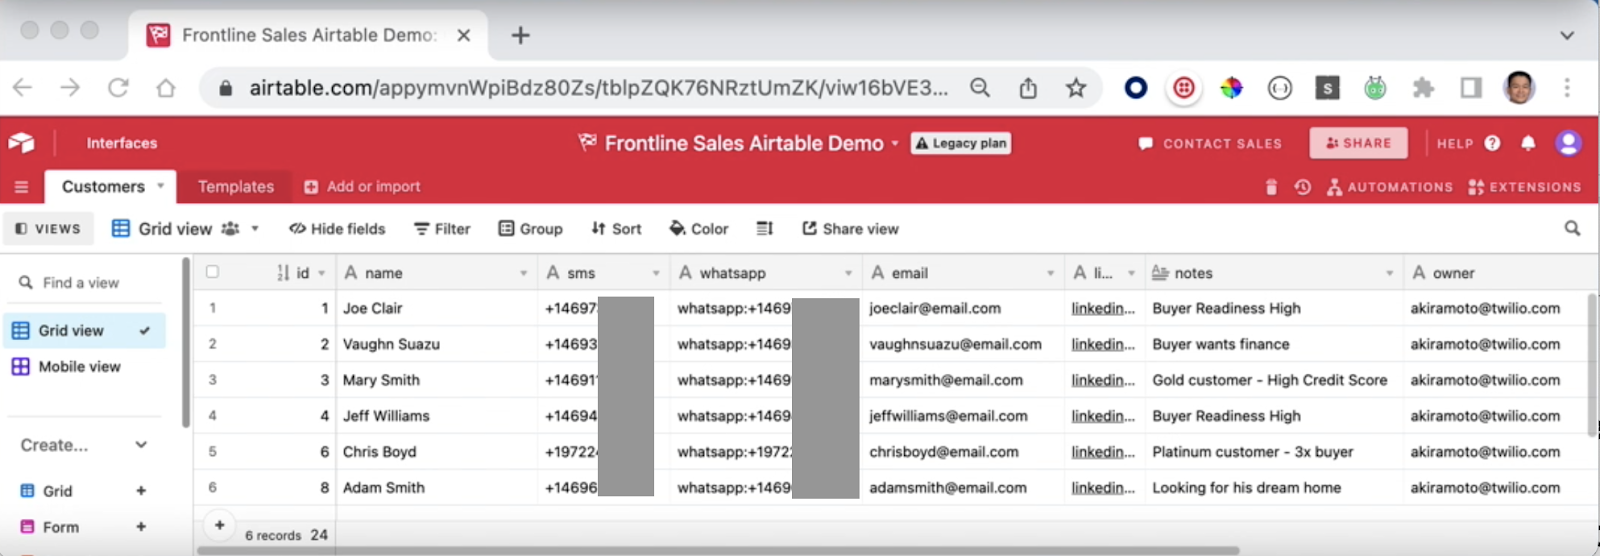
For the notes, add some initial information (e.g., “Buyer Readiness Low”).
Prime these users in Segment by running the /callbacks/prime-users Twilio Serverless Function. Click the link on your terminal (e.g., https://frontline-quick-deploy-1111-dev.twil.io/callbacks/prime-users):
Go to Sources > TwilioKeyword > Debugger. Check if your customers are updated:
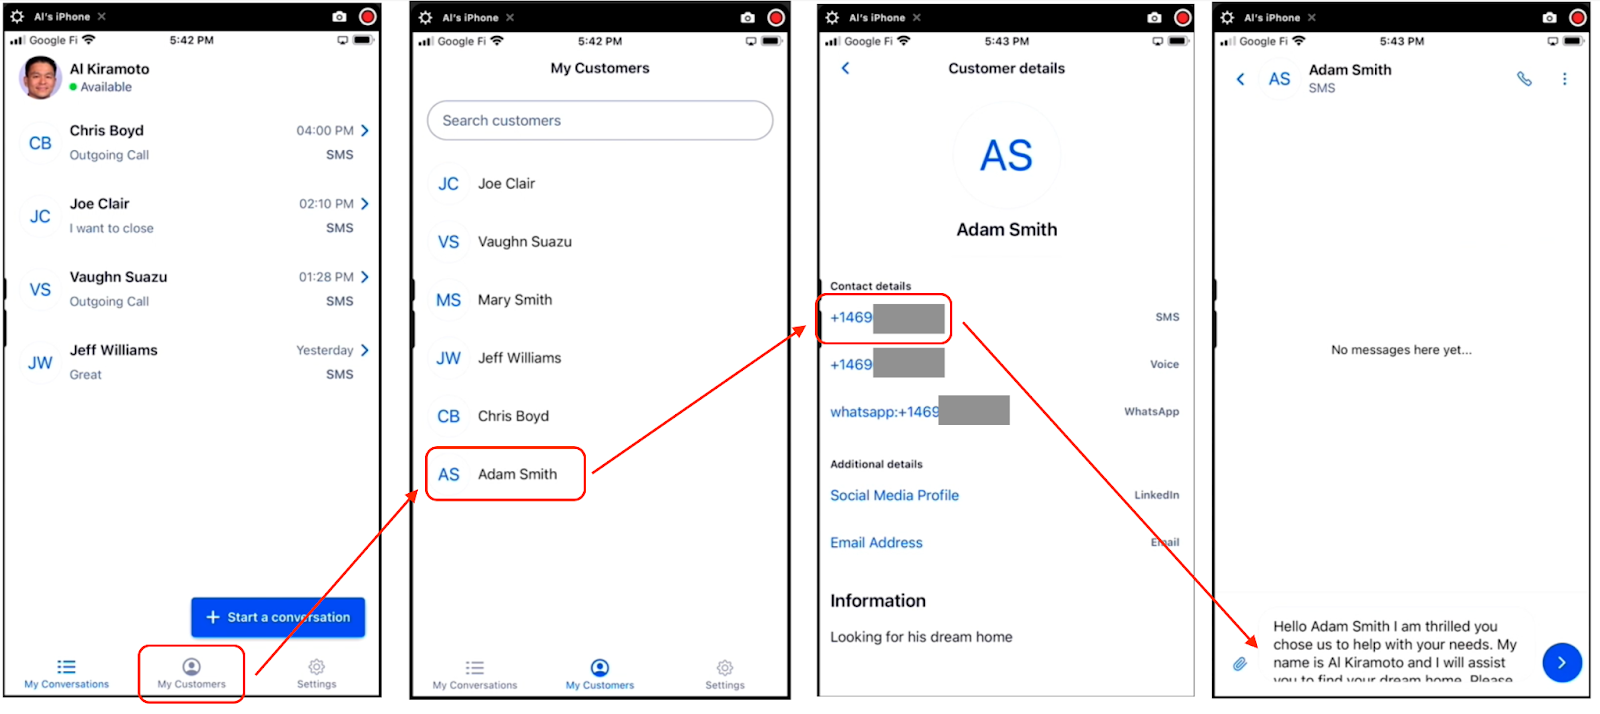
Log in to the Frontline App, and you should see your customers under My Customers. Click on one of your customers, select their phone number, and send an SMS.
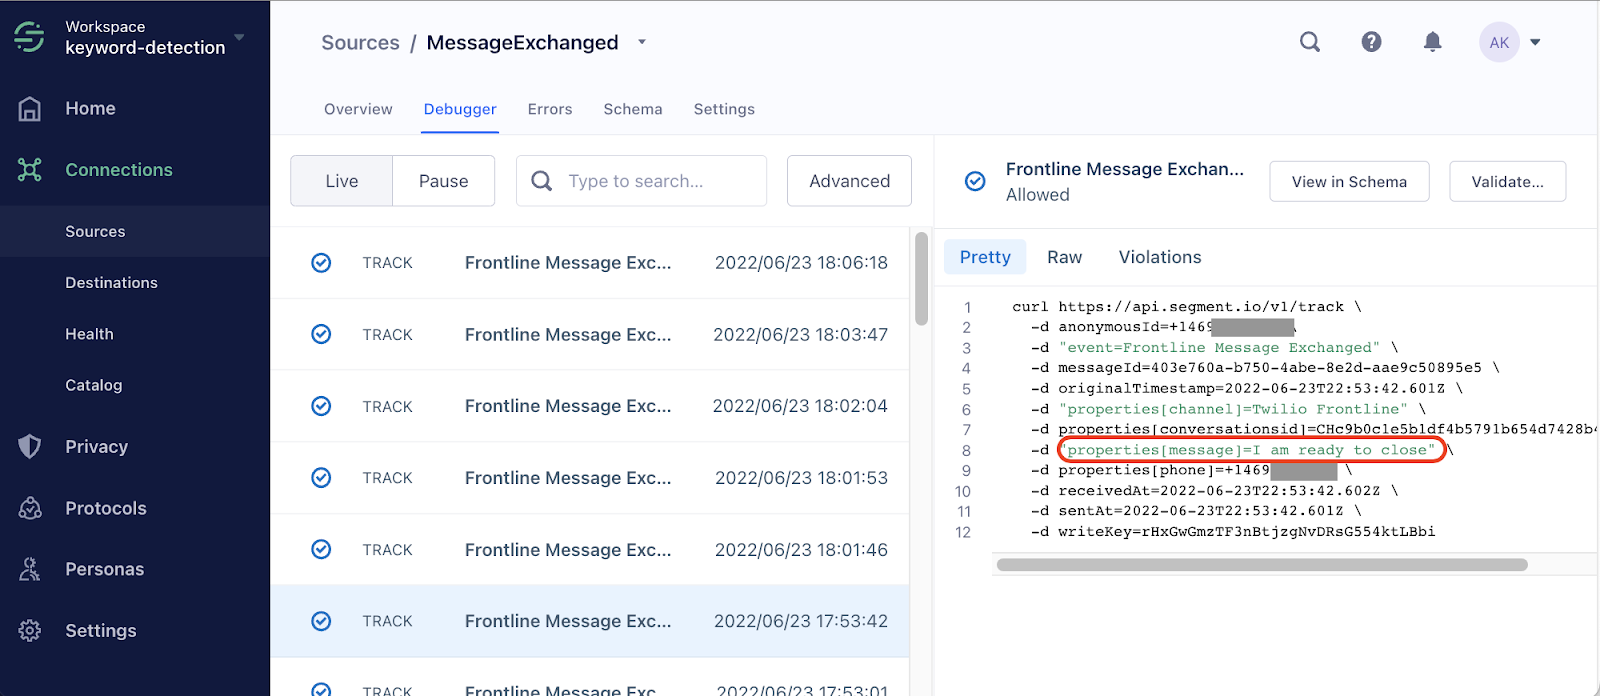
Exchange messages and monitor them in the Segment Debugger (Sources > messageExchanged > Debugger). You will see your messages being logged:
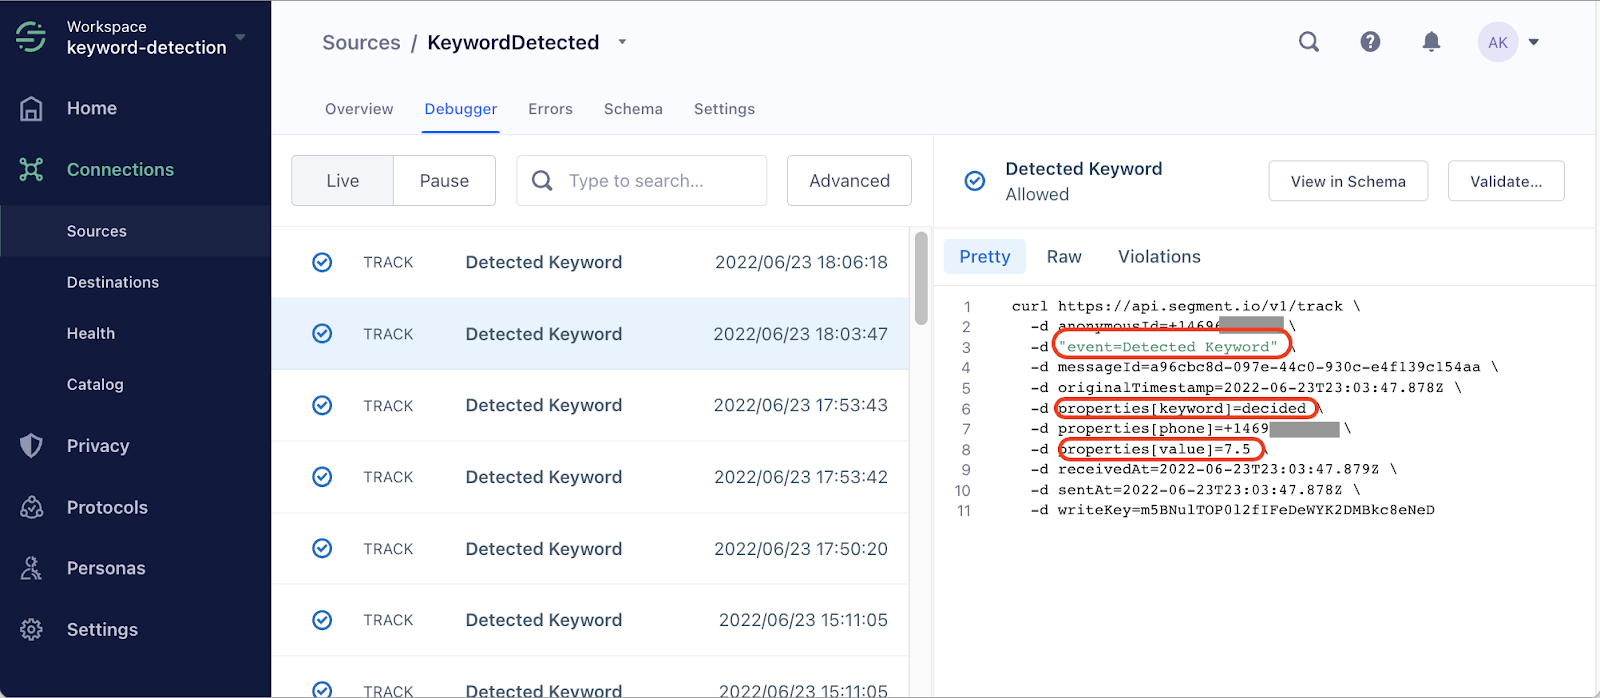
Use sales related keywords (e.g., “interest”, “purchase”, “close”, “deal”, “contract”, “decided”, “buy”, “opportunity”) and monitor them on the Segment Debugger (Sources > keywordDetected > Debugger). You will see them being logged, with their respective value.
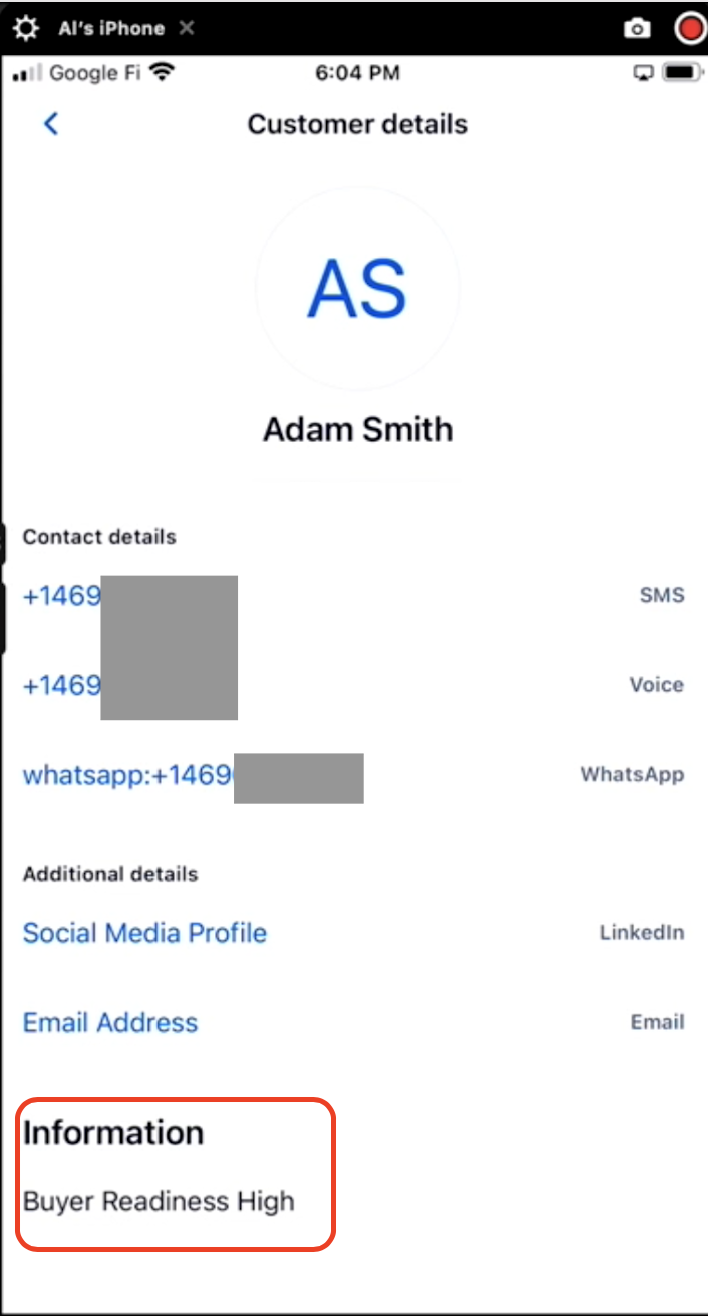
Once the sum of all values associated with a keyword is higher than the threshold we defined (in our example 20), our customer will be added to the Audience ‘CustomerReadinessHigh’ and our CRM will be automatically updated:

And you also can see your Frontline customer record updated:
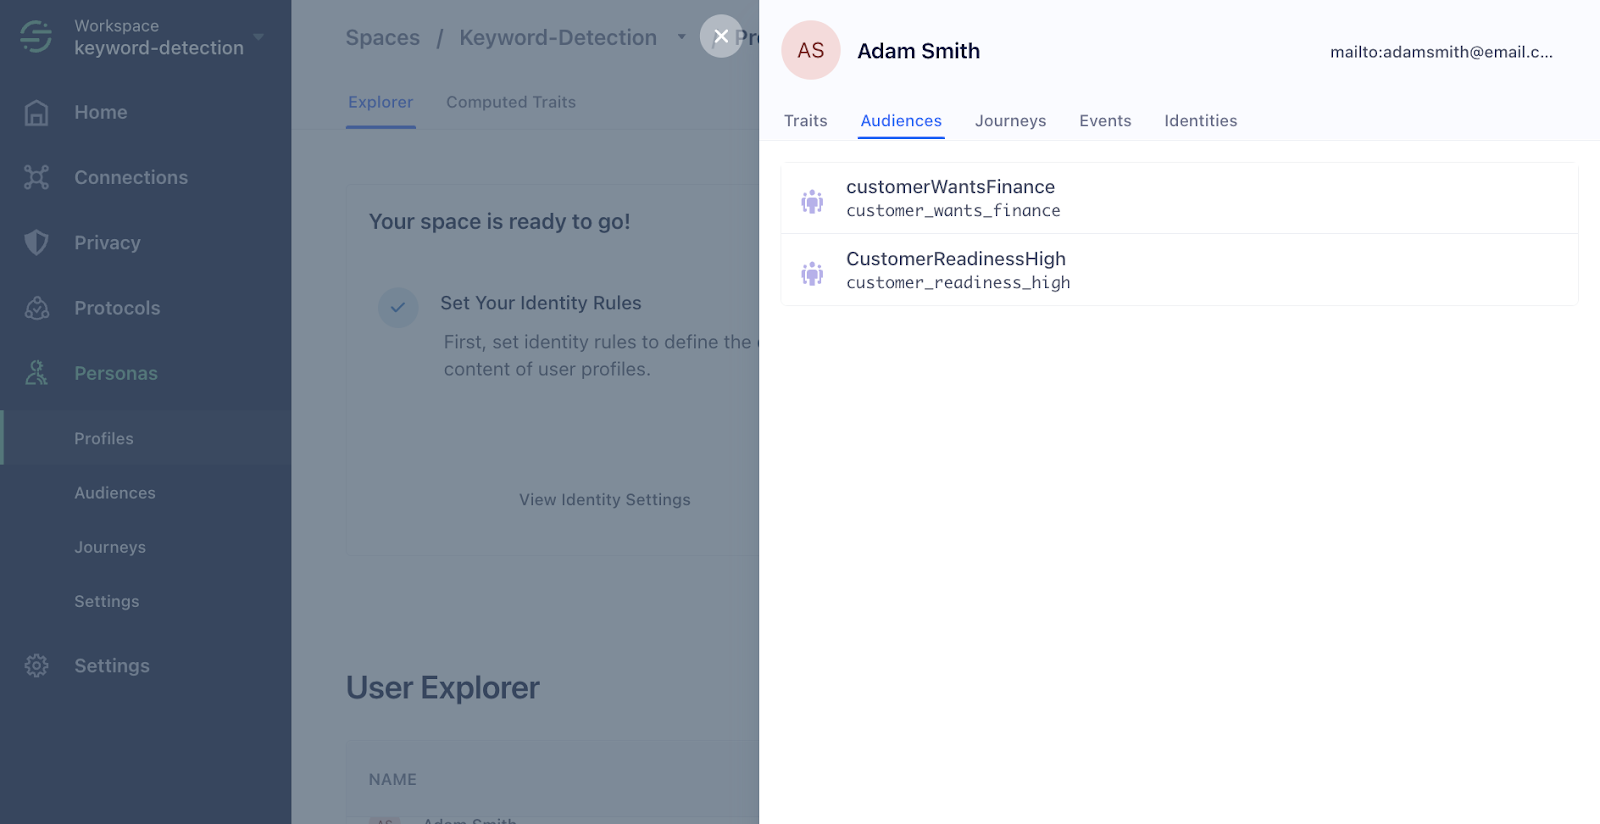
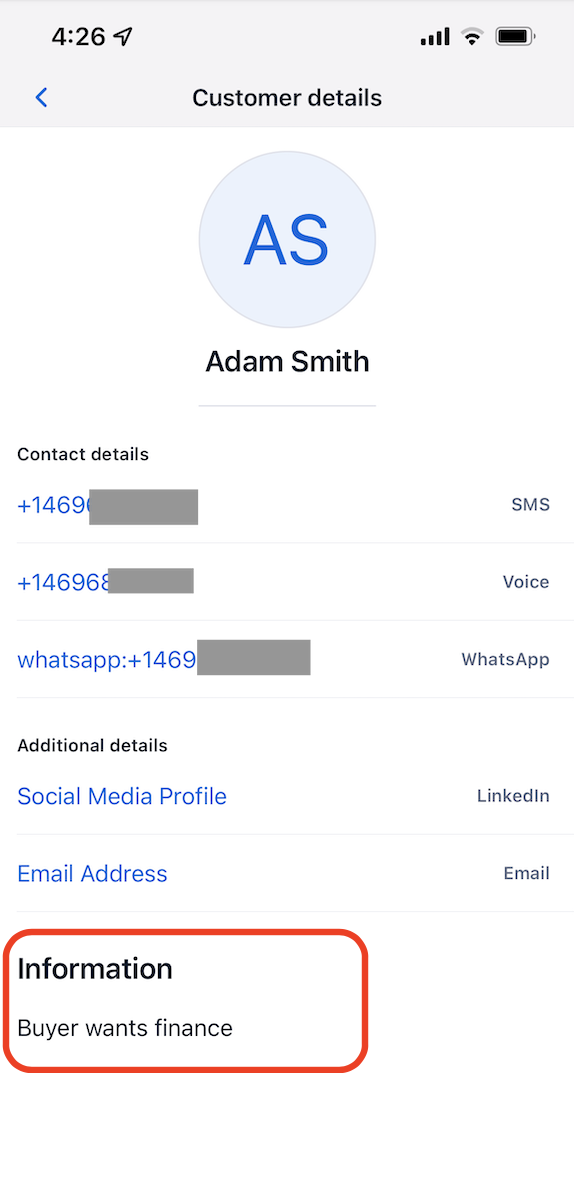
Now use the keyword “finance” that we defined for the Audience customerWantsFinance. For example, send a message with the phrase ‘I want to finance’:
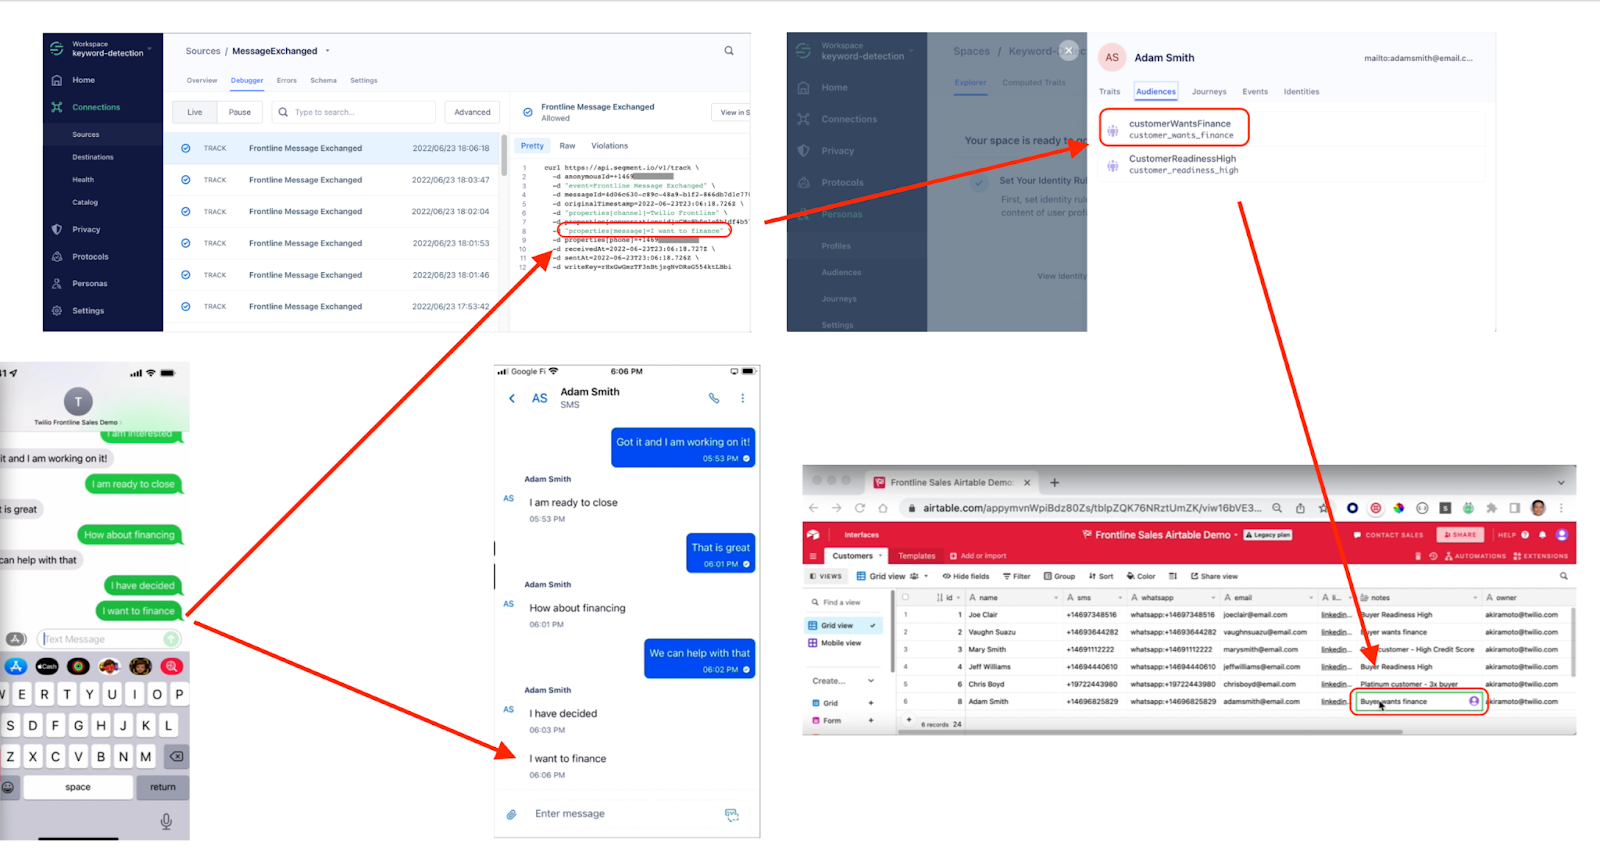
The keyword is detected by Segment, the customer is added to the “customerWantsFinance” audience, and the CRM and customer profile on Frontline are updated.
Success!!
Supporting Assets/ Documentation/ Links
- Personalize Communication Channel Outreach using Segment and Twilio
- Twilio Frontline Node.js Quickstart
- Function Invocation
- Using Pre-Action Webhooks to Modify or Reject Changes
Al Kiramoto is a Solutions Architect at Twilio. He lives in Dallas - TX and enjoys working with customers and solving business problems - besides a good barbecue and TexMex food. He can be reached at akiramoto [at] twilio.com
Charles Weems is a Solutions Architect at Twilio. He lives in Berkeley, California and enjoys building solutions that bring different Twilio APIs and products together. He can be reached at cweems [at] twilio.com
Mark Urquhart is a Principal Solutions Engineer at Segment. He lives in New Hampshire and enjoys working with Segment customers on building out their CDP as well as hiking with his family when outside of work. He can be reached at murquhart [at] twilio.com
Related Resources
Twilio Docs
From APIs to SDKs to sample apps
API reference documentation, SDKs, helper libraries, quickstarts, and tutorials for your language and platform.
Resource Center
The latest ebooks, industry reports, and webinars
Learn from customer engagement experts to improve your own communication.
Ahoy
Twilio's developer community hub
Best practices, code samples, and inspiration to build communications and digital engagement experiences.