How I keep my mom updated on my travel schedule with Python, Twilio, and Google Calendar
Time to read:
June 12, 2018
Written by
This post is part of Twilio’s archive and may contain outdated information. We’re always building something new, so be sure to check out our latest posts for the most up-to-date insights.

I travel a lot for both work and pleasure. My mom loves to know where I’m jetsetting off to and I was failing to keep her properly updated. I could share my location via Find my Friends, but that doesn’t solve the problem of upcoming travel events. I could create a shared document or calendar, but she isn’t always in front of a computer.
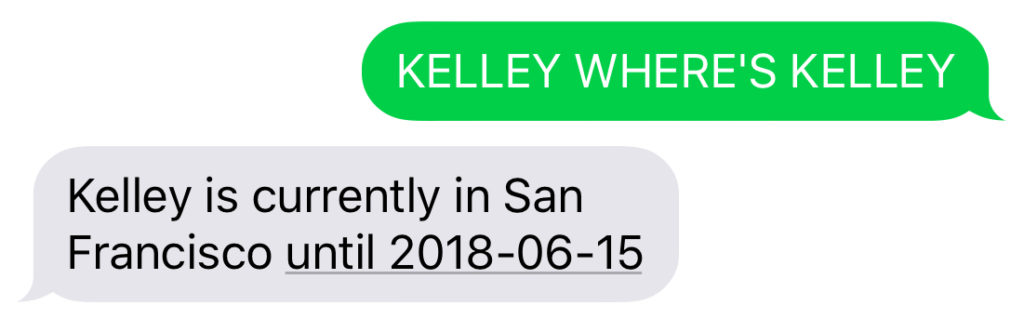
Enter the Where’s Kelley bot.
Using Twilio SMS, I hooked up a phone number to my Google calendar and created a simple text message bot that my mom can ask about my current location and upcoming travel schedule.
This post will walk through how to build one for yourself! Check out the final code here or follow along with this tutorial to build your own Text Travel Tracker from scratch.
Google Calendar API and Service Accounts
First things first, you’ll need a calendar to track. The way I’ve set this up is to have a separate calendar that I only add my travel schedule to and I recommend you do the same. To create a new calendar head to this page. Give your new calendar a name like Travel Tracker and create the calendar.
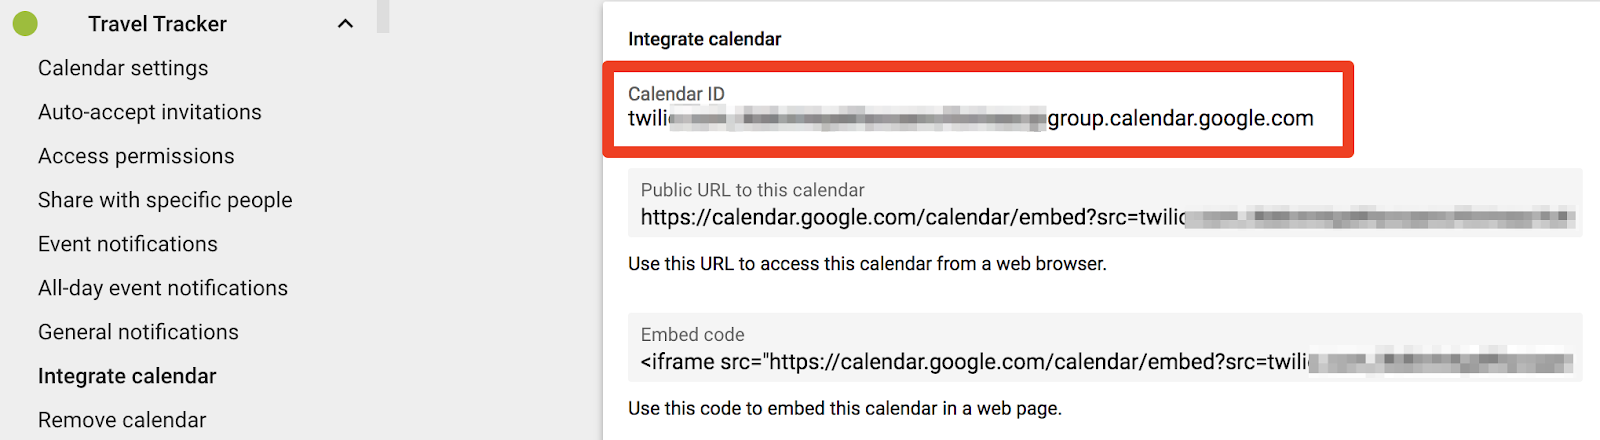
While we’re at it, click on your new calendar and go to Integration Settings. Grab the Calendar ID and copy it; we’ll need this later. Add a couple events in your calendar: one that’s happening today and a few in the future.
To programmatically access your calendar, you’ll need to create a service account and OAuth2 credentials in the Google API Console. If you’ve been traumatized by OAuth2 development before, don’t worry; service accounts are way easier to use.
Follow along with the steps and video below. You’ll be in and out of the console in 60 seconds (much like Nic Cage in your favorite Nic Cage movie).
- Go to the Google APIs Console.
- Create a new project.
- Click Enable API. Search for and enable the Google Calendar API.
- Create credentials for a Web Server to access Application Data.
- Name the service account and grant it a Project Role of Editor.
- Download the JSON file.
- Copy the JSON file to your code directory and rename it to client_secret.json
https://www.twilio.com/blog/wp-content/uploads/2018/06/calendar-service-account-setup.mp4
There is one last required step to authorize your app, and it’s easy to miss!
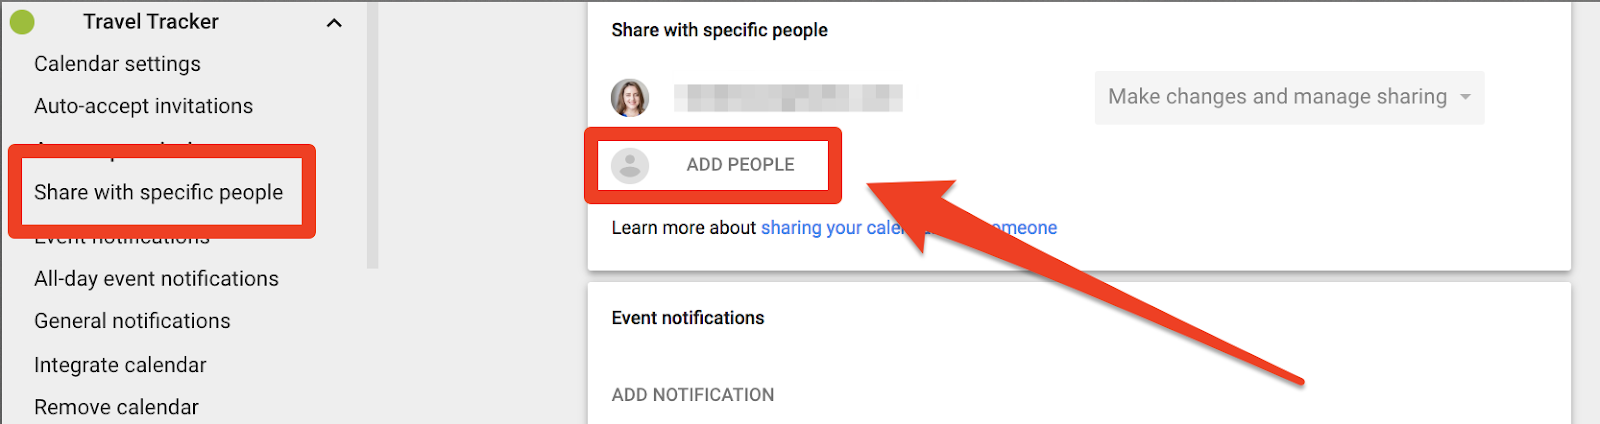
Find the client_email inside client_secret.json. Back in your calendar settings, click “Share with specific people” and add that client_email by clicking ADD PEOPLE.
Excellent, the boring part is done and now we can write some code!
Let’s write some code
To code along with this post, you’ll need to:
In an empty directory for your project, create a new file called requirements.txt and add the following dependencies:
The Google API python client provides a nice interface for talking to the Calendar API while the oauth2client helps us connect our Service Account to our code. We’ll be using Flask and Twilio to manage our text bot.
Set up your virtualenv and install the dependencies by running:
Create a file called app_config.py and add the following code:
This expects that your Calendar ID and Twilio credentials are set as environment variables. We grabbed our Calendar ID earlier and you can find your Twilio credentials in the Console under Project Info. For more information on how to set environment variables, check out this handy post.
Now that you have the dependencies taken care of, create a file called tracker.py in the same directory as app_config.py. This will be the code for the Flask app that will receive the messages.
Here’s the code you’ll need to parse your calendar and respond to SMS messages. Copy and paste it into tracker.py and save the file:
This code creates a Flask server with a single endpoint for responding to an incoming SMS message. We take a look at the body of the message and respond to the user in one of 3 ways:
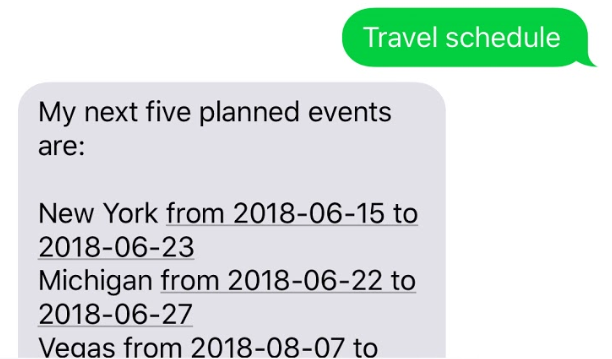
- Current location
- Travel schedule
- Help / default response
If the message is asking for either our current location or travel schedule, we use the Google Calendar API to look up current and future events and format those as a friendly message back to the user. Otherwise we respond with a help response that tells the user what they can ask.
Start up the application by running python tracker.py from your terminal.
Connecting Your Calendar to Twilio SMS
We’ll need to make our application accessible on a public port so that Twilio can connect to what’s running on your local computer. We’ll use a tool called ngrok for that.
Fire up ngrok from a new terminal window or tab and point it to your Flask application, which will be running on Port 5000
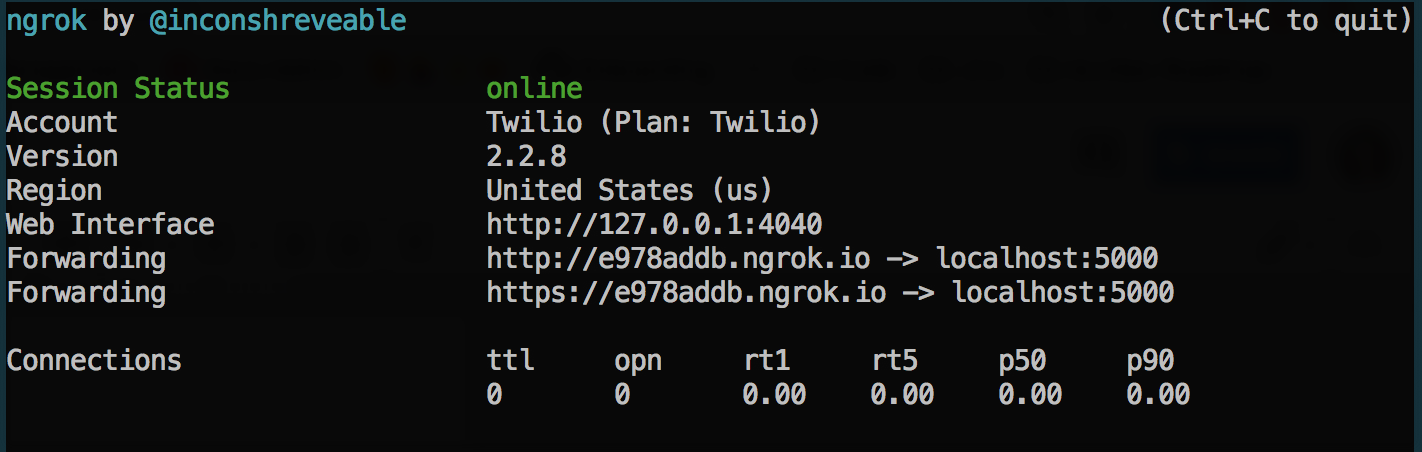
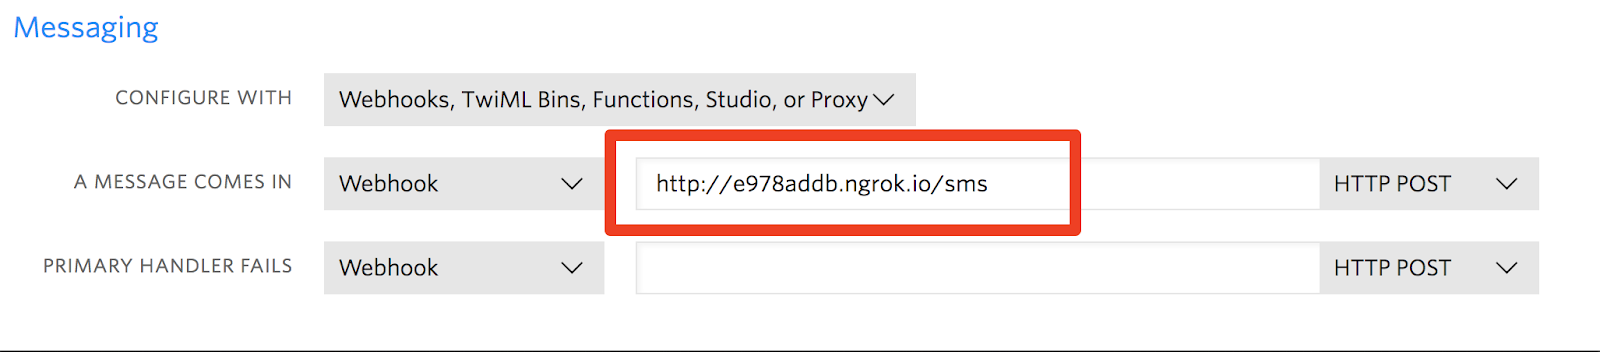
Copy your ngrok url,
http://e978addb.ngrok.io in this example, and head over to the configuration page for the Twilio phone number you purchased. Paste your ngrok url plus /sms in your Twilio phone number configuration as a webhook for when A MESSAGE COMES IN.
Grab your phone and send a text to your Twilio number and et voila:
Go Forth and Travel
I’ve added some special flavor to my own script, and I encourage you to do the same. You could restrict responses to a list of known numbers or support more incoming questions. I wasn’t sure how much use this bot would get, but it’s been a huge hit. My mom doesn’t feel guilty bothering me about my schedule and my friends have even used it to see when I’m in town.

Now that you are familiar with using Service Accounts, check out how to read data from a Google Sheet with Python. If you have any thoughts, questions, or travel suggestions leave me a note on Twitter @kelleyrobinson.

Related Resources
Twilio Docs
From APIs to SDKs to sample apps
API reference documentation, SDKs, helper libraries, quickstarts, and tutorials for your language and platform.
Resource Center
The latest ebooks, industry reports, and webinars
Learn from customer engagement experts to improve your own communication.
Ahoy
Twilio's developer community hub
Best practices, code samples, and inspiration to build communications and digital engagement experiences.