How To Create a Spooky Halloween Hackpack with Laravel and Arduino
Time to read:
October 30, 2015
Written by
This post is part of Twilio’s archive and may contain outdated information. We’re always building something new, so be sure to check out our latest posts for the most up-to-date insights.

I found myself trapped in what seemed like a terrible dream. Visions of ghosts and bats blinking at me in the darkness were revealing what looked to be a foreign language. As I peered closer I caught a glimpse of what looked to be dollar signs and weird arrow shapes. Could it be? Yes, it was in fact my worst nightmare: having to work with a programming language I haven’t worked with in a long, long time. It was clear I was going to have to face this fear head on if I was ever going to escape…
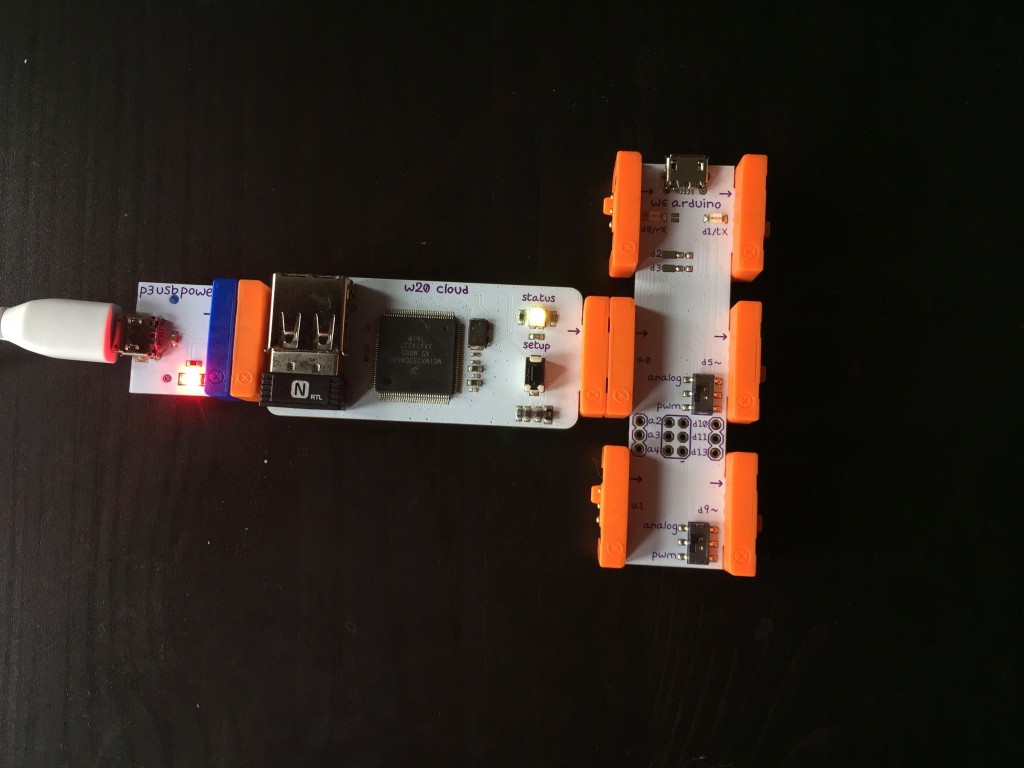
Halloween has always been a fun holiday for me. People dress up in crazy costumes, everyone makes excuses for eating candy and every now and then you might just have to face your fears. It’s also a great time to hack on spooky projects that involve LEDs. My favorite gear for hacking on LEDs is the hackpack we gave away at Signal this past year. In this post we’ll build an SMS-powered Halloween-themed hackpack. We’ll write code for the littleBits Arduino to draw a ghost and a bat with blinking eyes. Then we’ll embrace the frightening spirit of the holiday by doing something that seems utterly scary to me: using PHP to build our backend. There’s nothing inherently spooky about PHP itself, but it’s always a little scary to write code in an unfamiliar language. However, once our app is in place we’ll be able to update the spooky image shown on our hackpack using an SMS message.
For some fun, you can send a text message to (215) 584-4678 with the word bat, ghost, pumpkin, spider or skull and it’ll update the image on my hackpack here in Philadelphia.
Get Your Costume Ready
Before we get started writing code we’re going to need to prep a few things. Here’s what you’ll need for this haunt:
- A Hackpack: If you’re in possession of a Twilio Hackpack from Signal 2015 you’re good to go. If not, you’ll want to follow this guide to build your own.
- littleBits cloudBit: You’ll need a cloudBit to update the Hackpack based on an incoming text message. It’s not required for drawing the ghost and bat images though so if you don’t have a cloudBit you can still do everything else in the post.
- Arduino IDE: This allows us to write code and upload it to our Arduino.
- Run through this post to get the Adafruit libraries installed. After that, you can start with the code in this repo as a baseline for this hack.
- Laravel: We’ll use Laravel to respond to incoming text messages
- An SMS-capable Twilio phone number – this is always free during development so sign up for an account today if you haven’t already
Spooky Lights
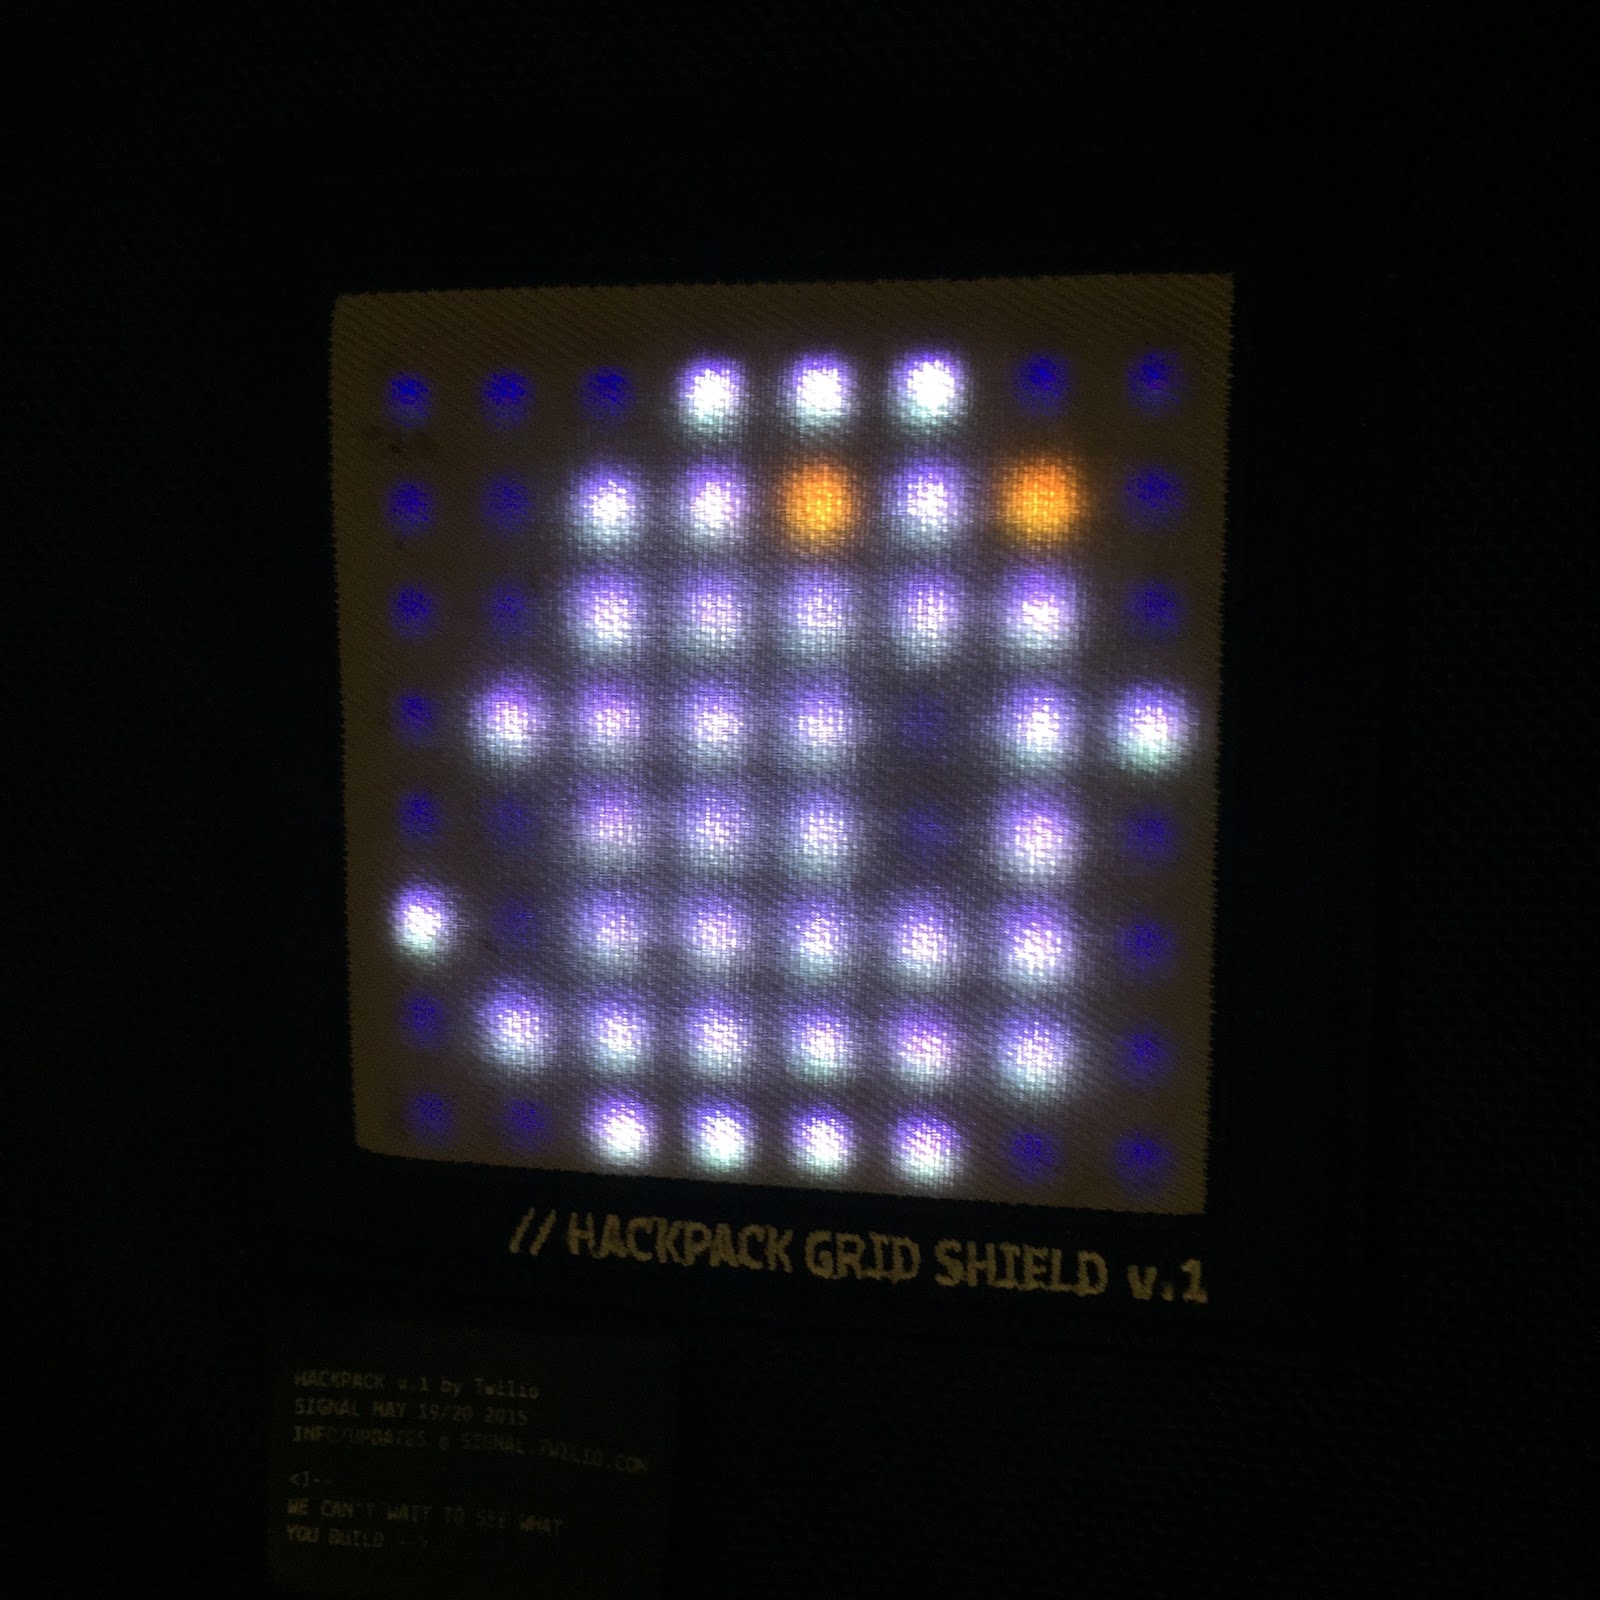
The first piece of our hack involves putting some Halloween imagery onto the NeoMatrix 8×8 LED display in the Hackpack. We’re going to create a bat that looks like this…
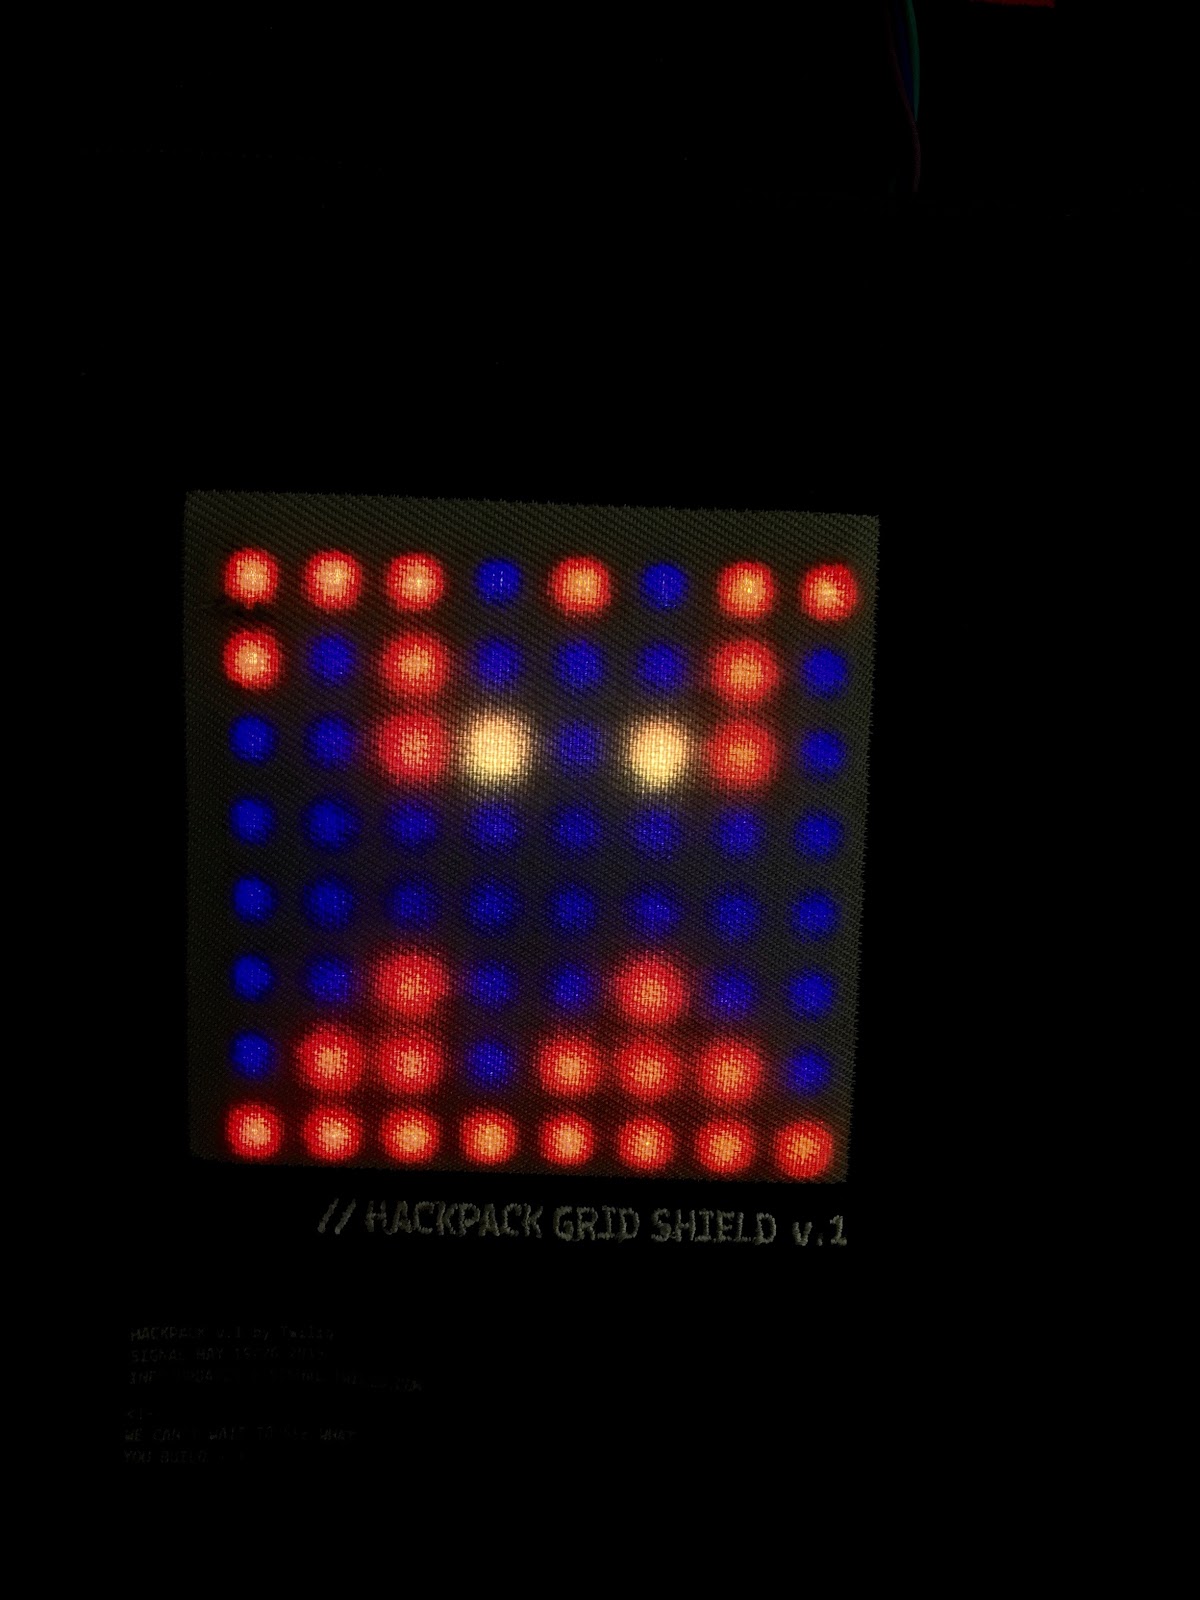
…and a ghost that looks like this…
Open hackpack-starter-kit.ino from the hackpack-starter-kit repo in the Arduino IDE. The top of the file should look like this:
As explained in this guide this code sets up the NeoMatrix LEDs we will be manipulating in our program. Right below these lines let’s add some variables to track some application state:
Next, we need to add a some colors to the RGB.h file:
The setup() function in the file runs once when the Arduino first starts up. Add the following code to this function:
Here we set the brightness of the matrix, fade the entire screen to orange, wait 1 second and then call the drawBat() function which we will implement next. Add the drawBat() function with the following code:
The two-dimensional array at the top of the function indicates which pixels should be set to purple to make up the body of the bat. The for loop fades each body pixel from orange to purple. The last two lines in the function set the eyes of the bat to yellow.
This is probably an excellent time to test and make sure everything is working properly. Connect your littleBits Arduino via USB and upload the sketch. If all goes well, you should see a purple bat with yellow eyes on an orange background appear on your Hackpack display.
All good? Excellent. Let’s add a drawGhost() function :
Since the ghost will always be drawn after the bat is already on the screen we start the function by switching the background to purple. The rest of the function behaves similarly to the drawBat() function we implemented above. If you want to test this out at this point, update your setup() function to look like this:
This added lines will wait 5 seconds after the bat is drawn and then draw the ghost to the screen. Spooky lights indeed.
Now that we have our images in place let’s make the hack interactive by adding the ability to switch images via SMS.
Enlightening Text
Now for the part scary bit…we’re going to write some PHP. I’m not a PHP expert so I hope this code isn’t too frightening. We need a backend that can communicate both with Twilio and the littleBits Cloud API. Let’s start a new Laravel app:
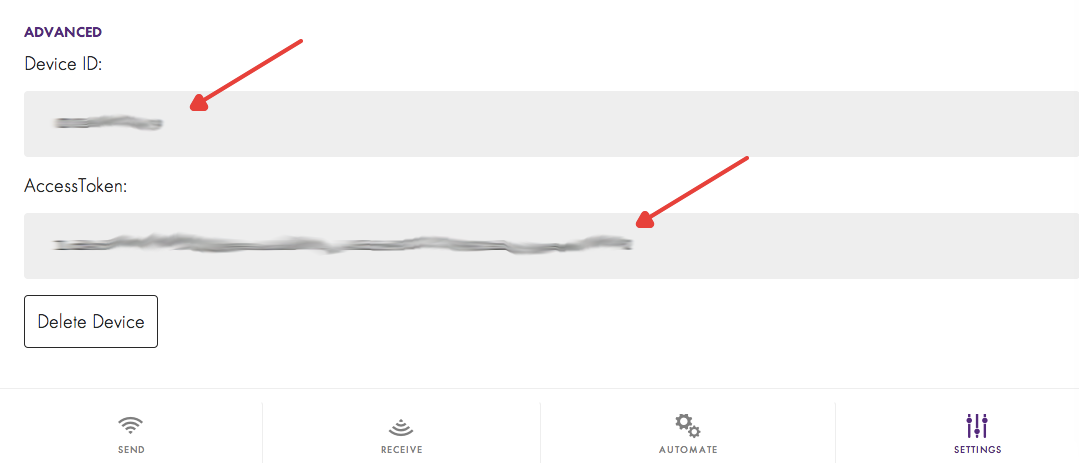
In the .env file inside of the project add your littleBits cloudBit device ID and access token:
You can find these values in the littleBits cloud dashboard in the Settings section:
Now in app/Http/routes.php add a /message route that will be called by Twilio when we receive a text message at our Twilio number:
The first highlighted line fetches the Body of the text message that was sent, removes whitespace from it and makes it lowercase. The next highlighted section configures the data we send in the POST request to the littleBits cloud. If a ghost was requested we set the cloudBit to 75% for 2 seconds and if a bat is requested we set the cloudBit to 25% for 2 seconds. I’ll explain what the 25% and 75% mean in terms of the Arduino code in the next section but if you’re curious you can read more about it in the littleBits API documentation. Otherwise we let the sender know what commands to try instead of whatever they sent. Finally in the last highlighted section we respond to Twilio with TwiML to let the texter know we’ve set the Hackpack to their requested picture.
Run the Laravel server using the following command:
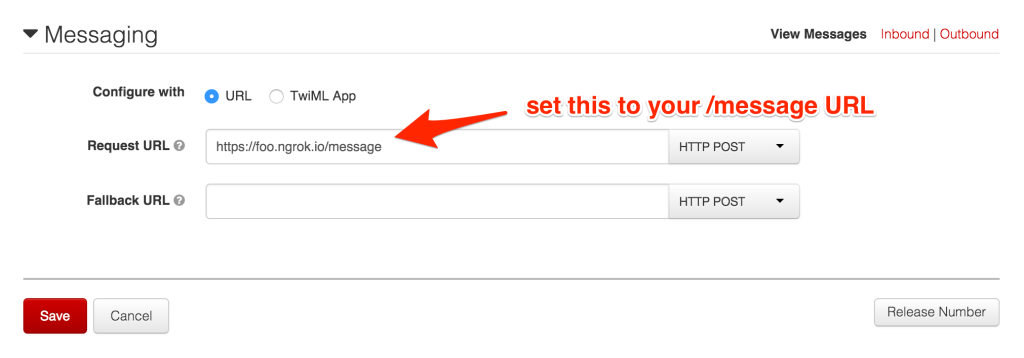
For Twilio to be able to access our locally running server we’ll need to make it accessible on a publicly addressable URL. Ngrok is a great tool for accomplishing this. You can find a great tutorial and tips for setting up ngrok here. Once you have your server exposed to the outside world, head into your Twilio Dashboard and set up our Messaging Request URL for your number to point at your /message route:
Now we just need to modify our Arduino code to handle the cloudBit input value that’s being set in our Laravel code.
Trick or Treat!
I have my littleBits cloudBit set up on the a0 input like this:
Add the following highlighted line to the top of the Arduino sketch underneath the other variables we configured:
Now let’s set up the loop() function in our sketch. If there’s already a loop() function replace it with the following code:
The key here is the analogRead(cloud) call which checks the value of the cloudBit input. The 25% and 75% that we set from the Laravel code roughly map to 250 and 750 but to be safe we check a range of values. The isBat and isGhost bool values help to ensure we don’t redraw the requested picture if it is already displaying.
That’s everything we need to make the hack work. Upload the sketch to your hackpack and send ghost or bat to your Twilio number and you should see the Hackpack update based on which word you sent.
What’s Next?
This hack was a lot of fun to build. In fact, I’m planning to continue building it all the way up until Halloween. Follow me on Twitter @brentschooley to see what I do next with this hack. If you want to continue building on the hack, consider the following additions:
- Make the eyes blink (the completed repo for this hack has this implemented)
- Add an IVR that allows you to play spooky music over a speaker attached to your Hackpack
- Return an animated gif in the response to the incoming message in the Laravel code
Halloween and hacking were made for each other. Let me know what kind of cool things you are working on!


Related Resources
Twilio Docs
From APIs to SDKs to sample apps
API reference documentation, SDKs, helper libraries, quickstarts, and tutorials for your language and platform.
Resource Center
The latest ebooks, industry reports, and webinars
Learn from customer engagement experts to improve your own communication.
Ahoy
Twilio's developer community hub
Best practices, code samples, and inspiration to build communications and digital engagement experiences.