Send an SMS With PHP in 30 Seconds
Time to read:
May 17, 2023
Written by
Reviewed by
For getting your message out and communicating with users, SMS is still one of, if not the best methods.
This might seem strange in the era of apps such as WhatsApp, Facebook Messenger, and so many others. However, according to IDG Connect, SMS is still the better choice.
These may be ‘old' channels, but because of their age, they allow organisations to connect to nearly every single mobile phone, ever made, anywhere.
What's more, according to Web Tribunal:
- 2.1 trillion text messages were sent in 2020
- Text messages have an open rate of 98%
If you feel that SMS is still a platform worth using, then come and learn how to send an SMS with PHP in under 30 seconds.
Prerequisites
To follow along with this tutorial, you will need the following:
- PHP 8.2 or above
- Composer installed globally
- A Twilio account (either free or paid). If you are new to Twilio, click here to create a free account
- A Twilio phone number
- A mobile/cell phone that can receive SMS
- A project directory for the tutorial's code
- Your preferred text editor or IDE (I recommend PhpStorm)
Install the required dependencies
Next, you need to install the code's two required dependencies:
- Twilio's PHP Helper library: This library simplifies working with Twilio's APIs in PHP
- PHP dotenv: This library simplifies working with environment variables in PHP; so much so that I use it in virtually every PHP project
Create a directory for your project and navigate to it using your terminal. Then install the required dependencies for your project using the following command.
Set the required environment variables
Next, you need to retrieve and set four environment variables so that you can make authenticated requests to Twilio's APIs; these are your Twilio Account SID (your username) and your Auth Token (your password), your mobile phone number, and your Twilio phone number.
First, create a new file in your project directory, named .env, and paste the following code into the file.
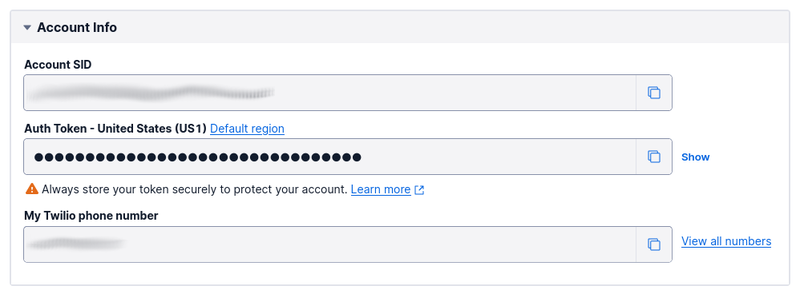
Then, from the Account Info section of Twilio Console's Dashboard, copy your Account SID, Auth Token, and Twilio phone number. Paste the values into .env, in place of the placeholders for TWILIO_ACCOUNT_SID, TWILIO_AUTH_TOKEN, and <<SENDER>> respectively. After that, replace <<RECIPIENT>> with your mobile number.
Write the code
Now, it's time to write the PHP code; which will send an SMS containing the following, Star Wars-inspired, message:
This is the ship that made the Kessel Run in fourteen parsecs?
Create a new file in the top-level project directory named send-sms.php, and in that file, paste the code below.
The code starts by using PHP dotenv to load the variables defined in .env into PHP's $_ENV and $_SERVER superglobals, nicely keeping them out of the code. Then, it initialises a new Twilio Client object, which is the central object for interacting with Twilio's APIs. After that, it calls the create() method to send the message to the recipient.
If the SMS was sent successfully, a message will be printed to the terminal confirming the delivery from the status string returned by the API call.
Test the code
That's all the code required to send an SMS with PHP and Twilio. Now, let's test that it works by running the following command.
If the code works as expected, you'll see a confirmation printed to the terminal, and an SMS will appear in your messaging app, similar to the screenshot below.

That's how to send an SMS using PHP and Twilio in 30 seconds
You've just learned the essentials of sending an SMS with PHP and Twilio. Not much to it, right?!
However, while it's a good start, there's so much more functionality on offer, which I strongly recommend you explore. For example, you can track SMS replies, schedule messages for sending in the future, efficiently send messages in bulk, plus so much more!
Have a play with the code and experiment. I'd love to see what you build.
Matthew Setter is a PHP and Go editor in the Twilio Voices team, and a PHP and Go developer. He’s also the author of Mezzio Essentials and Deploy With Docker Compose. You can find him at msetter[at]twilio.com. He's also on LinkedIn and GitHub.
Related Resources
Twilio Docs
From APIs to SDKs to sample apps
API reference documentation, SDKs, helper libraries, quickstarts, and tutorials for your language and platform.
Resource Center
The latest ebooks, industry reports, and webinars
Learn from customer engagement experts to improve your own communication.
Ahoy
Twilio's developer community hub
Best practices, code samples, and inspiration to build communications and digital engagement experiences.