Integrate SMS into your Wix Site using Twilio Programmable Messaging and Velo IDE
Time to read:
October 01, 2020
Written by
Reviewed by

Text message marketing is the latest craze these days for ecommerce stores. Having the ability to communicate real-time updates to customers via SMS is not only priceless, it’s a guarantee that 98% of your notifications will actually be read. In 2020, it’s hard to imagine a few use cases where your store couldn’t benefit from sending SMS!
Now, with the rise of npm modules and APIs such as Twilio Programmable Messaging, adding text messaging to your website doesn’t have to be a hassle. More importantly, with these tools you can easily incorporate SMS responses to your Wix site with Velo.
New to Wix or Velo?
For developers looking to build web applications quickly, Velo provides a simple but robust solution. It combines the Wix visual builder with an integrated online IDE, providing users with a flexible solution for rapid development. Beyond that, it makes it much easier for developers to integrate 3rd party solutions into their sites, such as Twilio.
When you enable Velo, also called Dev Mode on your Wix site, you get access to an array of npm modules to add to your site. Twilio provides an npm module that makes it easy to create messaging clients that can be used to send and receive SMS on your site.
Prerequisites
In order to get started with tutorial, it would be helpful to have the following tools and accounts on hand:
- Free Wix Account
- Free Twilio Trial
- Free Sendgrid Account
- Cell phone or Google Voice Number (that you can use for testing)
In addition to this tutorial, we have additional resources and documentation on the Velo site, as well as code examples to help you understand what Velo is capable of.
Signing Up for Your Twilio Account
After you have signed up for your Twilio account, you will be redirected to your console where your Twilio credentials are provided. If you haven’t signed up, you can do so here.
On your console, copy and paste the Account SID and Auth Token to a safe place on your computer.

After you have stored your credentials locally, reserve a Twilio phone number that supports SMS.
NOTE: You are more than welcome to use the default number provided to you at signup.
Once your Twilio credentials have been confirmed, head over to your Wix site and create a new blank site. On the blank site, you will want to enable Velo. To do so, go to the top menu bar and find Dev Mode. Click on Dev Mode and then select Enable. This will update your editor with some new features like a new site code structure, side pane, and built in IDE.

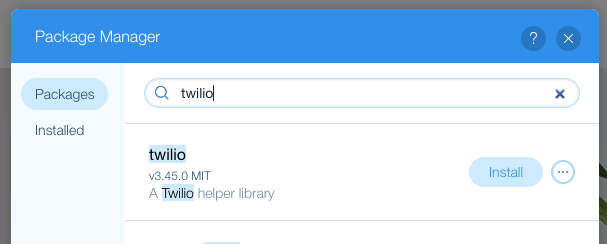
You can now add the Twilio npm module in your Velo-enabled Wix site. To install it, navigate to the node_modules section in your left-side Site Structure panel and using the gear icon or the Install a New Package link, open the npm package explorer.

Search for “Twilio” in the explorer and click Install to add it to your site.
Now you can use the Twilio package. To import the Twilio functionality, create a new backend code file. To do so, find the Backend section on your code editor in the left-side panel. Go to Backend, click the plus sign (+), and Add a New JavaScript Web Module. Copy and paste the code from this example and name it textMe.jsw.
At the top of the file, we used the standard import style that you have been using for other Wix APIs to import Twilio.
Next, we needed to define a set of constants that will allow you to authenticate yourself. This was accomplished by defining three constants accountSID, authToken, twilioNumber and using the values that you generated in your Twilio account to set the values of these constants. If you haven’t already done so, update these constants with their respective values:
NOTE: Your phone number does not have to be written in E.164 format, but remember to at least include the area code (and country code for international numbers).
We also created a new exported function in the backend file and defined a new Twilio client inside that function.
With our client authenticated, you can now call the Twilio Programmable Messaging API and use the create method to build and send a message. Check out the Messaging API documentation to learn more. The create method requires the following three parameters:
to: the phone number of who you are sending the text tofrom: your Twilio phone numberbody: the string to send
A JSON object was constructed inside the create method to pass these values. Your from number is the Twilio number you created earlier. Your to number can be your own for testing purposes and your message bodycan be “Test” or “Hello World”. Choose any text value.
Now you’ll need to actually call this function somewhere, so we need to switch back to the UI of the page. In your Site Structure pane, switch to the UI Page that you want to add the SMS ability to by going to the Pages section and clicking on the page name.
Here we’ll need to add a Button to a UI Page. Once the button element is added, give it a descriptive name like “sendSmsButton” in the properties pane.
While the properties pane is open, add an event for onClick. This will automatically create a function following the pattern uiElementIdName_event where you can add the event listener functionality.
Add an onClick event to this button. The following code will be generated after the event is applied:
In the button’s onClick event code, you’ll call the send message function on your backend. First you’ll need to import the backend function. Import the backend using the same style of import that you’ve been using for Wix APIs.
When forming the from statement, think of it like traversing a file structure. You are going to the backend folder and selecting the textMe.jsw file you created earlier.
Once you import the function, you can call it in the button onClick function.
Testing
Now you can test! PREVIEW your application, click your Send Text button, and you should receive a message on your phone!
Conclusion
It’s that easy to set up the Twilio integration. Now you can also schedule jobs to send to your customers when new items are available or their orders ship. To learn more about scheduling jobs, check out this article.
Prefer video? Check out this webinar replay to see if done live :)
Meredith Hassett is a Developer Advocate for Velo at Wix.com where she shares her passion for making web dev easier for JavaScript developers. She can be reached via:
- LinkedIn: https://www.linkedin.com/in/meredith-hassett/
- Twitter: https://twitter.com/mlhassett


Related Resources
Twilio Docs
From APIs to SDKs to sample apps
API reference documentation, SDKs, helper libraries, quickstarts, and tutorials for your language and platform.
Resource Center
The latest ebooks, industry reports, and webinars
Learn from customer engagement experts to improve your own communication.
Ahoy
Twilio's developer community hub
Best practices, code samples, and inspiration to build communications and digital engagement experiences.