Integrating Twilio Flex and HubSpot CRM
Time to read: 5 minutes
September 13, 2022
Written by
Reviewed by

One very common business requirement in contact centers is the ability to integrate a CRM or any other data source with the agent desktop. The information on a screen-pop varies from business to business, but it will likely include a customer name, contact information and interaction history. This type of integration is referred to as a screen-pop and has two primary benefits:
- Increased agent efficiency, as they no longer need to ask customers for information and search for the customer record.
- better customer experiences, as the agent will be able to provide a personalised service.
But before a task is assigned to an agent, it typically goes through some type of Interactive Voice Response (IVR) or Interactive Messaging Response (IMR) engine. You may want to use CRM or other external data to implement self-service journeys, validate customer inputs automatically or make routing decisions during this stage. These capabilities provide significant benefits too:
- self-service can reduce the number of calls that need a human agent interaction and improve customer experience as they don't need to wait in a queue.
- collecting and validating customer inputs on the IVR/IMR will reduce your average handling times.
- intelligent routing decisions based on data allow you to route specific customers to specific agents or teams, potentially improving the customer experience and reducing the number of transfers between agents.
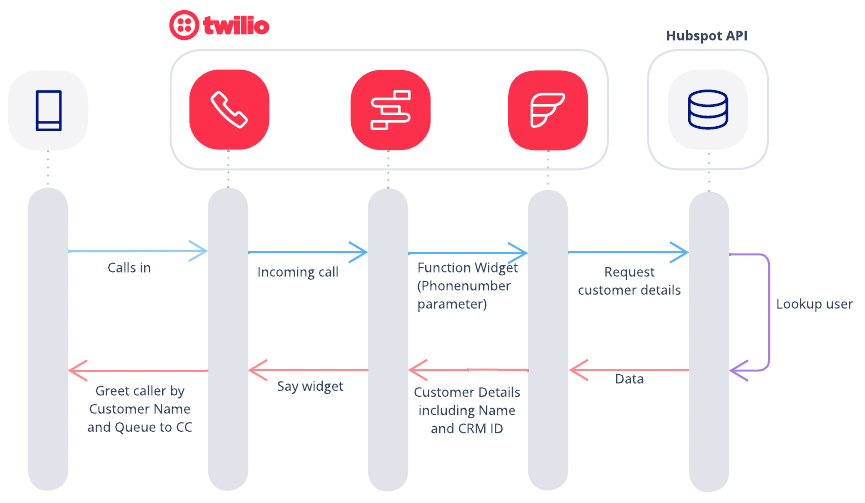
This post walks through the integration of Twilio Flex and HubSpot CRM. It provides the following capabilities:
- When a call or any other task is going through the IVR or IMR, you can request information from HubSpot CRM. In this example you will see how we can personalise the IVR/IMR.
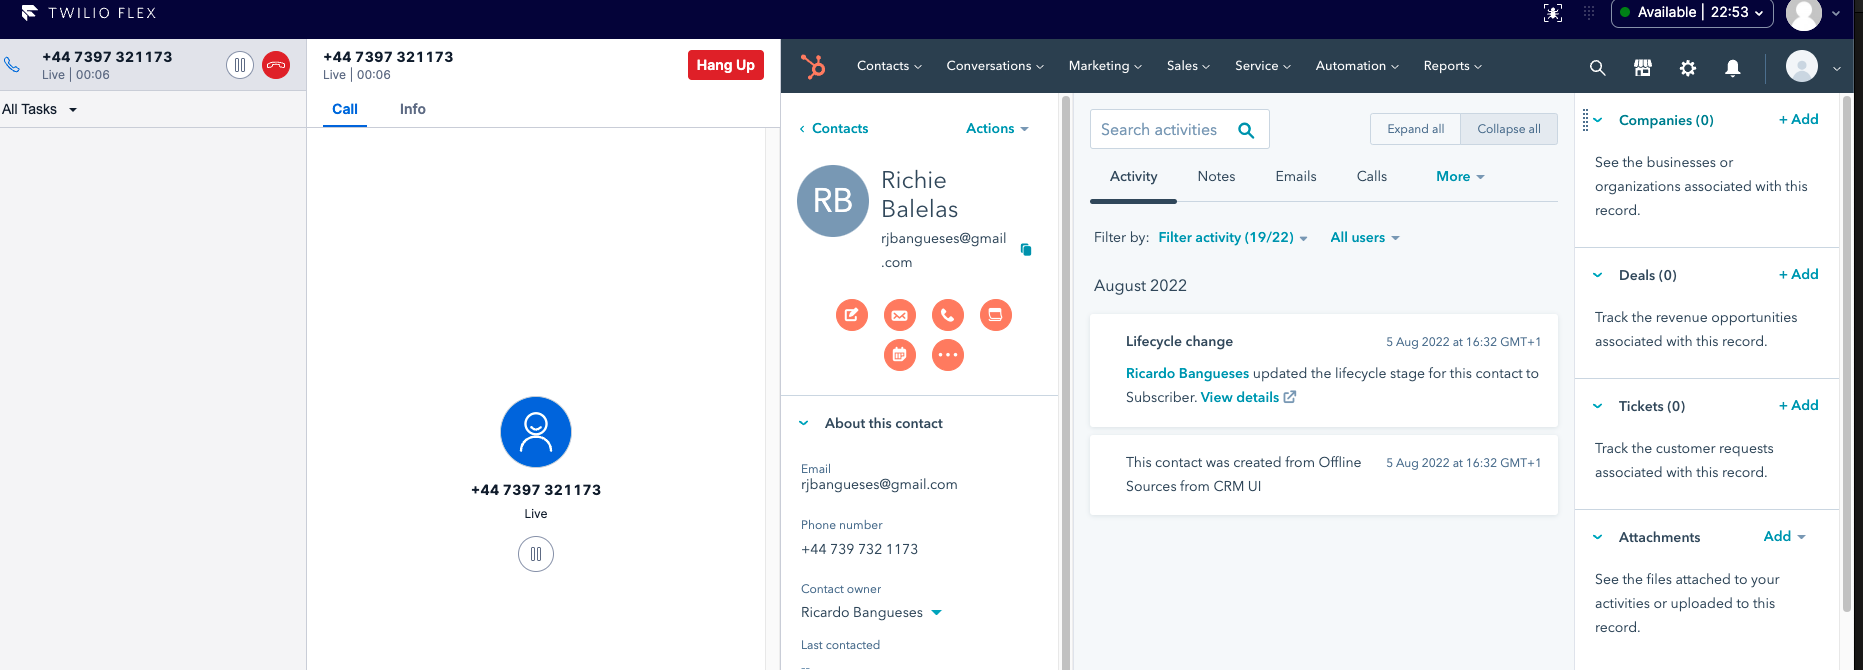
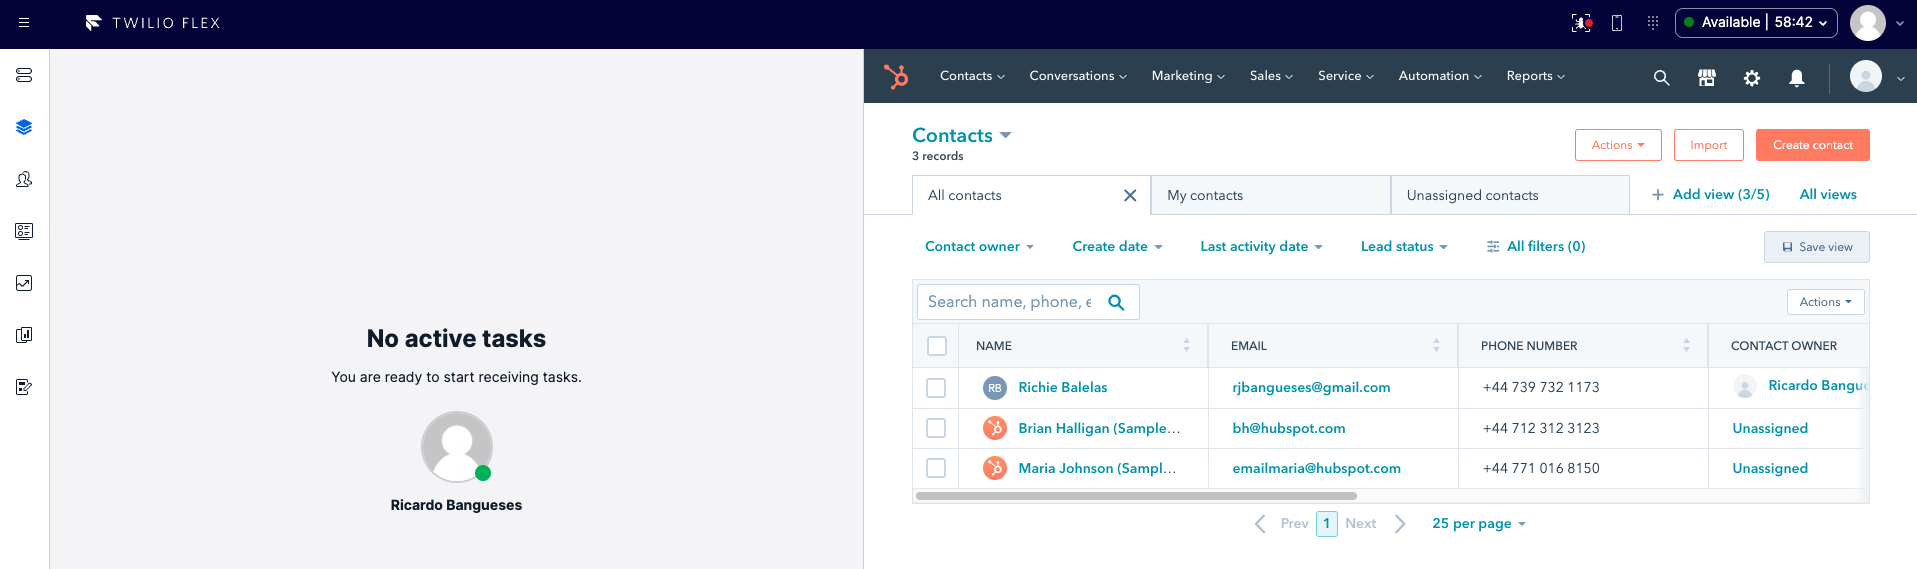
- When the tasks are accepted by agents, the plugin screen-pops the customer CRM record within Flex. HubSpot CRM is embedded in an iframe. The images below show:
- an example of a customer CRM record within Flex.
- what happens if a caller is not identified or during inactivity.
If you want to jump ahead and check out the full working code, head over to the Github repository for this project.
Prerequisites
In order to use this plugin you'll need to first make sure you have the prerequisites on hand.
- A basic understanding of Twilio Studio, Twilio Functions and Twilio Flex is recommended.
- Twilio CLI to test and deploy the plugin.
- A Twilio Flex instance created. Here's how to create a Flex instance.
- A Twilio phone number to point towards the Studio flow.
- Your HubSpot API token. Here's a link to a HubSpot guide to set this up.
- A HubSpot Contact record with your phone number, so you can test when calling from your phone.
Additionally, if this is the first time you're implementing a Flex plugin, we recommend you go through the Flex Quickstart to familiarise yourself with Flex plugins and their development process..
Solution Components
The solution has the following components:
- A Twilio Function, used to fetch the customer record from HubSpot based on the calling, SMS or WhatsApp number.
- Two Studio flows that invoke the function mentioned above, parse the response and pass the information to the Flex Agent desktop. One flow is used by incoming calls and the other flow is for incoming conversations (SMS / WhatsApp).
- A Flex plugin that embeds HubSpot within Flex as an iframe. This plugin will screen pop the customer record if it is found on HubSpot, otherwise it will present the HubSpot Contacts page.
In the remainder of the post, I'll walk you through how to create each of these components and tie them together into a unified solution., Lets get building!
Serverless Functions
Start by creating a Twilio Serverless function in your Twilio account. From the main navigation in the Twilio Console locate and expand the Functions and Assets group. Click on Services and create a service named HubSpot. Next add a new function named getContactID. Overwrite the default templates code with the following:
After you've pasted the code, make sure you click the Save button in order to save your functions new code.
Locate your functions Settings and add a new Environment Variable named HUBSPOT_TOKEN setting its value to your HubSpot API key. Again within Settings, add a new Dependency for the axios Node library which we will use to make HTTP requests from the Function to the HubSpot API.
Finally make sure to hit the Deploy All button in order to deploy your new Twilio Function.
Twilio Studio Flow
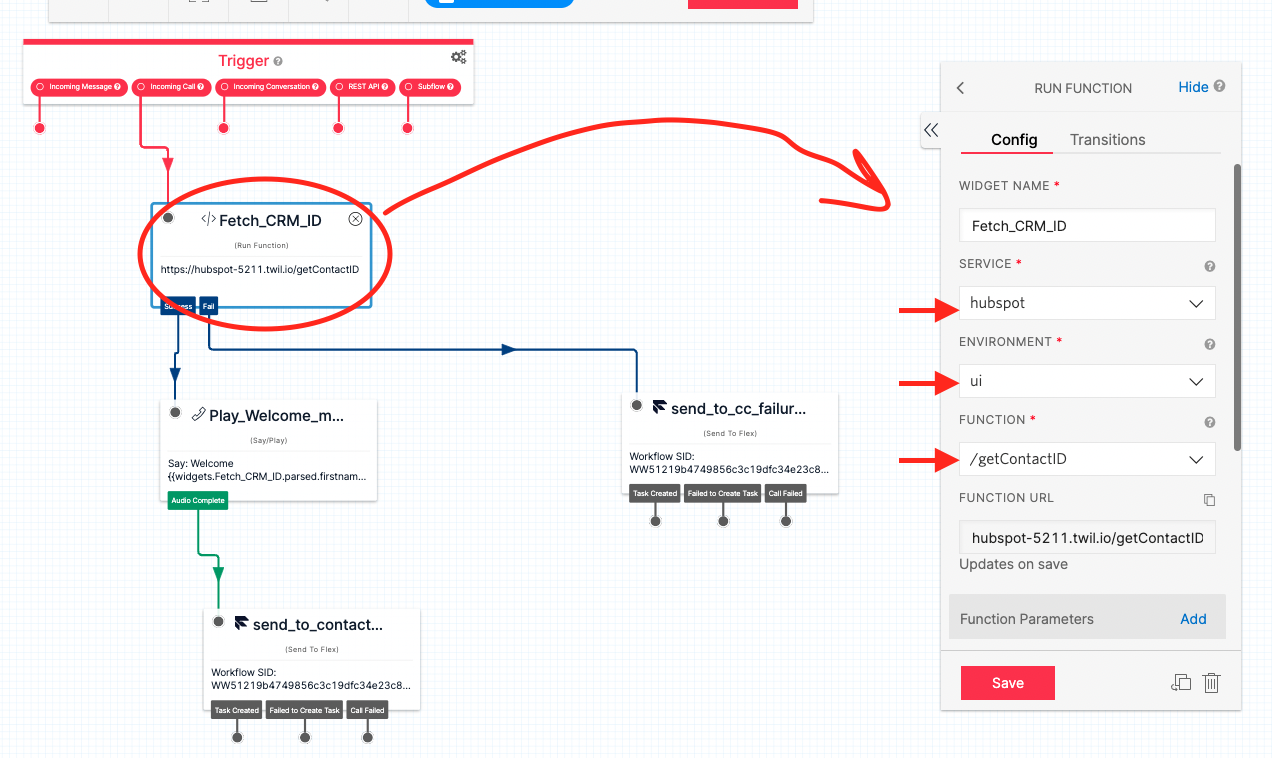
With the Twilio Function deployed the next step is to create a new Studio Flow. The Github repository referred to at the beginning of the post includes two Studio Flow definition files, one that handles incoming voice calls and one that handles incoming SMS/WhatsApp messages.
To deploy the voice call Flow locate and click to expand the Studio group in the Twilio console navigation. Click on Flows and create a new Flow named HubSpot_voice. Once the New Flow dialog opens, scroll down to locate and select the Import from JSON template. Paste the Flow definition JSON from this link into the dialog and click Next to finish the import.
To deploy the SMS/Whatsapp Flow, use the same process described in the prior paragraph, importing the Flow definition JSON from this link.
The Studio flows you just created will need to be adjusted as by default they are configured to use a Twilio Function which does not exist in your environment. Open the Studio Flow and click on the widget named Fetch_CRM_ID. On the widget properties select your own service, environment (ui) and select the function you just created.
You are are almost ready to test!
You're last step is to make sure you have a phone number configured to use your Studio flow. From the Twilio Console navigation locate and expand the Phone Numbers group, then the Manage group. Click the Active Numbers and select a testing number (or purchase a new one). Configure the phone number to use the correct Studio Flow for when a Call or Message comes in.
If you've set up the Voice flow, give your number a call or send a message and you should hear the IVR saying "Welcome <HubSpot Contact Name>". If you've set up the Message flow, send your number a text and you should receive a reply saying "Welcome <HubSpot Contact Name>".
HubSpot Plugin
The final step of this project is deploying the Flex React component that renders HubSpot within Flex as an iframe. The project repository includes separate versions of the component for each specific Flex UI version.
To identify which Flex UI version you're running navigate to the Twilio Flex Admin Dashboard. Once you have identified the Flex UI version, download the respective plugin from the repository.
Run this plugin locally by opening a terminal or command line window, navigating to the "plugin-hubspot" folder run the following commands:
After testing the plugin locally you can deploy the plugin to your account using the Flex Plugins CLI.
Wrapping up
Can you think of any more features to add to this? We can't wait to see what you build!
Ricardo Bangueses is a Principal Contact Center Solution Engineer at Twilio. He loves helping companies design great customer engagement solutions. He can be reached on LinkedIn.


Related Resources
Twilio Docs
From APIs to SDKs to sample apps
API reference documentation, SDKs, helper libraries, quickstarts, and tutorials for your language and platform.
Resource Center
The latest ebooks, industry reports, and webinars
Learn from customer engagement experts to improve your own communication.
Ahoy
Twilio's developer community hub
Best practices, code samples, and inspiration to build communications and digital engagement experiences.