When Not to Use Lock Files with Node.js
Time to read:
May 16, 2019
Written by

Probably one of the most common situations that you encounter when debugging a problem is the "works on my machine" scenario. This is often the result of different underlying dependencies on the system of the person with the bug and your own system. As a result both yarn and npm introduced so called "lock files" at one point that keep track of the exact versions of your dependencies. However, when you are developing a package that will be published to npm, you should avoid using such lock files. In this blog post we'll discuss why this is the case.
Quick Summary (tl;dr)
Lock files are super useful if you build an application like a web server. However, if you publish a library or CLI to npm, lock files are never published. Meaning your users and you might use different versions of dependencies if you use lock files.
What's a Lock File?
A lock file describes the entire dependency tree as it is resolved when created including nested dependencies with specific versions. In npm these are called package-lock.json and in yarn they are called yarn.lock. In both npm and yarn they are placed alongside your package.json.
A package-lock.json looks similar to this:
A yarn.lock is formatted differently but contains similar information:
Both of these contain some crucial pieces of information:
- The actual version of every dependency installed
- The dependencies of every dependency
- The resolved package including a checksum to verify the integrity of the package
So if all dependencies are listed in the lock file, why do we list them in the package.json? Why do we need two files?
package.json vs. Lock File
The goal of the dependencies field inside your projects package.json is to show the dependencies of your project that should be installed but not the dependencies of those dependencies. The dependencies can specify exact versions or a semver range. In the case of semver ranges, npm or yarn will pick the most suitable version to install.
That means that you might not actually get the same version of a dependency if you run npm install twice if in-between when a new version was published. For example if you install a dependency like twilio using npm install twilio, your dependencies in the package.json might have an entry similar to this:
If you check the documentation on semver on the npm page you'll see that the ^ actually means that any version bigger than 3.30.3 and smaller than 4.0.0 will be a valid version. So if any new version would be released and you don't have a lock file present, npm install or yarn install would install that one automatically and your package.json would not update. However the lock files would be different.
If npm or yarn find their respective lock files, they'll use these for the module installation instead. This is especially useful for situations like Continuous Integration (CI) on platforms where you want to make sure that the tests are run in a predictable environment. For this use case you can use special commands or flags with the respective package managers:
This is great when you are building an application like a web application or server because in a CI environment we want to emulate the behavior of the user. So if we start tracking our lock file in our source control (like git), we can make sure that every developer as well as the server or build system and our CI system uses the very same versions of dependencies.
So why wouldn't we want to do the same thing when we author libraries or other things meant to be published to the npm registry? In order to answer this, we'll first have to talk about how publishing works.
How Publishing a Module Works
Contrary to what some people believe, the content that you publish to npm is not always the same as what's on GitHub or overall in your project. The way that a module is published is that npm will determine the files that should be published by checking for a files key in your package.json and a .npmignore file or if none is present the .gitignore file. There are also some files that are always included and some that will always be excluded. You can find the entire list of those files on the npm page. For example the .git folder will always be ignored.
Afterwards npm will take the list of files and will package them all up together into a tarball using npm pack. If you want to check out what files are packaged you can run in a project npm pack --dry-run and you'll an output with all of the files:
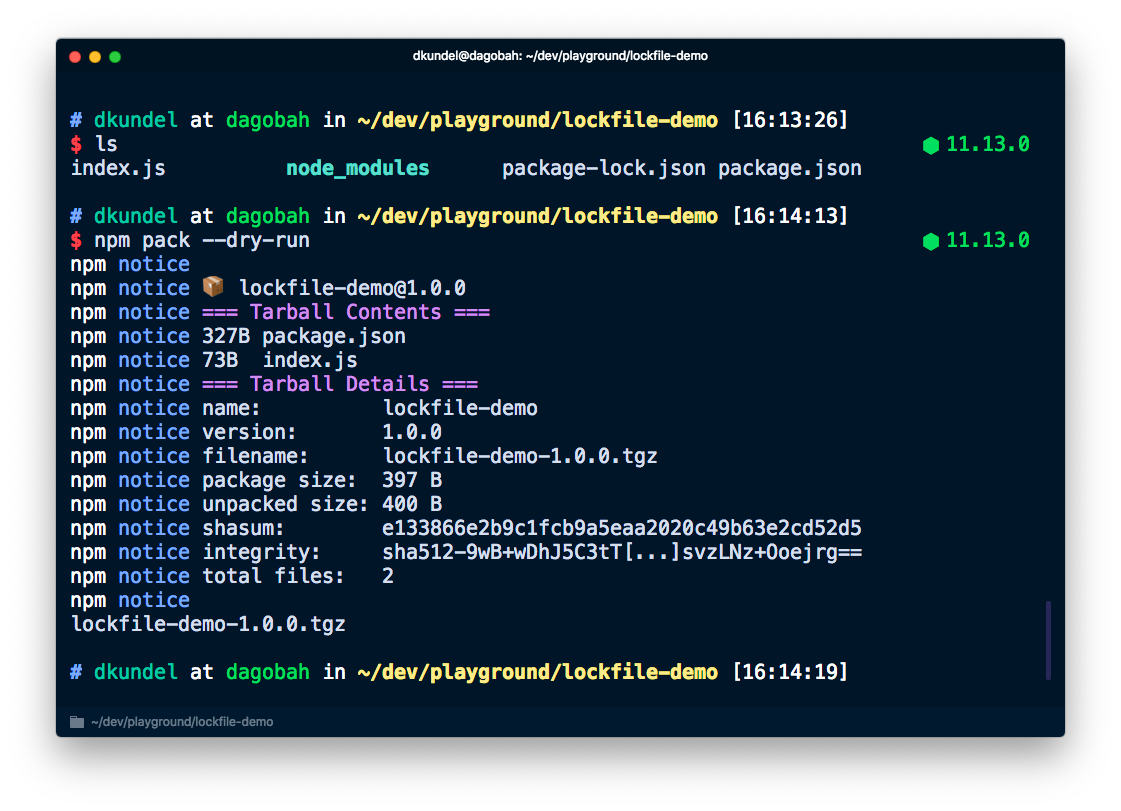
That tarball will then be uploaded to the npm registry. One thing you might notice when you run this command is that if you already have a package-lock.json it is actually not being bundled. This is because package-lock.json will always be ignored as specified by the list in the npm docs.
Subsequently this means that if another developer installs your published package, they'll never download your package-lock.json and therefore it will be completely ignored during the installation.
This might cause the "works on my machine" effect by accident since your CI and developer environment might pick up a different version of dependencies than your users. So what can we do instead?
Disabling Lock Files and Shrinkwrapping
First we should make sure to stop tracking our lock files. If you are using git, add the following to your .gitignore file in your project:
Yarn's docs say that you should check-in your yarn.lock even if you author a library, however, if you want to make sure you have the same experience as your users, I'd recommend to add it to .gitignore.
You can turn off the generation of a package-lock.json file by either creating or adding the following to an .npmrc file inside your project:
For yarn you can add the yarn install --no-lockfile flag to not generate a lock file.
However, just because we are getting rid of the package-lock.json doesn't mean we won't have the ability to pin the dependencies and child dependencies we have. There is another file we can use called npm-shrinkwrap.json.
It's basically the same file as package-lock.json and is produced by npm shrinkwrap and actually packaged and published to the npm registry.
So by adding npm shrinkwrap to your npm scripts as a prepack script or even a git commit hook, you can make sure that the same versions of dependencies are used in your dev environment, with your users and in your CI.
One important note, just make sure you use this with care. By using a shrinkwrap file you'll pin the exact version which can be great but it can also block people from getting critical patch fixes that would otherwise be installed automatically. npm strongly discourages the use case of shrinkwrap for libraries and recommends it more for CLIs or similar.
How Can I Learn More
Unfortunately while there's lots of material about this in the npm docs, it's sometimes hard to find. If you want to get a better idea of what gets installed or packaged, one common flag that will be your friend is --dry-run. It will run the command without affecting your system. For example npm install --dry-run won't actually install the dependency to your file system or npm publish --dry-run won't actually publish the package.
Here are some commands you might want to check out:
Some useful links to the docs on the topic are:
- What's the difference between
npm ciandnpm install - What's in a
package-lock.jsonornpm-shrinkwrap.json - List of files that are always packaged and always ignored
A lot of this is based on how npm handles packaging, publishing and installing dependencies, and with a constantly-changing landscape this might change at one point. Or maybe your development team has a different philosophy on the experience of developers vs. users of a library. I hope this article gives you a bit more insight into what's happening under the hood in an admittingly-complicated topic.
Shout-out to Tierney Cyren for cross-checking the blog post for me.
If you have any questions, feel free to reach out to me:
- Twitter: @dkundel
- Email: dkundel@twilio.com
- GitHub: dkundel
- dkundel.com


Related Resources
Twilio Docs
From APIs to SDKs to sample apps
API reference documentation, SDKs, helper libraries, quickstarts, and tutorials for your language and platform.
Resource Center
The latest ebooks, industry reports, and webinars
Learn from customer engagement experts to improve your own communication.
Ahoy
Twilio's developer community hub
Best practices, code samples, and inspiration to build communications and digital engagement experiences.