Mars Rover Emails with Python and Twilio SendGrid
Time to read:
February 28, 2022
Written by

NASA has a bunch of awesome APIs which give you programmatic access to the wonders of space. I think the Mars Rover Photos API in particular is really amazing as you can use it to see what kind of pictures the Mars Curiosity rover has been taking.
Let’s build an app using the Mars Rover API with Twilio SendGrid, Python, and Flask to make it so that we can send an email and receive back pictures from Mars.
Prerequisites and dependencies
Make sure you have the following before moving on:
- Python 3 installed on your machine
- A free SendGrid account
- An email address to test out this project
- A domain on which you will receive emails. For the purposes of this article, I’m going to use yourdomainhere.com. You will need to replace it with your own domain name.
Here is a guide you can follow for setting up your development environment if you are going to be doing more web development with Python in general and are unfamiliar with things like virtual environments.
Before writing code, you'll need to install some dependencies:
- The SendGrid Python library for sending emails
- Flask as a web framework for receiving HTTP requests
- Requests to grab data from the Mars Rover API
Make sure you create and activate a virtual environment, and then install these with the following command:
Sign up for SendGrid and create an API key
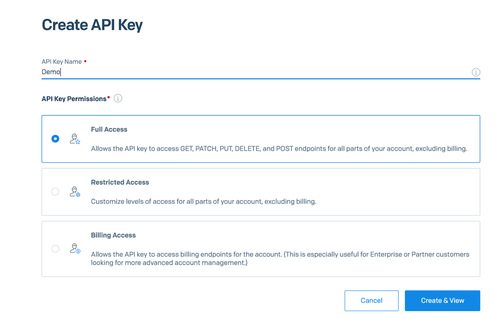
When creating a SendGrid account, you can choose the free tier for the purpose of this tutorial. Once you have an account, you need to create an API key as seen in this screenshot. You can name it whatever you want, but once it is created make sure you save it before moving on!
A good way to save this API key is to set it as an environment variable that you can access from your Python code in order to avoid writing it directly in your code. Set the value of the SENDGRID_API_KEY environment variable to be the API key from your SendGrid account. It still doesn't hurt to make note of it elsewhere though, because you cannot view it again. Here's a useful tutorial if you need help setting environment variables. We will use this API key later on.
The Mars Rover API
Now that you have a SendGrid account and API key, you're ready to dive into some code and send emails! Start by opening your terminal and navigating to the directory where you want your project to live.
Let’s write a module to interact with the Mars Rover API, which is a URL that returns some JSON, and send those responses in an email. Create a file called mars_emails.py in this directory and add the following code to it:
What we’re doing here is sending a request using the requests module to the URL corresponding to Mars Rover’s API, parsing the JSON response, and grabbing the URL associated with a random image for whatever Martian Solar day we provide.

You can test this code by opening a Python shell in the same directory and running the following:
You should see a URL to an image taken on Mars printed to the console.

Sending an Email with Python
Now we want to write a function that takes the response we get from that API, and sends it in an email. This is where the SendGrid API key from earlier comes in.
In mars_emails.py add another function, as well as some new import statements:
To test this code, open your Python shell again and try the following line, which calls both of these functions:
Use your own email address for the to_email argument, so you can verify that it actually works. For the from_email argument, you can use any email address for testing purposes, but I would recommend using one from the domain that you own because we're going to use that later anyway.
The next step is to create a Flask app that can receive requests from a SendGrid Inbound Parse webhook, for the purpose of receiving incoming emails that we can then respond to with a Mars picture.
Domain authentication
The first step in setting up an email receiving pipeline is to authenticate your domain with Twilio SendGrid, so that they can send and receive emails on it on your behalf. Here is a detailed tutorial you can follow to set up domain authentication. The rest of this blog post will assume that you have a domain authenticated.
Write an incoming email endpoint with Flask
We are now ready to create a small Flask application that will receive incoming emails. Create a file called app.py and add the following, which is the code for the complete application:
The application defines a single web route attached to the /email URL. SendGrid will invoke this route each time an incoming email arrives, sending all the information about the email as a standard form post. You can review the complete list of email parameters in the SendGrid documentation. In this function, the code from our other module is called in order to respond to this incoming email with a picture from Mars, based on the Martian solar day they included in the body. There is some very minor error handling, in that if the user sends something that isn't a number the default value of "1000" is used, simply because I happen to like some of the images taken on that day.
You can run this code with the command python app.py in your terminal.
The application is now running and waiting for incoming requests, but it is only reachable from your own computer because we are running a development server. Leave it running for now, and we will make it accessible on the Internet.
Configure the SendGrid Inbound Parse webhook
With the Flask application running, we need to connect it with SendGrid to be able to receive emails. We are going to use a tool called ngrok to create a public URL that SendGrid can use to forward requests to our locally running application.
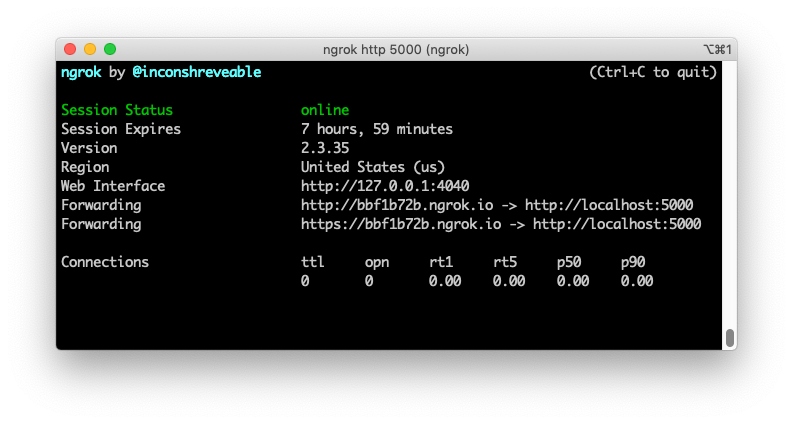
If you haven’t yet, install ngrok on your system. With the Python code running, open a second terminal window to start ngrok as follows:
This is telling ngrok to create a “tunnel” from the public Internet into port 5000 in our local machine, where the Flask app is listening for requests. The output should look something like this:
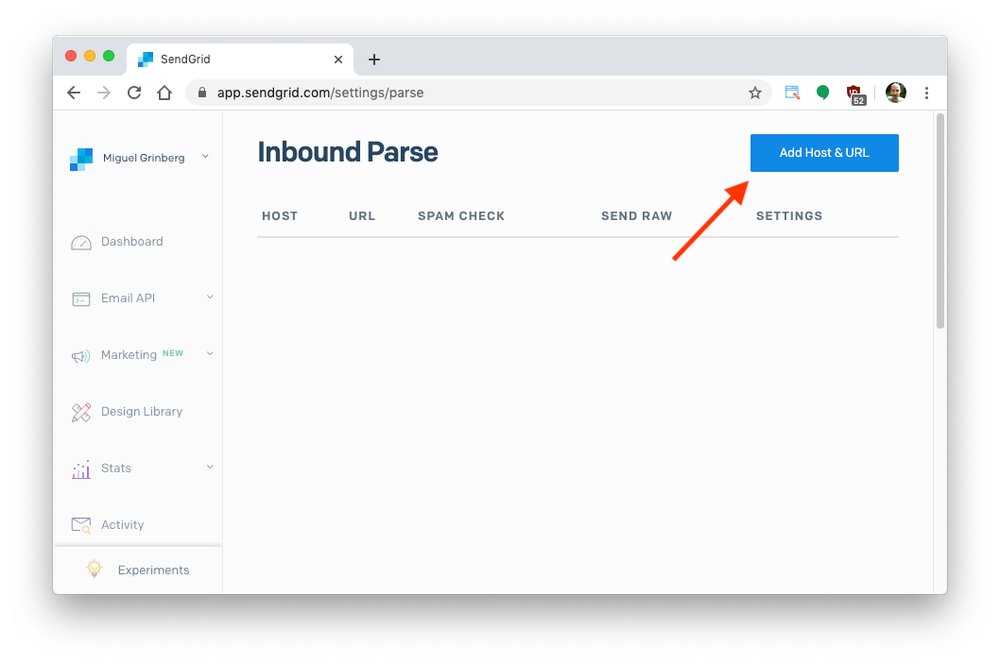
Now that you have a publicly accessible URL, go back to the SendGrid dashboard and under Settings select Inbound Parse, then click on “Add Host & URL”.
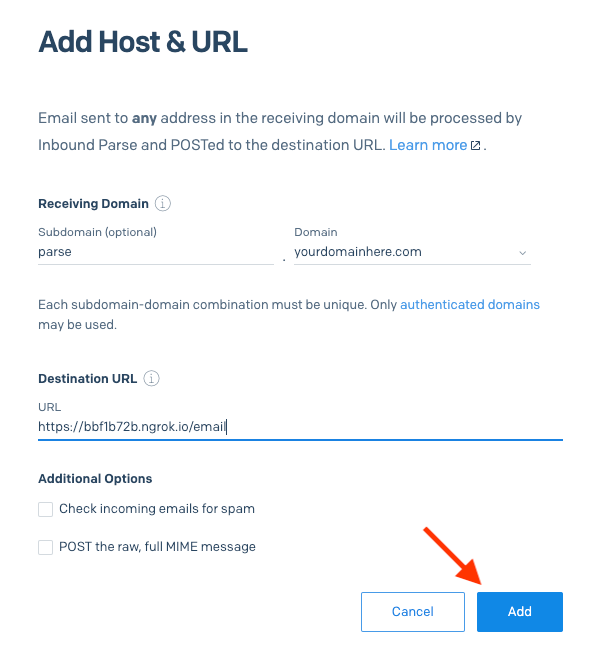
In the next screen you can optionally enter a subdomain on which you will be receiving emails. This can be any subdomain that is available on your domain. If you want to receive emails on your top-level domain it can be left empty.
Next you have to select your domain name. This is a dropdown list that shows all the domains that you have verified with SendGrid. If you are doing this for the first time you will only see the domain that you verified above.
Next you have to enter the destination URL for your webhook. This is the URL generated by ngrok with /email attached at the end. In my case this was http://bbf1b72b.ngrok.io/email.
Click “Add” to configure your webhook.
Now you will see an entry for your webhook in the main Inbound Parse page:

Keep in mind that ngrok URLs change each time ngrok is stopped and restarted, so during development you may need to edit your webhook to update the URL. When you deploy your webhook for production use you will host it directly on a public URL, so ngrok will not be needed.
Set up an MX Record
The domain that you selected to receive emails in the previous section needs to be defined in the DNS configuration of your domain provider with a MX record. The value is the same for all SendGrid customers: mx.sendgrid.net. (note the trailing dot after “net”).
For example, if you are using a subdomain called "parse" to receive your emails, in Google DNS it should look something like this:

Depending on what domain provider you use, you may need to enter the complete hostname for this DNS record, so in that case it would be parse.yourdomainhere.com.
If you decided to not define a subdomain in the previous section, then your hostname is going to be yourdomainhere.com or just “@”.
Once you add this final entry to your domain’s DNS configuration you will once again need to wait for it to propagate before you can use it.
Send a test email
While having your Python code and ngrok running, open your email client and send a test email. In the To field you can enter any name that you want, as SendGrid captures all usernames. For the body of the email, just send a number corresponding to a Martian solar day, such as "1000" to get an image taken 1000 Martian days into the rover's journey. What goes after the @ needs to be your complete email-receiving domain.
Wait a minute or two and eventually SendGrid will invoke the ngrok webhook URL, which in turn will invoke your Flask endpoint. You should get a response that looks something like this:
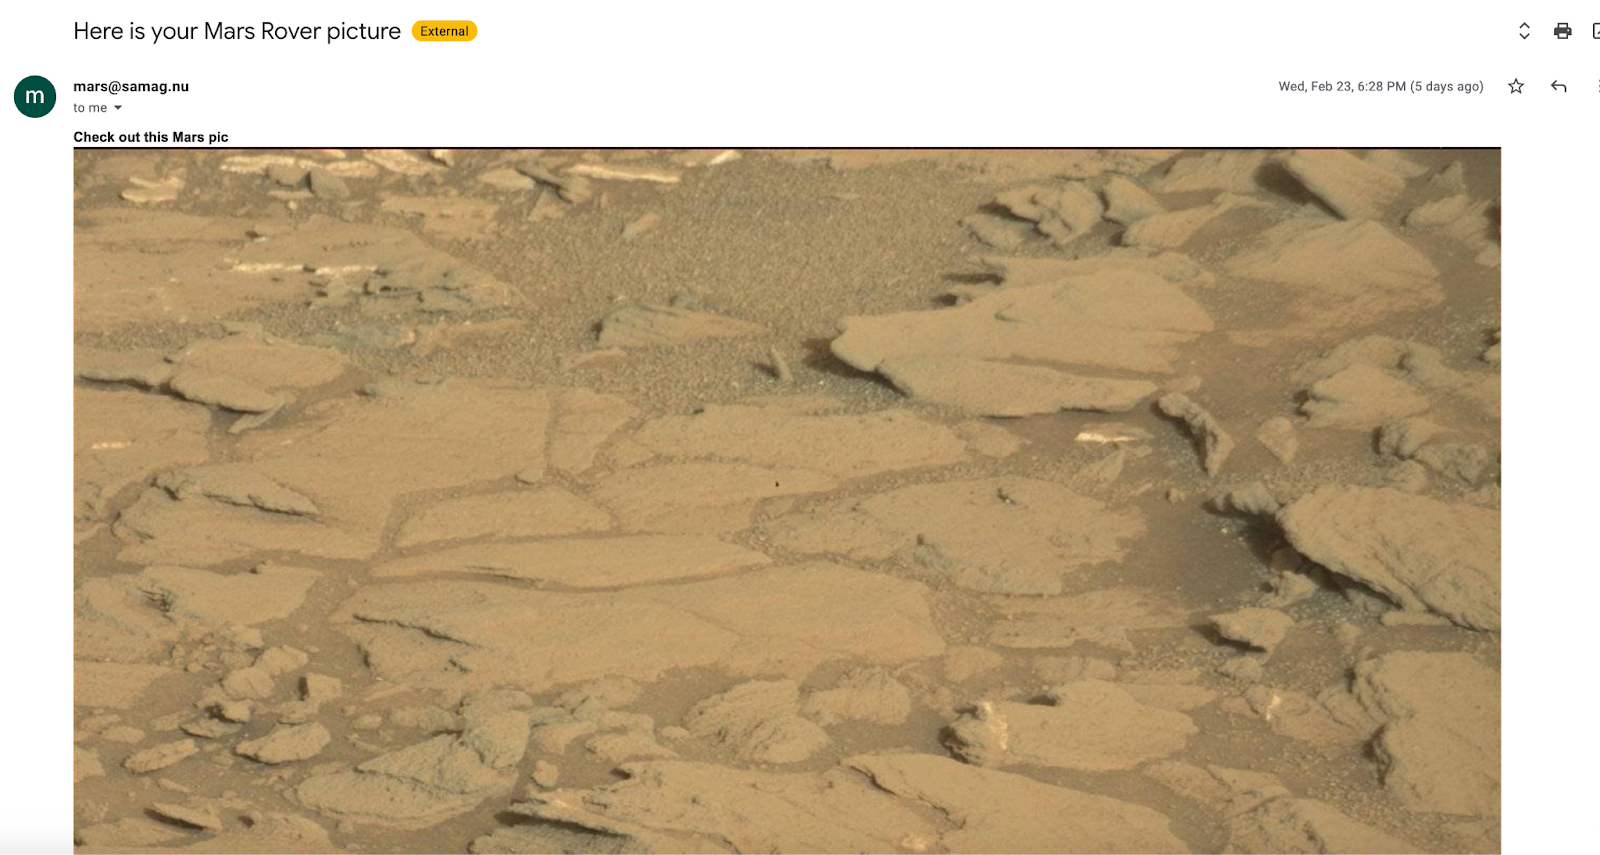
Congratulations on receiving Mars Rover emails with Python! I can't wait to see what you build with Inbound Parse in the future.
- Email: sagnew@twilio.com
- Twitter: @Sagnewshreds
- Github: Sagnew
- Twitch (streaming live code): Sagnewshreds


Related Resources
Twilio Docs
From APIs to SDKs to sample apps
API reference documentation, SDKs, helper libraries, quickstarts, and tutorials for your language and platform.
Resource Center
The latest ebooks, industry reports, and webinars
Learn from customer engagement experts to improve your own communication.
Ahoy
Twilio's developer community hub
Best practices, code samples, and inspiration to build communications and digital engagement experiences.