Open and Click Tracking for Email using Java and Twilio SendGrid
Time to read:
April 23, 2020
Written by

I covered sending emails from Java using the Twilio SendGrid API before, but for important emails it can be vital to know whether recipients have opened your mail, and whether they have clicked on the links in it. You can do this using the SendGrid Event Webhook, which works by sending HTTP requests to a URL you provide. In this post I’ll show how to configure this with Twilio SendGrid and build a Java web application to handle the webhooks and record your recipients’ activity.
Before you start
You will need
- Java - version 8 or newer. I like to use SDKMAN! to manage Java installations
- Ngrok
- A Twilio SendGrid account - sign up here if you don’t have one already.
Creating the application
If you prefer to skip the coding and instead try things out you can find the code for this application on GitHub, and should skip ahead to the section below called Creating a public URL for your application with ngrok.
The application will be built with Spring Boot and Spring MVC annotated controllers. When Twilio SendGrid events are received by the application, it will store open and click events in a couple of Map objects to record which addresses have opened a particular email or clicked on a particular link. There are also a couple of endpoints so that you can retrieve that data, for example to use in a dashboard.
Creating the application template
You can use SDKMAN! to install the Spring Boot cli tool with sdk install springboot. Use this to create a new project in an empty directory with:
This command sets up a new Spring Boot project in your current directory. Feel free to choose your own groupId and artifactId using the Maven naming conventions. If you don’t want to use the CLI tool, you can enter the same details at start.spring.io then download and unzip the project which is generated.
You can now import the project into your IDE and start coding. My favourite is IntelliJ IDEA but Eclipse and NetBeans are also popular.
Adding the events controller
In the same package as the Application class created by the Spring Initializr, create a class called SendGridEvent which will hold a subset of the JSON data posted by SendGrid. Spring will take care of turning the JSON into instances of this class.
That class will have a few final fields, so it will need a constructor but we can do without getters and setters:
The @JsonProperty annotations allow the fields in this class to be named differently from the fields in the JSON.
In the same package, create a class called SendGridEventWebhookHandler annotated with @Controller which has methods for receiving events by POST requests and serving up the data by GET requests:
The receiveSGEventHook (highlighted) method takes a List<SendGridEvent> parameter which will be created from the JSON sent by SendGrid. It is a List because SendGrid can batch up events if many arrive in a short space of time.
openedEmail is a Map which maps sg_message_id to a Set of email addresses which have opened the email with that ID. This id can be looked up by performing an “advanced search” in your Activity Feed and filtering by Message ID. The Message ID may be different for each recipient. If you prefer to use your own categorization system for emails, then the Unique Arguments feature is designed for that purpose.
clickedLinks is a similar structure which maps URLs to a Set of email addresses whose owner has clicked on the link. In both cases I have used ConcurrentHashMap and computeIfAbsent to avoid thread-safety problems if multiple sets of events are received simultaneously.
When events are received the code loops through them using forEach and adds any open or click events to the appropriate Map. There are several other types of events such as bounce and unsubscribe, which this application ignores. Later you will see how to configure which types of events SendGrid will send.
The final thing needed is a couple of methods to expose the data from the openedEmails and clickedLinks maps. I added an endpoint for each:
This is all the code needed for the application. Run it from the terminal with ./mvnw spring-boot:run in the root directory of the project.
Creating a public URL for your application with ngrok
So far, the application is running and listening for HTTP requests on your localhost, but SendGrid needs a public URL for the webhook. You could deploy this application on a cloud server, but to keep it simple here I recommend using ngrok, which can create public URLs that are tunneled to your localhost server.
After installing ngrok, create a tunnel with ngrok http 8080:
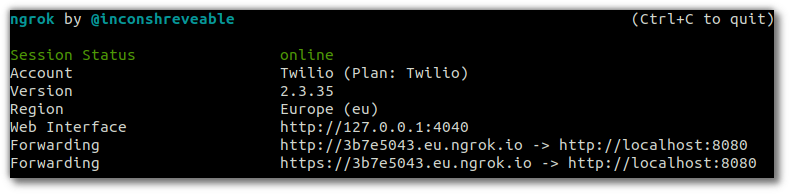
Take note of the https forwarding URL as that will be needed when configuring SendGrid. From the screenshot above, my webhook URL will be https://3b7e5043.eu.ngrok.io/events - your ngrok domain will be different, but don’t forget to add /events at the end.
Enable Event Webhooks & set the webhook URL
Once you have created your SendGrid account, there are three things to do:
- Add open-tracking and click-tracking to your outbound emails
- Configure SendGrid with your
ngrokURL for webhooks - Configure SendGrid to make webhook requests for
openandclickevents.
Adding open-tracking and click-tracking to outbound emails
On the Tracking Settings section of your SendGrid dashboard, enable “Open Tracking” and “Click Tracking”
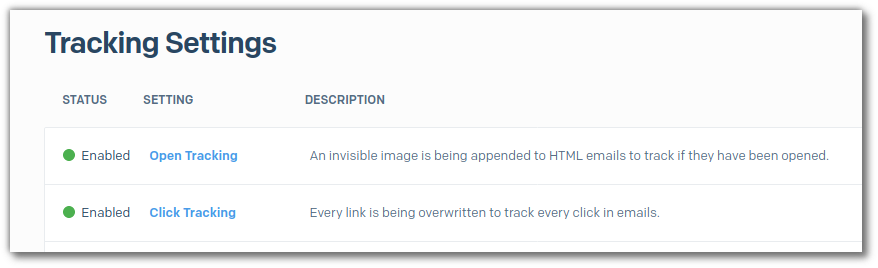
Open Tracking configures SendGrid to add an invisible image to each outbound email which is used to tell whether the recipient has opened the email. Click Tracking configures SendGrid to rewrite URLs in your messages to track which recipients have clicked on which URLs. Make sure to read these best practices for how to construct links to make sure they will be tracked.
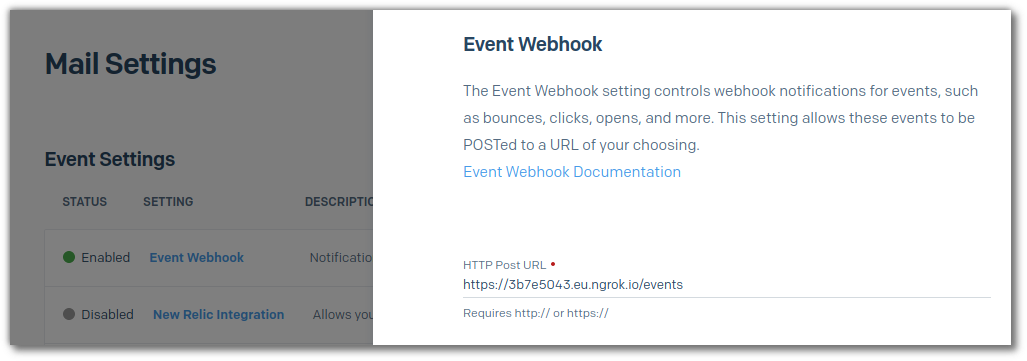
Configure SendGrid to use your application for webhooks
From the Mail Settings page on your dashboard, enable Event Webhooks, and configure the HTTP Post URL to be your ngrok URL followed by /events:
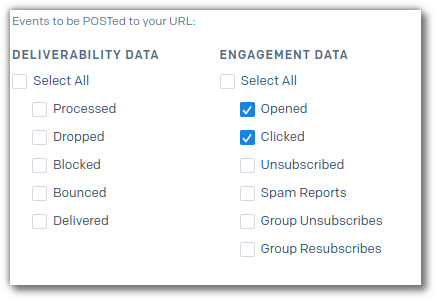
Configure SendGrid to send Open and Click events
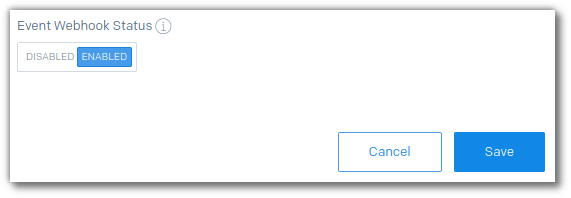
While you are on the Event Webhook configuration page, check the boxes for Opened and Clicked under Engagement Data:
Finally, enable the Event Webhook and save the configuration
Testing your application from the SendGrid dashboard
On the Event Webhook configuration page there is a button to test your integration, which you can use now. You will see the following in your Spring Boot application logs when you click it:
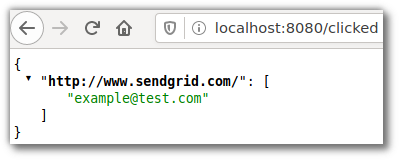
You can check that the data from these test events has been stored in your application by making an HTTP request to localhost:8080/opened and localhost:8080/clicked either in your browser or using a tool like curl or (my favourite) HTTPie.

Using your application for real
The instructions from How to Send Email in Java using Twilio SendGrid can be used to test this with a single change - you need to add a link to the email to check click-tracking. Remember to follow the Click Tracking Best Practises to make sure that your URLs will be tracked correctly. The code to send email will look like this:
You can add that class to your project and run it from the IDE while the Spring Boot app is still running in the terminal. Just make sure that you add the sendgrid-java dependency to your build as described in that post.
When you run the main method in that class, you will send yourself an email. After you open it in your mail client, SendGrid will report an open event, and when you click the link there will be a click event. These might take a minute or so to arrive, and might be batched together but your code will handle that just fine.
And, voila! You can now track which of your recipients has opened your emails and clicked the lovely links they contain.
Wrapping up
If you are building with Twilio or SendGrid, I’d love to hear about it - let me know.


Related Resources
Twilio Docs
From APIs to SDKs to sample apps
API reference documentation, SDKs, helper libraries, quickstarts, and tutorials for your language and platform.
Resource Center
The latest ebooks, industry reports, and webinars
Learn from customer engagement experts to improve your own communication.
Ahoy
Twilio's developer community hub
Best practices, code samples, and inspiration to build communications and digital engagement experiences.