Twilio Programmable Voice JavaScript Quickstart Demo Application with Node

Time to read: 11 minutes
September 26, 2022
Written by
Reviewed by
Ahoy builders! So, you have created a Twilio account and you now want to get started with calling your clients via your browser, great stuff! That’s where the Twilio Voice SDK comes into play.
But, you may ask, what is an SDK?
An SDK is known as a Software Development Kit which is a fancy term for a collection of libraries and code which you can build on to. Rather than wasting valuable time writing code to connect to Twilio, handle phone calls, create tokens, etc., you can download and deploy our SDK to hit the ground running. This allows you to focus on the more important aspects of your application such as the GUI and your customer experience leaving the complex HTTP negotiation to Twilio. How great is that?
Twilio supports the addition of Programmable Voice to your web and mobile apps on the following platforms:
In this post, our demo application will give you a ready-made starting point for writing your own voice apps with the Twilio Voice JavaScript SDK 2.0 and allow you to make and receive calls via your web browser. In this blog post, we will run over the installation and walk through how to set up your own instance. We’ll also go over some common issues and error codes you may encounter.
Let’s get started!
Prerequisites
Before we get started, please check you have already installed the following:
- Node.js version 14.0 or above.
- ngrok - this is used to expose your local development server to the internet. For more information, read this Twilio blog post.
- A WebRTC enabled browser (Google Chrome or Mozilla Firefox are recommended). Edge and Internet Explorer will not work for testing.
- For the purpose of this blog post, we will be sticking to the JS SDK quickstart which you can find here.
Once you have these installed, the next step is to login to your Twilio account (if you haven’t yet, you can sign up for a free account here).
For now, you can create a TwiML Application and name it, we can worry about the URL aspect later on. We will also need to purchase a Twilio number which we will call from, and create or generate an API key which we can use in our application to authenticate our connection with Twilio. I will run through these steps below.
Create a TwiML Application
Create a TwiML Application in the Twilio Console. Once you create the TwiML Application, click on it in your list of TwiML Apps to find the TwiML App SID. You will need this SID for your .env file later on, so take note.
You will also need to configure the Voice "REQUEST URL" in your TwiML App later, but for now you can leave it as blank.
- For detailed instructions with screenshots, see the Create a TwiML App.md file
Purchase a Phone Number
Purchase a Voice phone number. You will need this phone number in E.164 format for your .env file.
- For detailed instructions with screenshots, see the Buy a Phone Number.md file
Create an API Key
Create an API Key in the Twilio Console. Keep the API Key SID and the API Secret in a safe place, since you will need them for your .env file. Your API KEY is needed to create an Access Token.
- For detailed instructions with screenshots, see the Create an API Key.md file
Make sure to document each one of these for later. Feel free to create a temporary text file to hold the values to save you some time but before we begin local development, we will need to collect all these config values in order to run our application.
Below I have included what is needed.
| Config Value | Description |
|
“TWILIO_ACCOUNT_SID” |
Your primary Twilio account identifier – find this in the console here. |
|
“TWILIO_TWIML_APP_SID” |
The SID of the TwiML App you created in step 1 above. Find the SID in the console here. |
|
“TWILIO_CALLER_ID” |
Your Twilio phone number in E.164 format - you can find your number here |
|
“TWILIO_API_KEY” “TWILIO_API_SECRET” |
The `TWILIO_API_KEY` is the API Key SID you created in the last step above, and the `TWILIO_API_SECRET` is the secret associated with that key. |
Work with the Twilio Programmable Voice SDK
Once you have these values, our next step is to download our demo application. If you are familiar with Git, you can clone or download a copy of the demo application from Github using your terminal following the steps below. For the purpose of this post, I will be outlining the steps from the point of view of a Mac user utilizing the Terminal.
Local development
First, clone this repository into a directory where you want the repo to live on your local machine and cd into it. To do this, open up your terminal and type or paste the following:git clone https://github.com/TwilioDevEd/voice-javascript-sdk-quickstart-node.git
This will download the demo application from the link above and store the application in whichever folder was open in the terminal at the time of execution.
Then, we need to navigate into that same folder to create our environment variables file where we will store our config values we discussed above. We can simply copy the already created env.example file and fill in our config values we discussed above. To do this cd into our demo application like so:
cd voice-javascript-sdk-quickstart-node- Now that we are in our app, we need to create a configuration file for our application by copying the
.env.exampleand editing the.envfile with the configuration values from above. We can do this by running the following:cp .env.example .env
Once you run the above command, a new copy of the.env.exampleis created for us called.env. We will fill this out and populate it with our values. At this point you can open up our demo application in a code editor of your choice. I personally use Visual Studio Code but it’s entirely up to you what you use.
Once you open the project, you should see a file titled “.env”. This is the file we just created. Open this up and you should see it populated with some text for your Account SID, Caller ID, etc.
Go ahead and enter the same values we documented next to each attribute and hit save.TWILIO_TWIML_APP_SID=AP145df1xxx9920048daxxxx2ca9f61ex
Now we need to install some additional dependencies to allow our application to function. - Install the dependencies by executing the following in your terminal
npm install - Then we need to copy the
twilio.min.jsfile from yournode_modulesto your public directory. This sounds complicated, but you can simply run the following from the root directory of your project:cp node_modules/@twilio/voice-sdk/dist/twilio.min.js public
Note: In order to keep this quickstart as simple as possible, this step is used to avoid any need for build tools like Webpack. - Once done, you can launch a local development web server by running the following:
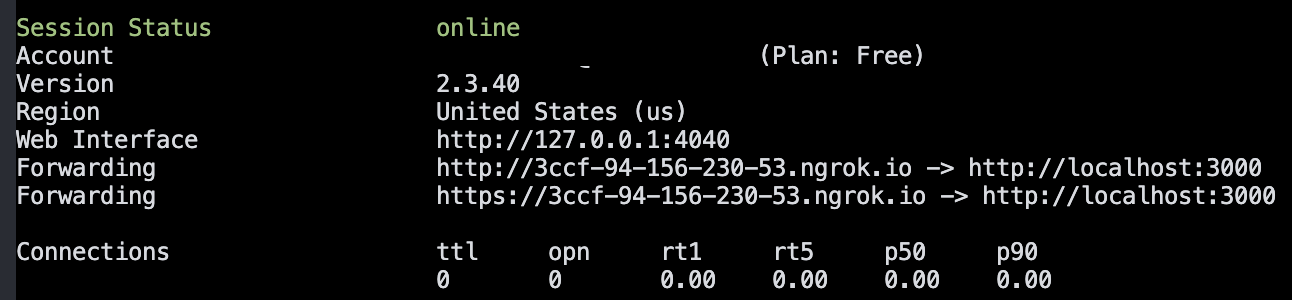
npm start - Then we need to expose your application to the wider internet using ngrok. This step is crucial for the app to work as expected. Run the following in your terminal:
ngrok http 3000
Ngrok will assign a unique URL to your tunnel once executed and the URL might look something likehttps://asdf456.ngrok.io. You will need this URL to configure your TwiML app in the next step. Earlier we discussed a REQUEST URL and this URL is exactly that! - Configure your TwiML app
- In the Twilio Console, navigate back to your Twilio app by navigating to Programmable Voice > TwiML > TwiML Apps
- Select the TwiML App you created earlier
- On your TwiML App's information page, find the Voice Configuration section.
- Change the Request URL to your new ngrok url and add
/voiceto the end of the URL (e.g,https://asdf456.ngrok.io/voice)
Note: You must use the https URL, otherwise some browsers will block microphone access.
- Click the Save button

You should now be ready to make and receive calls from your browser.
Your Web Application
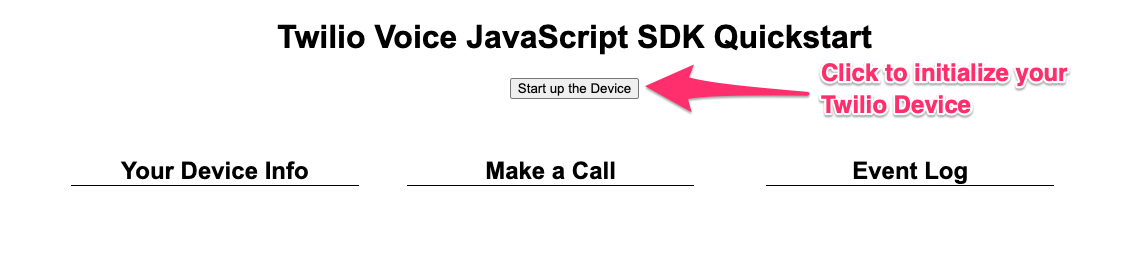
Now when you navigate to localhost:3000, you should see the web application containing a Start up the Device button. Click this button to initialize a Twilio.Device.
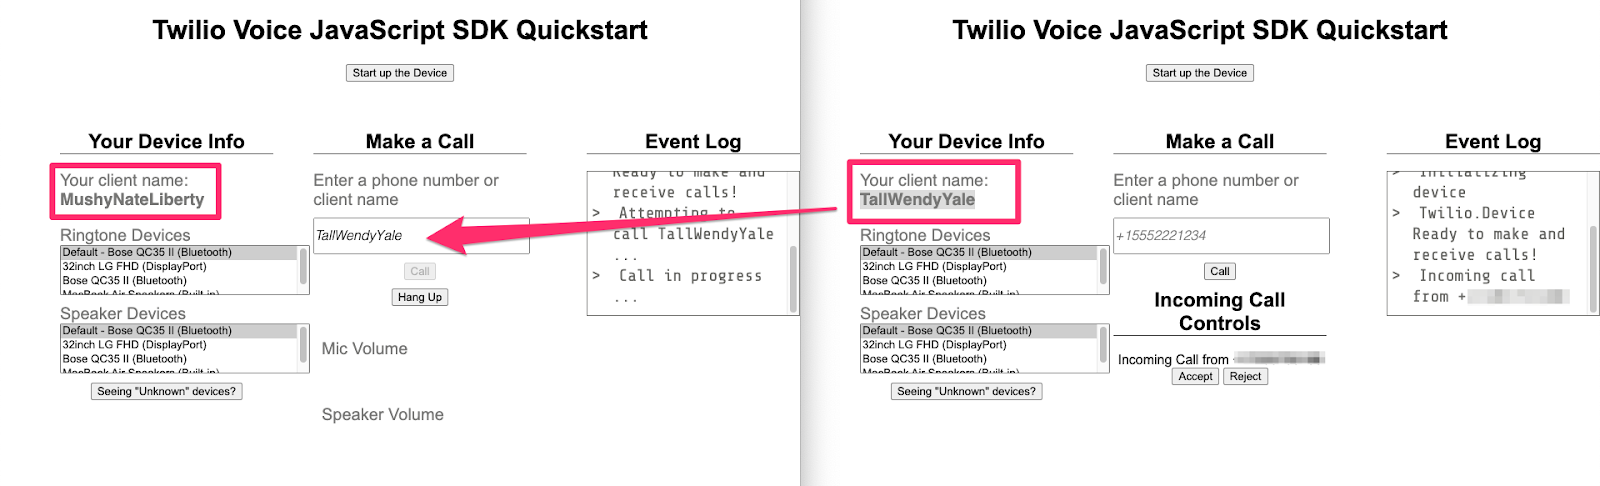
When the Twilio.Device is initialized, you will be assigned a random "client name", which will appear in the Device Info column on the left side of the page. (We will run over how to change this later.) This client name is used as the identity field when generating an Access Token for the Twilio.Device, and is also used to route SDK-to-SDK calls to the correct Twilio.Device.
To make an outbound call to a phone number
- Under Make a Call, enter a phone number inE.164 format and press the Call button
To make a browser-to browser call
Open two browser windows to localhost:3000 and click the Start up the Device button in both windows. You should see a different client name in each window.
Enter one client's name in the other client's Make a Call input and press the Call button.
Receive incoming calls from a non-browser device
You will first need to configure your Twilio Voice Phone Number to use the TwiML App we created earlier. This tells Twilio how to handle an incoming call directed to your Twilio Voice Number.
- Log in to your Twilio Console
- Navigate to your Active Numbers list
- Click on the number you purchased earlier
- Scroll down to find the Voice & Fax section and look for CONFIGURE WITH
- Select TwiML App
- Under TWIML APP, choose the TwiML App you created earlier
- Click the Save button at the bottom of the browser window
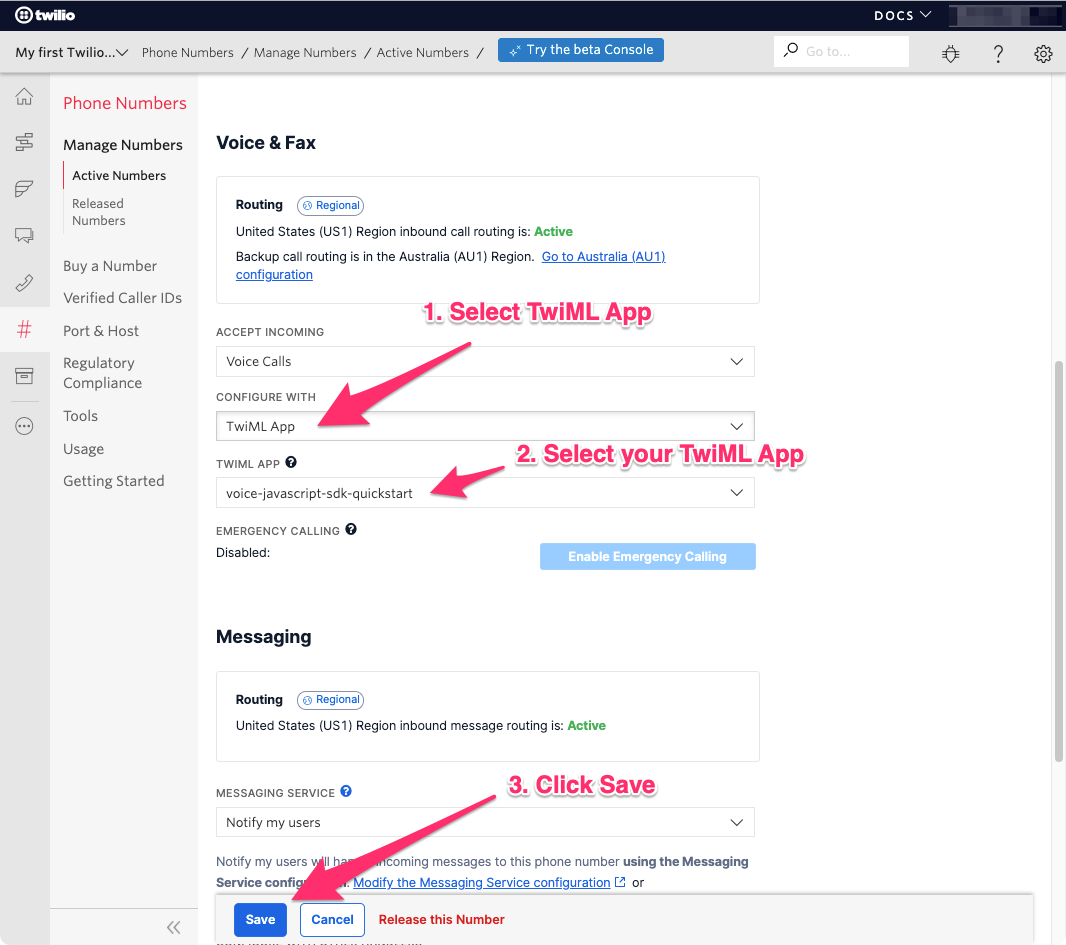
You can now call your Twilio Voice Phone Number from your cell or landline phone, which will be forwarded to your application.
Unknown Audio Devices
If you see "Unknown Audio Output Device 1" in the Ringtone or Speaker devices lists, click the button below the boxes (Seeing "Unknown" Devices?) to have your browser identify your input and output devices.
Other Methods
When using our demo application, it is also important to familiarize yourself with the other various methods that are available within our demo application to change or customize things on the fly.
Above we discussed the use of the logLevel attribute, which is contained within a method called intiallizeDevice. In this method, you can see the line device = new Twilio.Device()
This is where we pass in our token and create an instance of our device. The Twilio.Device object is available when twilio.js is included in your page and it represents a soft device, the client that provides connections into Twilio. Think of this as your virtual phone in your browser. It’s the main entry point for creating outbound connections, accepting incoming connections, and setting up your connection event handlers.
A new instance of a Device should be constructed by using the new keyword and passing an Access Token as the first argument.
const device = new Device(token);
The constructor also takes an optional second argument which is called “DeviceOptions” which we will talk about below.
The second argument DeviceOptions is optional but allows you to customize your device. You can set such things as the sound your device makes when it rings, or perhaps you wish to place a call through a specific geo-graphichal region, this is where you can avail our the Device Options. Below you can see where we are instantiating a new Device and passing in the token as well as our deviceOptions.
const device = new Device(token, deviceOptions);
If you just have the one option or requirement, you can pass in your one option directly like below where we set our edge location to Ashburn.
If you have a few options, however, one of the easiest ways to set your specified options is to pass in an object as an argument for your Device. For example, below we create an object called deviceOptions and the first element is our edge location (which we talked about earlier), and our 2nd element is “sounds” which we have not discussed.
Earlier on, we mentioned setting the sound of your device. Here we are going to include our sound attribute, followed by the key/value pairs of sound names (as the key) and URLs (as the value).
We then pass in our new deviceOptions object during our device instantiation while including our token. This device will now use the edge location Ashburn for all calls, and the sounds we have set for incoming, outgoing, and our DMTF (touch tones).
Another thing to be familiar with is Device.register. This is called shortly after we instantiate the “device” to open a signaling websocket connection to allow for incoming calls. You will see this in our demo application and is called just after we instantiate the device.
device.register();
The autoplay policy implemented by Chrome, for example, will inhibit automatic audio playback when a page is loaded unless the user has interacted with the webpage or app. Due to this, Twilio recommends calling device.register() in response to a user gesture, such as a click. One popular and intuitive way to implement this is to add a button that will call device.register() that the user must click within your application. Without implementing something like this, the browser will most likely block the audio of your call.
• Device.connect(connectOptions)
Attempts a new connection to the TwiML Application that you associated with the Access Token used when instantiating the Device instance. This method will return a Promise with a Call object. You should keep track of this Call object to monitor/modify the active call.
For example, to end a call, you can use the .disconnect() method on the Call object or use the device.disconnectAll() method.
Connectivity Requirements
When using our Voice SDK, your voice call is highly dependent on the VOIP (Voice over IP) technology so there are some various things to consider to ensure quality of service.
The big one that causes the most issues for people is a firewall.
First, you must allow UDP traffic through your firewall. The Twilio SDK is reliant on the UDP protocol so blocking this would hinder your call experience.
Restricted networks should select a region with IP ranges allowed. If needed, you can use TURN. It is possible to use Twilio's Network Traversal Service to restrict media traffic to UDP port 3478 by using our TURN servers (regional media IPs will still need to be allowed.
Other than firewalls, the clients internet/network connection plays one of the largest roles in the quality of a given call. Poor network conditions can result in increased latency, jitter, and packet loss. Latency usually becomes apparent after 250ms or so. To minimize the occurrence of such issues, we recommend avoiding older generation mobile networks and to stick to high bandwidth and reliable connections.
If needed, you can configure the Opus codec to control bandwidth. You can do this by updating our Twilio.Device's options with .updateOptions(options)
Demo App customization
You may be thinking that you’d like to change certain aspects of our demo app/quickstart to make it feel more like your own application. Two of the most common questions we get asked are “How do I set or change the caller ID/Client name?” and “how can I test the demo app against an IVR as there is no where to enter numbers”. Well, let me show you!
When we generate a token, we will use the Account SID, API Key, API Secret and most importantly in this case, the identity. This acts as your caller ID when you place a call, so let me run through how you can change this.
First, in the quickstart demo application open up the file handle.js in an IDE of your choice:
voice-javascript-sdk-quickstart-node/src/handler.js
Once open, scroll down to line 11 where you should see something like this:
Here you can see on the second line we are creating a string called “identity” followed by the actual identity we wish to use as our client ID. You are free to set this as you want. You can hardcode a value here or choose something random each time by calling nameGenerator(); for example. It is entirely up to yourself.
For the purpose of this post, here our identity is simply set to the string “MyClientID”.
The key take away from this is that when you are generating the token, the identity is also a part of the process. If you planned on having multiple different clients, it is important to remember these aspects.
That said, I hope you were able to take away some key aspects from this blog post and are now ready to get building with our SDK.
We cannot wait to see what you build!
David Dooley is a Developer Support Engineer at Twilio based out of Dublin. He’s very passionate about helping our customers achieve success with Twilio and loves to work on complex problems. He also enjoys educating others, hence this blog post. In his spare time he likes to dabble in crypto and is a strong believer in blockchain technology. He can be reached at ddooley [at] twilio.com.
Related Resources
Twilio Docs
From APIs to SDKs to sample apps
API reference documentation, SDKs, helper libraries, quickstarts, and tutorials for your language and platform.
Resource Center
The latest ebooks, industry reports, and webinars
Learn from customer engagement experts to improve your own communication.
Ahoy
Twilio's developer community hub
Best practices, code samples, and inspiration to build communications and digital engagement experiences.