Running a Mailing List with Google Sheets, Twilio SendGrid and Python
Time to read:
February 07, 2020
Written by
This post is part of Twilio’s archive and may contain outdated information. We’re always building something new, so be sure to check out our latest posts for the most up-to-date insights.

A mailing list is a great way to share information with a group of people. Google Forms provides the tools needed to handle subscriptions to a mailing list. In this tutorial we will build a Google Form that is backed by a Google Spreadsheet. The spreadsheet will be used as a storage mechanism for a list of subscribers. Then we will create a Python script that reads the spreadsheet and finally we will use the Twilio SendGrid Python client to send emails to all subscribers.
Tutorial Requirements
Working through this tutorial will require access to the following items:
- Python 3.6 or newer. If your operating system does not provide a Python interpreter, you can go to python.org to download an installer.
- A Google account.
- A Twilio SendGrid account. A free SendGrid account allows you to send up to 100 emails per day. Sign-up here.
Create a Python Virtual Environment
Before we do anything let’s get our Python environment set up and running. This setup will be used throughout the tutorial, so let’s make sure we get this right. Following Python best practices, we are going to make a new directory for our mailing list project, and inside it we are going to create a virtual environment. We then are going to install the Python packages that we need for our mailing list on it.
If you are using a Unix or Mac OS system, open a terminal and enter the following commands to do the tasks described above:
For those of you following the tutorial on Windows, enter the following commands in a command prompt window:
The last command uses pip, the Python package installer, to install the three packages that we are going to use in this project, which are:
- The gspread library which is a Python client library for Google’s spreadsheet API.
- The oauth2client library which is a Google maintained library that will allow you to authenticate with your Google Account from your Python code.
- The sendgrid library which is the official Twilio SendGrid led, community driven Python API client. This will allow you to connect to SendGrid with your API key and make requests to send emails.
- The markdown2 library for markdown to HTML conversion.
Preparing the Google Form and Google Sheet
In the part of this tutorial we’ll build out the form that will allow users to subscribe to the mailing list. This spreadsheet will contain a list of the subscribers to our mailing list.
Create the Subscribe Form
Now it’s time to create our subscription form and spreadsheet for managing our mailing list subscribers. Head on over to Google Forms and create a new form using the blank template.
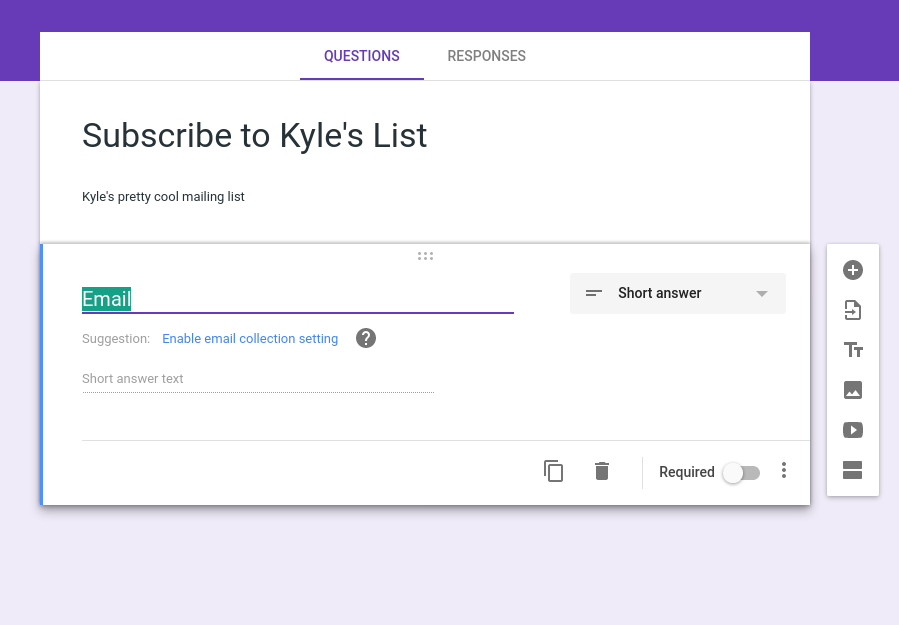
Change the title and description of your form as you see fit. Now we need to make some changes to this form so that users can submit their email addresses. This form will only need one question for now, “Email”, and it will need to use the “Short answer” format. Changing the name of the form’s question to “Email” will take care of that automatically for you. You should see a suggestion appear that reads “Enable email collection setting”, click on it as that will enable email validation in the form (please see the image below).
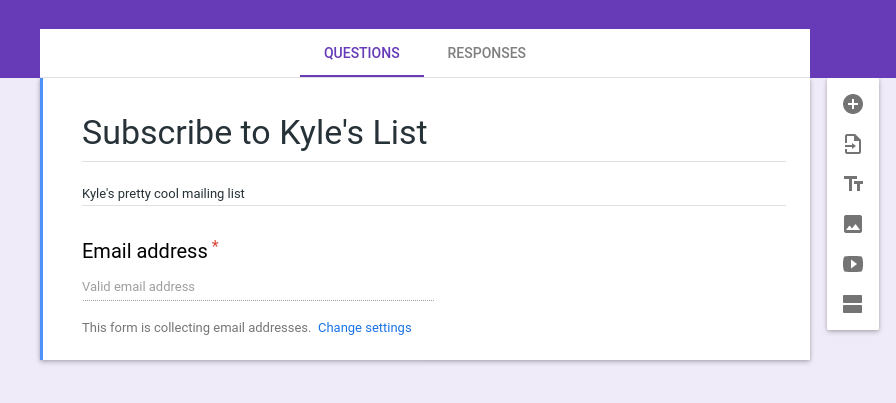
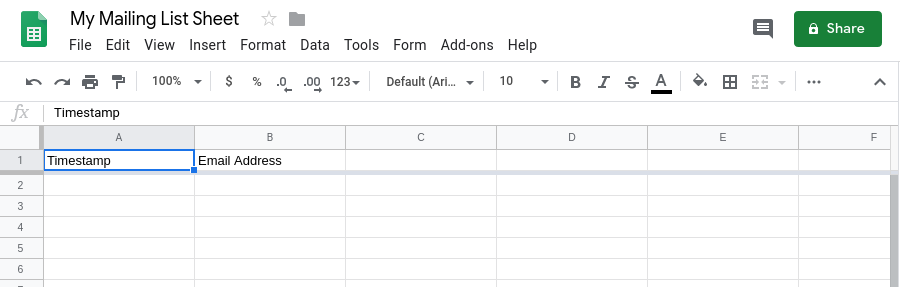
At this point your form is ready to collect email addresses and should look like this:
Connect the Form to a Spreadsheet
The last step to configure this form is to connect it to a Google Spreadsheet. Here is the process for doing that from the Google Form editor:
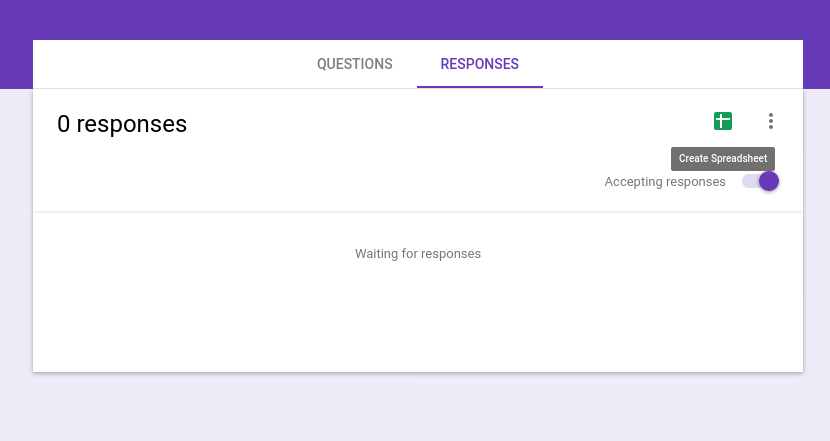
- Go the “Responses” tab in the form,.
- Look for the green Google Sheets icon, and click it.
- Select “Create new spreadsheet”, give it a useful name and click the “Create” button

After the last step above you should be redirected to your newly created spreadsheet which is linked to your form responses.
Testing the Form and Spreadsheet
Before moving to the next part of this tutorial it’s important to make sure that the form and spreadsheet system is working as expected. To do that you need to:
- Go to your Form and click the “Send” button in the top-right
- Change the “Send via” option to the “Link”. Then copy the link for the form and visit the link in your browser
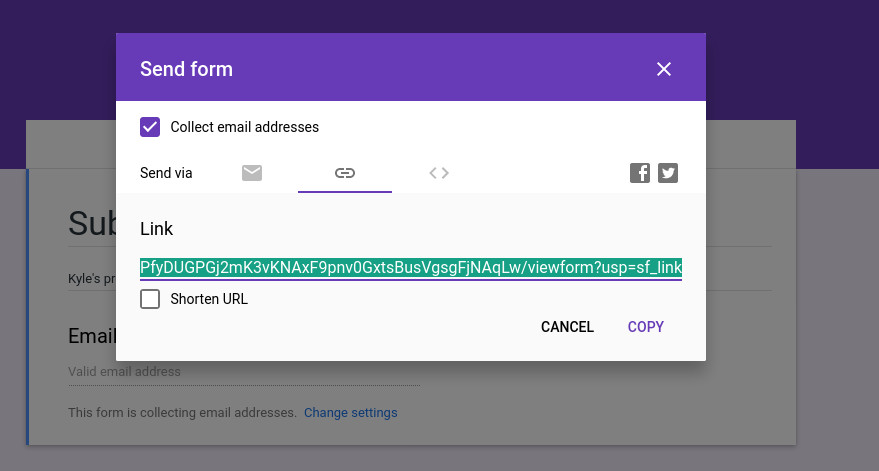
- Submit an email address
- Check that the spreadsheet you created in the previous step was updated with the email you just entered
Now that you have a functioning form and spreadsheet backend for maintaining the email addresses of your mailing list subscribers, we can move on to the next part of this tutorial which is setting up a Google service account in order to gain API access to your newly created spreadsheet.
Please take note of the name of your spreadsheet. This will allow our Python code to easily load the spreadsheet later on. You can always find this name by looking in your Google Drive.
Creating a Service Account for Google API Access
In order to make requests to Google APIs we need to create a service account. A service account allows you to configure access to specific Google APIs. When you create a service account you can also limit the permissions that service account has. In our case we are going to create a service account that has full-access to our Google Drive and Google Sheets APIs. This is a personal project, and we are going to keep our credentials safe (do not commit or share the credential files used in this tutorial). The reason we are allowing the service account access to our Google Drive is for convenience. We want our API client “gspread” to load our spreadsheet by it’s name.
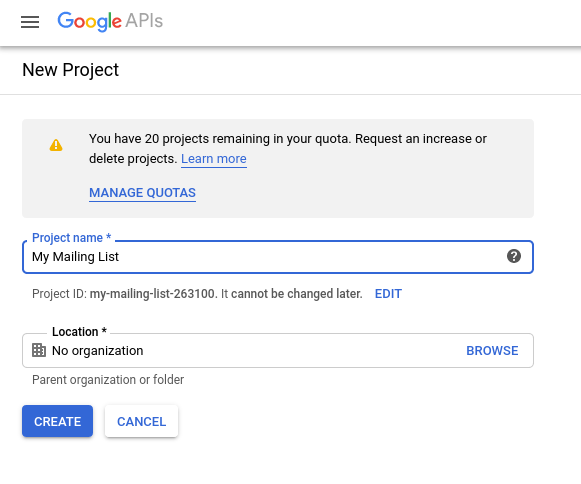
The first step in getting signed-credentials is to create a project under your Google account. When you visit the project dashboard in your Google Account click “Create New Project”. Once you have named your project click “Create”.
Now we need to enable the API access for this project. Notice how in the upper-lefthand corner there is a dropdown that allows you to select the project you are provisioning the API access for. We need to make sure that we are setting up the API access for the project we created in the previous step.
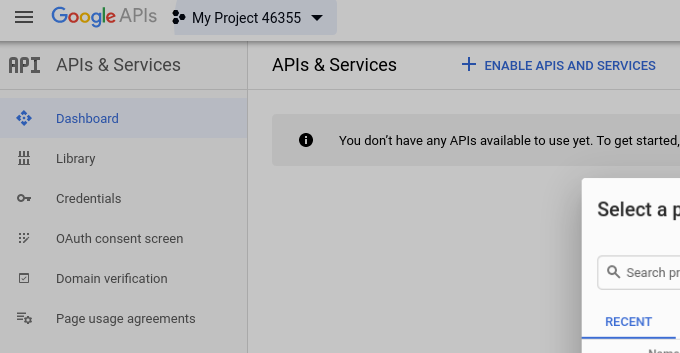
Click on the “+ Enable APIs and Services” button and then allow access to:
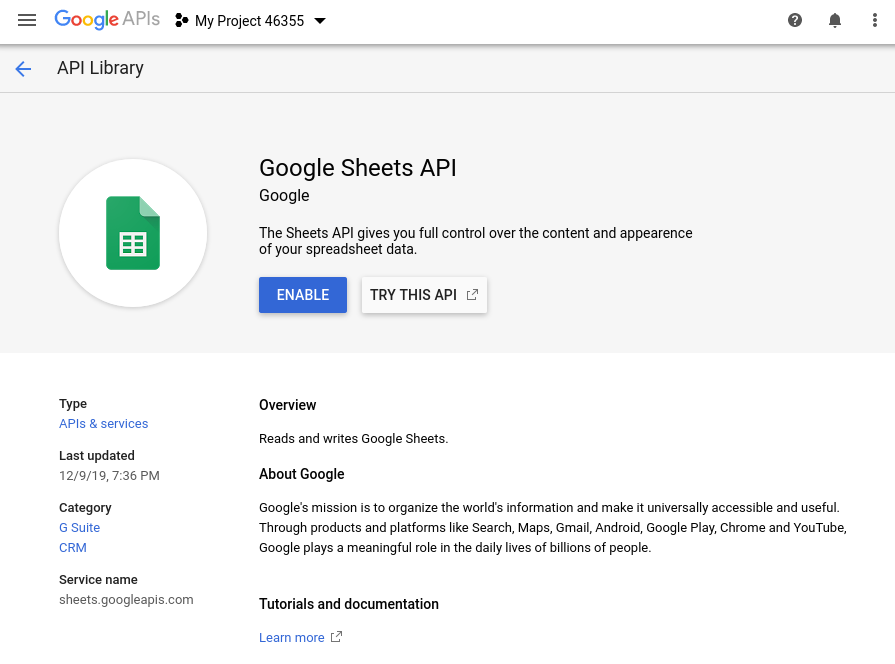
- Search for “Google Sheets” and click “Enable”. You will be brought to a page containing more information about the Sheets API.
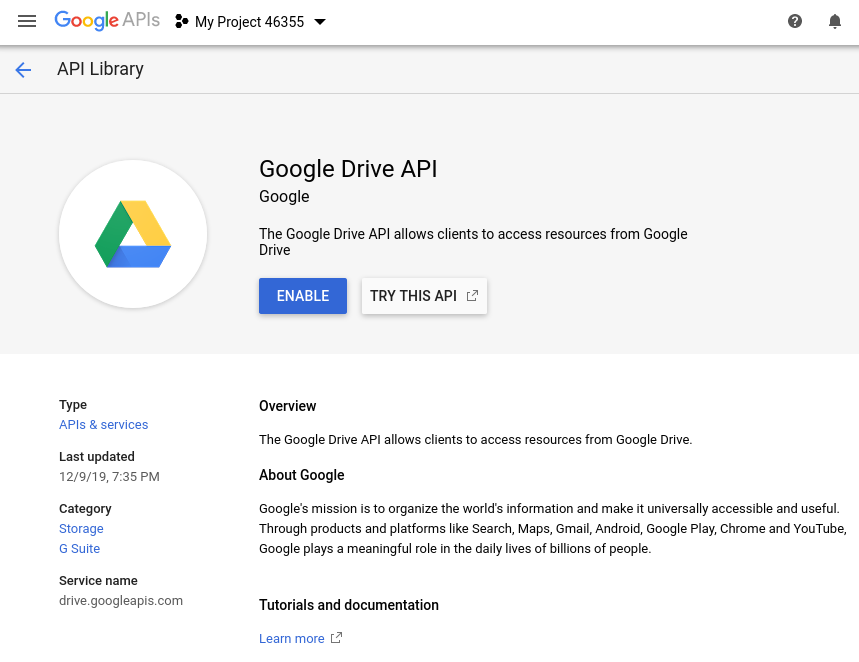
- At this point you can use the search bar top-middle of your screen or go back to the “APIs & Services” main page to enable the “Google Drive” API. In either of those locations search for “google drive” and then proceed to click “Enable”.

Getting Google Service Account credentials
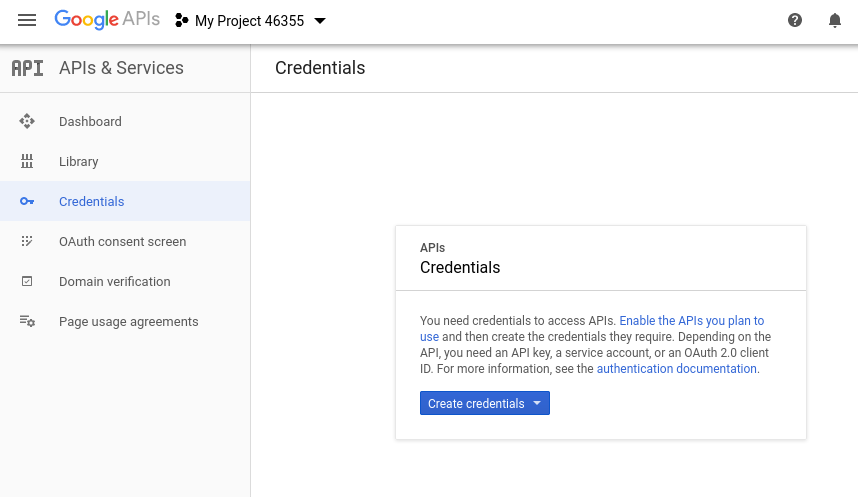
Once we have both of those APIs enabled we need to navigate to the project’s API dashboard. Click “Credentials” in the navigation bar on the left-hand side. You should now see a “Create Credentials” button, click that and then choose the “Service account key” option. In the next page we need to choose “New Service Account” from the Service Account dropdown. At this point we need to pick a name for our service account, “mailing-list-user” seems like a good choice. Now we need to set the “Role” for the service account. In the Role dropdown let’s choose “Project -> Owner” and then click “Continue”. On the next screen click “+ Create Key”. Leave the JSON option selected and then click “Create”.
After clicking create your browser will download your credentials file. I would recommend storing this file in a directory in your computer that only you have access, and jotting down the path somewhere. Later on in the tutorial we will be putting the full path to the credentials file in a configuration file for our mailing list program.
Sharing the spreadsheet with the Service Account
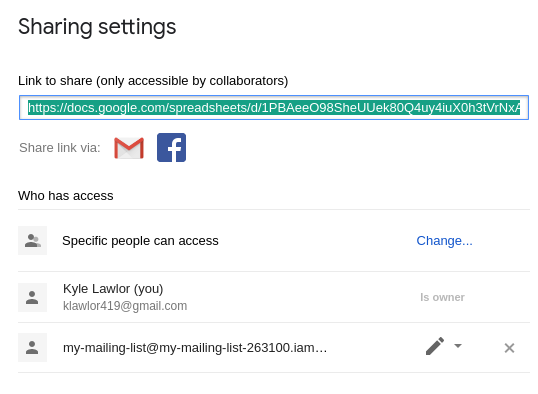
In order to programmatically fetch data from our spreadsheet we need to share the spreadsheet with the service account user we created in the previous step. To do that we need to open up the credentials file we received at the end of the last step with your favorite text editor. When you open up that file you will see a field called “client_email”. Copy the email address listed there, go to the spreadsheet we created at the beginning of this tutorial and then “Share” the spreadsheet with that email address.
The email address should look something like this:
- kyle-mail-list@quiet-meadow-204820.iam.gserviceaccount.com
We can confirm the user was added by checking the sharing permissions of the spreadsheet. If shared correctly you will see that the service account has access.
Creating test subscribers using our Google Form
Before we move forward let’s create some test subscribers in our mailing list. Navigate to the form we created earlier and enter some test data. Let’s enter in a few fake email addresses like:
- foo@biz.com
- bar@fuu.com
You can also add a valid personal email address, as later on this will allow us to confirm that our mailing list is working.
Fetching the user emails from the spreadsheet API
In this section we will develop a few Python functions that will allow us to fetch data from the spreadsheet. Let’s start by creating a new file called maillist.py in the twilio-gsheet-maillist directory we created a virtual environment in earlier. Eventually maillist.py will contain all our logic for dealing with the mailing list. For now let’s put the following code into maillist.py:
Before diving in to what these functions are doing let’s have a quick look at how to use them. Let’s open up a Python terminal session and key in the following:
Note: When you open this terminal session you will need to use the correct full-path and filename to your Google credentials file. Additionally you will need to specify the name of your spreadsheet correctly.
Now let’s dissect these functions a bit. The client() function deals with setting up the gspread api client to be able to interact with the Google spreadsheets API. The client() function requires the full path the credentials file we received earlier in this tutorial. Once we have specified the scopes needed, we pass the credentials file to authenticate. The function returns an authorized gspread API client to use in accessing spreadsheets in your account.
The spreadsheet() function takes the authorized client and the name of the spreadsheet we want to interact with. This function returns a gspread sheet object which can further interact with. In the terminal session above you can see reference to ss.sheet1. The spreadsheet object allows us to open up particular sheets in the spreadsheet. Now that we have selected a sheet to interact with, we can read the data from the sheet.
The emails() function shows precisely how we read data from a sheet. We call a method on the wks object called get_all_records(). This returns us a list of dictionaries, each containing all the values in a row of the spreadsheet using the column headings as keys. In our case we only want to read the emails, so we iterate through the list and yield each row's “Email Address” value.
Setting up Twilio SendGrid
In this section we will configure the Twilio SendGrid service so that we can send out emails from Python code.
Creating your SendGrid account
If you don’t have a Twilio SendGrid account, the first step is to create it. To create your account follow these steps:
- Follow this link to the SendGrid sign-up page.
- Enter your username, password and email address.
- Proceed with the remainder of the form and then click “Create Account”
You will be prompted to give more information about yourself, please complete this as you see fit.
Verifying your account
You will receive an email from SendGrid to verify your account. Please complete the verification process before moving forward. Once you are done with that, please visit navigate to your SendGrid dashboard.
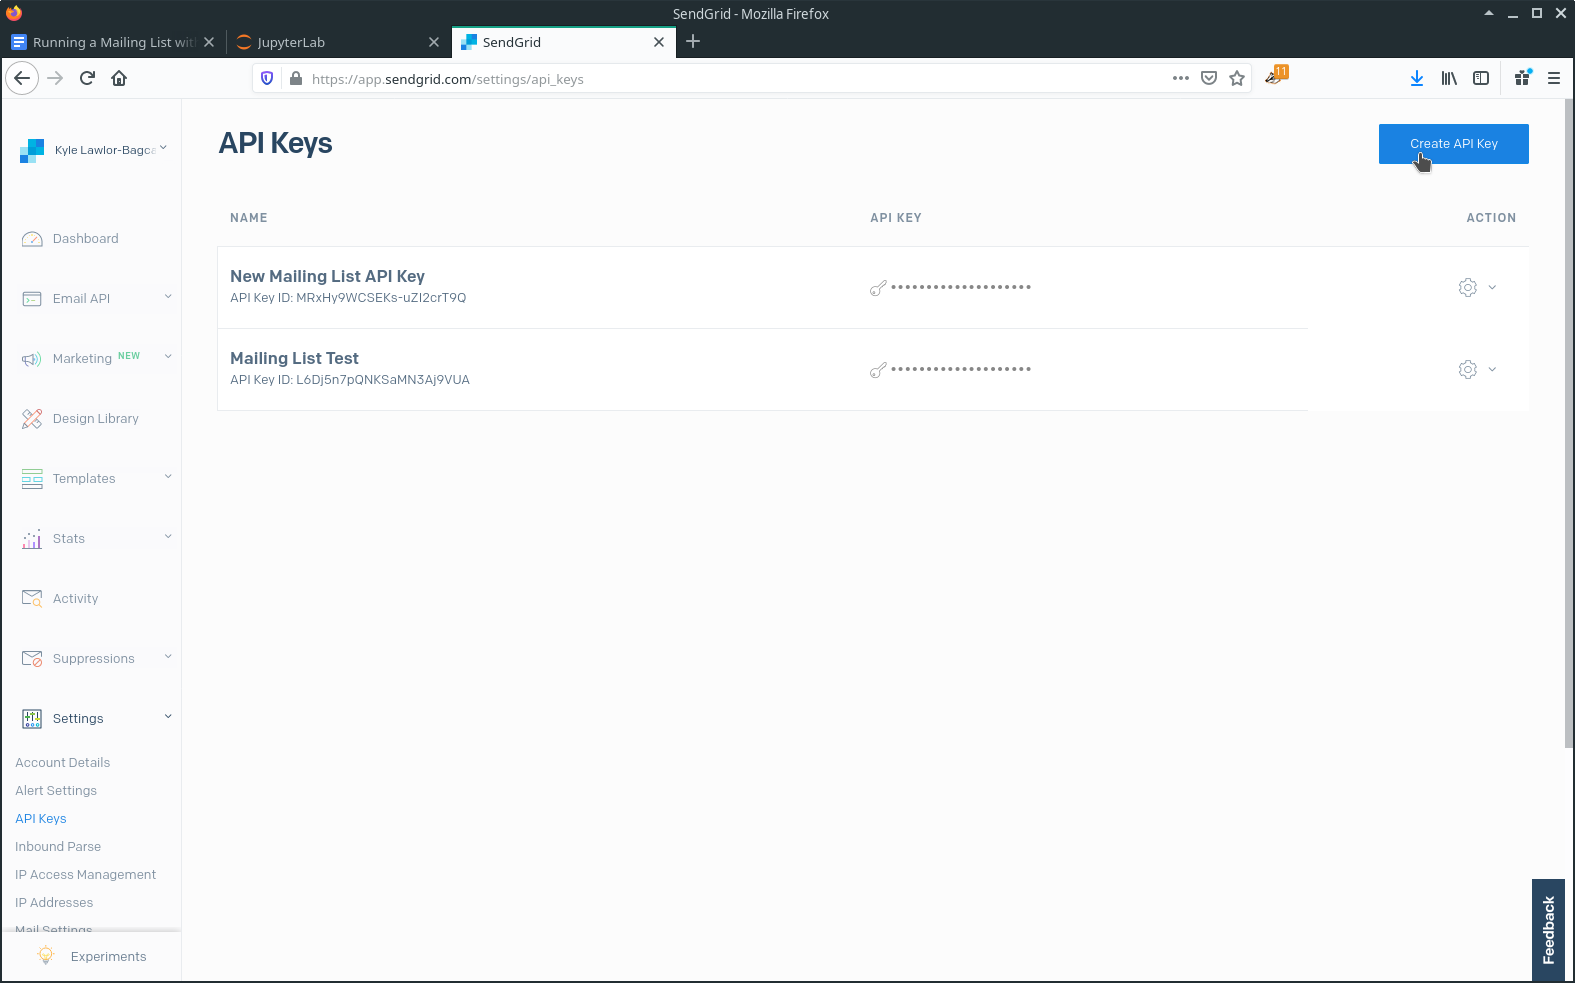
Getting your API key
Now we need to get the API key from SendGrid. The API key will allow us to authenticate with and make API requests to SendGrid.
- Click on “Settings” and then click on “API Keys”
- Click the “Create API Key” button
- Give your API Key a useful name that you will remember
- Select “Restricted Access”
- Go to the “Mail Send” dropdown and click it
- Enable the “Mail Send” option by using the slider
- Scroll to the bottom and click “Create & View”
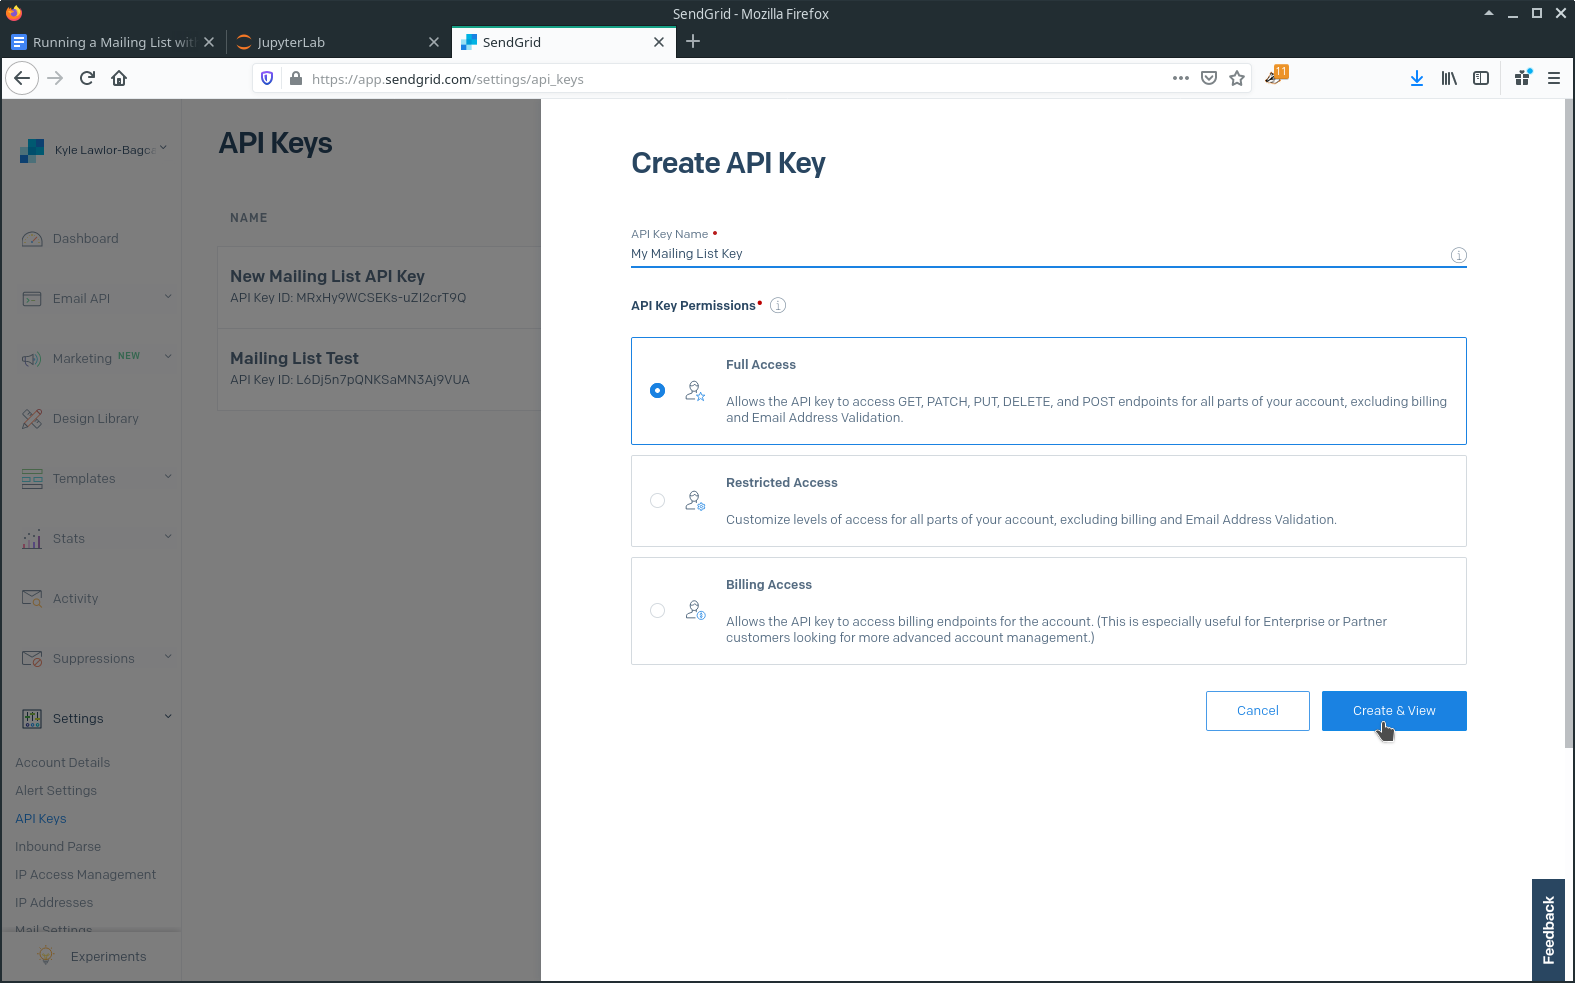
Once you are done with these steps you will be provided with the API Key. Copy and paste it somewhere you will not lose it. If you lose your key you will need to create a new one.
Sending an Email with SendGrid from Python
Let’s put together a few functions that will help us interact with SendGrid from our Python code. Fortunately a lot of the heavy lifting is done for us and we will just be glueing a few pieces together. Let’s go back to our maillist.py file from earlier and add in the following code. Make sure to put the import statements at the top of your file and alongside the imports from earlier in the tutorial:
The send_email() function accepts a few arguments which are self-explanatory. We will send an email from a given address, that has a subject and html content, to a list of email addresses. We also have to specify our SendGrid API key to authenticate. This function sends one email to each email address listed in the to_emails argument. Let’s open up a Python terminal and type in the following to test it out:
Note: Make sure to use your email address in from_addr and in the to_emails. Also be sure to use the SendGrid API key you obtained in the previous section.
Wait a minute or two after running the send_email() function above and you will receive an email. If you do not see the email in your inbox it may have gone into your spam folder. If that happened you might be able to avoid this email being marked as spam if the from address of your script is different than the personal email you used to sign-up to the mailing list with. Unfortunately where the email ends up is very dependent on the email provider you use. At the end of the tutorial I will discuss what the best practices are to prevent that from happening in a production system.
Coding a Python Script to Send Mailing List Posts
Before we move forward, let's discuss what the script we will be writing in this section does:
- It will provide a command-line interface or CLI that will accept a path to a markdown file that contains the content of our email.
- The CLI will also accept a string that contains the subject of our email.
- The following values will be easy-to-adjust by using a config file:
- The SendGrid API key
- The path to our Google Service account credentials
- The name of the spreadsheet that contains our mailing list subscribers
- The email address that we will be sending emails from
- It will load a list of subscribers from the Google Sheets API
- It will turn our markdown file into HTML
- It will send an email to each subscriber using SendGrid
Code for the Mailing List
With those high-level goals in mind, let’s take a look at the script. This code combines the code from previous sections of the tutorial and adds new code. This code needs to be in the twilio-gsheet-maillist directory, replacing the existing maillist.py file:
Running the Script
Now we need to set up our script’s configuration file. The configuration file will need to be in the same directory that the maillist.py script is in. It will be called maillist.json and it will store values for our script that are considered secret or that we want to be able to easily change. Here is what the maillist.json file needs to contain:
Here are some reminders about where these values were set up:
- For the
SENDGRID_API_KEY, see the SendGrid “Getting your API key” section - For the
GOOGLE_CRED_FILE, see “Getting Google Service Account credentials” - For
SPREADSHEET_NAME, see “Connect the Form to a Spreadsheet” FROM_ADDRESSis the same email that you used to create your SendGrid account
Now that we have the configuration file setup, we can create our first post. For those of you not familiar with markdown, it is a concise and human-readable syntax for writing documents. That said let’s write the email we want to send to our subscribers.
For simplicity let’s create a new directory inside of our twilio-gsheet-maillist directory and let’s call that new directory posts. Inside of the posts directory let’s create a new file called my-first-post.md. Feel free to make the content of that post whatever your heart's desire but I will use:
We are now ready to run our script! Let’s do one final review of the steps required to run:
- We need to have created the virtual environment and installed the project dependencies.
- We need to have created the maillist.py script and the maillist.json configuration file.
- We need to have created a markdown file that contains the content of our email.
Here is the command to run our script:
At this point you should give yourself a well-deserved pat on the back. Those who subscribed to your mailing list will now have received an email from you, with the content of your post.
Markdown Rendering
In this last version of maillist.py we have added a new function called render(). This function allows us to render any markdown file on our system into HTML. The magic happens in the markdown2 library. Markdown is designed to be converted to HTML, and we leave it up to the library to do that for us. Let’s open up a Python terminal session and take a quick look at how to use the render() function on its own:
We can see that the render() function takes in a file object, reads the file object and then converts the markdown content into HTML, which is returned as a string.
Command-Line Interface
In order to get the desired CLI we made use of the argparse module. Let’s review that code and discuss it in relation to how we run the maillist.py script:
We created a CLI parser that looks for two flags, --markdown and --subject. This means that when we run our script we will be able to access args.markdown and args.subject. The argparse module has a handy tool for working with files, notice the type=argparse.FileType("r"). We are specifying that the “markdown” argument is a file and therefore argparse needs to load the file and create a file object. Later in the script we can access the file object as args.markdown and the subject string as args.subject, i.e.:
So each time we need to send a new mailing list post we can use this helpful CLI to do that for us, without the need to edit the script, since the CLI arguments specify the path to the markdown file with the post and the subject of the email.
Configuration File
We have also added a function to deal with loading our maillist.json configuration file. This function opens the maillist.json file and deserializes the JSON content into a python dictionary. We can then access the values from anywhere in the code that needs them.
We only need configuration values when we are running the script, so we call and access our configuration values within the __main__ code block:
These values are then available when we orchestrate the remainder of our mailing list script:
Best Practices for Production Mailing Lists
One important feature of a mailing list is offering people the option of unsubscribing. In this tutorial we did not implement a fully-featured unsubscribe feature. However we do provide an “email to” link that people can use to send an email requesting to be unsubscribed. Please keep in mind that many countries have legal requirements to allow users to unsubscribe and the unsubscribe process probably should be handled in an fully-automated way. However for our small-scale mailing list we will simply pay attention to our email address and manually remove any people who wish to unsubscribe from the spreadsheet.
There are some important points to note about running a mailing list like this in a production system. If you intend to send emails using an address based on your own domain, then you need to verify the domain with SendGrid. In order to prevent emails being marked as spam, you will also set up the SPF, DKIM, DMARC records in your DNS. For more production best practices with SendGrid, please refer to the official documentation.
Conclusion
In this tutorial we have built a command-line tool for sending markdown content to a mailing list, and our mailing list subscribers are conveniently maintained in a google spreadsheet. We have also utilized the Python SendGrid client and the SendGrid API.
I really enjoy writing in markdown, using spreadsheets, following personal mailing lists of my friends and writing code in Python. This project was a great combination of technology for my personal interests. I hope you have enjoyed following along and have learned a bit along the way. All of the code developed in this tutorial can be found here.
Now, what will you build with Python and Twilio?
Additional Resources
- Google Tutorial for creating a Form with responses backed by a spreadsheet: https://support.google.com/docs/answer/2917686
- The “gspread” library: https://gspread.readthedocs.io/en/latest/#
- Google Drive and Sheets API references:
- Another Twilio article about Google Spreadsheets: https://www.twilio.com/blog/an-easy-way-to-read-and-write-to-a-google-spreadsheet-in-python>
Kyle Lawlor-Bagcal (
wgwz [at] protonmail [dot] com) is a software engineer and systems developer who is passionate about good code and constantly learning new things.


Related Resources
Twilio Docs
From APIs to SDKs to sample apps
API reference documentation, SDKs, helper libraries, quickstarts, and tutorials for your language and platform.
Resource Center
The latest ebooks, industry reports, and webinars
Learn from customer engagement experts to improve your own communication.
Ahoy
Twilio's developer community hub
Best practices, code samples, and inspiration to build communications and digital engagement experiences.