Schedule a Message in Twilio Studio
Time to read:
Back in August 2022, we released Twilio Message Scheduling for general availability! This feature enables you to schedule an SMS, MMS, or WhatsApp message for a fixed time in the future.
Scheduling a message is free of charge and can be done by including the following additional parameters in your API request:
ScheduleType: indicates your intent to schedule a messageSendAt: indicates when Twilio will send a message
At the time of publishing this blog post, Twilio Studio, our low-code/no-code application builder, does not have a built-in feature to schedule messages. In this blog post, you’ll learn a workaround that uses Studio and a bit of Python code.

This blog post will be structured as followed (feel free to jump ahead):
- Python 3.7 or higher installed on your computer
- ngrok installed on your machine. ngrok is a useful tool for connecting your local server to a public URL. You can sign up for a free account and learn how to install ngrok
- Access to a phone that can make and receive SMS messages
If you want to give Twilio a spin, and haven’t yet, sign up for a free Twilio account. Sign up is quick and no credit card is required!
If you haven’t done so already, buy a Twilio phone number – a phone number purchased through Twilio – to send messages using Twilio.
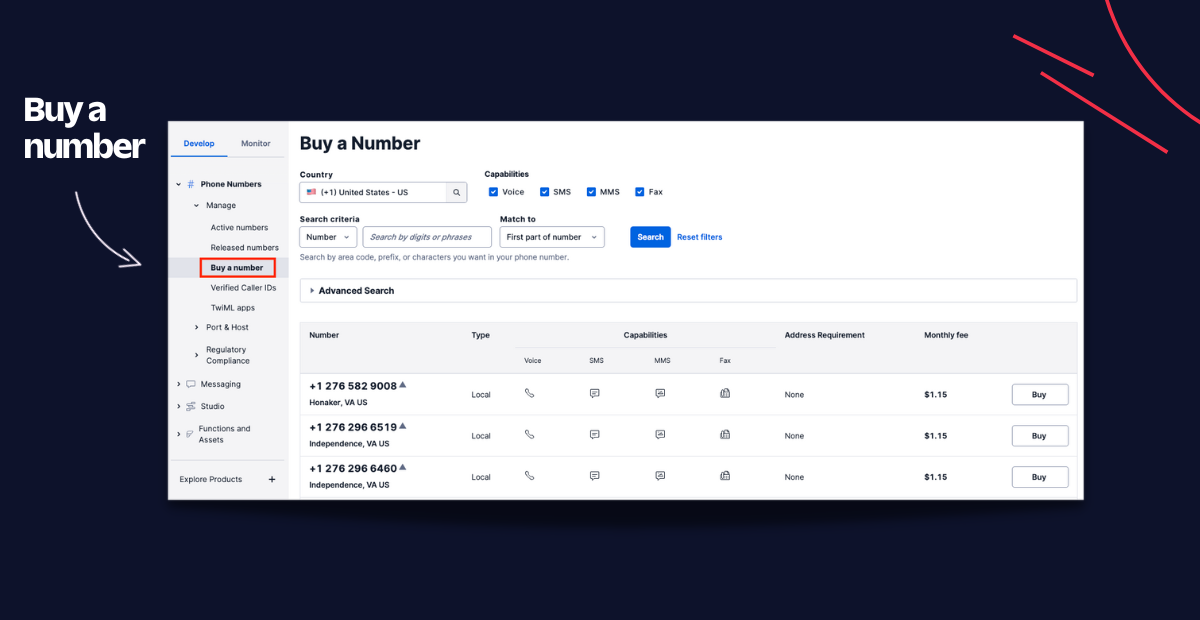
After signing up for an account, log in to the Twilio Console. Then, navigate to the Phone Numbers page. Click Buy a Number to purchase a Twilio number.
To take advantage of Message Scheduling, you will need to configure your Twilio number with a Messaging Service.
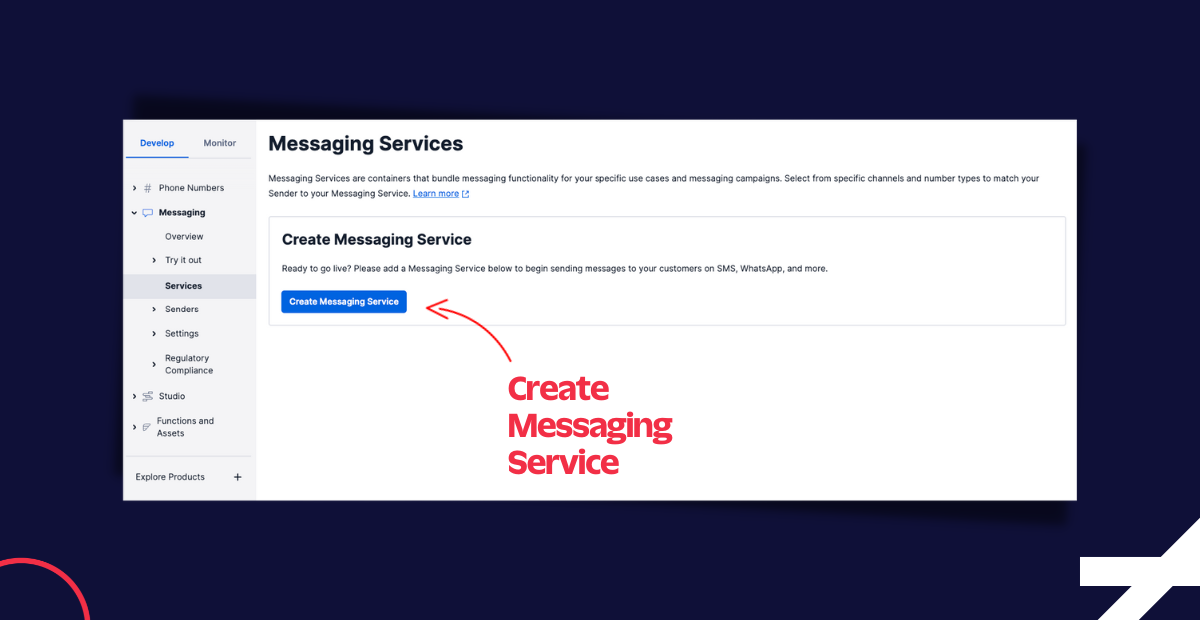
In the Twilio Console, visit the Messaging Services page and click the Create Messaging Service button, then follow the prompts.
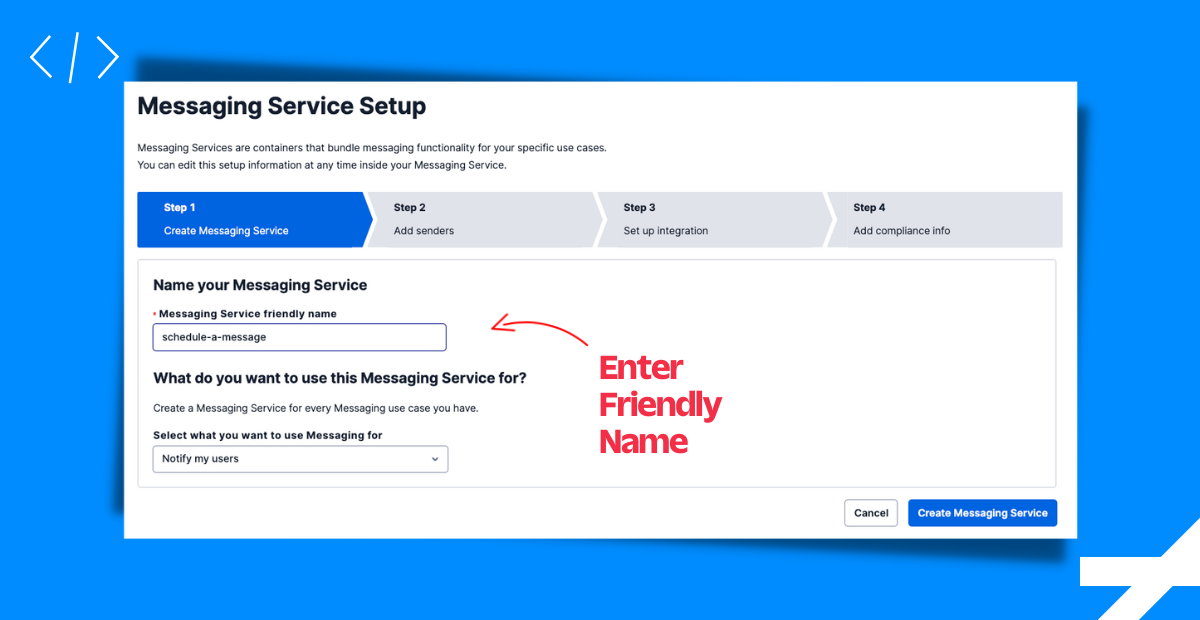
On the next screen, enter a Messaging Service friendly name, such as “schedule-a-message”. Then click the Create Messaging Service button.
Click the Add Senders button to add your Twilio phone number to this Messaging Service.
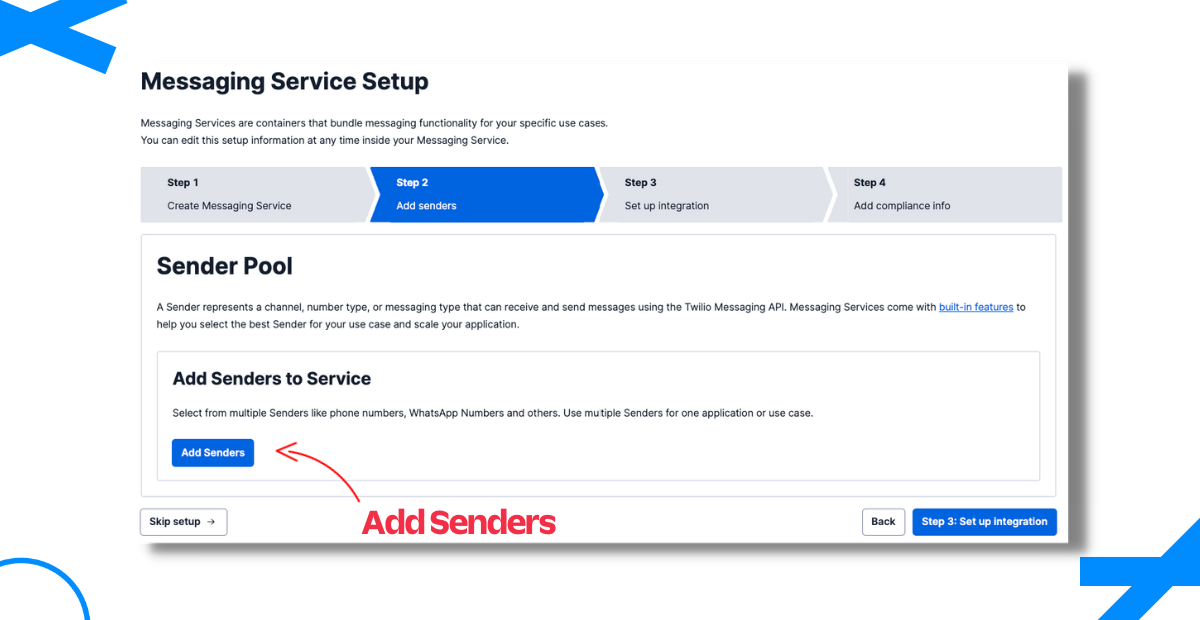
In the Sender Type dropdown, select Phone Number, then click Continue.
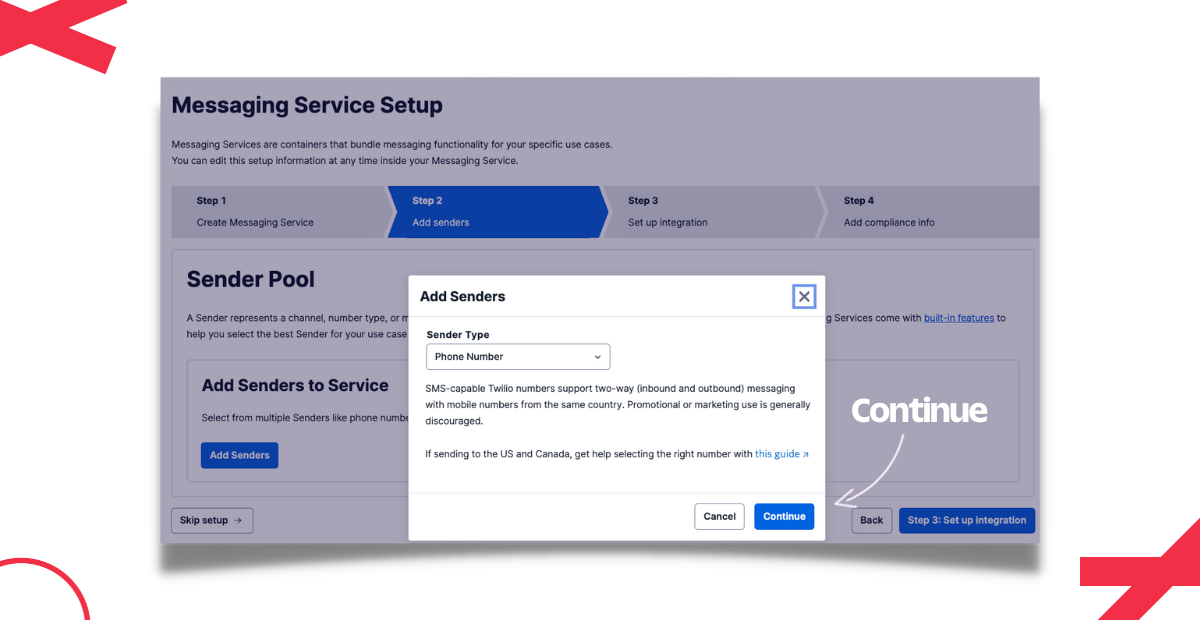
Select your Twilio phone number, by clicking the checkbox next to the number you want to use as a sender. Then click the Add Phone Numbers button.
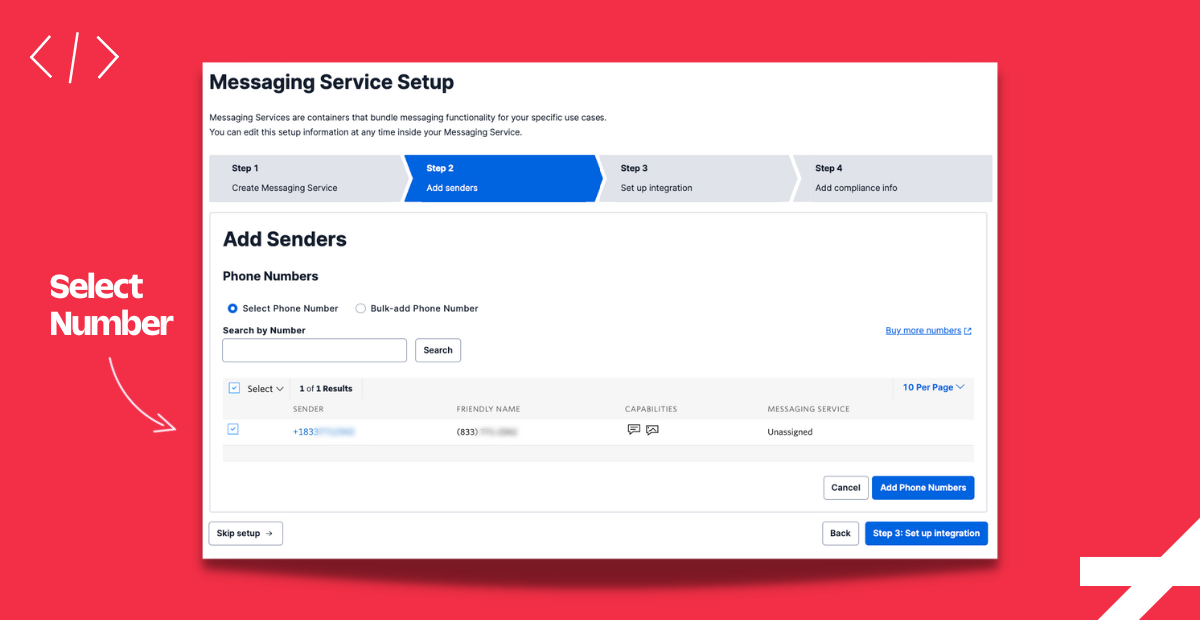
You should see a confirmation notification at the top right corner of the screen that says “Numbers {YOUR-NUMBER} were successfully assigned to the service”
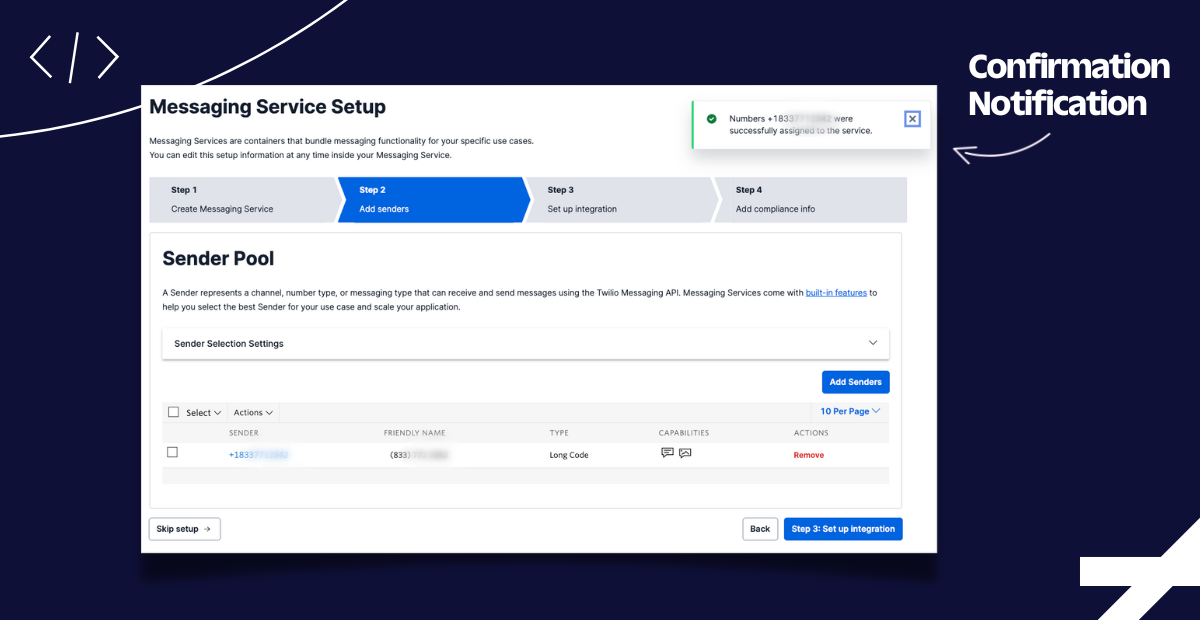
Click the Step 3: Set up integration button to continue.
In this step, you can use the default settings, so click the Step 4: Add compliance info button.
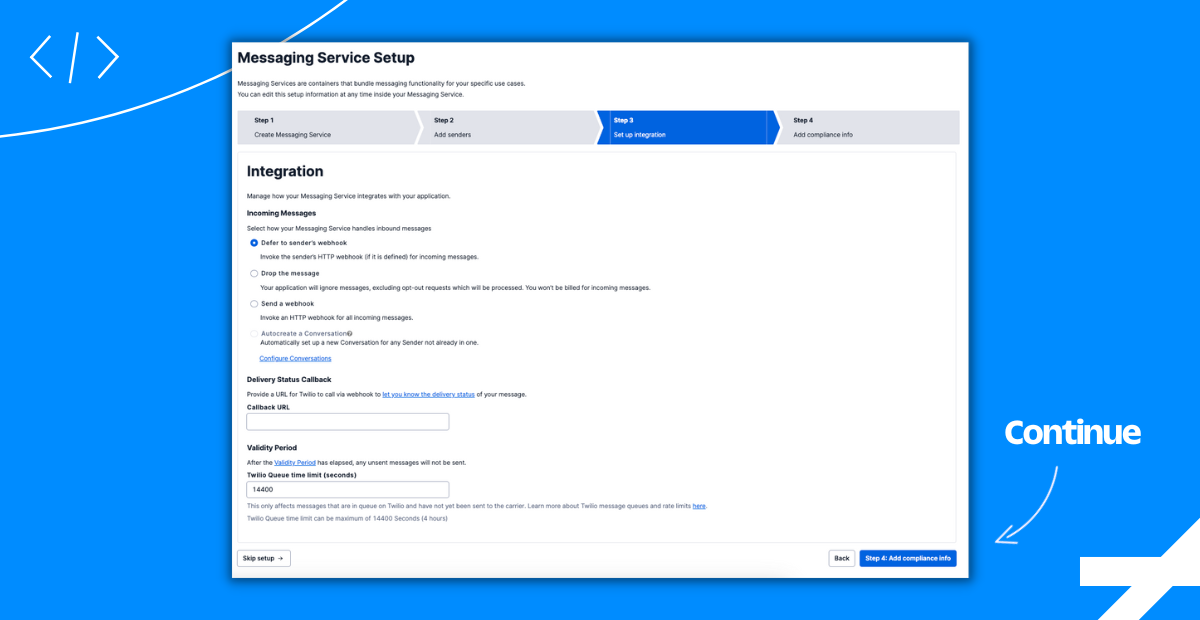
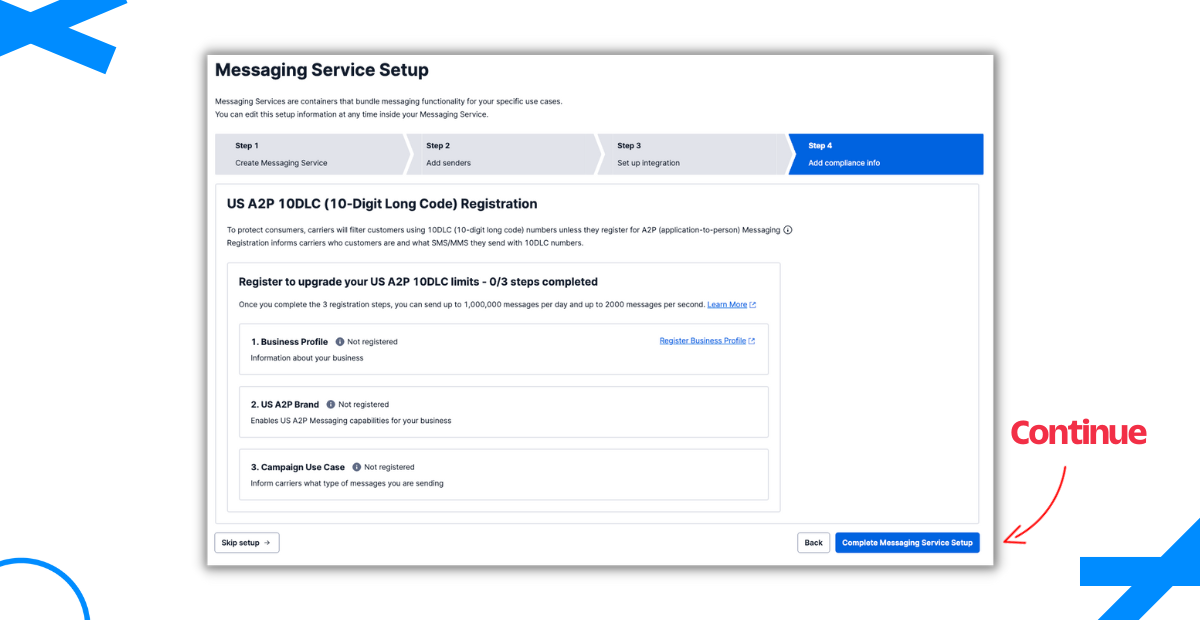
Next, click the Complete Messaging Service Setup button to finalize creating a Messaging Service.
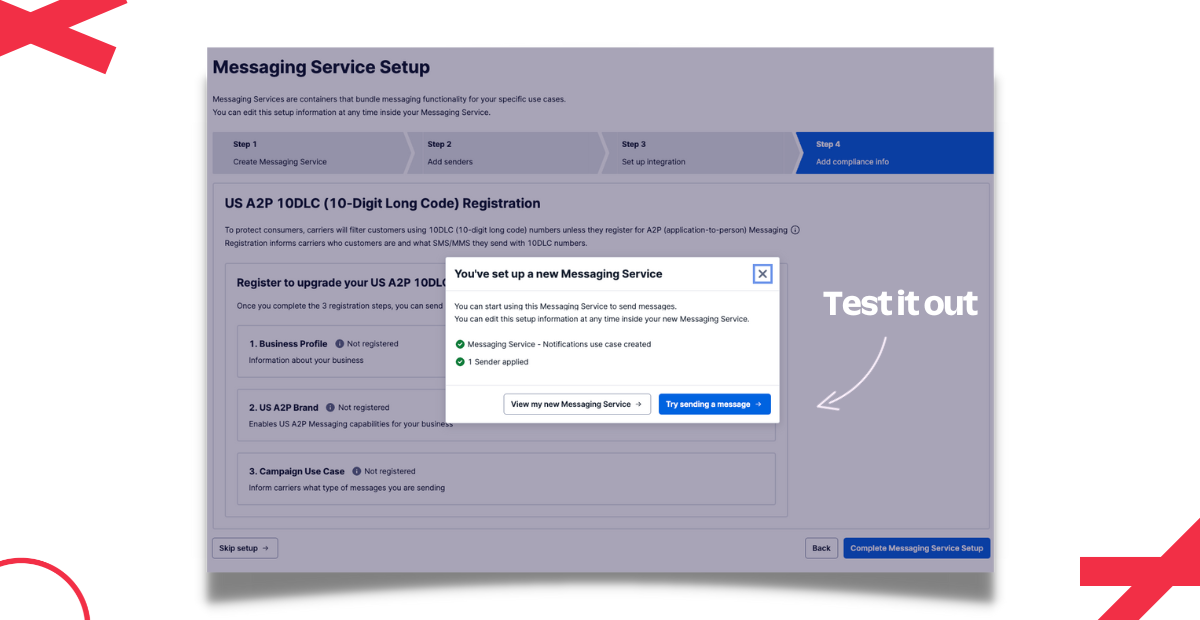
To test out your Messaging Service, click the Try sending a message button.
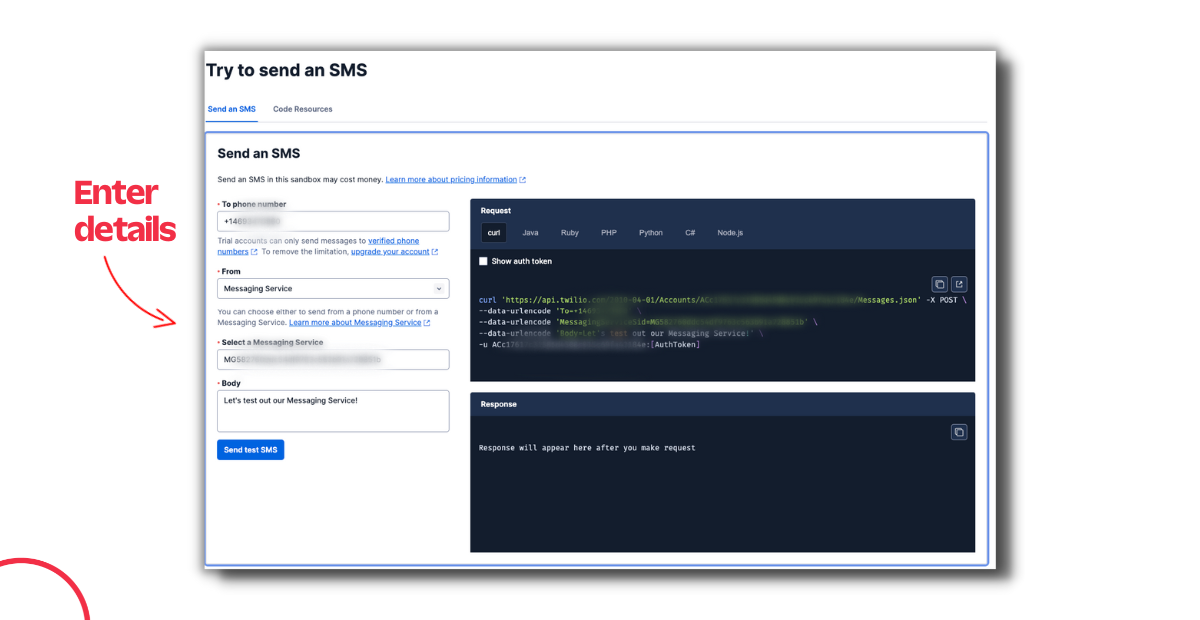
Continuing on this screen, enter the following details:
- To phone number, or the phone number that would receive the message
- In the From dropdown, select Messaging Service
- Select the Messaging Service which you created earlier
- Input text for the Body and click the Send test SMS button
If successful, you should receive an SMS at your test number and see a similar response to the following in the Console:
Having successfully created a Messaging Service, this step will set up a project that will accommodate your code.
Open a Terminal window and create an empty project directory called twilio-schedule-message:
Then change into that directory, as that’s where your code will be.
Since the code for this tutorial will be in Python, create a virtual environment:
Activate your virtual environment:
Then, using the pip package manager, install the required dependencies in your virtual environment:
With your local environment set up, it’s time to configure environment variables so your credentials are hidden. As a best practice when working with sensitive information like API keys and passwords, it’s important to ensure they are secure and not exposed to the public.
Create a file called .env in the project’s root directory (twilio-schedule-message/) to store your API keys.
Within the .env file, create the following environment variables:
Your .env file should now look similar to this:
In this next step, you will interact with the Twilio SMS API to create a scheduled message.
Within your project directory, create a file called scheduler.py and paste the following code into it:
Here’s a breakdown of the code in scheduler.py:
- Lines 1-7, are module imports to make use of their functionality.
- Lines 1-2, provide access to operating system and date functionality.
- Lines 5-6, provide access to functionality within the Twilio API.
- Line 7, provides access to environment variables from the .env file.
- Line 10, reads environment variables from the .env file.
- Lines 13-14, assigns variables from the values of your Twilio credentials.
- Line 15, creates a client object using your Twilio credentials.
- Lines 21-34, define a function that sends a scheduled message using the Twilio API.
- Line 25,
messaging_service_sidparameter is set to the environment variable of your Messaging Service SID, which identifies the Messaging Service used to send the message. - Line 26,
toparameter is used as the recipient of the message. Make sure to replaceENTER_THE_NUMBER_YOURE_TEXTING_TOwith the recipient’s number. - Line 27,
bodyparameter sets the text of your message. In this case, the recipient will receive a text message reading, “Ahoy, world! This is a scheduled message in Python.” - Line 28,
schedule_typeparameter indicates your intent to schedule a message.fixedmeans the message is scheduled at a fixed time. - Line 29,
send_atparameter indicates the time that Twilio will send the message. It must be in ISO 8601 format. In this example, the message is scheduled to be sent on March 3, 2023 at 5:55.
- Line 25,
- Line 37, invokes the
schedule_message()function and sends out a text message.
To test out the message, run the scheduler.py file with this command in your terminal:
Your application is now capable of sending a scheduled message at a fixed time in the future. But by modifying the scheduler.py file, you can adjust the schedule_message() function to accept dynamic parameters. This way, instead of hardcoding values into the function, they can be provided at execution time for greater flexibility. Check out changes made to the scheduler.py file:
Here’s a breakdown of the revisions made to scheduler.py:
- Line 3, provides access to manipulate date and times.
- Line 20, the
schedule_message()function now accepts two parameters:minutesandbody. Using theminutesparameter, you can specify how many minutes in advance you want to schedule a message. Using thebodyparameter, you can pass in the body of the text message. - Line 26, the
bodyparameter will take in a parameterized message. - Line 28, the
send_atparameter will invoke a new function calledminutes_from_now()which returns a datetime object. - Lines 36-40, define a function that returns a datetime object based on the input parameter.
- Lines 37-38, if the input parameter is within 15 minutes to 7 days in advance, a datetime object will be returned.
- Line 43, invokes the
schedule_message()function and sends out a text message 16 minutes in advance.
Test out the scheduler by re-running the scheduler.py file with this command in your terminal:
Before continuing to the next step, let’s make one more change to our function. Instead of hardcoding a “to” phone number, you can parameterize it. Make note of the following changes to schedule_message():
- Line 1, adds a new parameter,
to_number, to the function. - Line 6, passes the value of
to_numberto thetoparameter. - Delete the call to
schedule_message()at the bottom of the file
In the previous step, you created a function called schedule_message() that will schedule a message using the Twilio SMS API. In this step, you will create an endpoint using Flask, a web framework for Python. This endpoint will be used later in Studio and interact with the Make HTTP Request Widget.
Within your project directory, create a file called app.py and paste the following code into it:
Here’s a breakdown of the code in app.py:
- Lines 1-3, are module imports to make use of Flask functionality.
- Line 5, is a function import from the previously created scheduler.py file.
- Line 8, creates an instance of Flask.
- Lines 11-23, define a function that sets a route for the Flask app to respond to HTTP POST requests via the
/v1/message/scheduleendpoint.- Lines 13-17, extracts JSON data from the request body and assigns them to variables.
- Lines 19-20, calls the
schedule_message()function, passing in the data from the JSON request. If the function call succeeds, it returns a Response object with a successful response and a 201 status code. - Lines 21-23, if the function call fails, it returns a Response object with a failure response and a 500 status code.
- Lines 26, starts the Flask app listening on port 8080 of localhost.
In a new terminal window, run app.py with the following command:
At this point, your server should be running on http://localhost:8080. As of now, your application is only running on a server within your computer. But you need a public-facing URL (not http://localhost). You could deploy your application to a remote host, but a quick way to temporarily make your web application available on the Internet is by using a tool called ngrok.
In another terminal window run the following command:
This will create a “tunnel” from the public Internet to port 8080 on your local machine, where the Flask app is listening for requests. You should see output similar to this:
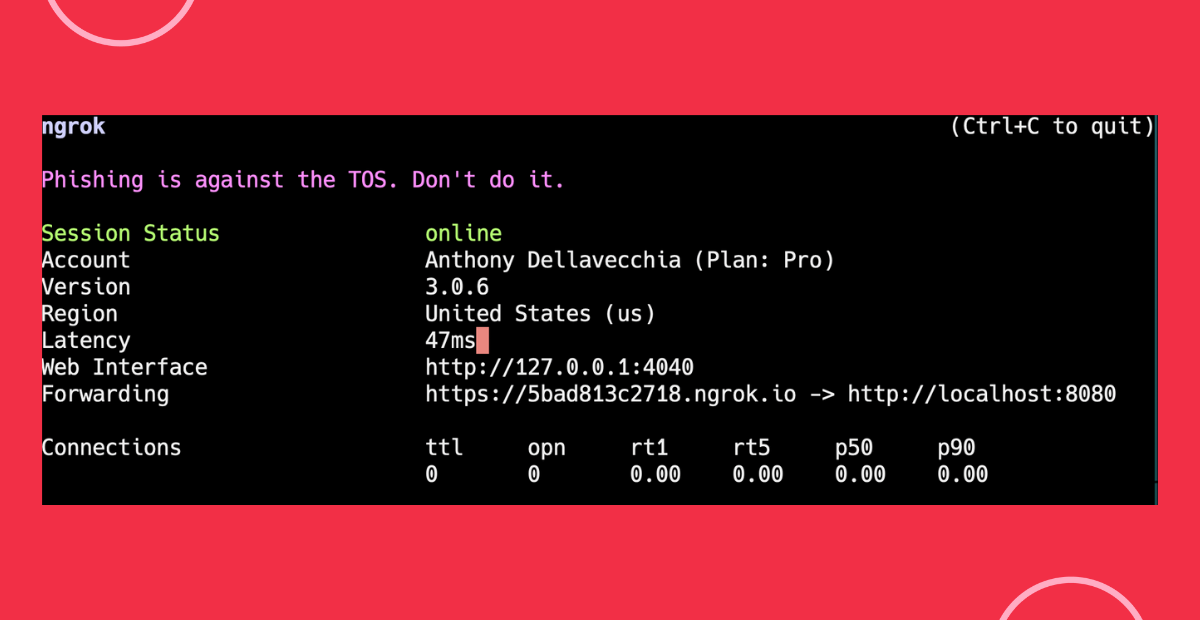
Take note of the line that says “Forwarding”. In the image above, it reads: https://5bad813c2718.ngrok.io -> http://localhost:8080.
This means that your local application is accessible, publicly, on https://5bad813c2718.ngrok.io and your endpoint is accessible on https://5bad813c2718.ngrok.io/v1/message/schedule.
Now that you have created the backend for scheduling a message, it’s time to leverage Twilio Studio to schedule a message using your backend application.
You can use an existing Studio Flow or create a new Flow.
To create a new Flow:
- Navigate to the Studio Flows section in the Console.
- Click the Create new Flow button to create a new Flow.
- Name your Flow. For this project, let’s name it “Schedule SMS in Studio”. Then click Next.
- Select the Start from scratch option. Then click Next.
From the Widget Library, drag and drop the Make HTTP Request widget onto the Canvas. Then, from the Trigger widget, draw the Transition from Incoming Message to the Make HTTP Request widget. Your Flow should look similar to this:
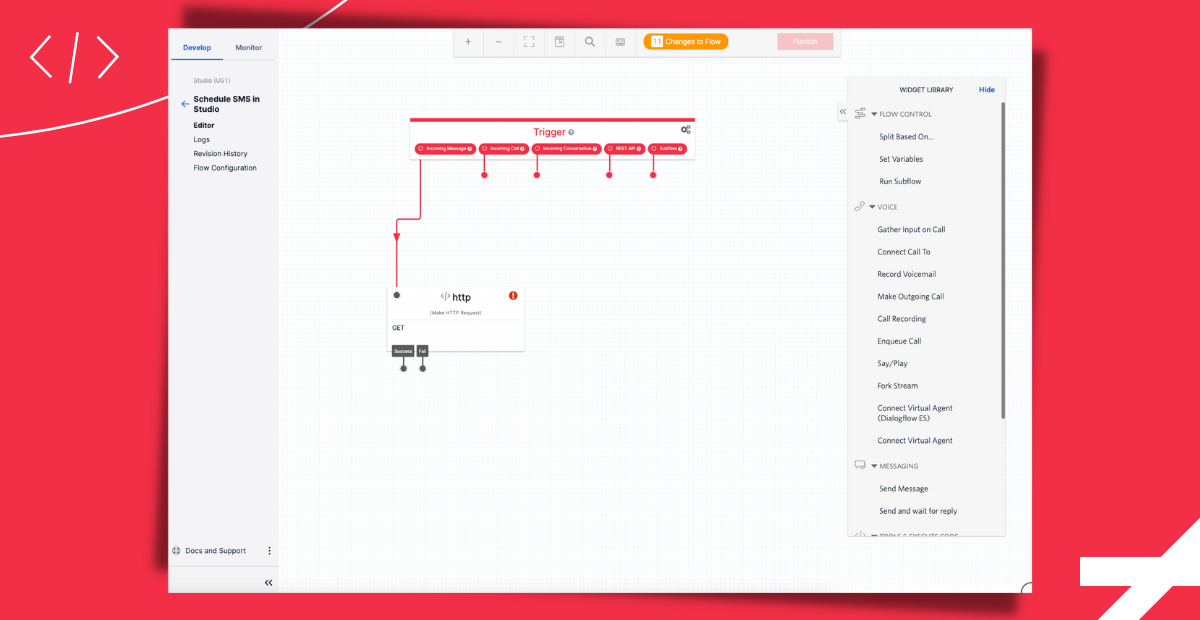
Select the Make HTTP Request widget to configure the following properties:
- For the Widget Name, call it something like “schedule_message”
- Select “POST” as the Request Method in the dropdown
- Set the Request URL to “{YOUR-NGROK-URL}/v1/message/schedule”
- Change the Content Type to “Application/JSON” in the dropdown
- Add the following to the Request Body:
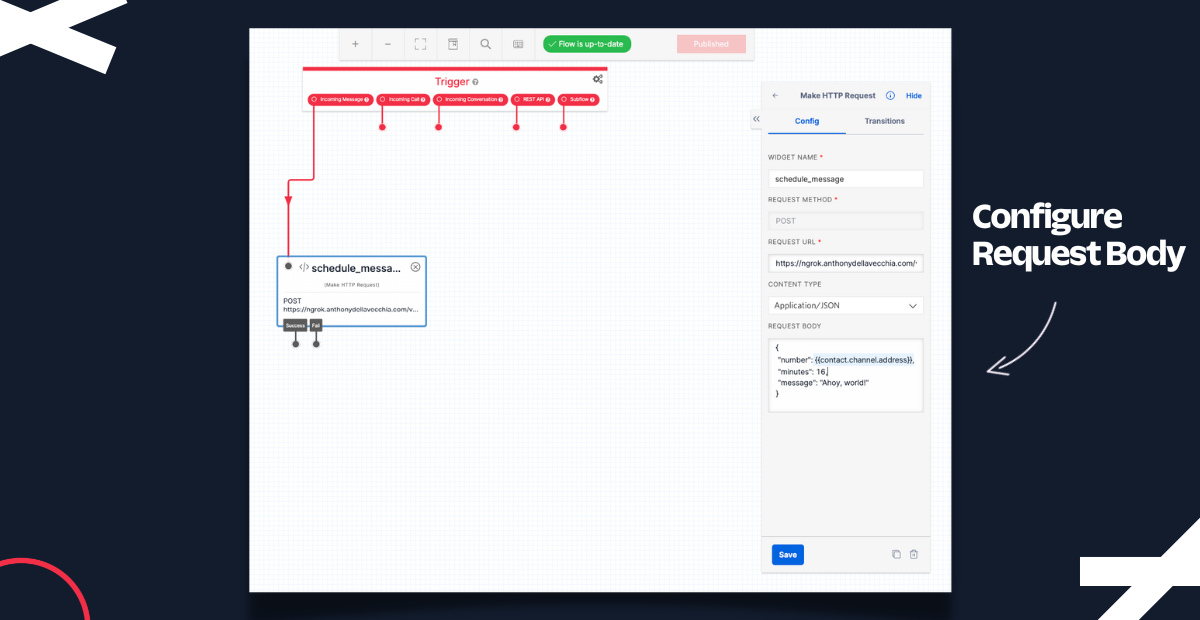
Save those changes by clicking the Save button. Finally, publish your Flow by clicking the Publish button.
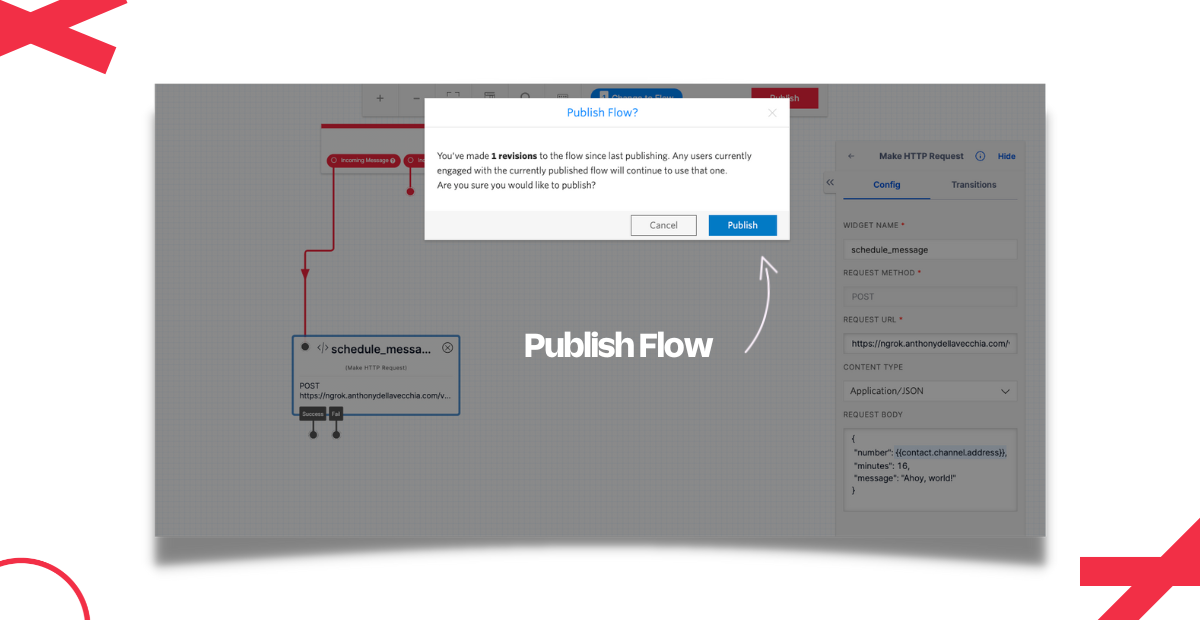
Although the Flow is published, you still need to configure your Twilio number to test it out.
Select the Trigger Widget by clicking on it. In Flow Configuration, under Active configurations for this Flow, click the Manage Phone Numbers link.
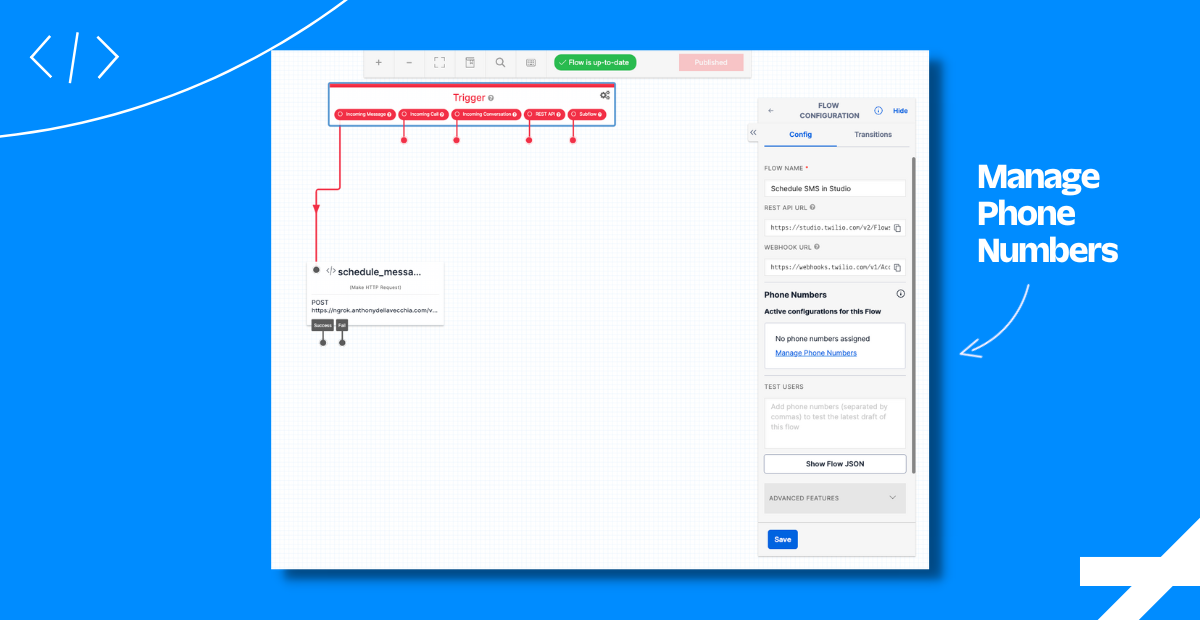
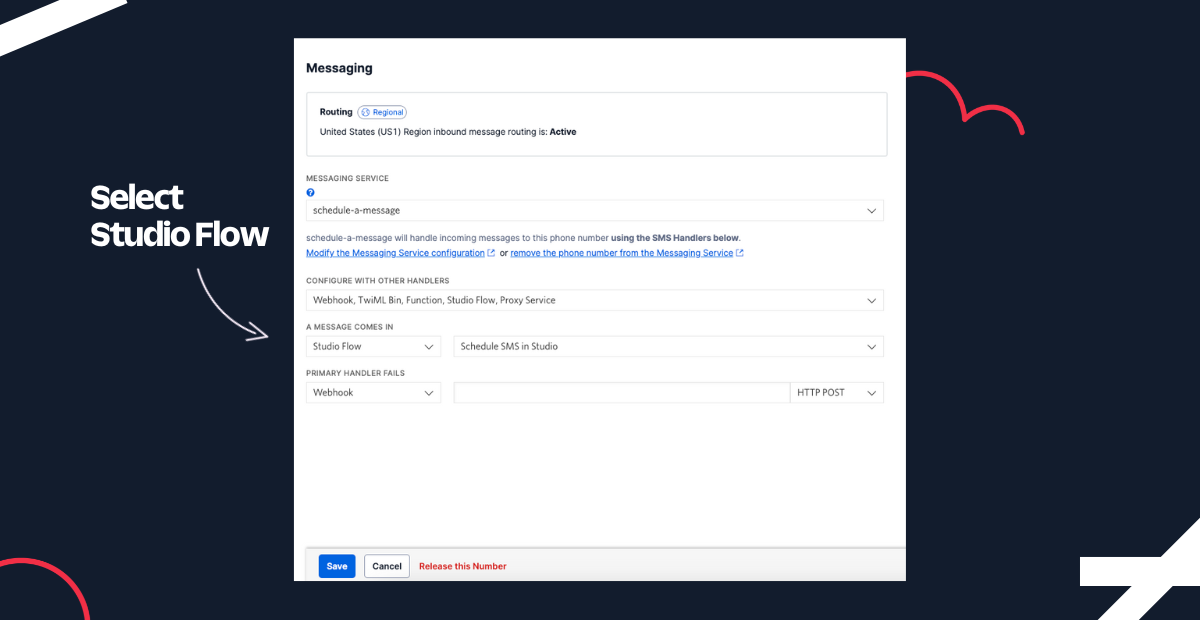
Select your Twilio phone number and scroll down to the Messaging section. Under A Message Comes In, select Studio Flow. Then select the name of the Studio Flow you created earlier. If you used the example name, it should be “Schedule SMS in Studio”. Then click Save.
With your Flow published, your web server and ngrok running, you can try it out.
Since the Flow is triggered by an Incoming Message, send a text message to your Twilio number to trigger the scheduled message.
As a recap, when your Flow is triggered, it makes an HTTP Request to your endpoint /v1/message/schedule. From there, the schedule_message() function is called which will send a scheduled message based on the input from Studio.
Nice job following along, but the fun doesn’t stop here. There are many other features and use cases you can incorporate into your own workflows. For instance, you can see a list of scheduled messages and also cancel a scheduled message before it’s sent.
For more information about scheduling a message and answering common questions, see the Message Scheduling FAQs.
If you’d like to see the code associated with this blog post, it’s available in this GitHub repository.
Thanks so much for reading! If you found this tutorial helpful, have any questions, or want to show me what you’ve built, let me know online. And if you want to learn more about me, check out my intro blog post.

Related Posts
Related Resources
Twilio Docs
From APIs to SDKs to sample apps
API reference documentation, SDKs, helper libraries, quickstarts, and tutorials for your language and platform.
Resource Center
The latest ebooks, industry reports, and webinars
Learn from customer engagement experts to improve your own communication.
Ahoy
Twilio's developer community hub
Best practices, code samples, and inspiration to build communications and digital engagement experiences.


