SMS Doorbell with MicroPython and Twilio
Time to read:
February 05, 2020
Written by

The Internet of Things (IoT) has the potential to touch not only every industry, but also most everyday aspects of our lives. As a software developer, I’m excited about how low the barrier of entry is considering the low cost of IoT hardware and the wide availability of development tools in the open-source ecosystem.
In this article, I want to show you how to build an IoT doorbell that sends you an SMS instead of producing sound. This project should give you a good idea of the kinds of projects you can build on your own with cheap microcontroller hardware using MicroPython and the same Twilio APIs that many users know and love.
The project that we are going to build is an SMS doorbell using an ESP8266 microcontroller, a push button, MicroPython, and Twilio’s Programmable SMS service.
Building an SMS Doorbell
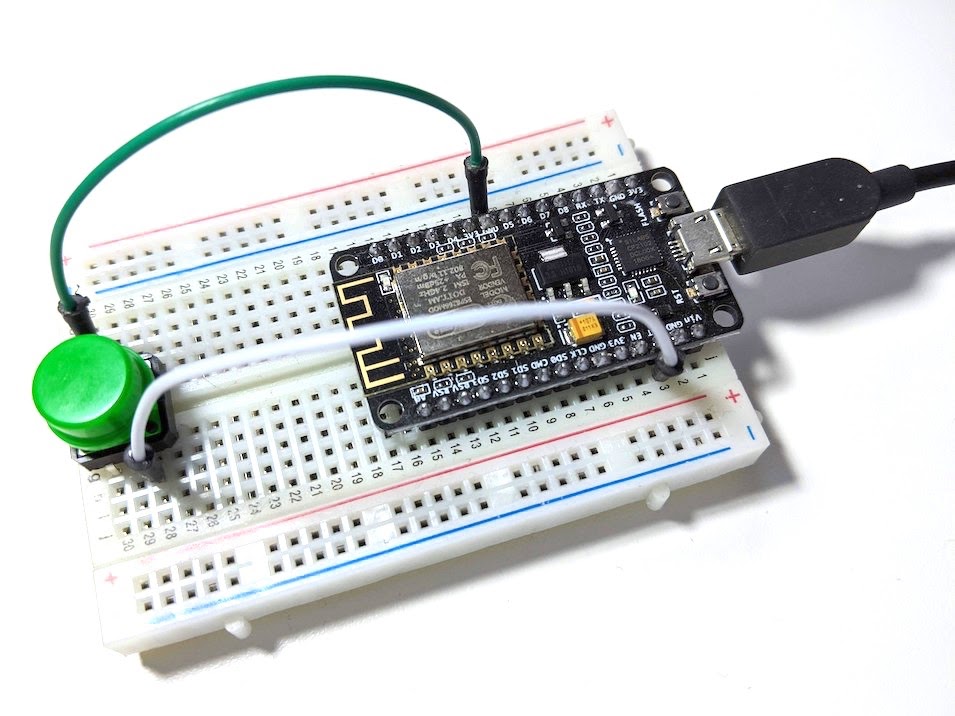
This is the perfect project if you are new to microcontrollers and want something simple that you can build without soldering. Below you can see a picture of the hardware prototype:
What is a Microcontroller?
You can think of a microcontroller as a small computer – so small that it is contained in a single chip. In addition to their small size, these devices are cheap. Most microcontrollers have a unit sale price below $10 USD, much less when buying them in bulk.
Below you can see the popular ESP8266 microcontroller:
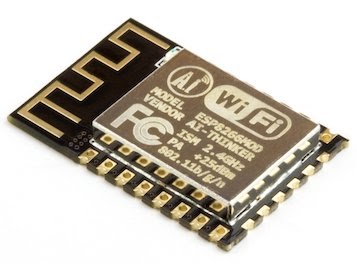
This model is a single chip mounted on a small board providing connectors on the top, bottom and right sides. To these you can solder additional components such as batteries, buttons, sensors, and displays.
You can guess from looking at the picture that this microcontroller has Wi-Fi connectivity, which makes it ideal for projects that need to connect to cloud services such as Twilio’s. The golden lines printed on the left side of the board function as an antenna to increase wireless reception.
Microcontrollers like the above are inside of a lot of devices that we use every day. Having to design your own project using one of these is, however, somewhat inconvenient. During development, you want to be able to easily connect and experiment with other components, and you also need a link to a computer to upload the code that runs inside the microcontroller.
You can think of the above type of microcontrollers as “production” devices, better for a finished product. During the prototyping and development phases, we prefer more accessible devices such as the below model, based on the same ESP8266:
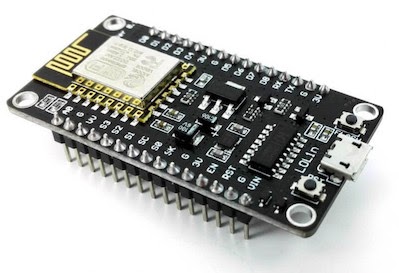
While the microcontroller on this device is the same as with the previous one, the board is larger and has additional components.
This is known as a “development board”, because it comes with a few nice extras. On the right side, it has a micro-USB port to power the device and to connect to a computer to upload code and debug.
Development boards do not usually require soldering, they have pins for all the inputs and outputs. To simplify prototyping you can use a breadboard and jumper wires to make connections.
Project Requirements
If you plan to build this project you will need to buy the following hardware components:
- ESP8266 microcontroller development board. Other microcontrollers supported by MicroPython might work as well, but this is the one that I have tested.
- A 400-point breadboard.
- Some jumper wires.
- A USB to micro-USB cable.
You can buy these components online, either from the large retailers (you know who they are), from smaller IoT-specific shops, or even from auction sites.
In addition to the above, you will need the following items:
- A computer with a USB connection. Linux, Mac and Windows operating systems are all supported.
- Python 3 installed on your computer. If your operating system does not provide a Python interpreter, you can go to python.org to download an installer.
- A phone that can receive SMS.
- A Twilio account. If you are new to Twilio create a free account now. Please review the features and limitations of a free Twilio account.
Note that when you create your free Twilio account you will need to verify your mobile number. This verification step is required on free accounts, as Twilio will not send SMS to unverified numbers. If you have upgraded to a paid Twilio account you do not have this limitation.
Getting A Twilio Phone Number
Since we are going to be sending text messages, it is a good idea to start by setting up the Twilio service with a phone number that can send SMS.
From your Twilio Console, select Phone Numbers, and then click on the red plus sign to buy a Twilio number (you will not be charged for this purchase if you are using a trial account).
In the Buy a Number screen select your country, then check SMS in the capabilities field. If you’d like to request a number that is local to where you live, you can enter your area code in the Number field.
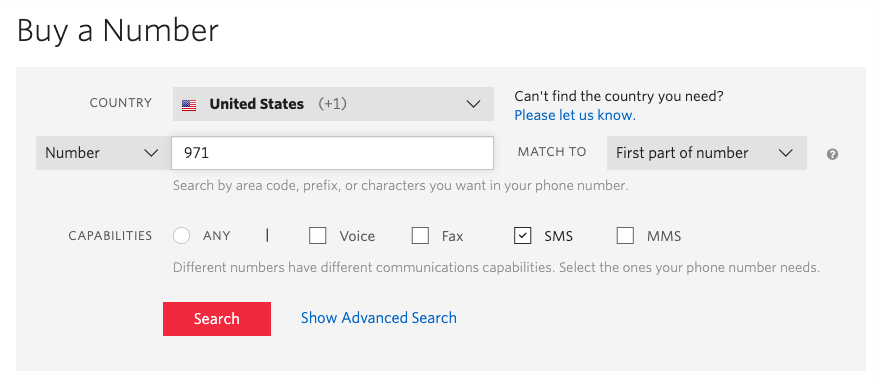
Click the Search button to see what numbers are available, and then click Buy for the number that you like from the results. After you confirm your purchase, click the “Close” button.
Congratulations, you now have your very own Twilio phone number! This is the number from which we will be sending text messages when the doorbell button is pressed, so write down this number and keep it handy for when we need it later.
A Brief Introduction to MicroPython
MicroPython is a version of the Python programming language that is specifically designed to run on small devices. The syntax is very close to Python 3.5’s, but there are several differences in the standard library mainly due to the RAM constraints of microcontrollers.
MicroPython runs on several microcontroller platforms, including the ESP8266 shown above, its more powerful cousin the ESP32, and a few others.
The following sections go over the steps you need to follow to set up a development environment for an ESP8266 development board on your computer.
Microcontroller Driver
If you are using a Mac or Windows computer, a driver that allows your computer to recognize the microcontroller needs to be downloaded and installed from this page: https://www.silabs.com/products/development-tools/software/usb-to-uart-bridge-vcp-drivers. If you have a Linux computer you are in luck, as all recent Linux distributions have this driver already incorporated into the operating system.
Computer Setup
To work with a microcontroller from your computer you will use two applications:
- esptool: used to flash MicroPython or any other applications to the microcontroller’s flash memory.
- rshell: used to copy your application files to the MicroPython’s file system, and also to access the interactive REPL environment.
These two applications are written in Python, so they can be installed in a virtual environment using the pip installer.
To do this properly, let’s create a project directory that I’m going to call micropython-sms, and create a virtual environment with these two applications in it.
If you are using a Linux or Mac computer:
If you are following this tutorial on Windows, enter the following commands in a command prompt window:
As a reference, you can see below the versions of all the Python packages that were installed at the time I’m writing this tutorial:
Flash MicroPython
We are now ready to install MicroPython on the microcontroller board.
Begin by connecting the standard USB connector on your USB cable to your computer, and the micro-USB connector to the microcontroller. This is going to power the microcontroller and also establish a serial connection through which we will communicate with it.
(Be aware that for this connection to work, Mac and Windows computers require the driver mentioned above to be installed.)
To make sure there are no leftovers in the flash memory from previous code, it is always a good idea to erase the memory before starting on a new project. The esptool.py command can do this for us:
Check the output of the erase command, and look for a line that starts with “Serial port”. This line shows the device name for the serial port that is allocated to the connection to the microcontroller.
You can see that on my computer the device name is /dev/cu.SLAB_USBtoUART. Your device name can (and probably will) be different. On the Windows platform, device names are simply COMn, with n being a number.
Write down the device name, as we will need it later when we use the rshell command.
We are now ready to flash MicroPython. Go to the MicroPython download page and select the most recent stable build for your microcontroller. At the time I’m writing this, the current version of MicroPython is 1.12.
The build for the ESP8266 microcontroller is in a file named esp8266-20191220-v1.12.bin. Once the download is finished, move the file from your Downloads folder to micropython-sms, so that we have it handy.
To install this build of MicroPython on the microcontroller, we use esptool.py again:
This should take around a minute. Note that if you are using a version of MicroPython different from mine, you will need to change the filename accordingly.
Using the MicroPython REPL
You now have a MicroPython interpreter ready to run on your microcontroller. You can open an interactive session using the rshell command:
Note that the argument given after -p is the device name used by the serial connection to the microcontroller board.
You will now be in the rshell prompt. You can type help to see a list of accepted commands:
For now, let’s concentrate on the repl command, which starts a MicroPython interactive shell:
Here you can enter Python statements exactly like in a standard Python shell. But – it is important to note that your computer is merely acting as a dumb terminal. In this case, the Python session is managed by the microcontroller.
If you reach this point, rest assured that your MicroPython development environment is working well.
To exit the MicroPython shell, press Ctrl-X and that will bring you back to the rshell prompt. Press Ctrl-D at the rshell prompt to exit back to your terminal.
Send an SMS from MicroPython with Twilio
To begin our dive into MicroPython, we are going to work on sending a text message. This obviously involves sending an HTTP request to the Twilio Programmable SMS API.
Unfortunately, before we figure out how to talk to Twilio we have to solve a much more basic problem: network connectivity.
Network connectivity on a normal computer is set up by going into some sort of administration panel where you enter your Wi-Fi network name and password. Microcontrollers are extremely simple computers, so simple that they often lack an operating system. The task of configuring networking is usually done directly in an application.
Connect to Wi-Fi
The MicroPython standard library includes a network package that provides the support functions required to connect to a Wi-Fi router.
Let’s start our project by writing the following code in a file named main.py:
The connect_wifi() function takes your Wi-Fi network name and password as arguments and makes a connection to your router.
This microcontroller model comes equipped with two different Wi-Fi interfaces, an access point interface, and a station interface.
As its name implies, the access point interface is used when you want other devices to see the microcontroller as a Wi-Fi connection, which is not what we intend to do for this project. The station interface is used when we want the microcontroller to connect to a Wi-Fi router and gain Internet access.
The first line of code in the connect_wifi() function retrieves the station interface object, which is an instance of the WLAN class of the network package.
If we find that this station is not connected, we first activate it, then initiate a connection with the Wi-Fi network name and password (given to the function as arguments), and finally wait for the interface to report that it is connected.
The last line of the function prints the current network information. Printing in MicroPython is in general used for debugging. You will see that when we execute this function in the MicroPython REPL the output will be shown.
Testing The Wi-Fi Connection
Now that we have our first MicroPython function it is time to test it. To do this, we have to copy our main.py file from our computer into the MicroPython file system in the microcontroller board. The easiest way to do this is to start rshell as we did above, but adding the cp command at the end:
If you prefer to use the rshell prompt, you can start rshell as we did before, and then just enter the cp command at the prompt.
All the rshell file system commands use the convention that the /pyboard path refers to the root of the file system living in the microcontroller. Any other pathnames apply to the local computer.
As you see in the command above, we are copying main.py from our computer’s current directory to the top-level directory of the MicroPython file system.
If you are curious about what files are stored in the microcontroller, you can use the ls command:
You will very likely see that there are only two files, as I see on my device. The boot.py file is part of MicroPython’s release. This file contains some startup code that runs when the device is powered on or reset. The main.py file is the file that we just copied.
In MicroPython, if a file named main.py exists, it is automatically executed after the board has completed its initialization. This is where the user application is written.
We have our first function copied to the microcontroller, so now we can try running it from the MicroPython REPL:
Once in the REPL, you can import and call the connect_wifi() function as you would normally on standard Python:
And just like that, we are connected to Wi-Fi! Now you can see how useful it is to add print statements in your MicroPython code, as that helps us see what’s happening.
If you want to make sure the board is connected to the network, you can try a simple HTTP request using the urequests package, which is a lightweight version of the popular requests package of standard Python:
Create a Twilio SMS Client
Now that we have network connectivity, we are ready to investigate how to invoke the Twilio APIs to send an SMS.
When using standard Python, we have the Twilio Python Helper library, which encapsulates all the complexities involved in talking to Twilio APIs. Unfortunately, there is no equivalent library for MicroPython. Instead, we will send our requests directly using the urequests package you saw in the previous section.
The Send an SMS with Twilio’s API page shows how to send a text message using several languages. Of particular interest to our situation is to see how to do it using the cURL command-line utility, as we can easily replicate that from MicroPython code.
This is a cURL example:
In this example, the ACXXXXX stands for your Twilio account’s SID. You can find this value as well as your auth token in the Twilio Console:

In case you are not familiar with cURL, let me translate what the above command does:
- It sends an HTTP POST request to the URL given in the command
- It sends three items of data with URL encoding in the body of the request,
Body,FromandTo - It includes a basic authentication header containing the account SID and auth token
I decided to create a small TwilioSMS class to replicate this in a Pythonic way. You can incorporate the code below into main.py:
I’m guessing this is more complicated than you expected. Unfortunately, the urequests package from MicroPython is very basic. urequests does not currently implement the formatting for POST payloads or basic authentication so these need to be manually implemented.
Now, I’m going to walk through the parts of the code above slowly to discuss the implementation details.
The API client is going to be encapsulated in the TwilioSMS class. Looking at the documentation, the base URL that is common to all the resources in the SMS API is https://api.twilio.com/2010-04-01, so it is a good idea to store this URL in a class variable. Then it doesn’t need to be repeated elsewhere in the code.
The __init__() method accepts the Twilio account SID and auth token, which are used to authenticate to the Twilio API. You’ve seen that the SID is used twice, once as part of the URL, and again in the basic authentication header. To have this value available, I store it in the self.twilio_account_sid instance variable.
The auth token is only used for authentication. Following the basic authentication specification, the username and password must be sent in the Authorization header after applying base64 encoding.
To avoid having to repeat the encoding step every time we send a text message, I have decided to store the base64 encoded string containing the username and password. This is what I’m storing in the self.twilio_auth instance variable. The ubinascii package from MicroPython is used for the base64 encoding, this is yet another difference with standard Python, where the base64 package takes care of the encoding.
The create() method is where we send the HTTP request to Twilio. The three arguments are the SMS body and the sender and recipient phone numbers, both in standard E.164 format.
The data local variable holds the payload of the request, which includes the three arguments given to the method, formatted in standard form encoding. You have to keep in mind that the values of these three fields need to be percent-encoded, where certain characters are not allowed and need to be escaped. Unfortunately urequests does not handle this for us, so once again we have to implement this ourselves.
The phone numbers are in E.164 format, and start with a + character. This character needs to be escaped as %2B, so we simply do a string replace operation. I’m assuming that any other characters in these two fields are digits, which do not require escaping.
The body field might also require escaping if it uses special characters, but to keep this code simple we will assume that it is going to include just letters and numbers.
We are now ready to send the HTTP request with urequests.post(). Note how we build the URL using the base_url class variable, and also how we pass the basic authentication header in the headers argument. Because we are sending the payload as a form post, we also set the Content-Type header to application/x-www-form-urlencoded.
To complete the operation, we print the status code that the Twilio API returned in the response object for debugging purposes. This is going to be a standard HTTP status code, so we expect a number in the 200-299 range as an indicator of success.
Send a SMS with MicroPython and Twilio
Let’s copy the updated main.py code to the microcontroller:
Now we can finally test sending an SMS to ourselves from the MicroPython REPL:
Make sure you replace your Wi-Fi and Twilio credentials when you type the code above in your MicroPython shell. Also be sure to use the E.164 format for the phone numbers. If you are in the United States, the numbers must be given as ’+1aaabbbcccc’, where aaa is the area code, and bbb-cccc is the local number. Twilio has a page with information on formatting international phone numbers.
If everything went well and you receive a 201 response from Twilio, you should receive a text message from your Twilio number. Congrats!
An SMS Doorbell Application
We are now ready to build the full SMS doorbell project. We are going to start by building the hardware, and then write some more code that relies on the functions we’ve created in the previous sections of this article.
Hardware Diagram
Below you can see a detailed picture of the circuit that we are going to use for our doorbell prototype:
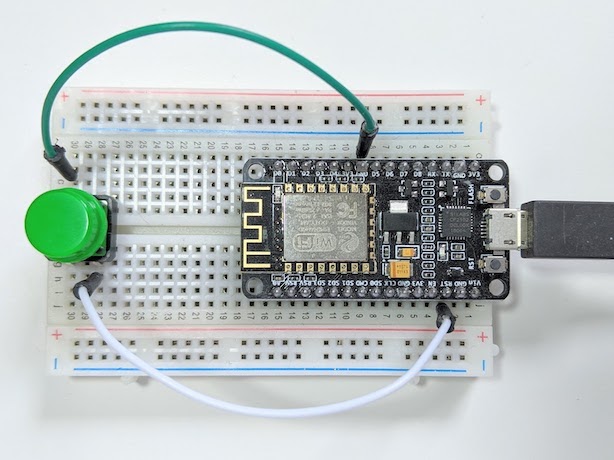
In this circuit, the microcontroller board and the button are connected with two wires. The left side button terminal is connected to the 7th pin from the left in the top row in the microcontroller board, which is labeled GND, or ground. In the picture this connection was made with a green wire. The right side button terminal is connected to the RST or reset pin, which is the 3rd from the right in the bottom row. This is the white wire that you see in the picture.
What does this circuit do? The RST pin of the ESP8266 controller has the special attribute that when connected to ground for a moment, it triggers a reset. What we’ve done with this circuit is make a connection from RST to the button, and then from the button to GND. When we press the button the connection between RST and GND is established and the board resets, which , in turn, will re-run the code in our main.py file.
This is one of the simplest circuits that you can build, but it is very useful, as it executes the logic that you write in main.py every time the button is pressed. Any kind of project where something happens when you press a button can be implemented with this circuit!
Configuration
As you’ve seen while playing with Wi-Fi and SMS in the MicroPython REPL, we have a few settings that we need our doorbell application to remember. We are going to write all these settings in a configuration file, to keep them separate from the code logic.
Create a file named config.py with the following contents:
Having the configuration stored separately from the code has three big advantages.
The first is that all the settings are consolidated in a single file, which makes it easy to make changes without having to navigate through the source code. This practice also increases security, as you will be less likely to make your passwords and tokens public by mistake when they are separate from the application. Finally, you will see in the next section that using the configuration variables helps make your code more readable.
Since you will have this configuration file installed on the microcontroller file system without encryption, you should make sure physical access to this device is restricted to people that you trust. This is extremely important; consider that anyone who has access to the device could potentially make a copy of your config.py file. If your hardware is stolen or lost you should immediately change your Wi-Fi router password and revoke your Twilio credentials as a safety measure.
Doorbell Logic
We finally have all the pieces that we need to create our doorbell application. Below you can see a new version of main.py that uses the connect_wifi() function and the TwilioSMS class to send an SMS message:
Now that we have the configuration file, we can import config and then access the Wi-Fi credentials, Twilio credentials, and phone numbers directly as variables.
The logic that sends the SMS is written outside of any functions in the global scope since we want this logic to execute every time the board resets due to pressing the button. As a side effect, you’ll also get an SMS sent when you power on the microcontroller for the first time.
Sending the SMS works exactly the same as when we tried it from the REPL. First, we connect to our Wi-Fi router, then we instantiate a TwilioSMS object, and finally call its create() method to send the message.
I left the last line of the application commented out. This line is optional, it puts the microcontroller in deep sleep mode, which means that once the SMS is sent the microcontroller is going to be mostly powered down. Once you have tested that the application works well, you may decide to put the board to sleep while it is idle. In this state, it consumes significantly less power. Pressing the button will still trigger a reset and reboot while in this mode.
If you are wondering why we are not enabling deep sleep mode right away, know that entering the REPL or copying files to the board is not possible in deep sleep mode. For this reason, it is best to not use the deep sleep feature until we are sure that the application is working well and all the bugs are fixed.
If you ever end up with a board that is in deep sleep mode and you need to upload new code to it, the best way to do that is to erase the flash memory, flash MicroPython again, and then copy the application files again.
Ready to try this doorbell application? Copy main.py and config.py to your microcontroller’s file system:
Since rshell is going to reset the board right after copying the files, you will get your first SMS without doing anything. At this point, the board is idle and waiting for a button push. So press the button to send yourself an SMS!
Debugging
If everything worked and you are getting your SMS delivered, then great! In the event the application does not appear to work, you may want to run it from the REPL so you can see if there are any errors or exceptions.
Since the application runs automatically when main.py is imported, simply enter the REPL and press Ctrl-D to trigger a soft reset of the board:
Each time you press Ctrl-D the board will reset and execute main.py again, in the same way it happens when you press the physical button. If you need to make changes, exit the REPL with Ctrl-X, make the necessary changes, copy the source code to the board and repeat.
Possible Improvements
With this article, I wanted to give you a small taste of how fun working on an IoT project can be.
There are many ways in which you can improve this project, so I’m going to leave you with some ideas:
- Change the application to place a phone call instead of sending SMS. You can create a
TwilioVoiceclass that is based on myTwilioSMSclass. - Add a battery to your circuit to be able to use it without a wire attached to your computer.
- Create a production version of your doorbell on the smaller ESP8266 models.
- Create a 3D printed enclosure for your doorbell.
- Attach a camera module to your microcontroller, and then have it send a picture to your phone instead of a text message.
- Add a piezo buzzer and make it play a sound, in addition to sending the SMS.
If you decide to continue experimenting with microcontrollers and MicroPython, I recommend you read my MicroPython and the Internet of Things series. You may also want to learn how to add cellular connectivity to your projects with Twilio IoT.
I hope you enjoyed working on this project!
Miguel Grinberg is a Python Developer for Technical Content at Twilio. Reach out to him at mgrinberg [at] twilio [dot] com if you have a cool Python project you’d like to share on this blog!

Related Resources
Twilio Docs
From APIs to SDKs to sample apps
API reference documentation, SDKs, helper libraries, quickstarts, and tutorials for your language and platform.
Resource Center
The latest ebooks, industry reports, and webinars
Learn from customer engagement experts to improve your own communication.
Ahoy
Twilio's developer community hub
Best practices, code samples, and inspiration to build communications and digital engagement experiences.