How to Use a Task Queue in Python to Send Twilio SMS
Time to read:
August 31, 2020
Written by
Reviewed by

It’s frustrating to deal with an API that enforces a rate limit, especially if you have a US or Canada phone number and can only send one SMS message per second. Fortunately as a developer, we can find a workaround solution so that you can continue to send out text messages timely and stick to your schedule without receiving 429 status codes.
In this tutorial we will implement a task queue in Python to send Twilio SMS messages in a timely manner.

Tutorial Requirements
- Python 3.6 or newer. If your operating system does not provide a Python interpreter, you can go to python.org to download an installer.
- A free or paid Twilio account. If you are new to Twilio get your free account now! (If you sign up through this link, Twilio will give you $10 credit when you upgrade.)
Let’s talk about task queues
Task queues are a great way to allow tasks to work asynchronously outside of a single request. This is incredibly helpful when managing heavy workloads that might not work efficiently when called all at once, or when making large numbers of calls to a database that return data slowly over time rather than all at once.
There are many task queues in Python to assist you in your project, however, we’ll be discussing a solution today known as RQ.
RQ, also known as Redis Queue, is a Python library that allows developers to queue jobs that are processed in the background. Using the connection to Redis, it’s no surprise that this library is super lightweight and offers support for those getting started for the first time.
By using this particular task queue, RQ makes it possible to process jobs in the background with little to no hassle.
Set up the environment
Create a project directory in your terminal called “twilio-taskqueue” to follow along.
Install a virtual environment and copy and paste the commands to install rq and related packages. If you are using a Unix or MacOS system, enter the following commands:
If you are on a Windows machine, enter the following commands in a prompt window:
RQ requires a Redis installation on your machine which can be done using the following commands using wget. Redis is on version 6.0.6 at the time of this article publication.
If you are using a Unix or MacOS system, enter these commands to install Redis.
Run the Redis server in a separate terminal window on the default port with the command src/redis-server from the directory where it's installed.
For Windows users, you would have to follow a separate tutorial to run Redis on Windows. Download the latest zip file on GitHub and extract the contents.
Run the redis-server.exe file that was extracted from the zip file to start the Redis server.
The output should look similar to the following after running Redis:
Keep the Redis server running on a separate terminal tab as you follow along in this tutorial.
Authenticate against Twilio Service
We need to create a .env file to safely store some important credentials that will be used to authenticate against the Twilio service. We’re going to set this up now but we’ll discuss more about it in the next section.
Here is what the .env file should look like:
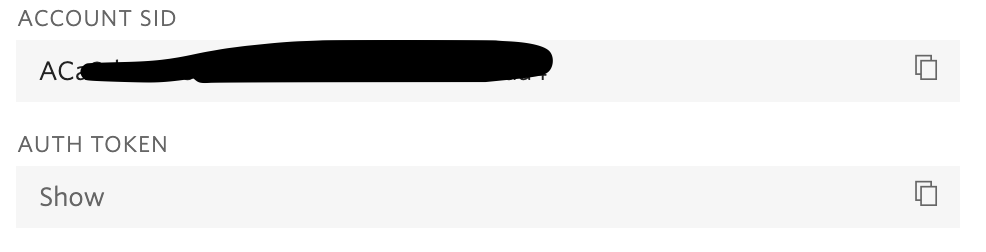
For the TWILIO_ACCOUNT_SID and TWILIO_AUTH_TOKEN variables, you can obtain the values that apply to your Twilio account from the Twilio Console:
Set up a contact .csv file
You might already have a .csv file of your own, but for the purpose of this tutorial, I created a .csv file with random information from the Web and replaced the phone numbers with my own. I also repeated the same contact three times to ensure that 3 text messages are sent to my phone number.
Here’s my sample that you can copy and save into your directory. Replace the phone numbers with your own.
Redis queue to the rescue
Open a new tab on the terminal so that Redis continues to run on the initial tab.
Create an app.py file in the root directory and add the following code:
A queue object is created here to keep track of functions to be executed.
The enqueue_in function expects a timedelta in order to schedule the specified job. The datetime module to specify the time difference between each text message sent. In this case, seconds is specified, but this variable can be changed according to the time schedule expected for your usage. Check out other ways to schedule a job on this GitHub README.
The delta variable is set to +=15 which means that every 15 seconds, a new text message will be sent out.
Create another file in the root directory called msg.py and paste the following code:
This file was created in order to send the text messages to the contacts taken from your .csv file.
Run the redis queue
The full code for this tutorial can be found on my GitHub.
The Redis server should still be running in a tab from earlier in the tutorial at this point. If it stopped, run the command src/redis-server inside the redis-6.0.6 folder on one tab. Open another tab solely to run the RQ scheduler with the command rq worker --with-scheduler. For developers with a Windows machine, start the redis-cli.exe to run the command above.
This should be the output after running the command above.
Lastly, open a third tab in the terminal for the root project directory. Start up the virtual environment again with the command source venv/bin/activate. Then type python app.py to run the project.
Have your phone next to you and wait delta time for the next message to appear.
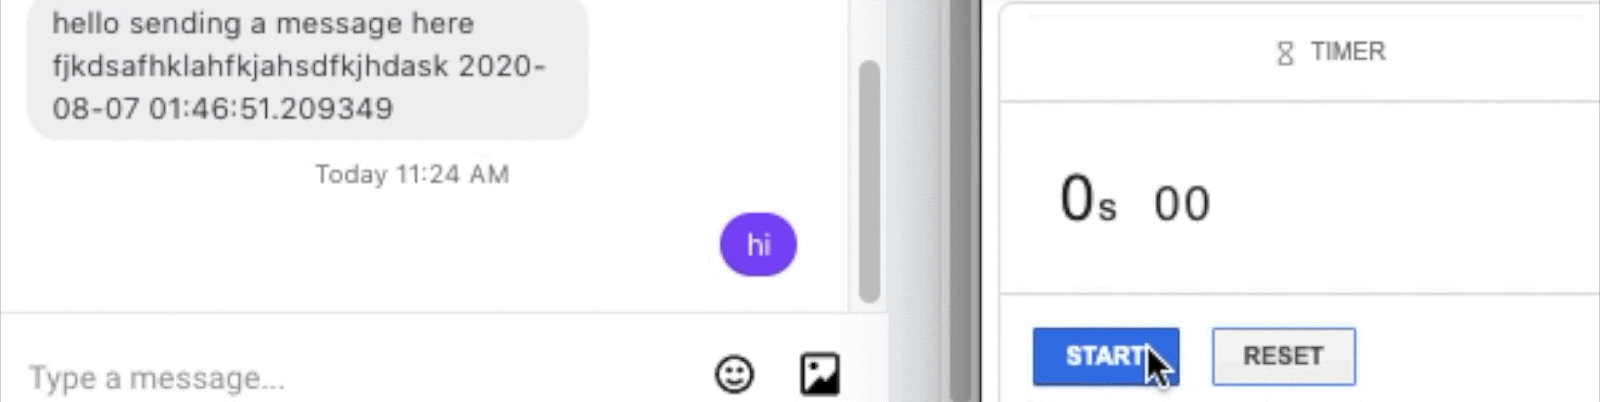
In the gif demo below, notice that 3 text messages were sent, as there were 3 contacts in the .csv file from earlier. They were scheduled to be sent every 15 seconds and although the gif wasn’t able to capture the best timing due to having to run the program and record, it is noticeable that it took at least 45 seconds to send out the SMS text messages.
Here’s the sample output inside of the rqworker tab. Notice that for every line with the phrase default: Job OK, the timestamp before the phrase shows a time that is 15 seconds before the next scheduled job.
What’s next for task queues?
Congratulations! You have successfully implemented a task queue in Python using Redis Queue to send Twilio SMS messages in a timely manner. No more 429 status codes for us!
Interested in new projects that require task queues? Check these out:
- Queue Emails with Python, Redis Queue and Twilio SendGrid
- Receive notifications from the International Space Station using Python, Redis-Queue and Twilio Copilot
- Explore other Python task queues perfect for your project
Let me know what you have been building by reaching out to me over email!
Diane Phan is a Developer Network editor on the Developer Voices team. She loves to help programmers tackle difficult challenges that might prevent them from bringing their projects to life. She can be reached at dphan [at] twilio.com or LinkedIn.


Related Resources
Twilio Docs
From APIs to SDKs to sample apps
API reference documentation, SDKs, helper libraries, quickstarts, and tutorials for your language and platform.
Resource Center
The latest ebooks, industry reports, and webinars
Learn from customer engagement experts to improve your own communication.
Ahoy
Twilio's developer community hub
Best practices, code samples, and inspiration to build communications and digital engagement experiences.