How to Transfer Files and Data Between Angular Clients and Node.js Backends
Time to read:
February 26, 2019
Written by

Having a shared codebase for both the server-side and browser-side code of an Angular application aids the maintainability of a project. You can do that with Angular Universal and Node.js using the server-side rendering (SSR) concept. You can even use SSR to securely pass data, including files, between the application server (Node.js) and the Angular application running on it.
This post will show you how to create an application for uploading, storing, managing, and downloading files from a Node.js server using a single codebase. When you finish this project you’ll be able to:
- Create an Angular application
- Set up server-side rendering with Angular Universal and Node.js
- Implement file transfer operations
- Create a dynamic, in-memory list of files
- Pass data about storage content between the server application and the JavaScript used by Angular for SSR
To accomplish the tasks in this post you will need the following:
- Node.js and npm (The Node.js installation will also install npm.)
- Angular CLI
These tools are referred to in the instructions, but are not required:
To learn most effectively from this post you should have the following:
- Working knowledge of TypeScript and the Angular framework
- Familiarity with Angular observables and dependency injection
- Some exposure to Node.js
You can learn more about server-side rendering (SSR) in a previous Twilio blog post.
There is a companion repository for this post available on GitHub.
Create the project and components and service files
In this step you will implement a first “draft” of the application. You will create a form which will be used for uploading files to the server and you will create an in-memory list of uploaded files. As always, you need to start by initializing the project.
Go to the directory under which you’d like to create the project and enter the following command line instructions to initialize the project and add Angular Forms:
Execute the following command line instruction to create the FileService class:
Execute the following commands to create the FileUploaderComponent and FileListComponent classes:
Be sure to carefully note the casing of the component names.
Create the file service
The initial implementation of the FileService will be a temporary one that will enable users to add and remove files from a list, but it won’t actually move the files anywhere. It connects the file list and file uploader components and maintains the file list but, as you can see from the code below, it doesn’t have upload or download functionality.
Replace the contents of the src/app/file.service.ts file with the following TypeScript code:
Create the file uploader component
The user interface for the file uploader component will be based on a form, so it’s necessary to import the ReactiveFormsModule into the main Angular AppModule.
Add the following import statement to the src/app/app.module.ts file:
Modify the imports: section of the src/app/app.module.ts file to include ReactiveFormsModule:
Implementation of the FileUploaderComponent begins with a template the user can use to choose a file to upload.
Replace the contents of the src/app/file-uploader/file-uploader.component.html file with the following HTML markup:
Implement the logic for uploading files in the FileUploaderComponent class.
Replace the contents of the src/app/file-uploader/file-uploader.component.ts file with the following TypeScript code:
Note that the onFileChange() method is bound to the (change) action of the input type="file" element of the HTML form. Also note that the patchValue method of the formGroup object is used to provide Angular with the contents of reader so it can proceed with the validation of the form.
When the form is submitted the onSubmit() event fires and uploads the named file to fileService, where the file list is updated.
Create the file list component
The FileListComponent class implements methods for retrieving list of files from the FileService. It also provides download and remove operations that can be performed on the listed files.
Replace the contents of the src/app/file-list/file-list.component.ts file with the following TypeScript code:
The data in the fileList$ observable will be displayed on a list that also includes clickable commands for downloading and removing each file.
Replace the contents of the src/app/file-list/file-list.component.html file with the following HTML markup:
The *ngFor loop iterates through the list of files from the fileList$ observable, which emits an array of strings. A <li> element containing <span> elements bound to download() and remove() operations will be created for each entry.
CSS can be used to indicate that the commands contained in the spans are clickable.
Insert the following CSS code into the src/app/file-list/file-list.component.css file:
The FileListComponent class and the FileUploaderComponent class have to be included in the main component of the application, AppComponent, to be rendered in the browser.
Replace the contents of the src/app/app.component.html with the following HTML markup:
Test the basic application
Execute the following Angular CLI command in angular-and-nodejs-data to build and run the application:
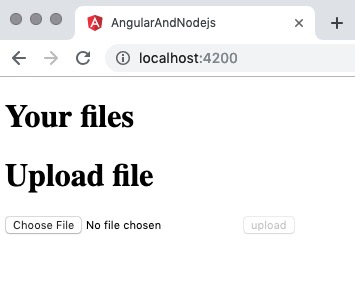
Open a browser tab and navigate to http://localhost:4200. You should see an empty file list and a form ready for user input, like the one shown below:
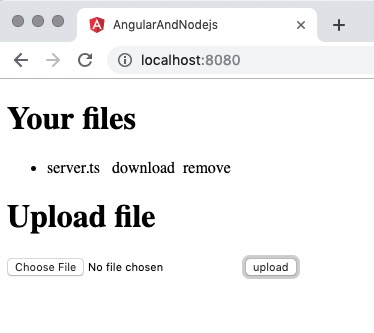
Choose a suitable file and click the upload button. The name of the selected file should appear in the file list, as in the example shown below:
Try clicking download. You will see that nothing happens.
Try clicking remove. The file name should be removed from the list.
At this point the application enables users to select files and “upload” them, but they are only “uploaded” as far as the list of files in memory on the client machine. Files can also be removed from the list in memory.
This isn’t very useful, but it’s enough to show you how the user interface and the file list work.
If you want to catch up to this step using the code from the GitHub repository, execute the following commands in the directory where you’d like to create the project directory:
Save files on the server
The next step is to transfer files to the server and store them on disk. You’ll do that by adding more functionality to the FileService class.
First you need to add the Node.js server to the project and create a folder dedicated to storing user uploads.
In the angular-and-nodejs-data folder, execute the following instructions at the command line:
Installing the @ng-toolkit/universal project added Angular Universal support to the project with just one command. It also includes a Node.js back end and server-side rendering (SSR). You can read more about SSR in Angular and its implications for search engine optimization (SEO) in this post.
Implement RESTful API endpoints in the server code
API endpoints will provide file handling on the server, so there are a few modifications to make to the server.ts file. They include adding fs module support (for manipulating the file system) and specifying a catalog in which to store data.
Open the server.ts file and find the following constant declaration:
Add the following constant declarations immediately after the line above:
Implement the /upload endpoint, which will be consumed by the front-end application.
In the server.ts file, find the following line of code:
Add the following TypeScript code to the server.ts file immediately following the line above:
Because we are going to upload Base64 encoded data in the request body, we need to adjust the maximum body size.
Near the top of the server.ts file, find the following line of code:
Replace the line above with the following TypeScript code:
Implement the /delete endpoint.
Add the following TypeScript code to the bottom of the server.ts file:
Implement the GET /files endpoint.
Add the following line of TypeScript code to the bottom of the server.ts file:
Using the express.static method informs Node.js that every GET request sent to the /files/** endpoint should be treated as “static” hosting, served from the userFiles directory, user_upload.
These RESTful API endpoints in the server can now be consumed in the front-end Angular application.
Replace the contents of the src/app/file.service.ts file with the following TypeScript code:
The code above fully implements the file operations to upload, download, and remove files. It also adds the isLoading() method, which returns an observable-emitting boolean value indicating if the action of uploading data is underway or not. The observable can be used in the AppComponent class to inform the user about the status of that activity.
Replace the contents of the src/app/app.component.ts with the following TypeScript code:
When the value from the Observable indicates an upload is in progress the app will display the following loader GIF (which is included in the GitHub repository):

Add the following HTML markup to the bottom of the src/app/app.component.html file:
Test uploading and downloading files
Rebuild the application and check if the upload and download functions work properly.
Execute the following npm command line instructions in the angular-and-nodejs-data directory:
Open a browser tab and navigate to http://localhost:8080. Choose a file and upload it.
The file name should be displayed in the file list under Your files and also be present in the user_upload directory.
You should also be able to download the file by clicking download. Note that your browser may open the file in a new tab or window instead of downloading it, based on the file type and your browser settings. The following illustration demonstrates the complete sequence:
Click remove and verify the file name is removed from the list under Your files and the file itself is removed from the user_upload directory.
If you want to catch up to this step using the code from the GitHub repository, execute the following commands in the directory where you’d like to create the project directory:
Retrieve and display a file list
You are almost done. The application supports uploading a new file to the storage, retrieving it, and removing it. The problem occurs when a user navigates back to the application.
You can simulate that behavior. If you still have http://localhost:8080 opened in your browser, hit the refresh button. The list of files is gone! But they are still on the server in the user_upload directory.
The next step in this project is to implement a responsive list of files for the user_upload directory. The list shown in the browser window will be updated dynamically to reflect the contents of the directory and it will reflect the list of files in the directory when the application starts.
It’s possible to do that by adding another REST endpoint to our server that returns a list of files. This would be good solution when the back-end server code is running on a different machine from the code that does the server-side rendering.
But as long as the back-end code is running on the same server as the code that serves the front end, it doesn’t make sense to execute the Angular Universal (server-side rendering) code and execute REST calls to the same machine. Instead, you can use the fs module to list all files in a given path.
The previous post, Build Faster JavaScript Web Apps with Angular Universal, a TransferState Service and an API Watchdog, demonstrates how to implement isPlatformServer() and isPlatformBrowser() methods to determine which platform is executing the code. This project uses those functions as well.
The previous post also shows how to share data between the server and the client with the TransferState object by injecting it into the AuthService class. These methods help make fs module functionality accessible to the client-side code, even though the module itself can’t be loaded in the browser. This project also utilizes that technique.
The following diagram shows the sequence of events:
- The user performs a GET / request to the server.
- Node.js receives the request.
- Node.js launches Angular and renders the view on the server.
- Data is stored in the TransferState registry.
- The server-side rendered view, including the browser-side JavaScript and TransferState registry, is passed to the browser and the Angular application is re-rendered in the browser.
There is one more thing to consider here. You know that browsers will not allow JavaScript code to manipulate the file system for security reasons. The webpack JavaScript module bundling system used by the Angular CLI won’t allow you to use the fs module for code built for the browser.
Since this project has a single codebase for both platforms, webpack interprets it as being built for the browser—which it is, in part. But it needs fs to read the directory contents and manipulate files, so it needs a solution that will get around the prohibition on running fs in the browser.
At this point you might think you need to create a separate codebase just for the server-side code, giving you two projects to maintain. But there is a technique which can enable you to maintain the single codebase and still manipulate files from the Angular executed on the server.
Angular has the ability to inject values and references outside the “Angular sandbox”. You can pass a reference to the Node.js function to the angular-side code and execute it from there.
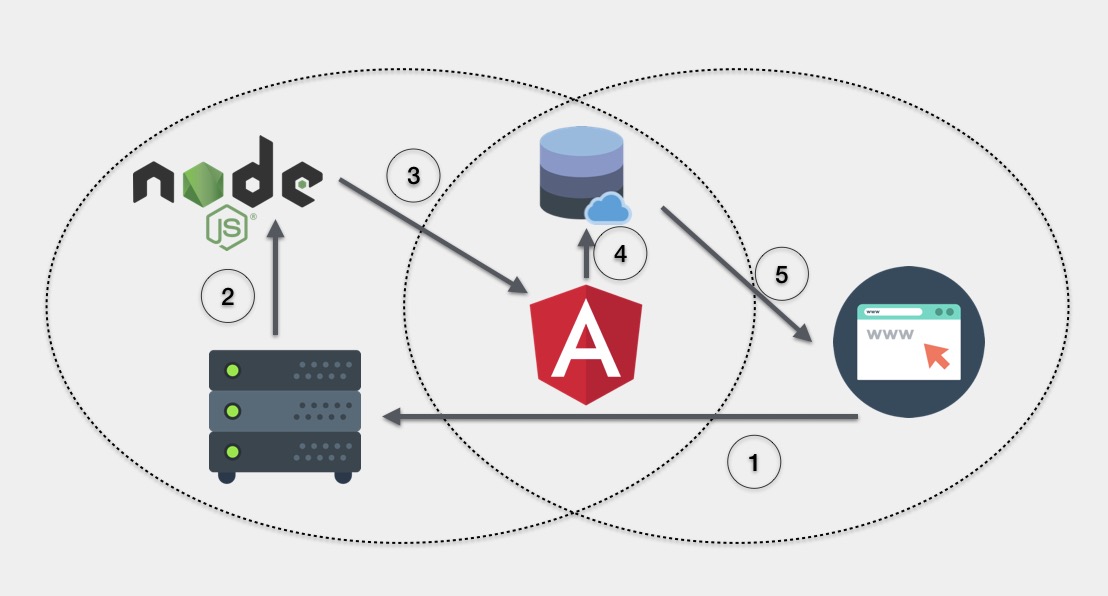
Take a look at the following diagram:
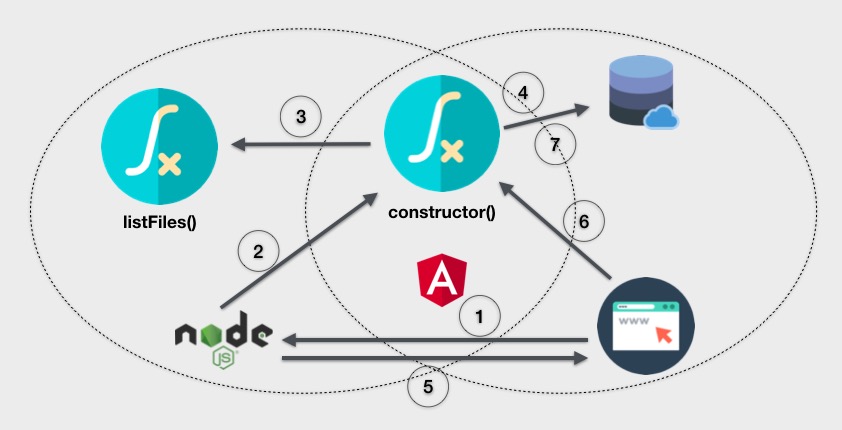
- The browser sends a GET / request to the server.
- Server fires Angular to render the view and calls the
constructor()of theFileService. - The constructor uses the
isPlatformServer()method to determine if it is being executed in Node.js on the server. If so, the constructor calls thelistFiles()method injected intoFileServiceas a callback. ThelistFiles()method provides the current list of the contents of the user_upload directory, which is then stored in thefileListlocal variable. - The list of files is stored in the
TransferStateobject. - The rendered view is send back to the browser and the browser displays the view and bootstraps Angular on the client.
- The client calls the
constructor()again and usesisPlatformServer()to determine that the code is being executed on the client. - The
constructor()retrieves list of files from theTransferStateobject.
Implement server-side file manipulation
With the API endpoints in place you can complete the implementation of file manipulation operations from the client.
Open the server.ts file and locate the following line of code:
Insert the following TypeScript code under the line above:
Locate the following code in the server.ts file:
Modify the code shown above to include the additional line shown below:
Now comes the time to consume this server function in the Angular application.
Open the src/app/file.service.ts file and replace the existing import directives with the following TypeScript code:
To make it possible for the file list displayed on the page to include all the files in the directory, the observable type for fileList$ needs to be changed to a ReplaySubject, an observable that makes available to its subscribers a list of the values previously emitted to it. This enables the observer to get the list of files added to the observable before the observer subscribes to the observable. According to the RxJS documentation: “ReplaySubject emits to any observer all of the items that were emitted by the source Observable(s), regardless of when the observer subscribes.”
Find the following line of code in the src/app/file.service.ts file:
Replace the line above with the following TypeScript code:
Modify the FileService constructor to provide the class with the PLATFORM_ID (client or server) and the TransferState object. If the code is running on the server the constructor logic reads the contents of the user_upload directory (by using injected reference to the listFiles method) and adds the list of files to the TransferState object. If the code is running on the client, the list of files in transferState is copied to the class’ private member variable, fileList.
Find the line of code below in the src/app/file.service.ts file:
Replace the line above with the following TypeScript code:
Test the complete application
Rebuild the application by executing the following instruction at the command line in the angular-and-nodejs-data directory:
Open a browser window and navigate to http://localhost:8080. Any files in the user_upload directory should be listed under Your files, as shown below, and you should be able to upload, download, and remove files from the server.
If you want to catch up to this step using the code from the GitHub repository, execute the following commands in the directory where you’d like to create the project directory:
What about security?
Does Angular running on the client have access to data outside of it, like the server file system? Yes it does. And you have same codebase for the server and browser? Yes you do.
You might ask: “What about path traversal? Can everyone on the internet see the data I store in the user_upload directory?” This question is more than appropriate here!
What we are doing in our app is passing reference to the method, not method itself. That’s why providing data from Node.js to the Angular client app is a great way of sharing sensitive data.
Examine the build output and take a look at the FileService constructor in the dist/main.hashcode.js file:
As you can see, the JavaScript is expecting Node.js to pass a reference to the function, passed as the variable t. No information about directory structure on our server can be retrieved from the JavaScript in the output bundle.
Summary of passing data from Node.js to Angular
In this project you learned how to transfer files between a client browser and a Node.js server in a single project codebase. The client’s user interface can select files to upload, upload them to the server where they are stored, list the files stored on the server, remove files stored on the server, and download files from the server. You saw how to do all this in a single Angular codebase using Angular Universal and Node.js. You also saw that this is a secure method of transferring data between the client and server, including files stored on the server.
Additional resources
Angular Universal documentation, including tutorials and the CLI reference
Dependency Injection in Action in Angular
TransferState class documentation, part of the @angular/platform-browser
ReplaySubject objects explained with other Subject object variants
RxJS ReplaySubject documentation, a “work in progress”
Maciej Treder is a Senior Software Development Engineer at Akamai Technologies. He is also an international conference speaker and the author of @ng-toolkit, an open source toolkit for building Angular progressive web apps (PWAs), serverless apps, and Angular Universal apps. Check out the repo to learn more about the toolkit, contribute, and support the project. You can learn more about the author on his website . You can also contact him at: contact@maciejtreder.com or @maciejtreder on GitHub, Twitter, StackOverflow, and LinkedIn.
Related Resources
Twilio Docs
From APIs to SDKs to sample apps
API reference documentation, SDKs, helper libraries, quickstarts, and tutorials for your language and platform.
Resource Center
The latest ebooks, industry reports, and webinars
Learn from customer engagement experts to improve your own communication.
Ahoy
Twilio's developer community hub
Best practices, code samples, and inspiration to build communications and digital engagement experiences.