Twilio on Rails Part 3 – Adding Contextual VOIP Using WebRTC to Your Rails 4 App
Time to read:
January 22, 2015
Written by
This post is part of Twilio’s archive and may contain outdated information. We’re always building something new, so be sure to check out our latest posts for the most up-to-date insights.

Welcome to the final part of our series on integrating Twilio with your Rails 4 app. In Part 1 we walked through signing-up for a free Twilio developer account, getting a phone number and processing an inbound phone call. In Part 2 we secured the webhooks, used Twilio’s REST API to send outbound SMS and MMS and processed delivery receipt notifications. In this post we are going create a contextual VOIP experience for your users by learning how to:
- Create a TwiML app
- Integrate the Twilio Client JS SDK
- Generate a Capability Token
- Connect the VOIP call
Contextual VOIP
In our previous blog posts we used Twilio to make phone calls and deliver text messages. These capabilities are quite powerful but they are often siloed away from the context of the application that the user is interacting with. With Twilio Client WebRTC you can embed a VOIP experience directly into your Rails 4 web application. This way the user has all of the context of your application in front of her as she’s engaged in a voice conversation.
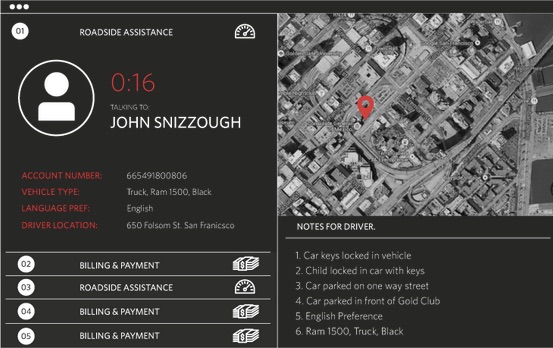
For the purpose of this blog post, we’re going to build a simple web page that a customer service agent could use to contact a customer who has requested a call back. The customer service agent will initiate the call on the web page and the customer will receive the call on their mobile phone. Be warned, the page we’re going to build won’t look nearly as beautifully designed as the image above but you’ll learn everything you need from a coding perspective to build a page like that in the real world.
If you haven’t worked through Part 1 and Part 2 of this tutorial series, go ahead and clone this Github repo so that your code base is up to speed. Run the following commands and you’ll be ready to go!
Create the TwiML App
To get started building a VOIP experience using Twilio Client, we need to learn about TwiML apps. Log-in to your Twilio account and click on “Dev Tools”.
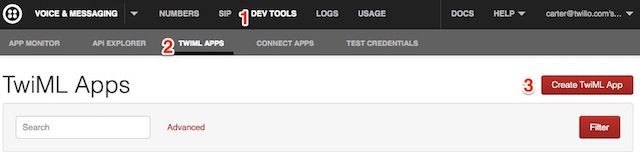
You’ll see a list of handy tools that you can use when you’re building or debugging your app. Click on “TwiML Apps” and then click on “Create TwiML App”.
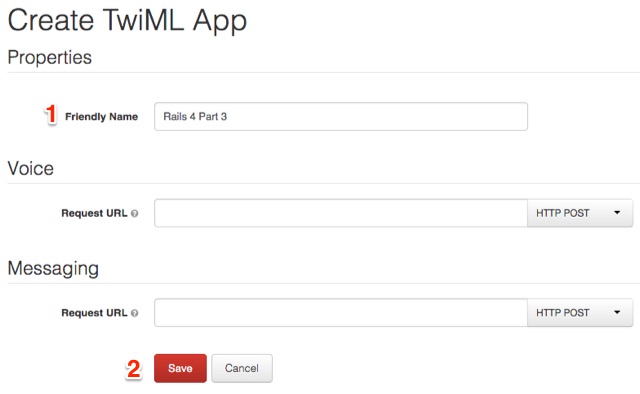
You might notice that this configuration form looks quite similar to the form you fill-out to configure a phone number. In place of a phone number there is a field called “Friendly Name”, which you can think of this as the name of your app. When your app needs to initiate an outbound VOIP call, the Voice Request URL will point to a route in your Rails 4 app that will generate TwiML and tell Twilio what to do regarding that call. Go ahead and fill-in the Friendly Name and click Save. You’ll be taken back to a list of your TwiML apps and the one you’ve created will be at the top. Click on that link for the new app.
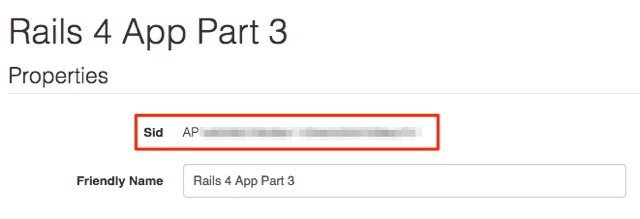
Your TwiML app has a unique identifier called a Sid. Copy the value for that Sid and open up the file config/secrets.yml in your text editor. Add the following highlighted lines.
In your terminal, create a new environment variable to store this value:
Build an Agent View
Now that the TwiML app has been created, let’s turn our attention to creating a view for the customer service agent who is using the web application. Create a new file called app/controllers/customer_service_controller.rb :
This controller defines a single action called agent. At the moment the action simply initializes a hard-coded customer object. In a real application this information would be fetched from a database or queue of customers that require a call back.
Next create a new directory: app/views/customer_service . In this directory, create a file called agent.html.erb :
In config/routes.rb , add the following line:
Start your Rails server and navigate to http://localhost:3000/customer_service/agent to verify that the web page looks like this:
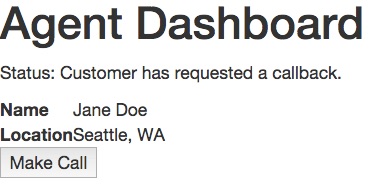
This is the view for our agent and it helpfully displays information (context) about the customer that she is about to call.
If you see the page above, you’re well on your way. If you don’t, make sure to check out the output on the command line from the rails server command. It may have some useful information for debugging the problem. Now let’s get that “Make Call” button to work.
Integrate the Twilio Client JS SDK
The first step when getting started with the Twilio Client JS SDK is to include a JS file. Open app/views/customer_service/agent.html.erb and add the following line to the bottom:
There are two steps to getting an outbound call initiated:
- Initializing the SDK
- Connecting the outbound call
To initialize the SDK, call Twilo.Device.setup. Add a
|
9 10 11 12 13 14 |
The setup method requires a token parameter to be passed-in, we’ll return to that in a minute. To connect the outbound call you call Twilio.Device.connect . Define a function called call that does this:
Ok, we are now done integrating the Twilio Client JS SDK. Let’s discuss this mysterious token.
Generate a Capability Token
In part 2 of this tutorial you learned how to use the Twilio REST API to send outbound SMS and MMS messages. This code required the use of your security credentials (Account SID and Auth Token) but the code was server-side, so you didn’t have to worry about your users sniffing your authentication credentials.
Making a phone call from a browser is a bit different. You want a web page to be able to connect to Twilio and initiate (or perhaps receive) a phone call. But it’s clear that embedding your authentication credentials in JavaScript on the web page is unacceptable. Somehow your Rails app needs to grant the browser the capability of making a phone call without leaking any credentials.
That is where the Twilio Capability Token comes in. A capability token is a JSON Web Token that you embeds one or more capabilities that your app is granting to the browser, for a limited period of time. Creating a capability token is easy, just open up app/controllers/customer_service_controller.rb and add the following lines to the bottom of the agent method:
Dial the Customer
Now that you’ve generated a capability token you have satisfied the requirements for setting-up the Twilio JS SDK. The user’s browser is now authorized to make phone calls. However you now must generate some TwiML that tells Twilio what to do once the VOIP connection is made between the browser and Twilio. In this scenario you want to dial the customer who requested the call back.
Edit app/controllers/twilio_controller.rb . Create a new action called connect_customer :
Please make sure to use your personal phone number in the code snippet above. It will help greatly with testing.
Now, there are three interesting things happening in this action:
- An id parameter is passed-in and we use it to do a lookup in a database of customers.
- TwiML markup is generated that dials a particular customer’s phone number.
- The callerId of this call references a new configuration setting
To create this new configuration setting, open config/secrets.yml and add the following lines.
Create the corresponding environment variable:
Finally, edit config/routes.rb and add the following line:
You can test your progress by starting your Rails server and running the following curl command on your local machine:
You should see the following TwiML document returned:
Connect the VOIP Call
The last thing to do is to return to Twilio.com and edit your TwiML app to point the Voice Request URL to the route you’ve defined to dial the customer. Remember that Twilio needs a publicly-addressable URL, so feel free to use Ngrok as we did in the past tutorials or simply deploy your Rails 4 app to the public internet. Once you have a fully qualified URL for your route (i.e. http://xxx.ngrok.com/twilio/connect_customer ), please paste it into the Voice Request URL field and hit Save.

Now it’s the moment of truth. Navigate to localhost:3000/customer_service/agent and click the “Make Call” button. If you’re using Chrome or Firefox, you will see a browser dialog appear asking for permission to access your microphone. Please click “Allow”.
If all goes well, you’ll hear the message “Hello. Connecting you the customer now.” and then your phone will start to ring. Feel free to have a friend answer your phone and have a chat with them via your web browser.
BOOM! Contextual VOIP in the Browser
In this blog post we explored how to create a contextual VOIP experience using Rails 4. In addition to some core Rails concepts like creating controllers/actions/views, we learned how to:
- Create a TwiML app
- Integrate the Twilio Client JS SDK
- Generate a Capability Token
- Connect the VOIP call
We also just scratched the surface of what you can do with Twilio Client. Here are some fun exercises to build on what you’ve learned:
- Create a new web page that lets the agent answer incoming calls
- Create a new web page that handle a browser-to-browser call (all VOIP)
- Use the audioConstraints parameter to tweak Chrome features like auto gain control
All of the code for this part of the tutorial has been posted to Github. Hope you’ve enjoyed this Twilio on Rails series. Happy hacking!
Related Resources
Twilio Docs
From APIs to SDKs to sample apps
API reference documentation, SDKs, helper libraries, quickstarts, and tutorials for your language and platform.
Resource Center
The latest ebooks, industry reports, and webinars
Learn from customer engagement experts to improve your own communication.
Ahoy
Twilio's developer community hub
Best practices, code samples, and inspiration to build communications and digital engagement experiences.