Update Your ServiceNow Incidents in Real-Time with Twilio
Time to read: 14 minutes
July 28, 2021
Written by

There’s never been a greater demand to provide employees and customers with communication options that meet them on their channel of choice. The demand to provide these users with the tools to do their job from anywhere requires a continual evolution of software services to meet that need head-on.
ServiceNow has continued to grow into a ubiquitous Incident Management Solution for enterprises. Twilio continues to grow into the customer engagement platform of choice for an increasingly overlapping set of customers. We’ve looked at integrating ServiceNow and Twilio through the lens of humility and empathy towards the developers tasked with the integration.
In this post, I will provide you with a real-time, bi-directional incident management framework that integrates Twilio with ServiceNow, including code samples and documentation for both technologies. It is based on an existing proof of concept, can be quickly implemented, and catapult you towards a truly differentiated Incident Management Solution.
ServiceNow and Twilio integrations
This post is Twilio's recommended Walk integration with ServiceNow. You can learn more about the ServiceNow use case on the Twilio website.
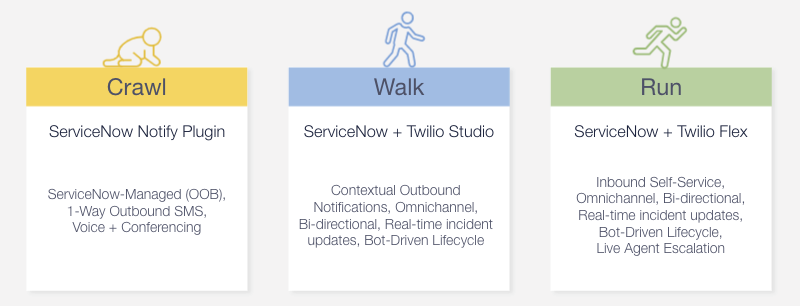
If you only need ServiceNow-Managed 1-Way SMS, Voice, and Conferencing, you can follow our tutorial on how to create a notification system from ServiceNow using their Notify plugin – Crawl.
If you're looking for the most fully-featured Flex and ServiceNow integration, which includes inbound self-service and the ability to escalate to a live agent, see our guide on how to integrate Twilio Studio & Flex with ServiceNow – Run.
Baseline Prerequisites
To walk through this entire blog, you will need the following:
A ServiceNow Developer Instance with read/write access so that you can:
- Create business rules.
- Create users and delegate roles.
- Access Incident Table Form Layout (You may need to update the Incident table layout to include the “assigned to”, “resolution notes”, and “resolution code” fields as part of the POC). For any given Incident, click the hamburger menu icon, select Configure -> Form Layout. Under the “Available” section, find the “Assigned To”, “Resolution Notes”, and “Resolution Code” fields and move it to the “Selected” field in the position of your choice. Then click “Save”.
- Access User Table Form Layout (You may need to update the User table layout to include the “Manager” field as part of the POC). For any given User record, click the hamburger menu icon, select Configure -> Form Layout. Under the “Available” section, find the “Manager” field and move it to the “Selected” field in the position of your choice. Then click “Save”.
A Twilio Account with the following setup:
- At least 1 provisioned phone number (you have 1 by default)
- A Messaging Service where you’ve provided the phone number as a sender in the service; the setup wizard for messaging services will take you through this.
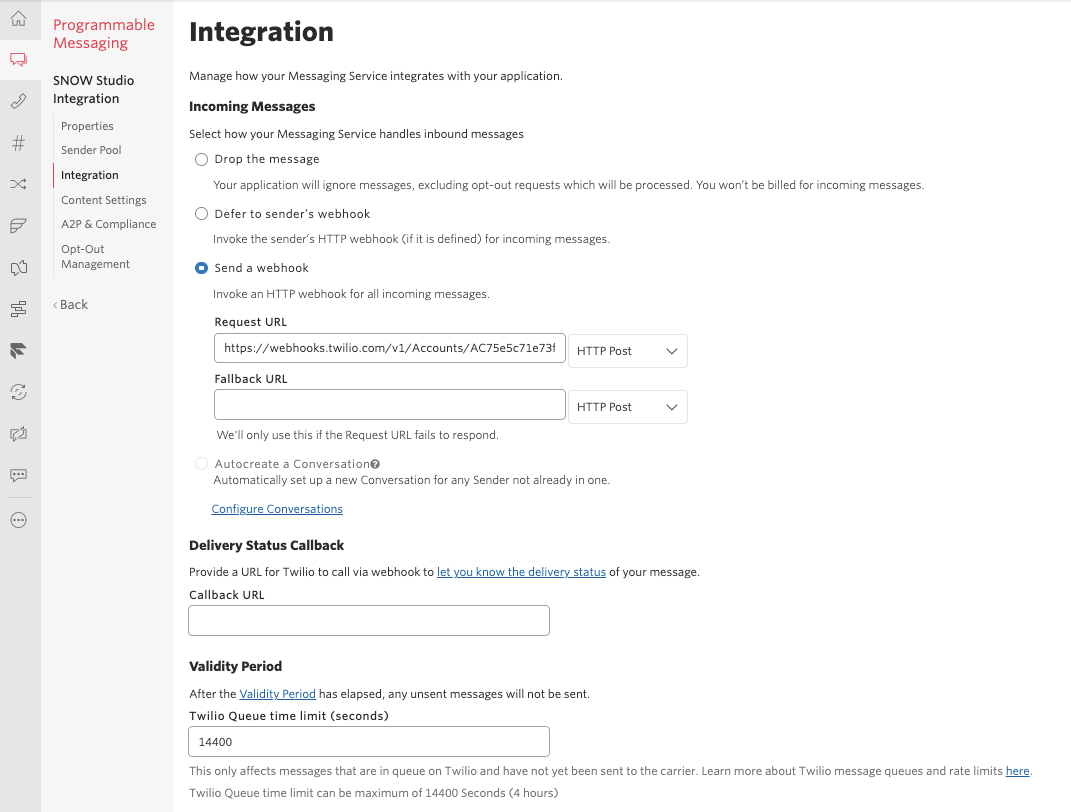
- In addition to step 2, you will need to set the “Send a webhook” Request URL in your Messaging Service to be the Webhook URL of your Twilio Studio Flow. For now you can leave this blank and we will come back to this in the Studio Flow setup.
As we continue on with the steps below, you can reference my GitHub repository at any time.
Above and Beyond Simple Notifications
ServiceNow is quite capable of providing meaningful solutions to outbound notifications using Twilio. They’ve long had a managed solution called “Notify” that provides outbound SMS capabilities and voice conference calling capabilities. To highlight these great features, I’d suggest reading my colleague Al Kiramoto’s blog post.
That said, when you want to meet your customers or employees on the channel of their choice—and provide the highest fidelity experiences for them to engage with ServiceNow Incidents—a more robust integration with Twilio will get you there.
ServiceNow Business Rules is where we will start that journey. Thus, it’s time to login to your ServiceNow Developer account and your Twilio Developer Account so we can get started spinning up this POC!
ServiceNow Business Rule Setup
As a general overview, Business Rule setup is pretty straightforward for most use cases: you specify a rule to run when an action occurs. But ServiceNow has an “Advanced” flag that allows you to tap into the scripting engine of ServiceNow for Business Rules.
Through the scripting engine, you can script API calls to third party services to perform actions. What's more, within that Scripting engine, ServiceNow’s Rest Message API allows you to script Restful API calls to third party services. This is where you’ll make the connection from ServiceNow to Twilio.
Simply put, you can script an outbound API call to Twilio’s Studio Execution API endpoint, and pass data with that API call (e.g., incident data such as description, name, and urgency, etc) in the context of an Incident that was just opened in ServiceNow.
With that said, we know scripting can be cumbersome. So for this POC I’ve created a baseline example for you, so that you don’t have to trip over syntax issues. I’ve also provided comments in the script so that you understand what is happening, as well as where you need to plug in your own Twilio variables to configure it.
The image below shows you the Business Rule configuration I used for the POC. Notice in the “When to Run” tab, that the rule runs after an insert occurs on the Incident table (i.e., When an incident is created) if the urgency is “1-High”.
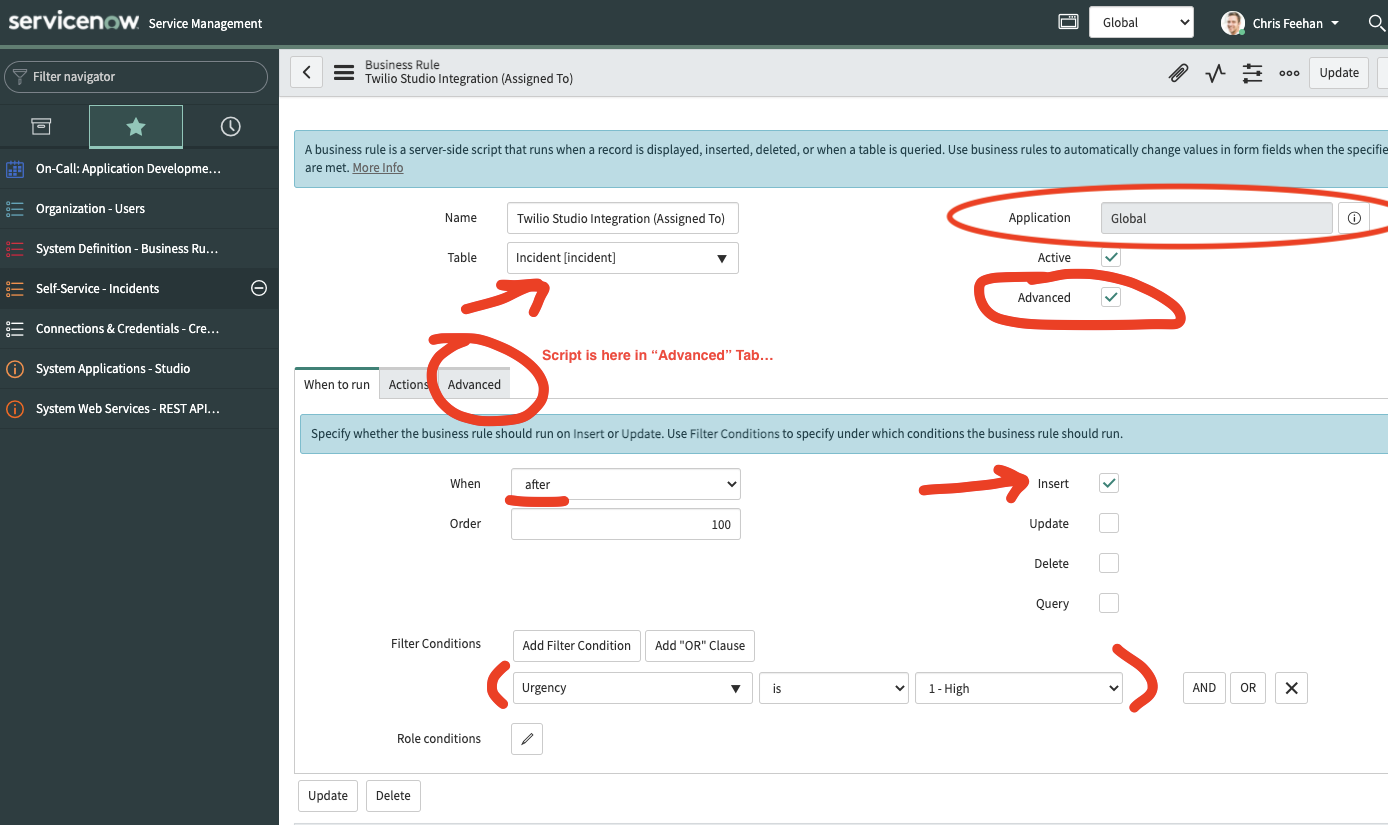
The “Advanced” tab is where we add the script. Here’s a direct link to my POC script from my GitHub repo. Copy the script and paste it into your Business Rule.
As denoted in the script, you will need the following Twilio variables to replace the script's placeholders:
- Your Twilio Account SID and Auth Token, which can be found on the Console dashboard (alternatively you could use API Keys).
- Your Messaging Service SID, which can be found here.
- Your Twilio Voice Number (you can obtain one here). Alternatively, you can add a Verified Caller ID if you want to use your own number to place calls.
- Your Twilio Studio SMS Assignee Flow SID (I will cover where you can find this in the Twilio Studio setup below - just save the script for now and we’ll come back to this).
Twilio Studio Flow Setup
With contextual data being passed to Twilio, our platform has the power of programmability to take that data and mold it to fit your business cases, as granularly as you need it. I’ve provided a working sample of a Twilio Studio Flow that takes this contextual data and creates a personalized, bot-driven experience with the end user, whether that be an internal employee assigned to work and resolve the incident or a customer looking for updates on where the incident status is at.
The idea here is that you can build real-time, incident lifecycle management in a way that meets your customers or your employees on the channel you’re most likely to reach them on. You also afford them the flexibility to stay on that channel to interact (if they aren’t near a computer to login to the back office), all while updates are synchronized to ServiceNow in the background so that back office employees can see updates happen in real time and provide updates themselves as needed.
With that said, here are the steps to setup Twilio Studio for this example. You will also update your ServiceNow Business Rules script as part of these steps.
- Log in to Twilio Console and navigate to All Products > Runtime > Studio.
- Follow this guide for importing my flows. You only need to import the “assignee” flows for this POC (which includes both the SMS and Voice flows).
- Once imported, you will be brought to the Editor UI for the Studio Flow. Click on the “Trigger” widget box and copy the “Webhook URL”.
- Navigate to your Twilio Messaging Service from the Twilio Console. You now can paste the Webhook URL which you just copied from the Studio Flow into the “Request URL” field, as mentioned in the Baseline Pre-requisites step 2C above.
- From the Studio Dashboard, grab the SID of the SMS Flow and copy it.
- Head back to your ServiceNow Instance and update the Business Rule script, by pasting the SID where the script says “[YOUR STUDIO SMS ASSIGNEE FLOW SID]”.
- From the Phone Numbers Dashboard, grab the number you want to use as your voice number and copy it.
- Head back to your ServiceNow Instance and update the Business Rule script, by pasting the phone number where the script says “[YOUR TWILIO VOICE NUMBER]”. The phone number needs to be in E.164 format, e.g. +17778889999.
Keep in mind that you won’t be able to publish your Studio Flows quite yet. They will need to be updated after you upload your Twilio Functions in the next step. Just save the flows for the time being.
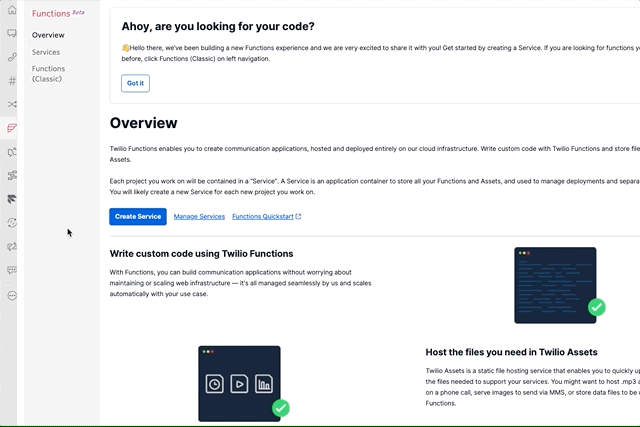
Twilio Functions Setup
Once you’ve imported the Studio Flow, you will be ready to hook that flow up to my POC Twilio Function scripts, which you can find here.
With Twilio Functions, you have 2 pathways to upload and host those functions on Twilio. You can either upload them directly to either classic Functions or V2 Functions, or you can use the Twilio Serverless Toolkit which provides a CLI option. There are pros and cons to consider that are out of scope for this blog. So please read the links provided if you’d like to consider the CLI option.
For the purposes of this post, let’s upload them manually from the Functions V2 dashboard by doing the following.
- Click “Create Service”.
- Specify a Service Name of your choice and click “Next”.
- Click the blue “Add” button and specify to “Add Function”.
- Provide a pathname for your function (eg. “/addComment”).
- Copy and paste the code from the add_comment.js function into the editor and click “Save”.
- Repeat steps 1-5 for the other functions in the repository.
- Mark all of your functions as “Protected” instead of “Public”.
Use the CLI if you prefer. Instructions are in the README.
My function scripts specifically use axios as a Node.js HTTP client to make HTTP calls to ServiceNow for CRUD operations. If you want to use axios, you will have one extra step to add it to your Function dependencies, as shown below in the V2 example. Also, make sure that your twilio version is up to date.

You will also need to update the environment variables for Twilio Functions to include the ServiceNow API endpoint and credentials required to send updates back to ServiceNow; I’ve included an example that you can reference. At a minimum, you only need 4 variables, so the setup should be quick and easy.
I’m using 6 variables, because I’m using API Keys for my Twilio Credentials, but you can leverage your Twilio Account SID and Auth Token as an alternative if you wish, and those are already included by default in your Twilio Function Environment Variables (see screenshot below).
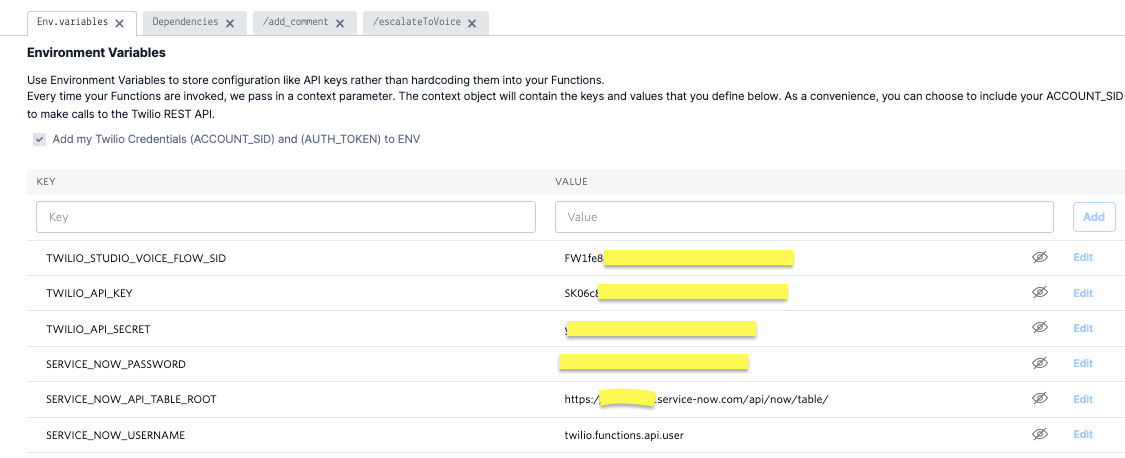
The 4 ServiceNow variables are self-explanatory. One is the Restful API endpoint for accessing ServiceNow Tables (Replace the domain with your ServiceNow instance domain). Two others are the ServiceNow username and password associated with a user with rights to make API calls. Lastly, there’s a Twilio Studio Voice Flow SID that will point to my voice flow that you imported in the Twilio Studio Setup Step #2 above.
In my example, for the ServiceNow username and password, I created a “Twilio Integration” user with web service access only, as denoted in ServiceNow’s user configuration. I gave it a user ID of “twilio.functions.api.user” and supplied a password.
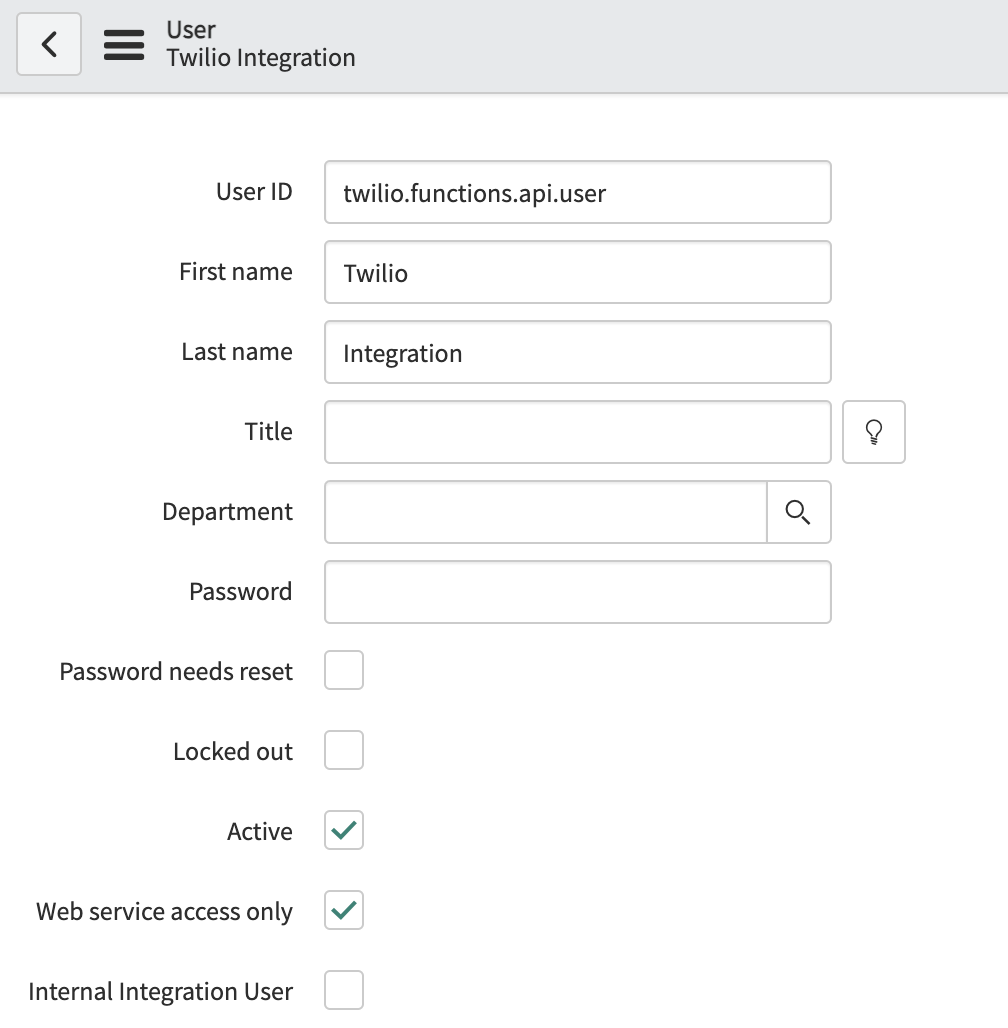
This user will need the roles appropriate to make outbound Restful API calls to the ServiceNow tables it needs to access. For our baseline implementation, this only includes the Incident and sys_user tables in ServiceNow.
As you eventually go beyond this POC to tailor my example to your specific use case, you may find that you need to query additional tables and provide additional roles to the web service user to allow for this. I completely expect this to be the case. With this POC, you will have the knowledge and experience to make those iterations with a roadmap that I’ve laid out for you here.
Once you have your web service access user all setup on the ServiceNow side, you can plug those credentials into your Twilio Functions environment variables.
After updating your environment variables, you can now head back to Twilio Studio and update all of the Run Function widgets in the Flow to point to the appropriate Twilio Functions.
As an example, I’ve shown my update to the “CommentToServiceNow” Run Function widget below. You would do this for each Run Function widget and select the appropriate Function.
Real-Time, Bi-Directional Incident Management - A Demo!
Ok, so you’ve now got ServiceNow and Twilio configured. Congratulations! Now we get to the fun part: running a live demo of this POC! Let’s get this show on the road.
Make sure you are logged into both your ServiceNow and Twilio instances. From ServiceNow, navigate to the Users table. We’ll need 3 users to test with. You can either use any of the default test users, or your own users if you already have them or want to create them fresh.
- The first user will be the “Caller”, i.e., the customer that has the issue that will be logged as an Incident.
- The second user will be the assignee to work the Incident.
- The third user will be the manager of the assignee.
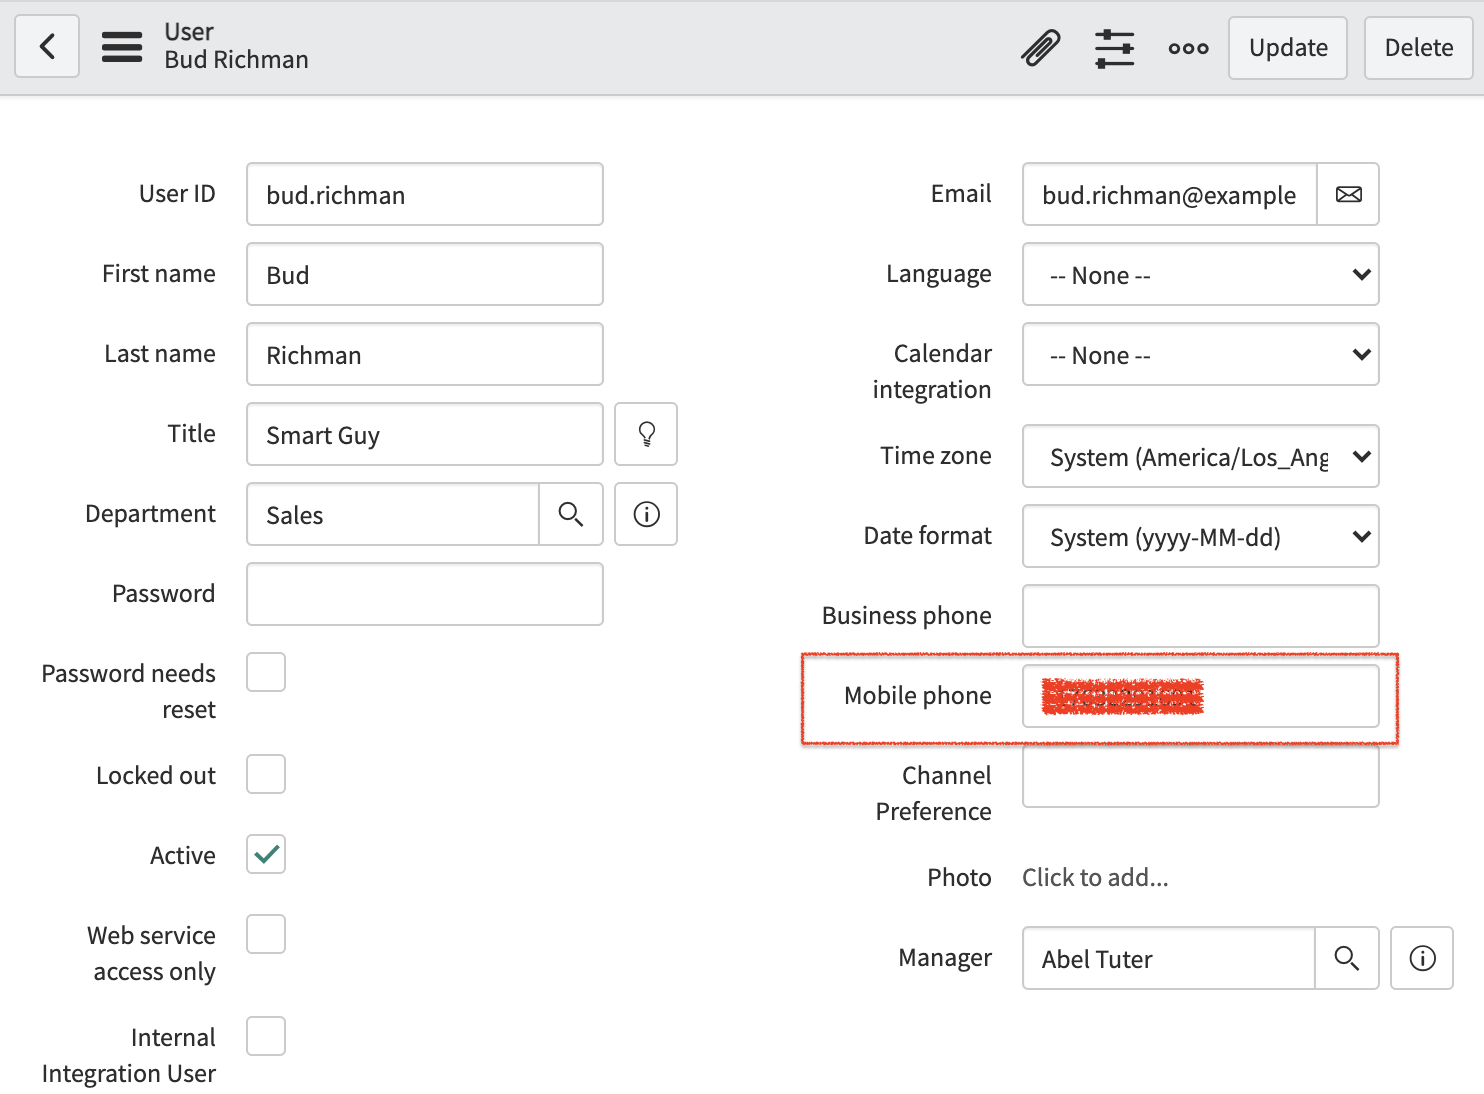
All 3 users can have the same or different user data. It doesn’t matter. The only fields that matter for this POC are the “Mobile Phone” and the “Manager” fields of the assignee user (recall from the Baseline Prerequisites section #1C above that you should have added the “Manager” field to the User record layout).
The assignee user will need to have your cell phone number added as the “Mobile Phone” field in their User record The “Manager” field should be populated with the third user mentioned above.
In the example below, I’ve used the mock user "Bud Richman" from my developer instance, added my cell number to the Mobile Phone field, and set another mock user, “Abel Tutor”, as the Manager.
Make sure the phone number is in E.164 format, e.g. +17778889999.
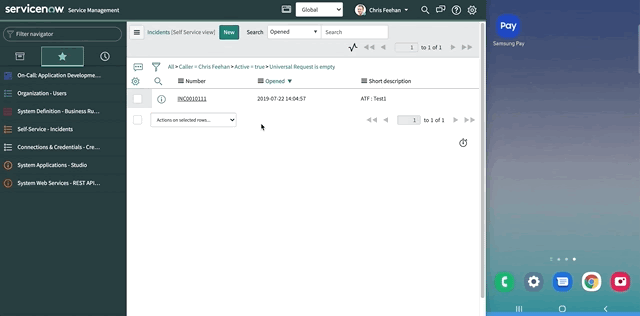
Now we’re set to create an Incident that will kick off our Business Rule. From the ServiceNow console, navigate to Self-Service -> Incidents, and click the “New” button. Then follow these steps to create the Incident:
- Set the “Caller” to the first user.
- Set the Urgency to “1-High” (remember this is our Business Rule filter).
- Set the “Assigned to” to the second user (i.e., the one you configured your cell phone for).
- Set the “Manager” to the third user.
- Set the “Short Description” to be whatever you want that would indicate a high urgency,
- Click “Submit” to submit the Incident.
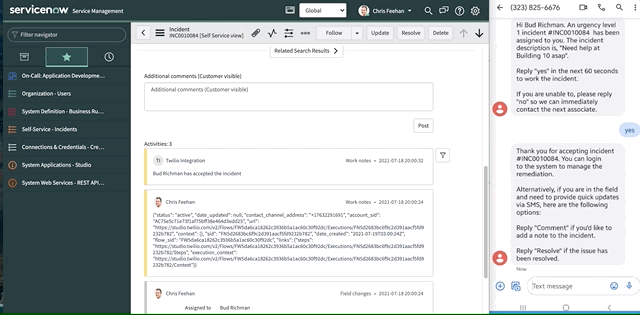
Once the Incident is created, you should receive an SMS on your mobile phone.
From here, you will have a limited time to respond to the incident via SMS, otherwise an escalation to a voice call to your cell phone will be made to try to contact you. I’ve configured the time in Twilio Studio to be 60 seconds, but you can adjust this for the POC as you see fit.
Let’s start with the assumption that you are the assignee and that you respond to the text in time, replying “Yes” to acknowledge that you are taking the incident. If so, ServiceNow will automatically be updated with the status: “[USER] has accepted the incident”.
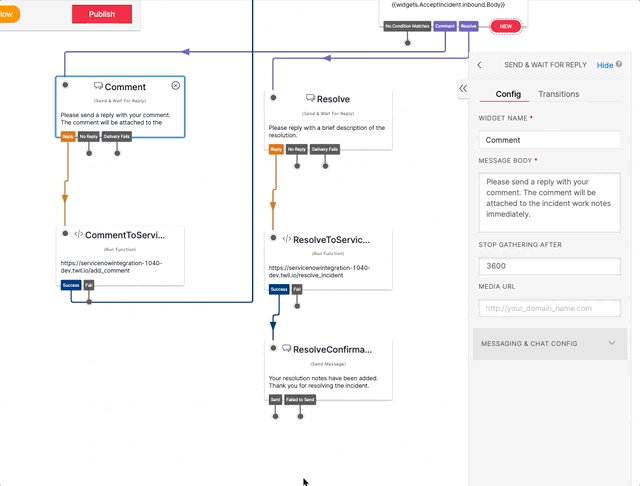
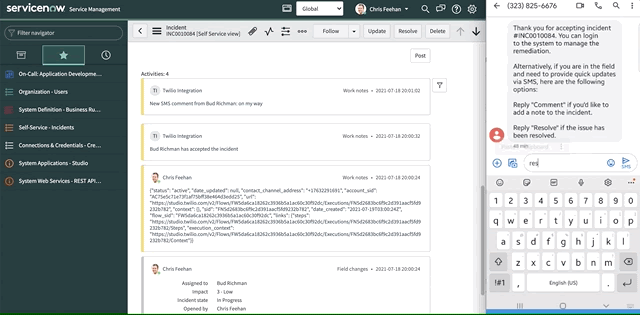
Subsequently, as the assignee, in this POC you can type “Comment” or “Resolve” to send an update back to ServiceNow directly over SMS. An example of this is shown below.
In this example, you can also add as many comments as you need before Resolving the incident. Each comment will be updated in ServiceNow in real-time as shown below.
After adding one or more comments, you can “Resolve” to resolve the incident. You then provide a description of the resolution, which will update the Incident to be resolved and add a resolution note.
If you’ve made it this far, congrats! You’ve successfully done your first bi-directional incident management POC using SMS with Twilio and ServiceNow!
You’ve now seen how you can use Business Rules to trigger an outbound notification to an assignee through Twilio, and then, as that assignee, add comments to and resolve the ticket via SMS, without ever needing to login to ServiceNow.
You could (and should) also test the escalation to a phone call and answer the call. Remember that to simulate this with the POC you just need to wait 60 seconds from the time the initial SMS from the Incident is sent. Then, you should receive a phone call if you do not respond to the SMS. From here, you’ll be greeted with an IVR where you can enter keypress inputs as directed by a Twilio Voice Bot. When prompted, your voice input will use Twilio’s speech-to-text, which will update ServiceNow in real time, just like you saw for SMS, but with Voice!
These examples may or may not be relevant to your actual use case or desired functionality, but the pieces are now in place for you to be able to manipulate this example and tailor it to your needs.
Beyond the POC - Tips to Tailor to your Specific Needs
You’ve taken the time to play around with the POC and run through the different scenarios I’ve built. Now you want to start tuning and manipulating the solution to fit with your needs, but want to know how to best get started doing that?
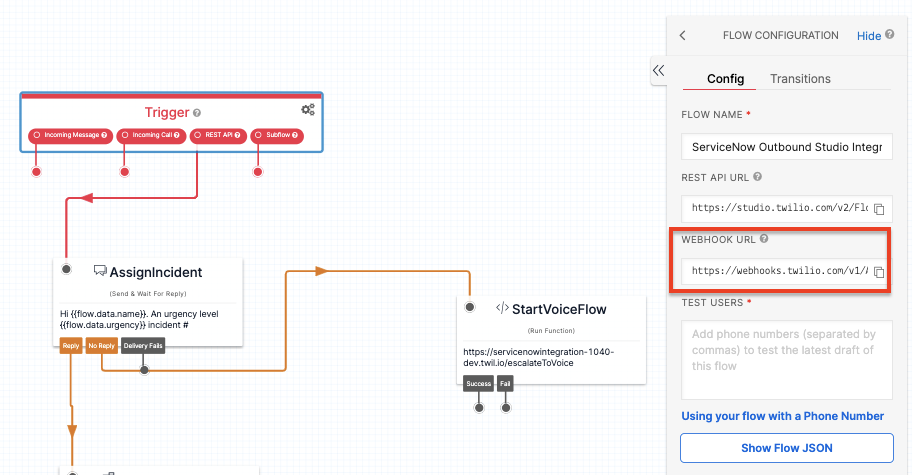
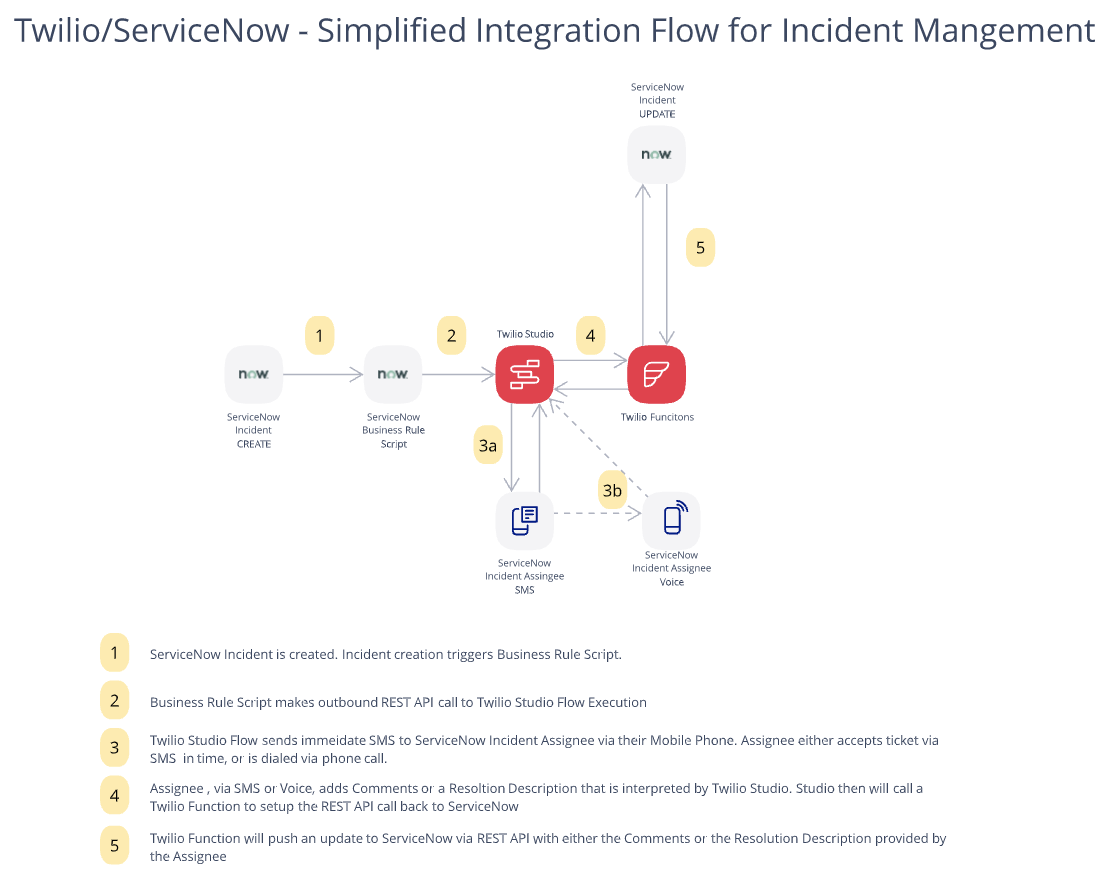
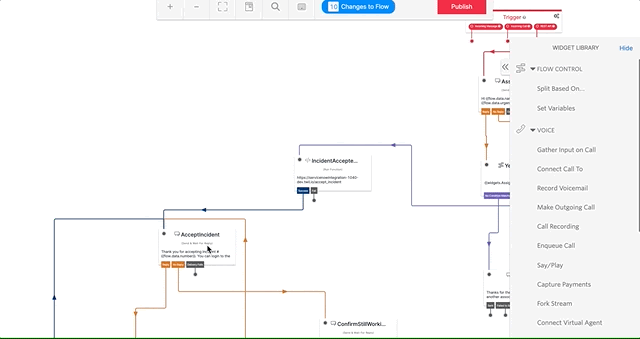
The flow diagram below gives a high-level glimpse into the flow of the POC solution, which should give you a sense of which components you need to update, depending on what iterations on the POC you want to make.
So, for example, let’s say you have more custom data that you want to send along to Twilio that isn’t currently passed in the POC. Or maybe you don’t actually need some of the data passed in the POC and want to remove it.
Well, the first thing you would need to do is update the Business Rule as part of Step #1 in the flow above. To do so, you could, for example, add additional context as provided in the “current” object that is part of the script’s current scope, (i.e. the Incident creation). Alternatively, you could take the data in context and make additional calls to additional tables if you needed additional data to send along. Here’s a Business Rule Scripting Developer Guide that you might find useful as you explore making changes that fit your business.
Below is an example of simply adding the Incident “State” as a variable in the script that would be then sent via the Restful API call to Twilio Studio. From Studio then you could use the liquid template language to make reference to that data (ie. `{{flow.data.state}}`) in one of the SMS or Voice widgets if you wanted to inform the assignee of the current state of the incident.

How about if you want to change the text messages or the text-to-speech (on voice calls) to better fit your use case vs. what the POC provides? In this case, you can edit your Twilio Studio Flow to do things like add/remove widgets to perform additional checks with the assignee, or modify the templates that are setup to change the verbiage or specify additional options.
Below is an example of adding a “Status Check” option to pull the latest status of the Incident from ServiceNow. This change to the “Send and Wait for Reply” widget would follow with an update to the subsequent Split Widget. Then, an additional Twilio Function would make an API call to ServiceNow to retrieve the status and present that status back to the assignee.
What if you wanted to change how the updates to ServiceNow from Twilio were presented in the Incident record? This is where you could go to Twilio Functions and update, add, and remove, etc. the specific logic tied to updates back to ServiceNow.
In the example below, maybe you simply want to change the way adding work notes via comments works by parameterizing the entire message. In this case, you could edit my example and tailor it to your needs and save the changes. The updates should reflect immediately.
Now the Real Work Begins. But How Daunting is it Really?
So now you’ve run through a demo and also have a roadmap for how you can iterate over the POC I’ve provided in this post. You may have already made some minor changes here and there in a matter of minutes just to confirm you’re ready and able to start to build off this POC.
Now the real work begins to build an integration that works for you and your business. But is it really as daunting now that you have the means to manipulate the POC and have a general understanding of the pieces that make up the integration?
My hope is the answer to that question is a resounding “NO!” I also hope that you feel a renewed sense of confidence and empowerment. While there will be challenges ahead of your development that I didn’t explicitly cover, you will have this post as a springboard into developing and tuning an Incident Management solution with ServiceNow and Twilio. It will wow your leadership and show that there’s differentiation in this approach that can be a win for employees, customers, and your business overall.
A Step Further - Building support for Inbound and Live Agents
If you want to go even one step further beyond the scope of this post into providing escalation to a live ServiceDesk agent in ServiceNow, or adding support for inbound communications, not just outbound-initiated, we’ve dedicated an entire blog post for you to get started, as well and building on what you’ve accomplished here.
If you'd like to go a step further, see this blog post from my colleague Dirk Nielsen on Integrating Twilio Studio/Flex with ServiceNow.
Related Resources
Twilio Docs
From APIs to SDKs to sample apps
API reference documentation, SDKs, helper libraries, quickstarts, and tutorials for your language and platform.
Resource Center
The latest ebooks, industry reports, and webinars
Learn from customer engagement experts to improve your own communication.
Ahoy
Twilio's developer community hub
Best practices, code samples, and inspiration to build communications and digital engagement experiences.