Receive SMS Messages with A LinkIt ONE using Programmable Wireless, AWS IoT and Lambda

June 21, 2017
Written by
Paul Kamp
Twilion
Reviewed by
Kat King
Twilion

LinkIt ONE Receive SMS

Want to receive - and react to - SMS and MMS messages on a LinkIt ONE?  We'll help you do just that today, using Twilio's Programmable Wireless and Amazon Web Services' IoT, API Gateway, and Lambda.  Upon receiving an incoming SMS or MMS, a Twilio number will trigger a Webhook that sets our infrastructure in motion.

If you haven't done so yet, run through our guide on sending SMS or MMSes with the LinkIt ONE and Twilio Programmable Wireless.  We'll be building on top of the same infrastructure in this post, and will assume you have it in place.  As before, this code will work with either Programmable Wireless or WiFi.

Already ran through the last guide?  Awesome, let's let the LinkIt talk back!

Building Infrastructure to Receive Incoming Messages 

We're going to turn the architecture from the sending article on its head for this objective.  Now, when Twilio receives and incoming message, it will post to an endpoint you expose with API Gateway.  API Gateway will trigger Lambda, which we will give permission to post directly to the twilio topic on MQTT.

LinkIt Receive Messages Infrastructure

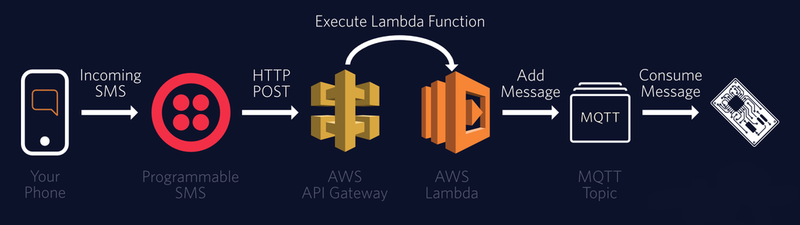
Remember, the LinkIt ONE is already subscribed to the MQTT twilio topic; we simply need to add some business logic which reacts to incoming messages.  We can then respond in the same way we did in the sending guide - by using the Lambda send message function.

Mock an API Endpoint with AWS API Gateway

We’re going to use Amazon’s API Gateway to expose the endpoint Twilio will hit when it sees incoming messages.  

There are quite a few steps here, so we've condensed them for you to take it a step at a time:

  • Go to the API Gateway console
  • Create a new API in the same AWS region as IoT and the first Lambda function from the previous post
  • Name it ‘Twilio-to-IoT’ and enter a description
  • You’ll now be redirected to your new API’s ‘Resources’
  • In the ‘Actions’ menu, select ‘Create Resource’
  • Name it ‘Messages’ and check the ‘Resource Path’ is ‘/messages’:

AWS New Child Resource
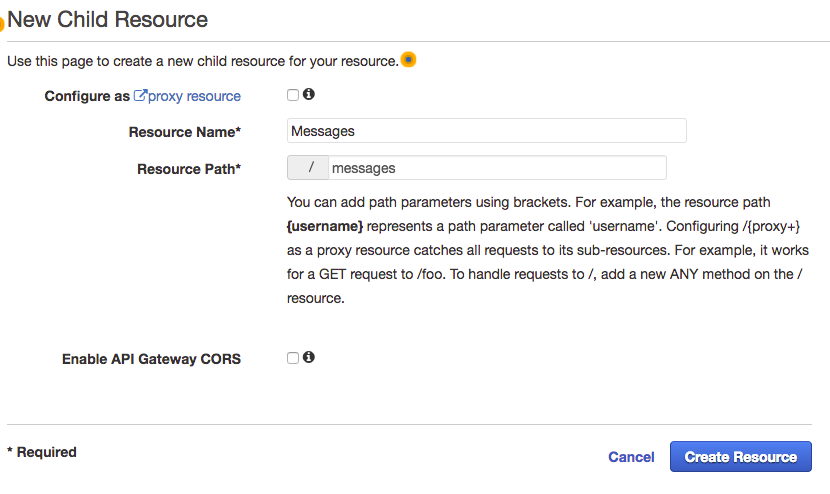
  • Create ‘/messages’ by hitting the blue 'Create Resources' button
  • In the ‘Actions’ menu, select ‘Create Method’, then ‘POST
  • Click the tiny checkbox next to POST. In the ‘Integration Type’ select ‘Mock’
  • You’ll then be redirected to a screen that looks like this:

API Gateway Method Execution
  • In the ‘Actions’ menu, select ‘Deploy API’
  • Create a new stage and name it ‘prod’ (and any description)
  • Deploy your mock API Gateway to prod
  • Next, you’ll be redirected to the prod stage editor (if not, it’s under your API in ‘Stages’)
  • Click 'POST' under messages
  • Find the ‘Invoke URL’ at the top of the page and copy it somewhere safe; that is the endpoint we will eventually use with Twilio's webhook

Invoke URL API Gateway

Great stuff!  You've not got a mock endpoint set-up.  We'll eventually return here to add the logic we need to receive and reply to Twilio, but for now, you're done.  Next, we're going to move on to Lambda.

Create a New Amazon Lambda Function

In the sending messages article, we created a simple function which POSTed to Twilio after receiving carefully constructed MQTT messages.  For receiving messages, we're going to do roughly the opposite, and forward incoming messages back to the LinkIt over the same channel.

Again, this is quite a few steps, so we've condensed them to make them easier to follow.

Here's a look at receiving messages:

"""
Very simple example of how to forward incoming Twilio webhooks to your IoT
devices using Lambda to publish to MQTT topics.

As a webhook comes in, we'll verify the webhook is from Twilio then extract the
key information and send to our IoT device(s) subscribed to the 'twilio'
topic.  Those devices will then presumably handle the information and react,
perhaps by sending a message back.
"""
from __future__ import print_function

import json
import os
import boto3
import urllib
from twilio.request_validator import RequestValidator

def twilio_webhook_handler(event, context):

    print("Received event: " + str(event))
    null_response = '<?xml version=\"1.0\" encoding=\"UTF-8\"?>' + \
                    '<Response></Response>'

    # Trap no X-Twilio-Signature Header
    if u'twilioSignature' not in event:
        print("NO HEADER")
        return null_response

    form_parameters = {
        k: urllib.unquote_plus(v) for k, v in event.items()
        if k != u'twilioSignature'
    }

    validator = RequestValidator(os.environ['AUTH_TOKEN'])
    request_valid = validator.validate(
        os.environ['REQUEST_URL'],
        form_parameters,
        event[u'twilioSignature']
    )

    # Trap invalid requests not from Twilio
    if not request_valid:
        print("NOT VALID")
        return null_response

    # Trap fields missing
    if u'Body' not in form_parameters or u'To' not in form_parameters \
            or u'From' not in form_parameters:
        print("MISSING STUFF")
        return null_response

    # Don't let through messages with > 160 characters
    if len(form_parameters['Body']) > 160:
        return '<?xml version=\"1.0\" encoding=\"UTF-8\"?>' + \
               '<Response><Message>Hey, keep it under 160</Message></Response>'

    # Now we package up the From, To, and Body field and publish it to the
    # 'twilio' topic (or whatever you have set).  Boto3 lets us easily publish
    # to any topic in a particular region, but ensure you have correctly set
    # permissions for the role.  'iot:Publish' needs to be included for these
    # next lines to work.

    aws_region = os.environ['AWS_IOT_REGION']
    aws_topic = os.environ['AWS_TOPIC']
    client = boto3.client('iot-data', region_name=aws_region)

    client.publish(
        topic=aws_topic,
        qos=0,
        payload=json.dumps({
          "To": form_parameters[u'To'],
          "From": form_parameters[u'From'],
          "Body": form_parameters[u'Body'],
          "Type": "Incoming"
        })
    )

    # A blank response informs Twilio not to take any actions.
    # Since we are reacting asynchronously, if we are to respond
    # it will come through a different channel.
    #
    # Even though we aren't responding to the webhook directly, this will all
    # happen very quickly.
    return null_response

As a message comes in from Twilio, we quickly do some checks for validity, message size, and the like. On an embedded platform you'll want to do a lot of this on the server.

Of special note, you can see we're checking for the existence of the X-Twilio-Signature header.  This signature is a hash of the POSTed form plus your API Secret, which you can find in the Twilio console.  See more about how Twilio helps you secure incoming requests.

Let's continue the build!

  • Change ‘Code entry type’ to ‘Upload a .ZIP file’ and upload the ZIP file
  • Set the following FOUR environment variables:
    AUTH_TOKEN (from the Twilio Console)
    AWS_TOPIC (set this to twilio, no quotes)
    REQUEST_URL (use the Invoke URL from API Gateway we called out above)
    AWS_IOT_REGION (use the region your LinkIt IoT resides in, e.g.: us-east-1 or us-west-2)
  • Set ‘Handler’ to ‘twilio_functions.twilio_webhook_handler’
  • For ‘Role’, create a new role and use the IoT Button template (remember what you name this role, you'll need it later)

For now, that's all you'll need to do on the Lambda side.  However, we're not quite finished with this specific functionality. You need to give a user some new permissions.

As you can see in the code, at one point we do this:

    aws_region = os.environ['AWS_IOT_REGION']
    aws_topic = os.environ['AWS_TOPIC']
    client = boto3.client('iot-data', region_name=aws_region)

    client.publish(
        topic=aws_topic,
        qos=0,
        payload=json.dumps({
          "To": form_parameters[u'To'],
          "From": form_parameters[u'From'],
          "Body": form_parameters[u'Body'],
          "Type": "Incoming"
        })
    )

We're using the boto3 package and trying to publish directly to the twilio MQTT topic in whichever region you set in the environmental variables.

However, if you ran this now... you'd have no luck.  Let's fix that.

Grant Your Code More Permissions with IAM

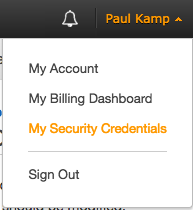
Go to IAM by using the 'My Security Credentials' in your name pulldown (top of the screen):

IAM Credentials
  • Click on the 'Roles' link on the left
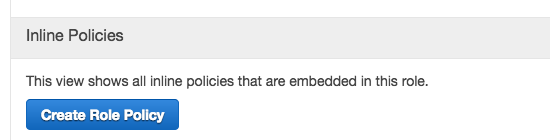
  • Find the role you made for the Lambda function and click on it to make it active
  • Click on the 'Create Role Policy' button under 'Inline Policies':

Inline Policy Creation
  • Pick ‘Custom Policy’ 
  • Here’s the policy to use:
{
   "Version": "2012-10-17",
   "Statement": [
       {
           "Effect": "Allow",
           "Action": [
               "iot:Publish"
           ],
           "Resource": [
               "*"
           ]
       }
   ]
}
  • Name it with your choice of name (you won't come back to it) and save it

And with that, Lambda can now publish to the twilio MQTT topic.  Let's return now to API Gateway and build out our mock API.

Fully Build Out Your API in API Gateway

By default, API Gateway is made to handle JSON data.  Twilio expects, however, to be able to POST form data and to receive XML in the form of TwiML.  These next steps will both ensure our Lambda function is called, as well as change the API Gateway defaults to handle form POSTs as well as XML.

Ready to dive in?  We've carved up the steps for you to follow once again.  Start by heading back to the API Gateway Console.

  • After logging in (if necessary), click 'Resources' under your API:

API Gateway Resources
 
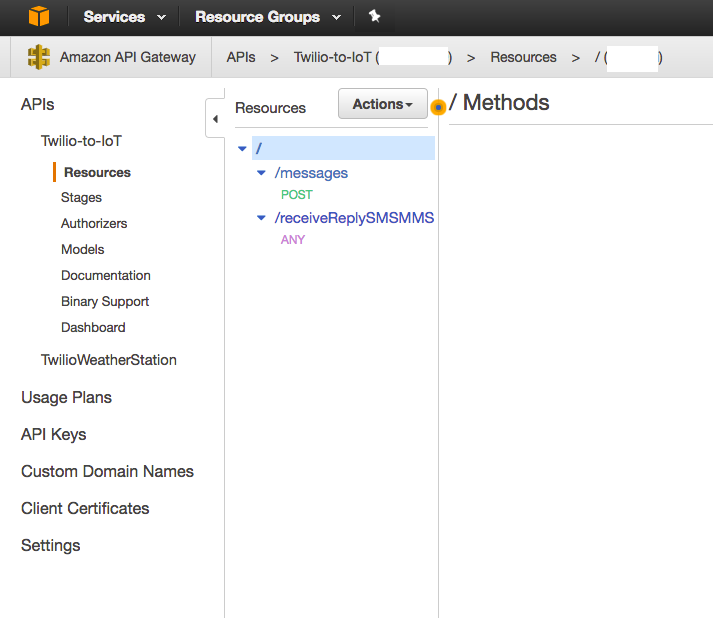
  • Click the ‘ANY’, in purple, which was automatically added by Lambda with the name of the function 
  • In the ‘Actions’ menu, choose ‘Delete Resource’
  • You’re now in the same place as the original Mocked API

Add a Lambda Integration (Integration Request)

At this point, we need to add back the Lambda integration.

  • Click ‘Integration Request’ and change the ‘Integration Type’ to Lambda function
  • Select your region and function
  • Click 'Save'
  • Click through the 'overwriting' prompt
  • Next, click the right arrow to expand the ‘Body Mapping Templates’
  • Delete any body mappings that currently exist (e.g.: application/json)
  • Add a new body mapping for: application/x-www-form-urlencoded
  • Add this as the body mapping template:
#set($httpPost = $input.path('$').split("&"))
{
"twilioSignature": "$input.params('X-Twilio-Signature')",
#foreach( $kvPair in $httpPost )
#set($kvTokenised = $kvPair.split("="))
#if( $kvTokenised.size() > 1 )
  "$kvTokenised[0]" : "$kvTokenised[1]"#if( $foreach.hasNext ),#end
#else
  "$kvTokenised[0]" : ""#if( $foreach.hasNext ),#end
#end
#end
}

Here we’re taking every POSTed parameter and mapping it to JSON to pass to Lambda.  In Lambda, you'll recall, we use the POSTed parameters to validate requests are from Twilio.

  • ‘Save’ the template
  • Click the back arrow ‘Method Execution’ at the top

Pass Through the X-Twilio-Signature Header (Method Request)

To validate incoming requests, we need to pass along the X-Twilio-Signature header as discussed above.  Let's add that now.

  • Click ‘Method Request’
  • Expand ‘HTTP Request Headers’
  • ‘Add header’ and add the header ‘X-Twilio-Signature’
  • Save that and return to the main screen with the ‘Method Execution’ link

Add XML Support to Your API (Integration Response)

When Twilio hits your endpoint, it expects XML in return.  Now, let's modify the API to return that XML.

  • Click ‘Integration Response’.
  • Expand the right arrow by clicking on it
  • Delete anything that exists in the ‘Body Mapping Templates’ area
  • Click ‘Add mapping template’ and add ‘application/xml’.  
  • For the template itself, use:
#set($inputRoot = $input.path('$'))
$inputRoot

We are simply passing along all data with this template, echoing inputRoot into the body.  This lets us write XML directly into the body without API Gateway attempting to rewrite anything.

  • Click the ‘Method execution’ link to return to the main API screen

Continue XML Support (Method Response)

There is one last step for our XML. We need to return application/xml when we give the all clear 200.

  • Click ‘Method Response’
  • Modify the ‘Response Body' for 200 to be ‘application/xml’.
  • Go back to ‘Method execution’ by clicking the link at top

Almost done now!

Deploy Your API

There is just a single API Gateway objective left - deploying!

  • In ‘Actions’, scroll down to ‘Deploy API’
  • Deploy it to prod
  • Copy the ‘Invoke URL’ to your clipboard

Make sure that you have copied the URL to the clipboard.  The last step is with Twilio itself; we're going to paste that URL into the Webhook and test the integration!

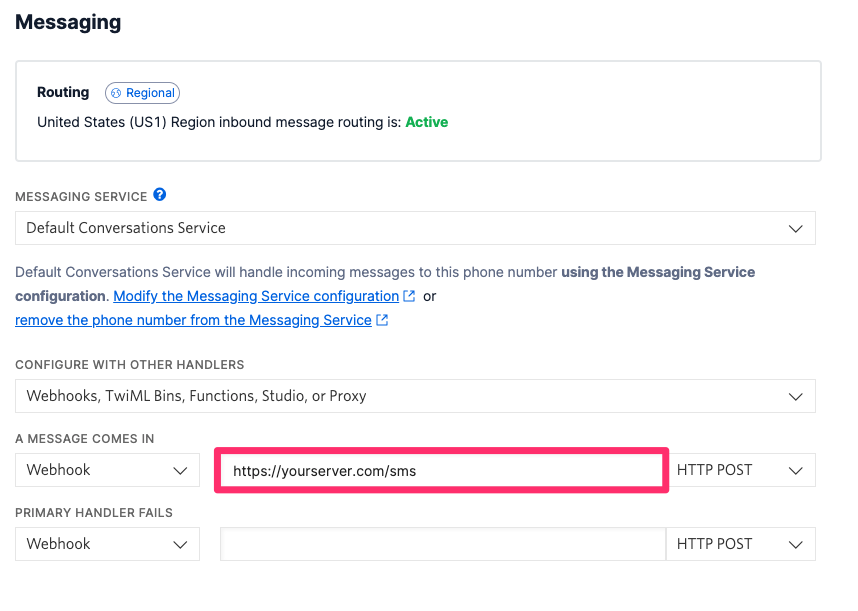
Set Up Your Twilio Webhook

The last step is to change the behavior of one of your Twilio phone numbers in the console.  We will set the message webhook to the URL you copied in the above step.

  • Go to the Twilio Console now
  • Click the ‘#’ icon to see the numbers you own
  • Pick - or buy - a number which handles MMSes and SMSes (or just SMSes, depending on what you plan to send) 
  • Paste the execution Invoke URL from API Gateway in the ‘Messaging’ Webhook:

Configure a Webhook

And that's it!  Power cycle your LinkIt and wait for it to connect to AWS IoT.  

Then text it something like 'Racecar'.

C'mon, you know you want to...

Editor: We pasted all the files you'll need in full in this post when we migrated it to the Twilio Blog. You'll need to compile the following three files for the LinkIt ONE to work with this example:

  • TwilioLinkItHelper.cpp
  • TwilioLinkItHelper.hpp
  • linkit-one-aws-twilio-demo.ino
/*
 * Twilio send and receive SMS/MMS messages through AWS IoT, Lambda, and API 
 * Gateway with the LinkIt ONE Mediatek development board.
 * 
 * This application demonstrates sending out an SMS or MMS from a LinkIt ONE
 * board through AWS IoT, and receiving messages via a MQTT topic
 * subscribed to by the board.
 * 
 * 
 * This code owes much thanks to MediaTek Labs, who have a skeleton up on
 * how to connect to AWS IoT here: 
 * 
 * https://github.com/MediaTek-Labs/aws_mbedtls_mqtt
 *
 * You'll need to install it to run our code.
 * 
 * License: This code, MIT, AWS Code: Apache (http://aws.amazon.com/apache2.0)
 */
// Handle incoming messages
#include <ArduinoJson.h>

/* Scheduling and connectivity from LinkIt ONE Board */
#include <LTask.h>
#include <LWiFi.h>
#include <LWiFiClient.h>
#include <LGPRS.h>

// Local Includes
#include "TwilioLinkItHelper.hpp"

/* CONFIGURATION:
 *  
 * Start here for configuration variables.  First up, all of the AWS IoT
 * configuration you need.  You'll need to upload the private key,
 * certificate, and root key to the board.
 * 
 */
String           AWS_IOT_MQTT_HOST =             "SOMETHING.iot.REGION.amazonaws.com";
String           AWS_IOT_MQTT_CLIENT_ID =        "LinkItONE_Twilio";
String           AWS_IOT_ROOT_CA_FILENAME =      "G5.pem";
String           AWS_IOT_CERTIFICATE_FILENAME =  "SOMETHING-certificate.pem";
String           AWS_IOT_PRIVATE_KEY_FILENAME =  "SOMETHING-private.pem";
String           AWS_IOT_TOPIC_NAME = "$aws/things/mtk_test_mf/shadow/update";


// Don't edit this one unless you also edit the /aws_iot_config.h file!
// We've left the name for ease of plug and play, but might eventually 
// rework this part of the library.
String           AWS_IOT_MY_THING_NAME =         "mtk_test_mf"; 

/* Should we use WiFi or GPRS?  'true' for WiFi, 'false' for GPRS */
boolean WIFI_USED =                     true;

/* 
 *  Now, the _Twilio specific_ configuration you need to send an outgoing
 *  SMS or MMS. 
 *  
 *  In production, you may want to pass these over MQTT (or a similar 
 *  channel) to change settings on devices in the field.
 */

String your_device_number        = "+18005551212"; // Twilio # you own
String number_to_text            = "+18005551212"; // Perhaps your cellphone?
String your_sms_message          = "Can you draw this owl?";
String optional_image_path       = "https://upload.wikimedia.org/wikipedia/commons/thumb/9/98/GreatHornedOwl-Wiki.jpg/800px-GreatHornedOwl-Wiki.jpg";
String linkit_image_path         = "http://com.twilio.prod.twilio-docs.s3.amazonaws.com/quest/programmable_wireless/code/LinkIt_Teaser.jpg";

/* Optional Settings.  You probably do not need to change these. */
String twilio_topic        = "twilio";
const int mqtt_tls_port = 8883;

/* Friendly WiFi Network details go here.  Auth choices:
 *  * LWIFI_OPEN 
 *  * LWIFI_WPA
 *  * LWIFI_WEP
 */
#define WIFI_AP "Signal 2017"
#define WIFI_PASSWORD ""
#define WIFI_AUTH LWIFI_WPA

/* 
 *  Twilio GPRS Settings here - you should not have to change these to 
 *  use a Twilio Programmable Wireless SIM Card.  Make sure your card 
 *  is registered, provisioned, and activated if you have issues.
 */
#define GPRS_APN "wireless.twilio.com"
#define GPRS_USERNAME NULL
#define GPRS_PASSWORD NULL


/* Workaround to remove a Macro from mbedtls */
#ifdef connect
#undef connect
#endif

typedef int32_t mqtt_callback(MQTTCallbackParams);

// Global Twilio Lambda helper
void disconnect_function();
TwilioLinkitHelper helper(
        mqtt_tls_port,
        AWS_IOT_MQTT_HOST,
        AWS_IOT_MQTT_CLIENT_ID,
        AWS_IOT_MY_THING_NAME,
        AWS_IOT_ROOT_CA_FILENAME,
        AWS_IOT_CERTIFICATE_FILENAME,
        AWS_IOT_PRIVATE_KEY_FILENAME,
        WIFI_USED,
        disconnect_function
);

struct MQTTSub {
        char* topic;
        mqtt_callback* callback; 
};

struct MQTTPub {
        
};


/* 
 * Our Twilio message handling callback.  This is passed as a callback function
 * when we subscribe to the Twilio topic, and will handle any incoming messages
 * on that topic.
 * 
 * You'll want to add your own application logic inside of here.  For this 
 * demo, we'll take the first 160 characters of the message body and send it 
 * back in reverse and optionally write to a serial connection.
 * 
 * No, this doesn't handle unicode - prepare for weird results if you send
 * any non-ASCII characters!
 */
int32_t handle_incoming_message_twilio(MQTTCallbackParams params)
{     
        MQTTMessageParams message = params.MessageParams;
      
        // We don't have std::unique_ptr
        //std::unique_ptr<char []> msg(new char[message.payloadlen+1]());

        char msg[message.PayloadLen+1];
        
        memcpy (msg,message.pPayload,message.PayloadLen);
        StaticJsonBuffer<maxMQTTpackageSize> jsonBuffer;
        JsonObject& root = jsonBuffer.parseObject(msg);
        
        String to_number           = root["To"];
        String from_number         = root["From"];
        String message_body        = root["Body"];
        String message_type        = root["Type"];

        // Only handle messages to the ESP's number
        if (strcmp(to_number.c_str(), your_device_number.c_str()) != 0) {
                return 0;
        }
        // Only handle incoming messages
        if (!message_type.equals("Incoming")) {
                return 0;
        }

        // Basic demonstration of rejecting a message based on which 'device'
        // it is sent to, if devices get one Twilio number each.
        Serial.print("\n\rNew Message from Twilio!");
        Serial.print("\r\nTo: ");
        Serial.print(to_number);
        Serial.print("\n\rFrom: ");
        Serial.print(from_number);
        Serial.print("\n\r");
        Serial.print(message_body);
        Serial.print("\n\r");

        // Now reverse the body and send it back.

        
        // std::unique_ptr<char []> return_body(new char[161]());
        
        char return_body[161];
        int16_t r = message_body.length()-1, i = 0;

        // Lambda will limit body size, but we should be defensive anyway.
        // uint16_t is fine because 'maxMQTTpackageSize' limits the total 
        // incoming message size.
        
        // 160 characters is _index_ 159.
        r = (r < 160) ? r : 159; 
        return_body[r+1] = '\0';
        while (r >= 0) {
                return_body[i++] = message_body[r--];
        }
        
        Serial.print(return_body);
        Serial.print("\n\r");
        
        // Send a message, reversing the to and from number
        helper.send_twilio_message(
                twilio_topic,
                from_number,
                to_number, 
                String(return_body),
                String(linkit_image_path)
        );

        return 0;
}


/* 
 *  Main setup function.
 *  
 *  Here we connect to either GPRS or WiFi, then AWS IoT.  We then subscribe
 *  to some channels and send out a SMS (or MMS) via MQTT and our 
 *  Lambda backend.
 */
void setup()
{
        LTask.begin();
        
        Serial.begin(115200);
        while(!Serial) {
                // Busy wait on Serial Monitor connection.
                delay(100);
        }

  
        if (WIFI_USED){
                LWiFi.begin();
                Serial.println("Connecting to AP");
                Serial.flush();
                while (!LWiFi.connect(
                                WIFI_AP, 
                                LWiFiLoginInfo(WIFI_AUTH, WIFI_PASSWORD)
                      )
                ) {
                        Serial.print(".");
                        Serial.flush();
                        delay(500);
                }
        } else {  
                Serial.println("Connecting to GPRS");
                Serial.flush();
                while (!LGPRS.attachGPRS(
                                GPRS_APN, 
                                GPRS_USERNAME, 
                                GPRS_PASSWORD
                      )
                ) {
                        Serial.println(".");
                        Serial.flush();
                        delay(500);
                }
        }

        Serial.println("Connected!");

        //char HostAddress[255] = AWS_IOT_MQTT_HOST;
        VMINT port = mqtt_tls_port;
        CONNECT_PORT = port;
        
        LTask.remoteCall(&__wifi_dns, (void*)AWS_IOT_MQTT_HOST.c_str());
        LTask.remoteCall(&__bearer_open, NULL);
        LTask.remoteCall(&__mqtt_start, NULL);

        MQTTSub sub_struct;
        
        sub_struct.topic = const_cast<char*>(twilio_topic.c_str());
                
        sub_struct.callback = handle_incoming_message_twilio;
        
        LTask.remoteCall(&__sub_mqtt, (void*)&sub_struct);
        
        //char mqtt_message[30];
        //sprintf(mqtt_message, "Hello World - Love, Twilio");
        Serial.println("publish_MQTT go");
        //linkitaws::publish_MQTT("twilio", mqtt_message);
}

/*  
 *   Disconnect callback function - what do you want to do when it goes down?
 *   
*/
void disconnect_function() 
{

        Serial.println("Oh no, we disconnected!");
        delay(10000);
        
        // We could just reconnect, but in this case it's probably better to 
        // power cycle in a place with better signal.
        
        // helper.start_mqtt()
        
        while(1);
}

/*  
 *   Every time through the main loop we will spin up a new thread on the 
 *   LinkIt to perform our watchdog tasks in the background.  Insert everything
 *   you want to perform over and over again until infinity (or power 
 *   loss!) here.
*/
boolean main_thread(void* user_data) 
{
        static bool sent_intro = false;
        
        Serial.println("Thread...");
        Serial.flush();

        if (!sent_intro) {
                helper.send_twilio_message(
                                twilio_topic,
                                number_to_text,
                                your_device_number, 
                                String(your_sms_message),
                                String(optional_image_path)
                );
                sent_intro = true;
        }

        // We need to handle any incoming messages from AWS.
        // Don't remove this call from the loop.
        helper.handle_requests();
        delay(1000);
}

/*
 * The standard Arduino loop.  You don't want to put anything here; just
 * spin up new threads since the MediaTek can handle these async.
 * 
 * This example just creates a new thread which calls main_thread()
 * every 3 seconds.
 */
void loop() 
{
        Serial.flush();
        /* We can do our main tasks in a new thread with LTask */
        LTask.remoteCall(main_thread, NULL);
        delay(3000);
}

/* 
 *  Trampolines/thunks are the easiest way to pass these class methods.  
 *  We don't have std::bind() or boost::bind()!
 */
inline boolean __bearer_open(void* ctx) 
{ return helper.bearer_open(ctx); }

inline boolean __mqtt_start(void* ctx)  
{ return helper.start_mqtt(ctx); }

inline boolean __wifi_dns(void* ctx)    
{ return helper.wifiResolveDomainName(ctx); }

inline boolean __sub_mqtt(void *ctx)   
{ 
        MQTTSub* sub_struct = (MQTTSub*)ctx; char* topic = sub_struct->topic;
        mqtt_callback* callback = sub_struct->callback;
        helper.subscribe_to_topic(topic, callback);
        return true;
}

Building Out the Internet of Things with Twilio and a LinkIt ONE

With this guide and the guide on sending messages with Twilio's Programmable Wireless, AWS, and the LinkIt ONE, you've now got both inbound and outbound messaging working with your board.