A Swift Adventure: Add Audio Controls to BasicPhone
Time to read:
October 22, 2015
Written by
This post is part of Twilio’s archive and may contain outdated information. We’re always building something new, so be sure to check out our latest posts for the most up-to-date insights.

Welcome back to my series of posts on using Twilio Client for iOS with Apples awesome new language, Swift. In prior posts we’ve had fun using Swift and Twilio Client to build an app that can make and receive phone calls.
In this post I’ll show you how you can generate input tones, called DTMF tones, from the app in order to let a user send input back to our TwiML app. I’ll also demonstrate ways that you can control the audio of a phone call by muting the device microphone and swapping the audio output.
Just joining us on our journey and want to catch up? I’d encourage you to start by reading through the first and second posts to see where we’ve been.
When you’re ready to get moving with this post, make sure you have XCode 7 installed to run the app and of course that you have a Twilio account which is free to sign up for, then go grab the starter project from Github.
Of course you can always just skip right ahead and grab the completed code for this post from Github as well, but that’s less fun!
Let’s get building!
Press One to Rock Your Socks Off
In the last post we left our TwiML app, the thing that provides the experience to a caller connecting through the instance of Twilio Client, pretty simple, translating some text into speech and then playing an audio file.
However, many voice applications are more complex and require the user to provide input so that the system can give the user the information or experience that’s best for them. In order to demonstrate how we let a user of our iOS application provide this input, we’ll start by modifying our current TwiML app<Gather> verb.
Using the verb tells Twilio to start listening for DTMF tones, the beeps and boops that you hear whenever you press the numbers on the dialpad of your phone and lets a developer like yourself create experiences like the menu we just added to our TwiML app.
If you want to learn more about creating phone menus using TwiML check out the IVR Phone Tree HowTo.
Each of the DTMF tones is a different frequency and represents a different number. Once one or more tones are entered by the caller, Twilio will make a new HTTP request to the URL we’ve specified in the action parameter. As part of that request it will pass a parameter named Digits which our application can use to process the caller input.
Once the caller selects a menu option, we need a second TwiML response that tells Twilio what we want to do next, either playing a song or making a call to another Taylor Swift fan. To do that we’ll have to use some code to dynamically generate that TwiML. I’m using Ruby and Sinatra to respond to Twilio HTTP request and generate the TwiML, but you can use any language and platform that you like.
Make sure you replace the phone number for the <Dial> verb with a real number like your own cell phone and then go ahead and make a call from your iOS app. Instead of hearing the introduction followed by music, you should now hear the introduction followed by the prompt to select the option you want. If you had called in from your cell phone, now is the point where you’d press a number on your dialpad, but how do you make that selection from our iOS app? Lets look at that next.
Ground Control to Major Tom
Now that we have a TwiML app that accepts input we need to modify our iOS application to send that input. Twilio Client for iOS makes it simple to send DTMF tones using a single function exposed by the TCConnection type named sendDigits. This function accepts a string representing the DTMF tones you want to send. Let’s modify our iOS app to use this function.
Add a function named sendInput to the Phone class:
This function first checks to see if we have an active connection and then calls the connection’s sendDigits function, passing it the value of the digit we want to send.
To let the user tell the application to send a specific digits add four buttons to the storyboard:
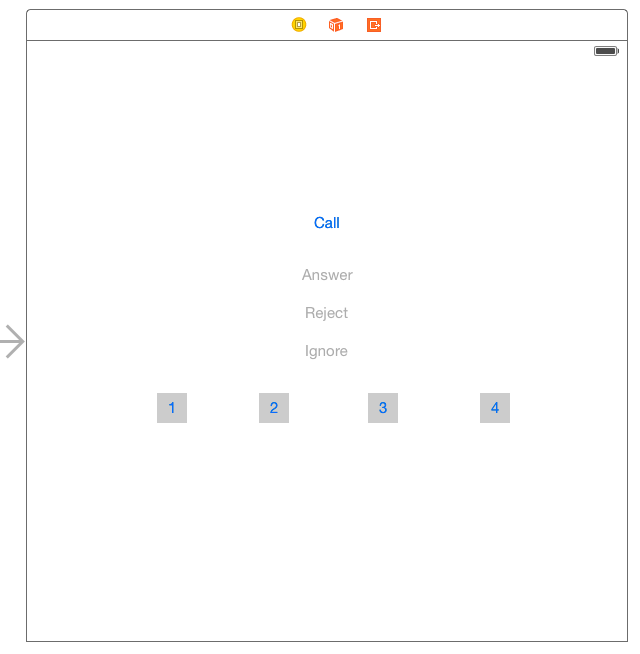
At this point you could create a separate Action for each button, but that’s a lot of repetitive code. The way I like to approach this is to use the same code to handle all of the button presses and use the Buttons Tag attribute to hold the value to send for a specific button press.
Assign the value 1, 2, 3 or 4 to each respective buttons Tag property. The Tag property accepts an integer that allows you to identify specific view objects in the application. In our case we will use it to determine which button was pressed and which digit we should pass to the sendInput function:

Create an Action for the first button and name it
sendDigit. Create Actions for the remaining buttons and associate them with the existing sendDigit action.
In the sendDigit action call the sendInput function we created earlier, passing as the input the value of the pressed buttons Tag property.
OK, give your app a whirl. When prompted by the TwiML app, select one if the options using the Buttons we added to the UI. This time, you should hear your app send the DTMF tone and the selected song begin to play.
Play it Loud
Now that callers can select the specific Swift song they want to hear, the next most obvious step is to let everyone else around enjoy that song as well. We can do that by having iOS redirect the calls audio input/output from the default location to the built in speaker and microphone.
To do this, in the Phone class import the AVFoundation framework and create a new function named setSpeaker:
This function checks to make sure we have an active connection and then uses an instance of the AVAudioSession to override the output audio port based on the boolean value passed to it. If true is passed in, the audio port is set to the built in speaker and microphone, otherwise the defaults are used.
To allow the user to toggle the speaker, add a new switch to the storyboard.

Add an Action for the switch and call the setSpeaker function from it, passing in the on value of the switch.
Great, run the app one more time and start an outgoing call. Once you’ve selected the Swift song you want to hear, flip that switch and shake it off with all of your neighbors.
Be Very Very Quiet
So far in this post we’ve added the ability to let the caller send our TwiML app input and let them toggle the audio output to the speaker. The last feature we’ll add to our app is the ability to mute themselves while on call.
To make this easy, the Twilio Client for iOS SDK takes care of the hard stuff and exposes a simple muted function on the connection which lets you get the current mute state of the connection or set a new state. Add this to our app by adding the following function to the Phone class
In this function we check to make sure that we have a connection and if we do, set its muted state. Resetting to the current state is fine.
Add another slider to the storyboard and connect its Action. In the Action method grab the current state if the switch and call the muteConnection function:
Run the app one more time and this time select menu option 4 to talk to another Taylor Swift fan. Twilio should call the number you provided in the <Dial> verb. If you provided your own cell phone number, go ahead and answer the call coming from Twilio. Because you’ve created a phone call between the iOS app and your cell phone should be able to talk into your laptop microphone and hear it on your cell phone and vice-versa.
Now slide the mute switch in the app and try speaking into the computer microphone again. This time you should not hear yourself in the cell phone.
Wrapping it Up
If you’ve been following along with this and my other posts on SwiftPhone you’ve now got a pretty functional app that does a bunch of stuff. It can make and receive calls, allow the user provide input to the application they have called, and let them control the audio input and output in the application. But there is so much more that could be added to this app:
- Sending parameters to Twilio from the iOS app
- Detecting network connectivity
- Creating a more beautiful UI
I’d love to see what you do with this app or any app you’re building using Twilio Client for iOS. Hit me up online on Twitter @devinrader or via email devin@twilio.com


Related Resources
Twilio Docs
From APIs to SDKs to sample apps
API reference documentation, SDKs, helper libraries, quickstarts, and tutorials for your language and platform.
Resource Center
The latest ebooks, industry reports, and webinars
Learn from customer engagement experts to improve your own communication.
Ahoy
Twilio's developer community hub
Best practices, code samples, and inspiration to build communications and digital engagement experiences.