Sending Images via SMS with Filepicker and Twilio
Time to read:
January 15, 2013
Written by
This post is part of Twilio’s archive and may contain outdated information. We’re always building something new, so be sure to check out our latest posts for the most up-to-date insights.


If you are a web developer, you know that handling file uploads is not fun. You are either spending time dealing with files and permissions, or learning how your language handles MIME multipart encoding. Then there is the problem of dealing with large file uploads and cross-browser compatibility.
Even when you get the basics figured out, all that you have working is something that allows your users to upload files from their computer. If you want to enable your users to choose photos and files from a service like Facebook, Dropbox, Google Drive or Flickr, well, that’s a whole other story. Integrating these different APIs, normalizing response formats, and maintaining these integrations can be time consuming.
Does this sound familiar? If it does, you will be excited to learn that Filepicker.io has made this process a whole lot easier. Filepicker.io provides APIs to connect, process, and store any piece of content in your web application. For example if you are building an application that needs to send files or photos to your users via SMS, then you can use Filepicker.io with Twilio to make this happen. Let’s explore how to build this.
With Filepicker.io, here is the bare minimum HTML that you will need to write to enable someone to send a link to an image via SMS:
As you look over the HTML, pay special attention to the tag and the two

After someone has used the Filepicker.io dialog to select an image, a URL to that image is inserted into the value of the tag. That URL is what will be submitted as part of the HTTP POST request that will be made when the “Send File” button is clicked.
So far, all that we have is some HTML that will submit a phone number and URL via a POST request. To actually send the message we will need a little bit of server side logic to take the URL and send the SMS to the phone number. For this, we will be using Python with the Flask web development framework. Here is a simple Flask application that will do just that:
|
1 2 3 4 5 6 7 8 9 10 11 12 13 14 15 16 17 18 19 20 21 22 23 24 25 26 27 28 | import os from twilio.rest import TwilioRestClient from flask import Flask, request, render_template twilio_account_sid = '' twilio_auth_token = '' twilio_from_number = '' filepicker_api_key = '' app = Flask(__name__) client = TwilioRestClient(twilio_account_sid, twilio_auth_token) @app.route("/", methods=['POST', 'GET']) def index(): if request.method == 'POST': client.sms.messages.create( to=request.form['phone_number'], from_=twilio_from_number, body="Check this out: %s?dl=false" % request.form['file']) fp_key = filepicker_api_key return render_template('simple.html', filepicker_api_key=fp_key) if __name__ == "__main__": port = int(os.environ.get('PORT', 5000)) app.debug = True app.run(host='0.0.0.0', port=port) |
If you want to run the code above, here is what you’ll need to do:
- Save the Python code in a file named “app.py”.
- Create a directory named “templates” in the same directory as the “app.py” file.
- Save the HTML in a file named “simple.html” in the “templates” directory.
- Run “pip install Flask“
- Run “pip install twilio“
- Run “python app.py“
- Open http://localhost:5000/ in your web browser of choice.
At this point, we have a very basic looking application. It works, but doesn’t look great. Let’s fix that by adding some design from Twitter Bootstrap and a little bit of error handling.
For the design, Twitter Bootstrap comes with CSS for a very nice looking “Horizontal form“. It looks nice, but requires a pretty substantial change to our HTML. For this we will start by modifying the Bootstrap “starter template“, remove the “navbar” and then enter the following HTML into the
tag:|
1 2 3 4 5 6 7 8 9 10 11 12 13 14 15 16 17 18 19 20 21 22 23 24 25 26 | class="container-fluid"> class="row-fluid"> class="span8"> SMS an image class="control-group"> class="controls"> name="phone_number" type="text"> class="control-group"> class="controls"> class="btn" name="file" type="filepicker" /> class="control-group"> class="controls"> |
Next, lets add some more HTML to let us know if there was an issue sending the SMS or to show us that the SMS was sent successfully. To only show the messages when appropriate, we will use the conditional blocks from the Jinja2 tempting language that Flask uses. Here is what those look like:
{% endif %}
|
1 2 3 4 5 6 7 8 9 10 11 12 13 14 15 | {% if sms_sent is sameas False %} class="row-fluid"> class="span4"> {% endif %} {% if sms_sent is sameas True %} class="row-fluid"> class="span4"> |
{% endif %}
And finally, we will update our backend code to take advantage of those changes. Here are the updates that we will make:
- Display success or failure messages when appropriate
- Add the bare minimum of error handling
- Switch to using environment variables for configuration, so that we can host this code on Heroku.
|
1 2 3 4 5 6 7 8 9 10 11 12 13 14 15 16 17 18 19 20 21 22 23 24 25 26 27 28 29 30 | import os from twilio.rest import TwilioRestClient from flask import Flask, request, render_template app = Flask(__name__) # TWILIO_ACCOUNT_SID and TWILIO_AUTH_TOKEN environment variables must be set client = TwilioRestClient() @app.route("/", methods=['POST', 'GET']) def index(): option = {} option['filepicker_api_key'] = os.environ.get('FILEPICKER_API_KEY') if request.method == 'POST': option['file'] = request.form['file'] option['phone_number'] = request.form['phone_number'] try: from_ = os.environ.get('TWILIO_FROM_NUMBER') body = "Check out this picture: %s?dl=false" % option['file'] client.sms.messages.create(to=option['phone_number'], from_=from_, body=body) option['sms_sent'] = True except: option['sms_sent'] = False return render_template('index.html', **option) if __name__ == "__main__": port = int(os.environ.get('PORT', 5000)) app.run(host='0.0.0.0', port=port) |
After these changes, we’ve got quite a bit more code, but the page we render looks much nicer:
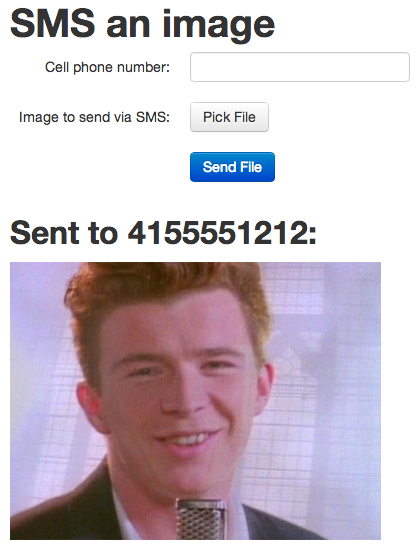
Here is what the page will look like after picking a file and clicking the “Send File” button. You can see that one of the conditional templates has been activated and is showing us what image we just sent and who we sent the image URL to:
Want to try this code out for yourself? Here are the commands that you’ll need to run:
- git checkout https://github.com/jpf/filepicker-twilio-example
- For this to work, you will need to have git installed on your computer. If you don’t have git installed, installing the Heroku Toolbelt in step 3 will take care of that for you. GitHub also has great instructions on how to install git.
- cd filepicker-twilio-example
- heroku create
- For this to work, you’ll need an account Heroku and the Heroku Toolbelt installed. Here are instructions on how to get started with Heroku.
- heroku config:add TWILIO_ACCOUNT_SID="{{ your Twilio Account SID }}"
- heroku config:add TWILIO_AUTH_TOKEN="{{ your Twilio Auth Token }}"
- heroku config:add TWILIO_FROM_NUMBER="+1YOURPHONENUMBER"
-
Get this information from your Twilio account. If you don’t have one already, sign up for a Twilio account here.
You will find the values for your “Account SID” and “Auth Token” in your Twilio account here: https://www.twilio.com/user/account
Set “TWILIO_FROM_NUMBER” to any Twilio number you own, you can see a list of what numbers you own here: https://www.twilio.com/user/account/phone-numbers/incoming
-
Get this information from your Twilio account. If you don’t have one already, sign up for a Twilio account here.
- heroku config:add FILEPICKER_API_KEY="{{ your filepicker api key}}"
-
This is your Filepicker API key. If you don’t have a Filepicker account yet. If you don’t have one already, sign up for a Filepicker account here.
You will find your Filepicker API key here: https://developers.filepicker.io/home/
-
This is your Filepicker API key. If you don’t have a Filepicker account yet. If you don’t have one already, sign up for a Filepicker account here.
- heroku config
- Make sure it’s all the settings are correct!
- git push heroku master
- heroku open
The last command will open your web browser. The browser will load the address where Heroku is hosting the SMS application we have been building. Once you’re looking at the application, here is what you’ll need to do to send yourself a link to an image:
- Enter in your cellphone number.
- Click the “Pick File” button and upload an image.
- Click “Send File” button.
A few seconds after you click the “Send File” button, you will receive an SMS with a URL for the image you just uploaded.
This is a simple demo, but I hope that I’ve given you a taste of the cool things you can do with Filepicker, Twilio, and about 93 lines of code.
What other cool things can you think of that can be built with Filepicker.io and Twilio?
Related Posts
Related Resources
Twilio Docs
From APIs to SDKs to sample apps
API reference documentation, SDKs, helper libraries, quickstarts, and tutorials for your language and platform.
Resource Center
The latest ebooks, industry reports, and webinars
Learn from customer engagement experts to improve your own communication.
Ahoy
Twilio's developer community hub
Best practices, code samples, and inspiration to build communications and digital engagement experiences.