Creating IVR Templates with Twilio Studio
Time to read:
January 18, 2022
Written by
Reviewed by

An Interactive Voice Response (IVR) system is critical in reducing operational costs, and increasing customer satisfaction. This blog post will show you how you can build your own API to templatize and deploy a custom IVR system with Twilio Studio.
Twilio Studio is our no-code visual editor for building, editing and managing workflows. Studio is used by Twilio customers of all kinds and sizes to build everything from order notifications, to conversational IVRs, to survey tools and SMS-enabled chatbots.
This project was originally built by our team as part of an internal hackathon. Our team's goal was to enable businesses to think outside the box on how our no-code Studio application could be used to help ISV partners build enterprise grade solutions. The API we're showcasing in this blog post was accompanied by a web form where users can sign up and select which IVR flows they would like to enable. We’ve also made our code available on github if you’d like to check it out here.
Prerequisites
For this project you will need:
- A Twilio account. Sign up for free here
- Generate Twilio API Key SID and API Key Secret here
- NodeJS installed. Download here
- Twilio Phone Number. Click here to learn how to buy a phone number
Set up your node environment
Start by creating your node app. Follow this guide for an official walkthrough on creating your first node.js app.
You’ll want to install the Twilio package, and optionally the express package if you want to run this as an API. You can do this by running the following on the command line:
npm install express twilio
Open up the .env file (or create one if you don’t have one in the application directory). And add the following lines, replacing the XXXs with your Account SID and Auth Token respectively.
ACCOUNT_SID = "ACXXXXXXXXXXXXXXXXXXXXXXXXXXXXXXXX"
AUTH_TOKEN = "XXXXXXXXXXXXXXXXXXXXXXXXXXXXXXXXX"
Strategy for creating a templated IVR
- One of the easiest ways to build out a template IVR will be via studio. We start by building all of the possible IVR options in Studio. We will then export the JSON file representing the templated IVR.
- Once you have your template JSON, we can pick and choose which of the IVR options we want to enable, and set the IVR messages programmatically via our nodeJS application.
- In the example below, we will build 3 IVR options (Operating Hours, List of Service and Talk to a Human).
Build a template IVR with Twilio Studio
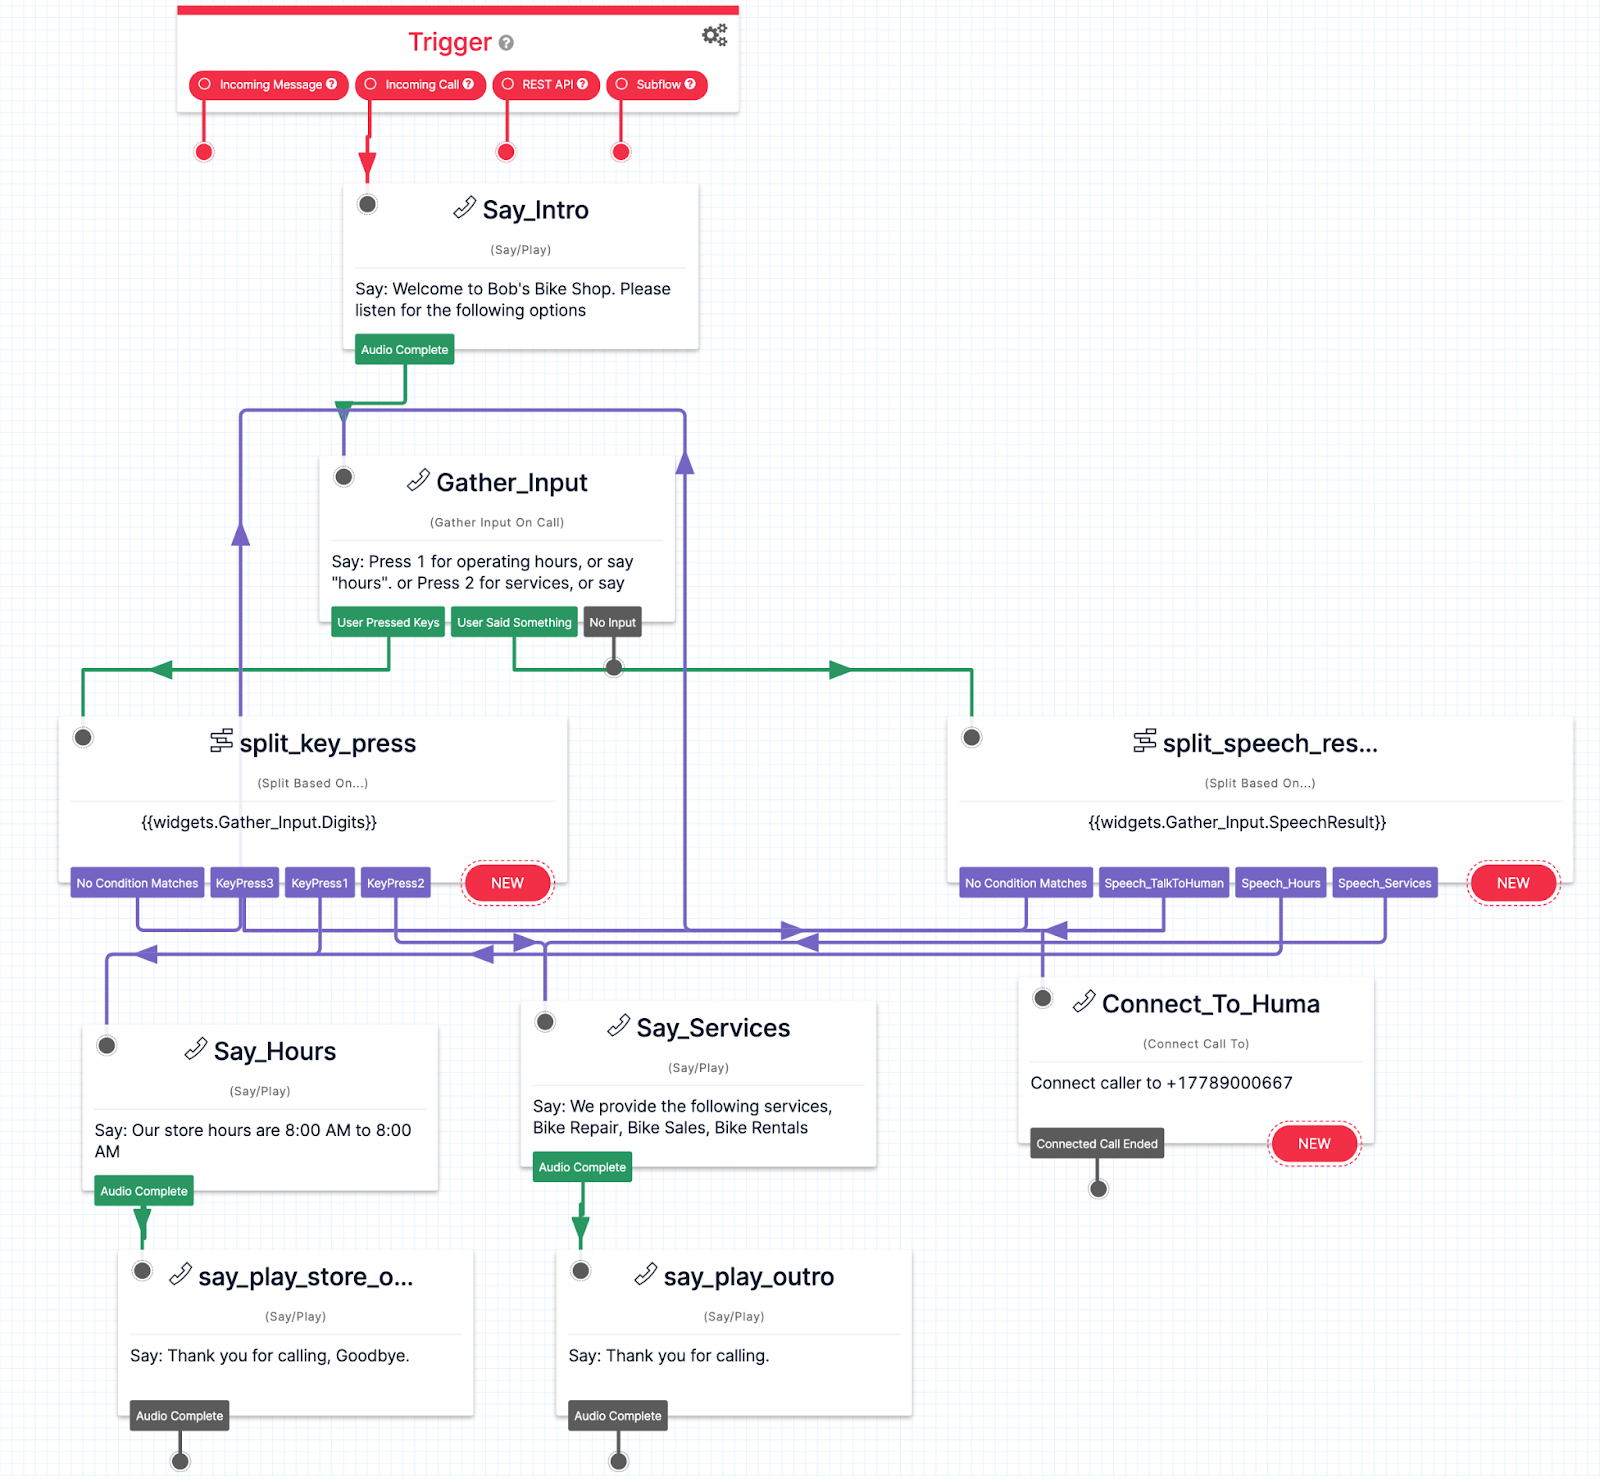
As with most IVRs, a good place to start is with an introduction message. We’ll use the Say/Play widget here, and link this to the Incoming Call trigger.
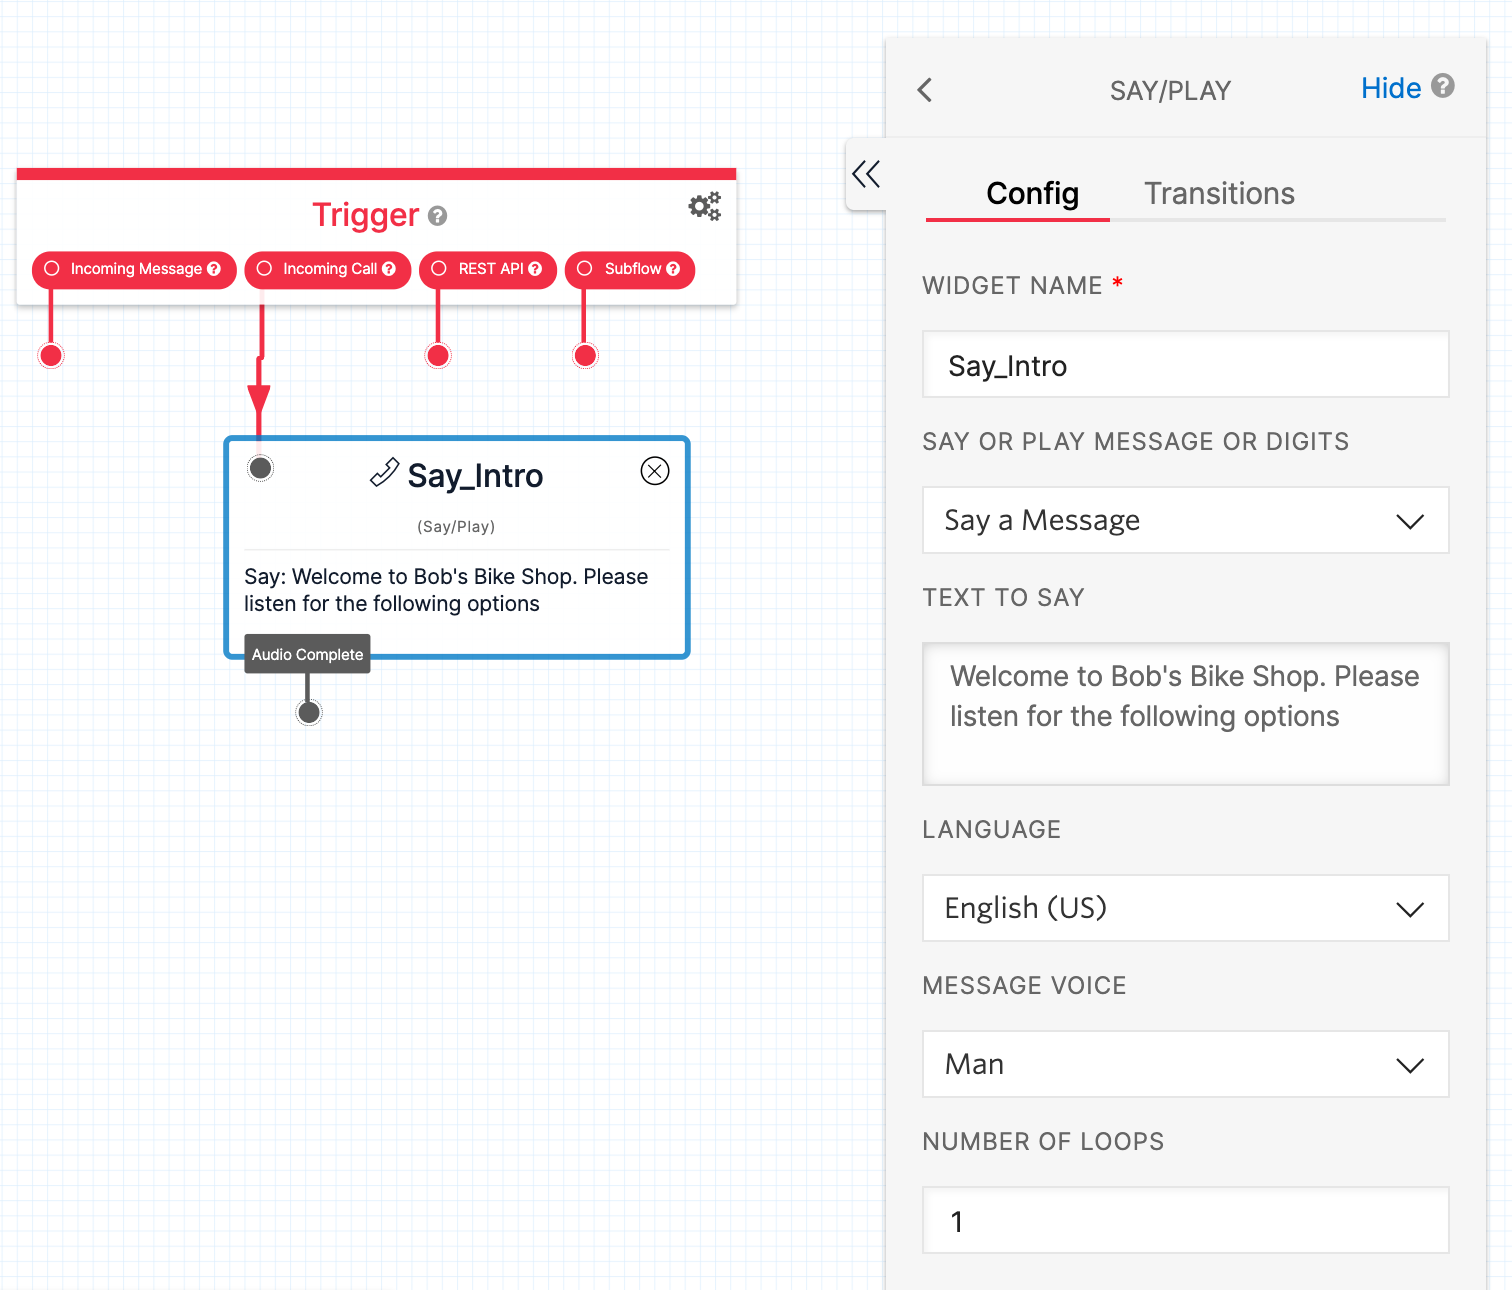
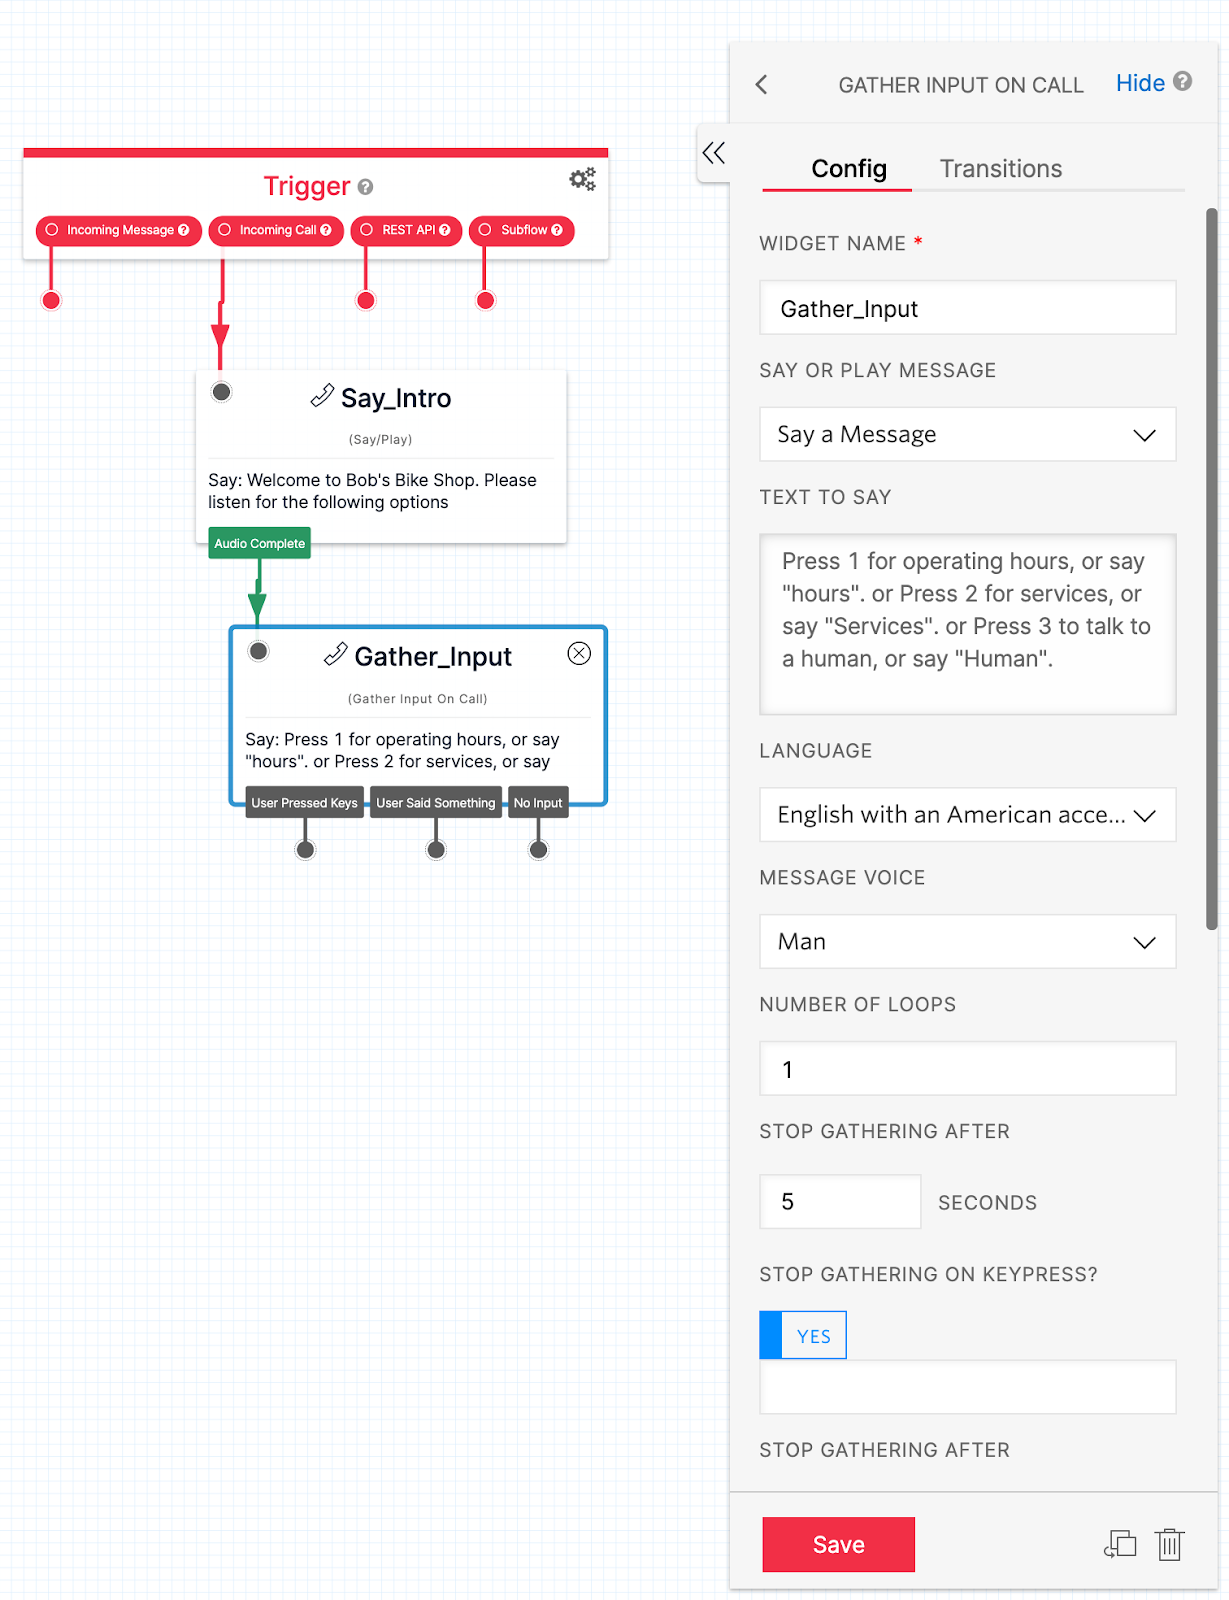
Let’s follow this up by listing our IVR’s options, and gathering the caller’s input. The Gather Input On Call is perfect for capturing keys pressed (DTMF) or any speech responses.
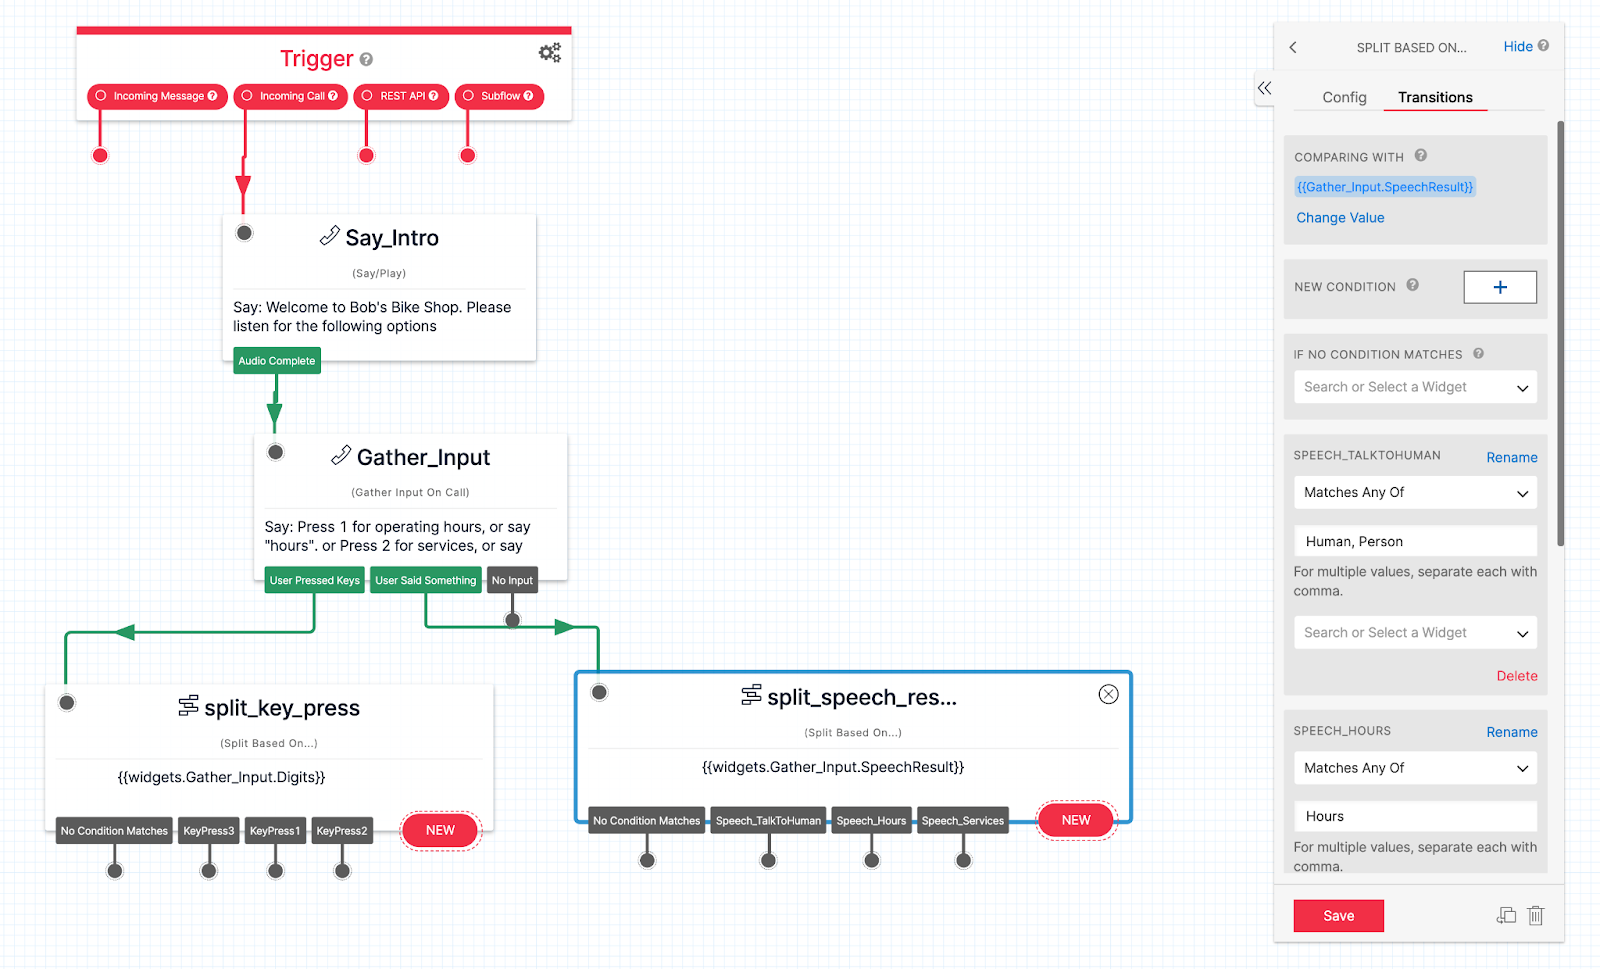
We’ll then create 2 distinct Split Based On widgets. One will be used to parse DTMF inputs, and the other will parse speech.
Finally we’ll want to build the flow once the caller has selected an option. In addition to the widgets used above, we can also use the Connect Call To widget to forward the call to a designated call participant (e.g. Office Reception, Backroom Staff, Customer Support, etc.).
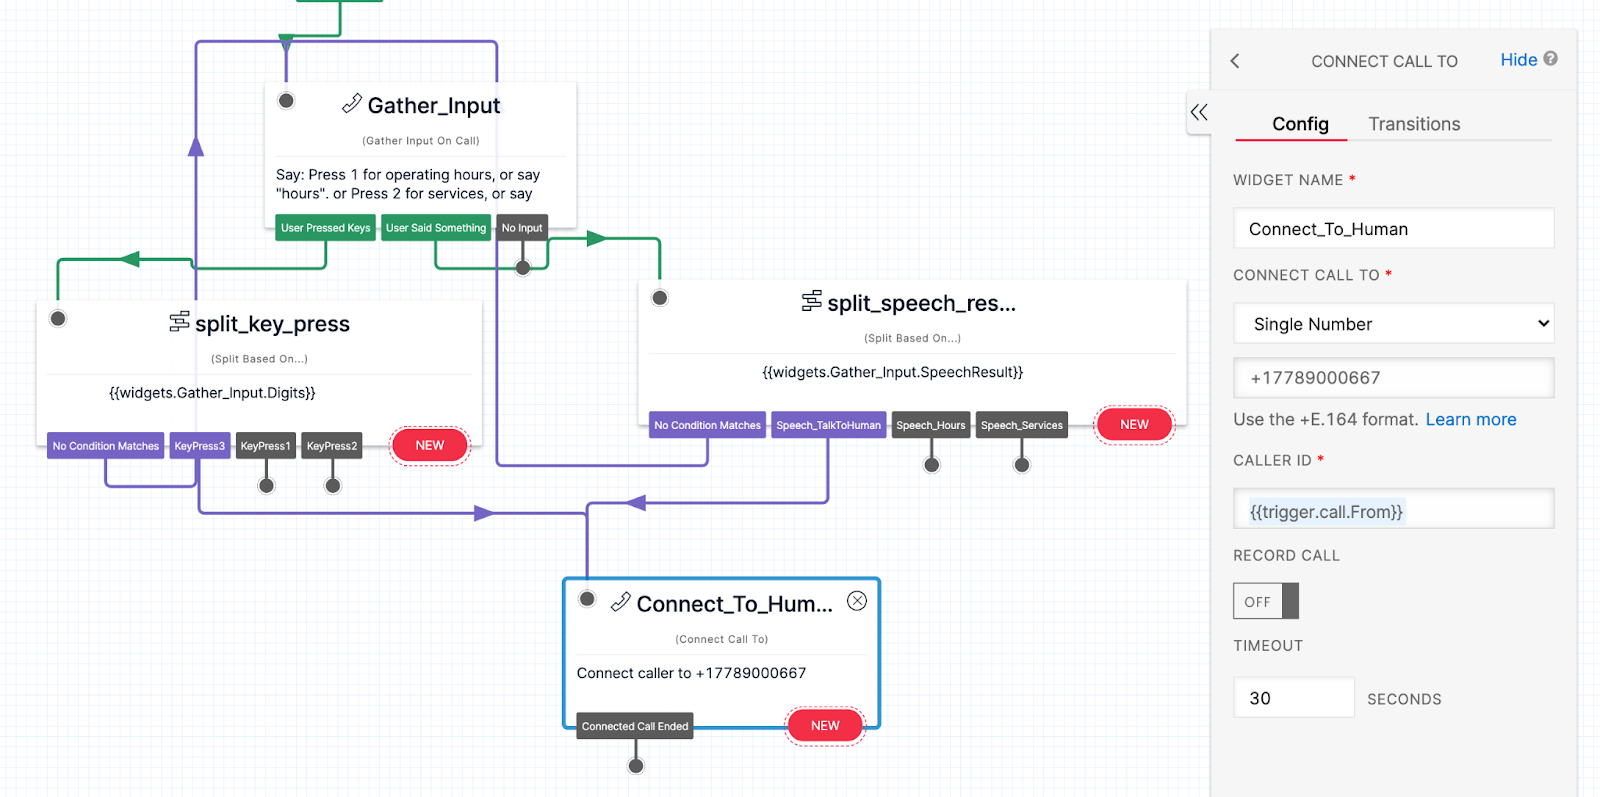
With all the widgets used so far, we can build the rest of the IVR system. This is what we’ve got:
Build a base IVR
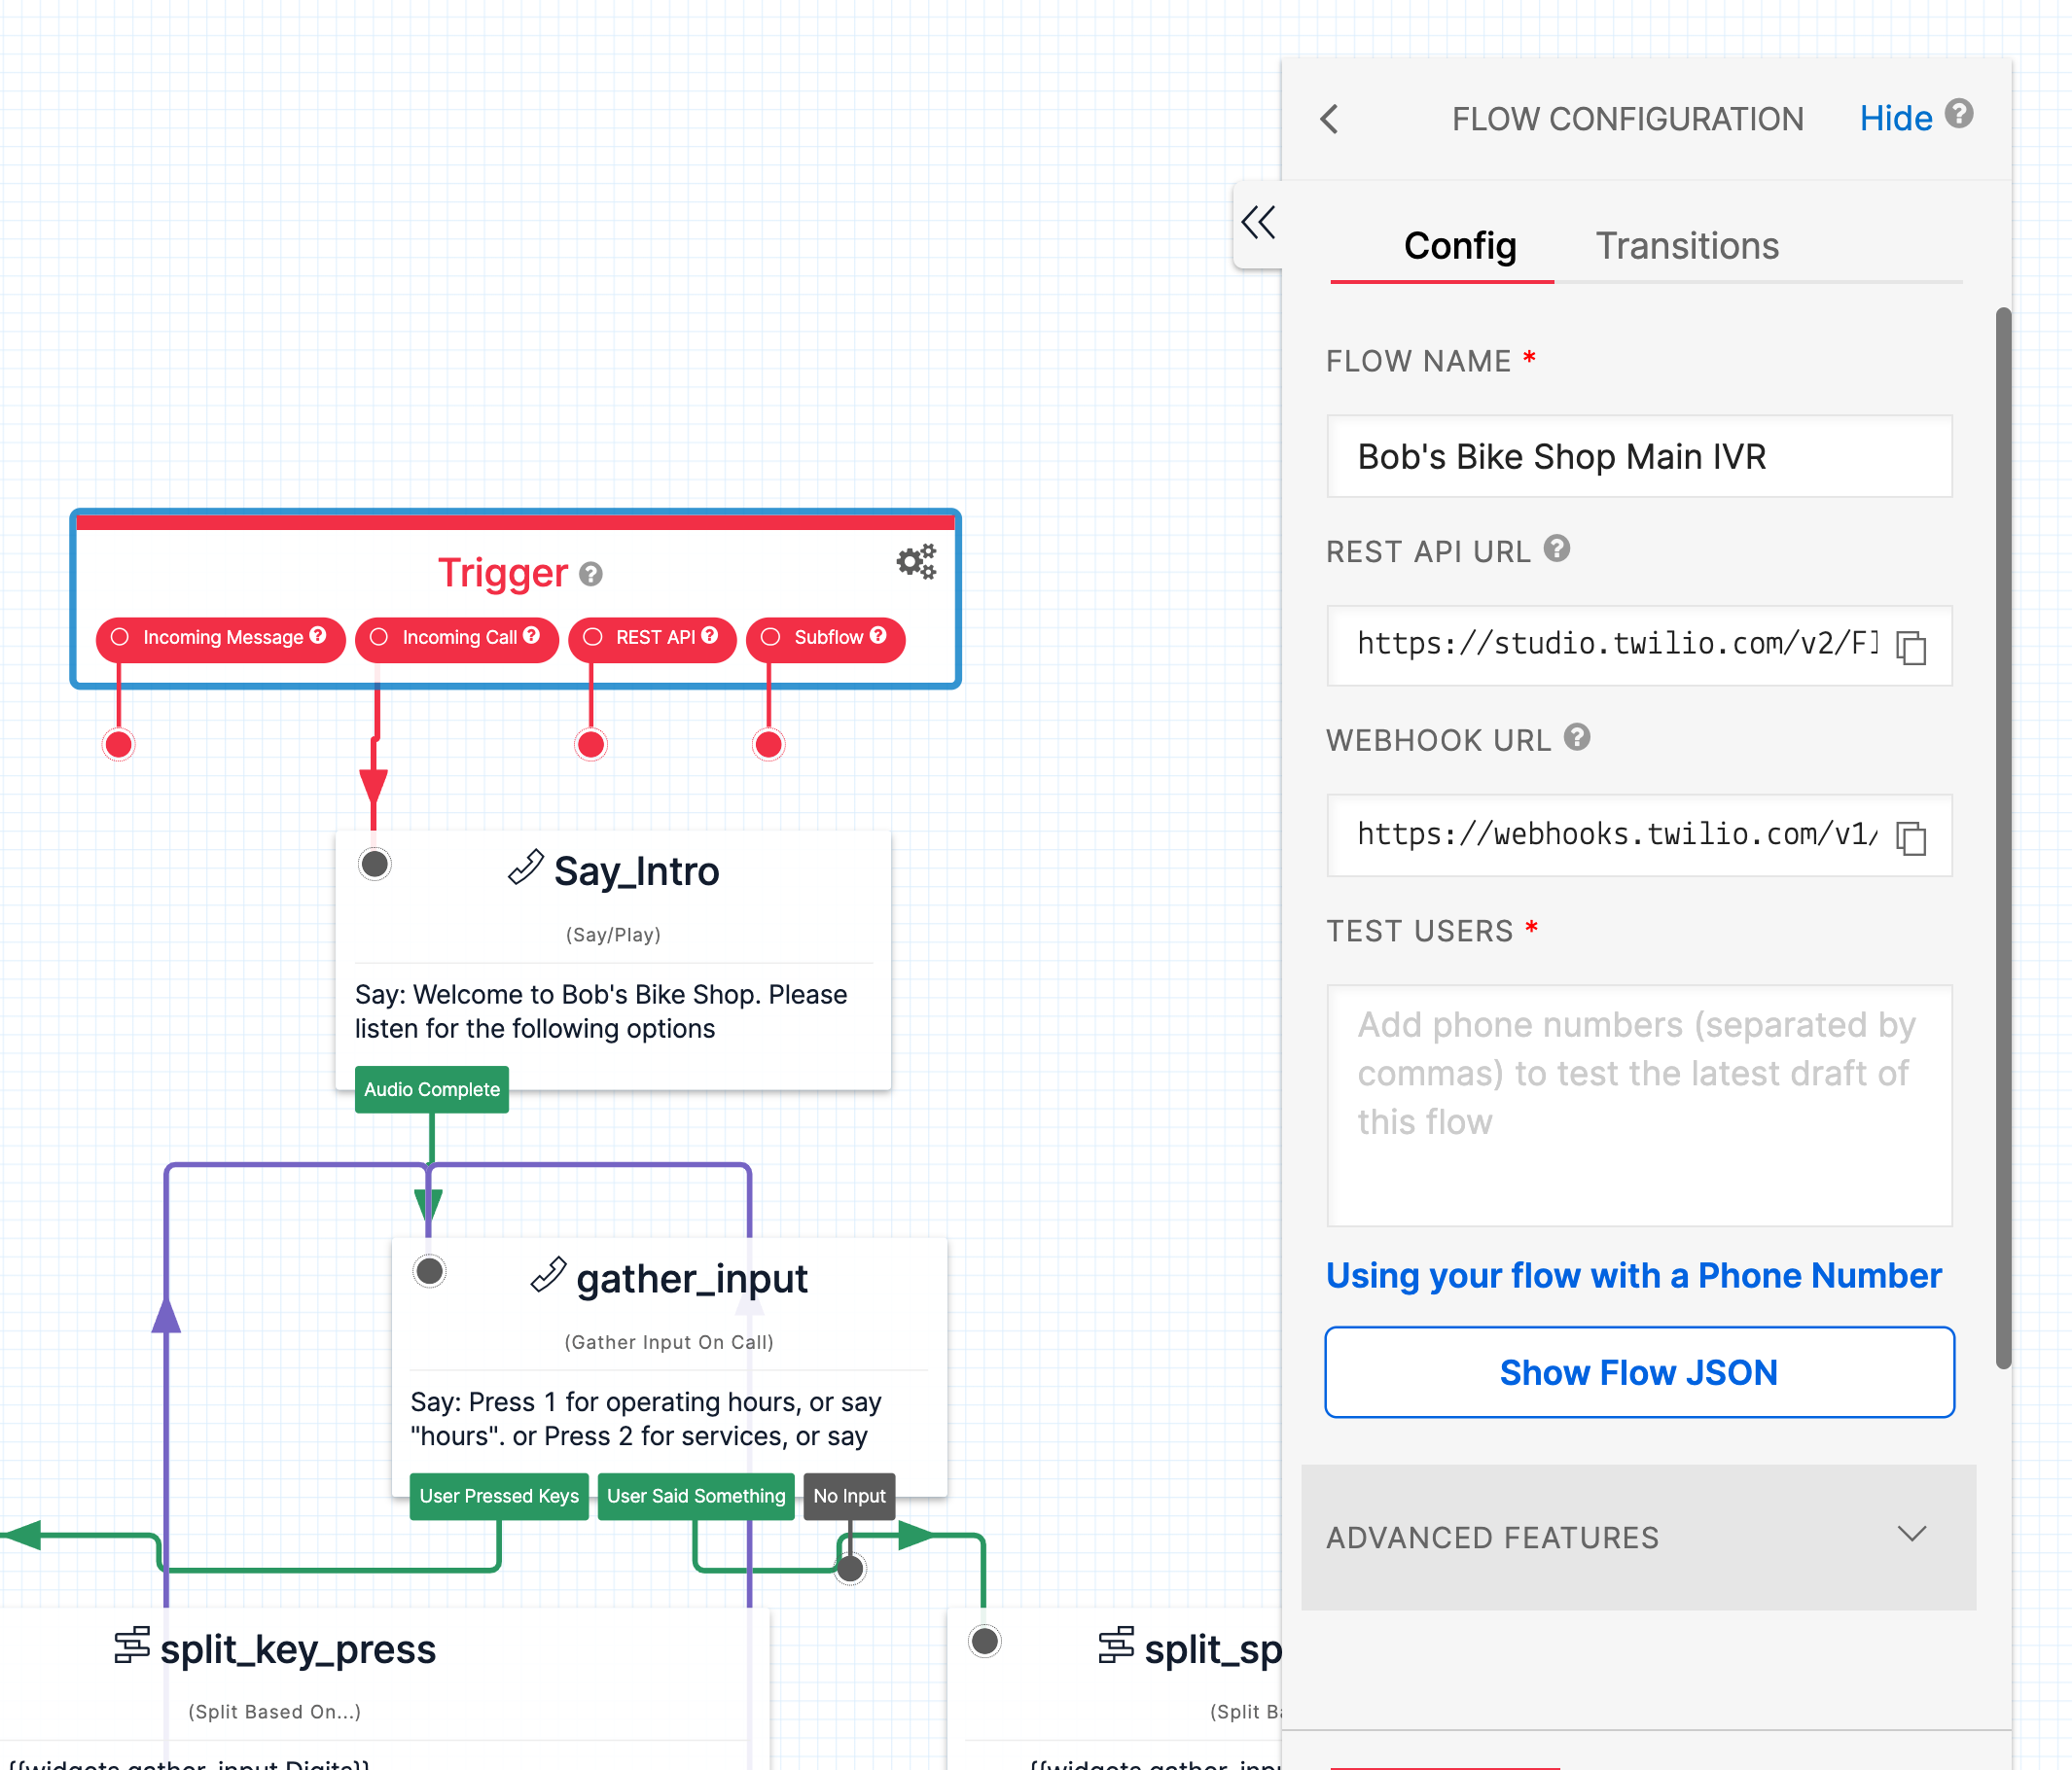
Now that we have a template IVR, we can export the JSON file and replace certain values with variables to create a template that can be reused. You can export the JSON by clicking on the red Trigger widget at the top of the workflow, then click Show Flow JSON.
In this project we chose to define a “Default Workflow” so that the IVR will always have the “Connect To Human” option as a bare minimum. To do this, we’ve taken our JSON file and stripped it down to contain only the following Widgets:
- Say_Intro
- Gather_Input
- Split_key_press
- Split_speech_results
- Connect_To_Human
This will be our base Studio definition in which we can later append additional widgets and conditions onto. The base IVR JSON object is too large to include here, so here is a link to the JSON from our github repo.
Programatically building an IVR
For our demo, we have built a corresponding web form where users can sign up for a simple IVR system. In the web form, users can indicate which of the 3 IVR options they would like to enable.
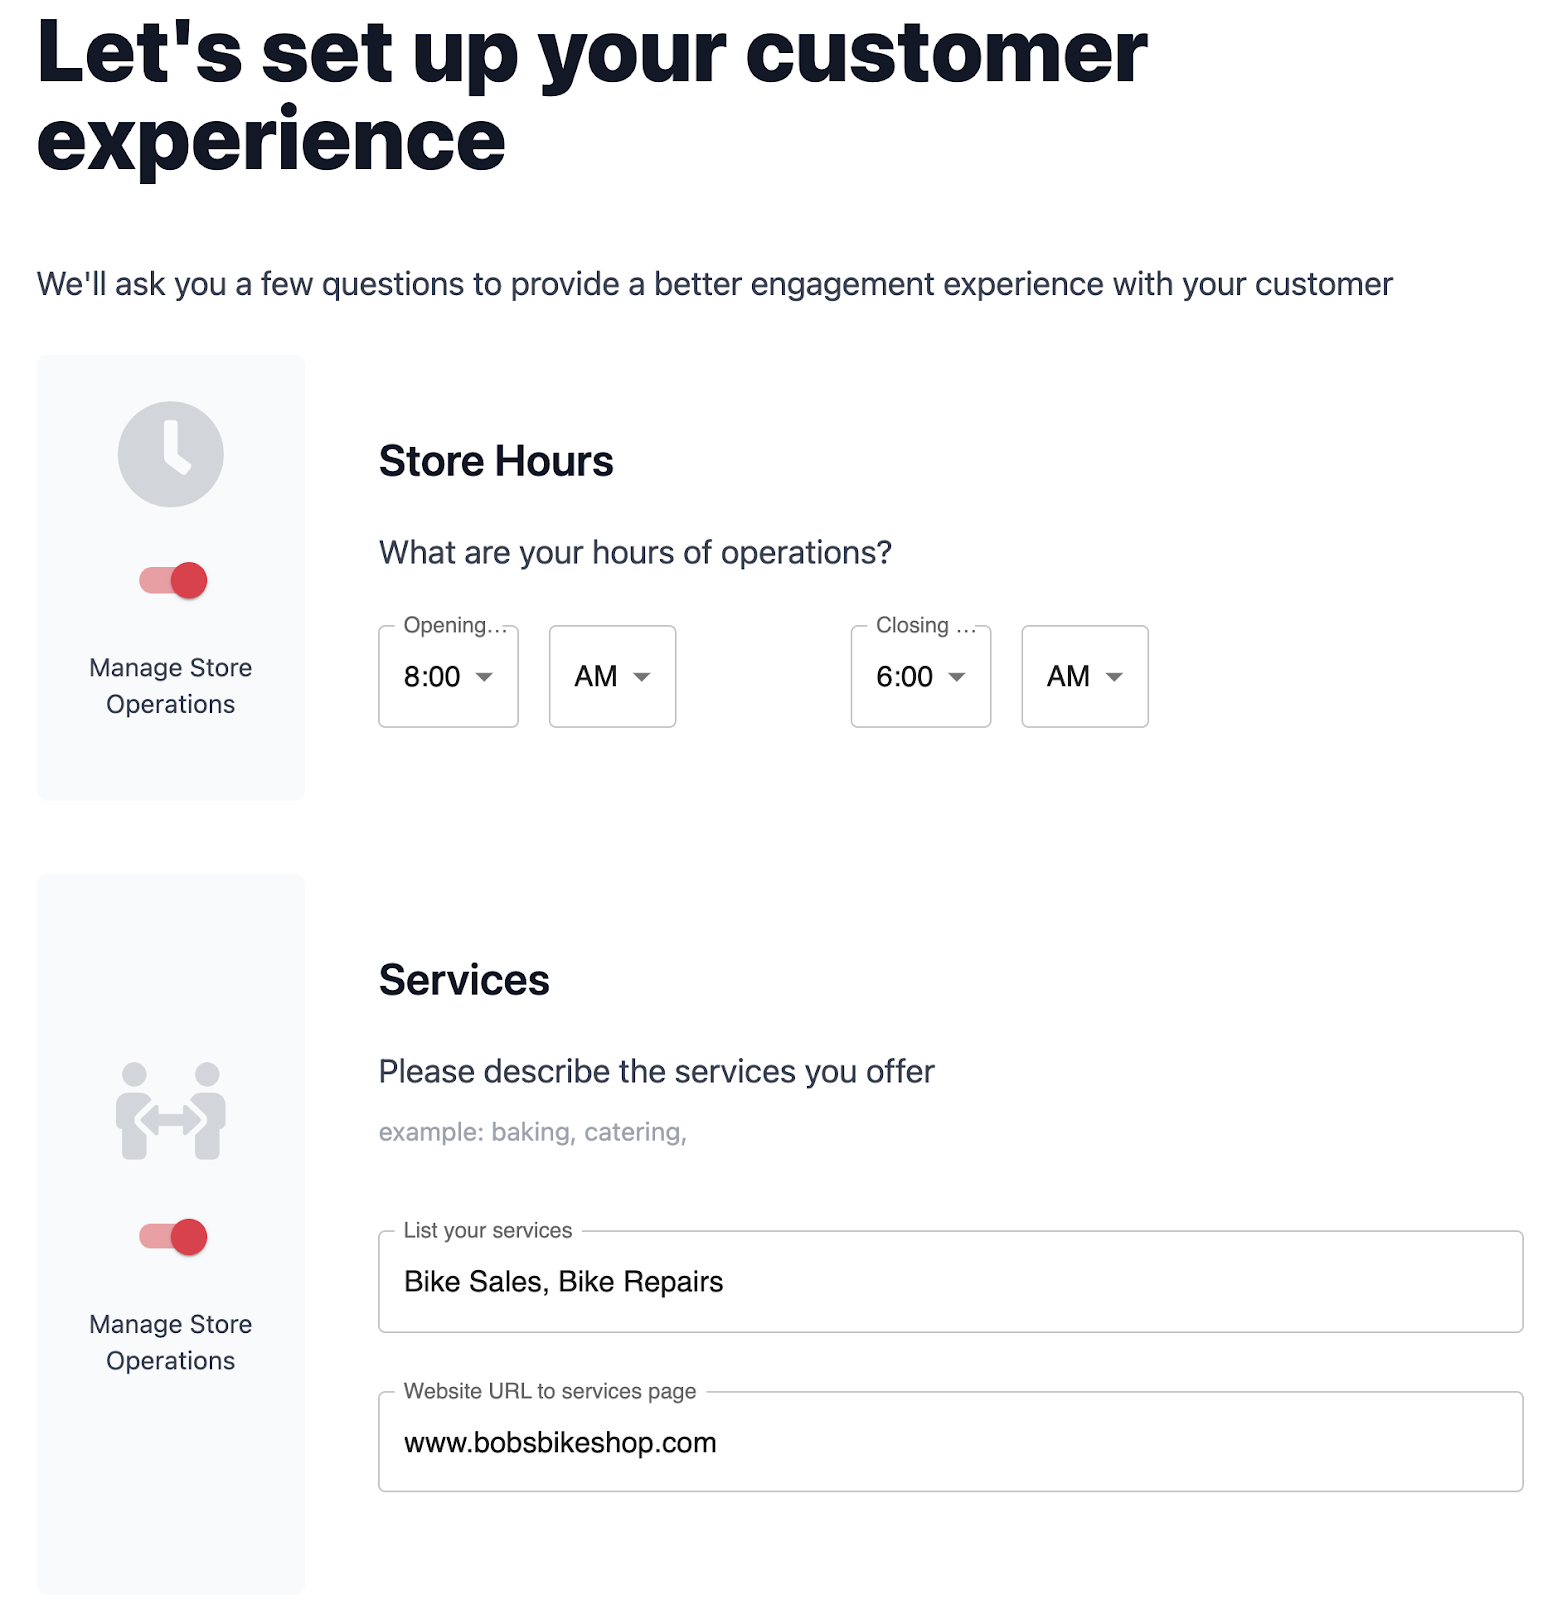
We can use these flags to determine which features of the IVR we need to add onto our existing base IVR, via the JSON object. We have also built out code to build out our main menu message which reads out all the IVR options to the caller.
// Create variables to store the options that our customer wants in their IVR
const { formResponse } = req.body;
const {
    businessName,
    phoneNumber,
    isStoreHours,
    storeHoursResponse,
    isServices,
    servicesSayResponse,
    servicesTextResponse,
    isEmployeeNumber,
    employeeNumberResponse,
} = formResponse;

// Placeholder array to store which keypad number represent an IVR option.
const mainMenuVariables: string[] = [];

// Determine which IVR options we'll need for this IVR
let hoursKeypadOption = 0;
let servicesKeypadOption = 0;
let employeeKeypadOption = 0;
if (isStoreHours) {
    mainMenuVariables.push('for operating hours, or say "hours".');
    hoursKeypadOption = mainMenuVariables.length;
}

if (isServices) {
    mainMenuVariables.push('for services, or say "Services".');
    servicesKeypadOption = mainMenuVariables.length;
}

if (isEmployeeNumber) {
    mainMenuVariables.push('to talk to a human, or say "Human".');
    employeeKeypadOption = mainMenuVariables.length;
}

// Concatenate the various IVR options to build our main menu message.
let mainMenuMessage = '';
if (mainMenuVariables.length === 0) {
    mainMenuMessage = 'Sorry, this IVR has not been set up correctly. Please try again later.';
} else {
    for (let i = 0; i < mainMenuVariables.length; i += 1) {
        const menuOption = i + 1;
        if (mainMenuMessage) {
            mainMenuMessage = mainMenuMessage.concat(` or Press ${menuOption} ${mainMenuVariables[i]}`);
        } else {
            mainMenuMessage = `Press ${menuOption} ${mainMenuVariables[i]}`;
        }
    }
}
Once we know which features to add on, we can use these flags to push new widgets and conditions onto our base JSON.
if (isStoreHours) {
    // add condition for KeyPressHours
    studioDefinition.definition.states[3].transitions.push({
        conditions: [
            {
                type: 'equal_to',
                friendly_name: 'hoursKeyPress',
                arguments: ['{{widgets.Gather_Input.Digits}}'],
                // replace with keypad number for Hours of Operation
                value: hoursKeypadOption,
            },
        ],
        event: 'match',
        next: 'Say_Hours',
    });
    // add condition for Speech_Hours
    studioDefinition.definition.states[4].transitions.push({
        conditions: [
            {
                type: 'matches_any_of',
                friendly_name: 'hours',
                arguments: ['{{widgets.Gather_Input.SpeechResult}}'],
                value: 'Hours.',
            },
        ],
        event: 'match',
        next: 'Say_Hours',
    });
    // Add widgets for Say_Hours and Say_Play_Store_Outro
    studioDefinition.definition.states.push(
        {
            transitions: [
                {
                    event: 'audioComplete',
                    next: 'say_play_store_outro',
                },
            ],
            type: 'say-play',
            name: 'Say_Hours',
            properties: {
                // Replace with Customer's hours of operation
                say: storeHoursResponse,
                voice: 'man',
                language: 'en-US',
                loop: 1,
                offset: {
                    y: 1060,
                    x: -320,
                },
            },
        },
        {
            transitions: [
                {
                    event: 'audioComplete',
                },
            ],
            type: 'say-play',
            name: 'say_play_store_outro',
            properties: {
                say: 'Thank you for calling, Goodbye.',
                voice: 'man',
                language: 'en-US',
                loop: 1,
                offset: {
                    y: 1420,
                    x: -310,
                },
            },
        },
    );
}
The last step is to call the Twilio API to create a studio flow, purchase a phone number and assign the studio flow as the number’s VoiceURL which is the webhook triggered when the number is called.
try {
    const flowSID = await client.studio.flows
        .create(createStudioFlow())
        .then((flow) => {
            client.incomingPhoneNumbers('PNecb475e6a9df8b3b3c35243216db0e6c').update({
                voiceMethod: 'GET',
                voiceUrl: `https://webhooks.twilio.com/v1/Accounts/${process.env.ACCOUNT_SID}/Flows/${flow.sid}`,
            });
            return flow.sid;
        });
    res.json({
        flowSID,
    });
} catch (err) {
    console.log(err);
}
Conclusion
That’s all there is to it. You now have an API that can be called by your mobile app, web app, etc. to create a custom IVR. As a software vendor, you can expose this API to your customers to create their own custom IVR without any code required.
For bonus points you can also integrate the Twilio Phone Number API to programmatically search and buy a phone number. Here’s a support page that goes through that process.
Kyle is a Twilio Senior Solutions Engineer from Vancouver BC. He is a builder at heart, and loves to find unique solutions to customer problems. He can be reached at kychan [at] twilio.com
Norris is a Senior Solutions Engineer at Twilio based in San Francisco, CA who paired with Kyle and team to build out this feature for rapid IVR creation. He enjoys breaking things down and putting them back together again. You can find him at nkwan [at] twilio.com
Varun is a Senior Solutions Engineer at Twilio. He has a diverse background in finance, tech, crypto, and travel. He loves learning, building, and helping customers solve problems. He can be reached at vvalluri [at] twilio.com


Related Resources
Twilio Docs
From APIs to SDKs to sample apps
API reference documentation, SDKs, helper libraries, quickstarts, and tutorials for your language and platform.
Resource Center
The latest ebooks, industry reports, and webinars
Learn from customer engagement experts to improve your own communication.
Ahoy
Twilio's developer community hub
Best practices, code samples, and inspiration to build communications and digital engagement experiences.