Use Cobra to Build Go-Powered CLIs
Time to read:
July 18, 2023
Written by
Reviewed by

Go is a popular open-source programming language that has gained immense popularity. Its simplicity, speed, and reliability make it ideal for building applications such as command-line interface (CLI) tools.
Building a CLI tool involves writing code to interact with command line arguments, input and output streams, and other system resources. Managing all this can become difficult as the functionality of the application grows.
Fortunately, Go has many excellent libraries to help developers build CLI applications quickly and easily. One such library is Cobra, a framework that can help you build scalable, maintainable, and extensible command-line interfaces in Go.
In this tutorial, I will show how you can use Cobra to build CLI applications in Go and highlight some of its key features and benefits. I will do this by walking you through the process of building a CLI that encrypts and decrypts text based on a specified cipher.
Prerequisites
To follow this tutorial, you will need the following:
- A basic understanding of and experience with Go
- Go 1.19
- A Twilio account. If you don't have one, you can sign up for a free trial account.
What you will build
In this tutorial, you will build a CLI tool that can help with generating secret messages using substitution ciphers. While such algorithms are not secure enough to save your passwords, they are certainly enough to share funny jokes with your friends without prying eyes spoiling the fun. To keep things short, your application will only use two algorithms: Caesar’s cipher and Bacon’s cipher.
In addition, your application will be able to directly send the encrypted message as an SMS to a specified phone number via Twilio.
Install Cobra Generator
While it is possible to manually integrate Cobra into an application, it is easier to create the project and commands via the Cobra CLI. Install it using the following command.
Once this is completed, you’ll be able to access the CLI by typing cobra-cli in the terminal.
Create the project directory structure
Create a new folder for the application, where you store your Go projects, and navigate into it using the following commands.
Next, create a Go module using the following command.
After that, create the application using the following command.
The --viper flag automatically sets up Viper. This is a companion to Cobra, intended to provide easy handling of environment variables and config files, and seamlessly connect them to the application's flags. For this article, you will manage your Twilio credentials via environment variables.
Add the commands
As the name implies, CLIs revolve around commands. Commands represent actions and they are the central point of the application. Each interaction that the application supports will be contained in a command.
Every Cobra application has a root command. This command is executed when the CLI name is called. By default, this command prints helpful information about the application but you have the option of performing a custom action. The root command is found in cmd/root.go. Open the file and edit it to match the following.
To keep things manageable, each command lives in its own file. Every command has two key things: the Command struct initialization, and the init() function.
There are three key fields required by the Command struct:
- The
Usefield is the name associated with the CLI. When typed into the terminal, this will execute the command (or sub-command) as the case may be. - The
Shortfield gives a short description of the command. - The
Longgives a more detailed description of the command. You can also include helpful examples of how to run the command here.
The init() function is where you can add flags to your command. You can think of flags as modifiers for your command. For example, depending on what algorithm you pass to the encrypt command, you will get a different behaviour.
A flag can either be local, or persistent. A local flag is only available to the command it is declared in, while a persistent flag is available to all sub commands. The previous code snippet declared a persistent flag named key which is used by the Caesar cipher to determine the number of rotations.
The root command file also includes an initConfig() function. This is where Viper is used to load environment variables into the CLI. This function expects the configuration to be in a file named .cipher_cli.yaml. The last thing to note with regards to configuration is that you can also specify the config file as a command argument.
By default, the application would search the $HOME folder for the config file. Create it in your home folder with the following command, or with your text editor or IDE.
Add the following placeholder values to the config file.
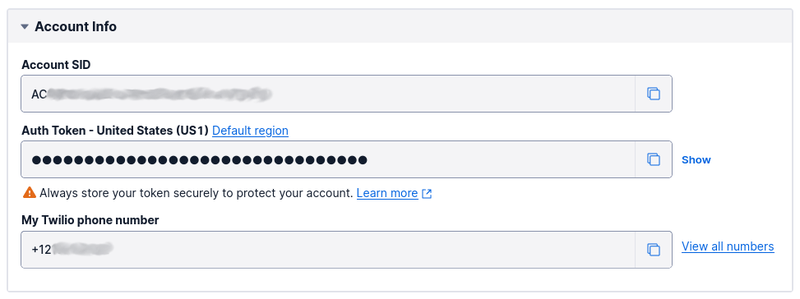
The Twilio SMS API will be used to send SMS notifications from the CLI. Before updating the code, you will need your Twilio Auth Token, Account SID, and phone number. To do that:
- Login to the Twilio Console
- Copy the details from the Account Info panel
- In ~/.cipher_cli.yaml, replace
<<TWILIO_AUTH_TOKEN>>,<<TWILIO_AUTH_TOKEN>>, and<<TWILIO_PHONE_NUMBER>>respectively, with the copied details
You can run the application using the following command.
For now, this command executes the root command which can be found in cmd/root.go. The long description of the command will be printed on your terminal.
Next, you need two new commands, one for encryption and another for decryption. Add them using the following commands.
This will add two new files for you in the cmd folder. Before modifying the code for the commands, we'll next add the helper functions they depend upon.
Implement the encryption/decryption algorithms
At the root of the project folder, create a new folder named pkg. This will hold all the helper code needed by the commands. Next, in the pkg folder, create a new folder named bacon, and in it create a file named bacon.go. Add the following to the newly created file.
The Bacon cipher replaces a character with a sequence of 5 characters. Since each character has a predefined replacement, a map named lookup is used to store the replacement for each character.
In the Encrypt() function, the string to be encrypted is provided as an argument. This function iterates over each character in the provided string and retrieves the associated replacement from the lookup map. The replacements for each character are concatenated into a string and returned as the Bacon encryption of the input string.
The Decrypt() function works in reverse. A reverseLookup map is declared which has the decrypted character for each five character sequence. Given an encrypted sequence, the function iterates through the sequence and generates five character chunks. For each chunk, the function checks for the decrypted value of the chunk in the reverseLookup map. The decrypted values are concatenated and returned just as was done in the Encrypt() function.
Both functions preserve the input case i.e., if the input text is in lower case, then the returned text will also be in lower case.
Next, add the functionality for the Caesar cipher. In the pkg folder, create a new folder named caesar and in it a file named caesar.go. Add the following to the newly created file.
To encrypt or decrypt a Caesarean cipher, you need the text and the number of rotations for each encryption. For each character in the text, the position in the alphabet is calculated. Then using the number of rotations, the position of the replacement text is determined and the character in that position retrieved. This is done for all characters in the input sequence. All the replacement characters are concatenated and returned as the output.
Bear in mind that the number of rotations provided can exceed the number of letters in the alphabet (26) and because of that, you need a function to determine the index of the character to be used for replacement. For encryption, the getCipherIndex() function is used, while the getPlaintextIndex() function is used for decryption.
Add functionality for validation
To ensure that the application functions smoothly, you also need to validate some of the user input. There are so many other things your code can (and should) validate, but to keep things simple, this application will validate the input for the number of rotations and the input for the recipient’s phone number.
In the pkg folder, create a new folder named validation, and in it a new file named validate.go. Add the following to the newly created file.
The GetRotationsFromKey() function takes an input string and tries to parse it as an integer. If this is done successfully, the integer is returned. Otherwise, an error is returned. The function also checks if an empty string is provided, if so an error with the appropriate message is returned.
The ValidatePhoneNumber() function takes a string and matches the value against the regular expression for a valid E.164 phone number. In the event that the provided phone number is invalid, an error is returned with an appropriate error message.
Add functionality for sending SMS notifications
Next, add the Twilio SDK to your project using the following command.
In the pkg folder, create a new folder named notification, and in it a new file named sms.go. Add the following to the newly created file.
Update the commands
With the functionality completed, it’s time to update the encrypt and decrypt commands. Open cmd/decrypt.go and update the code to match the following.
The structure of the decrypt command is similar to that of the root command. First, you have the declaration of the Command struct. This time, you have some special logic to execute when the command is called.
You do this via the Run field in the struct. The value of this field is a function which takes a Cobra command and the arguments provided by the user as input. In this function, you concatenate the args input to get the input text and depending on the provided value for the algorithm flag, you decrypt the input text accordingly.
In the init() function, you declare a local flag named algorithm which lets the command know which algorithm to use for decryption. This flag is local to the decrypt command. You also mark this flag as required since you cannot decrypt input text without knowing which algorithm to use.
Next, open cmd/encrypt.go and update the code to match the following.
The encrypt command is similar to the decrypt command in terms of structure. The major difference between them is that this command has the functionality to send encrypted text via SMS to a specified recipient.
To make this work, an extra flag is added to the command (recipient). In the function passed to the Run field of the command struct, a check is added to see if the user has passed any value for this flag. When present, this value is checked and an SMS is appropriately dispatched for valid input.
As you did earlier, you can access the root command via main.go. To access the sub commands, you add the command name along with the arguments and flags. For example, to encrypt a message, use the following command.
Install the CLI
At the moment, you have to run the main.go file in order to run your commands. However, there’s one more thing you can do to access your commands without even accessing your code. You can build your application as an executable binary and install it to your $GOPATH/bin folder. Do this by running the following commands.
Now, run your application by typing in the following command.
Make sure to replace <<PHONE NUMBER>> with a valid phone number for the recipient. This time, Twilio sends an SMS to your fellow mischief maker — encrypted in plain sight. Well done!
There you have it!
Using Cobra, you were able to build an encryption/decryption CLI. You also learnt how to handle arguments and flags in order to add more flexibility to your commands. Finally, you learnt how to build binaries of your application which can be shared amongst your inner circle.
The entire codebase is available on GitHub should you get stuck at any point. I’m excited to see what else you come up with. Until next time, make peace not war ✌🏾
Joseph Udonsak is a software engineer with a passion for solving challenges — be it building applications, or conquering new frontiers on Candy Crush. When he’s not staring at his screens, he enjoys a cold beer and laughs with his family and friends.
Related Resources
Twilio Docs
From APIs to SDKs to sample apps
API reference documentation, SDKs, helper libraries, quickstarts, and tutorials for your language and platform.
Resource Center
The latest ebooks, industry reports, and webinars
Learn from customer engagement experts to improve your own communication.
Ahoy
Twilio's developer community hub
Best practices, code samples, and inspiration to build communications and digital engagement experiences.